UPPLEVA 32-46" Design and Quality IKEA of Sweden
|
|
|
- Esko Uotila
- 10 vuotta sitten
- Katselukertoja:
Transkriptio
1 UPPLEVA 32-46" Design and Quality IKEA of Sweden

2 AV 1 adapter
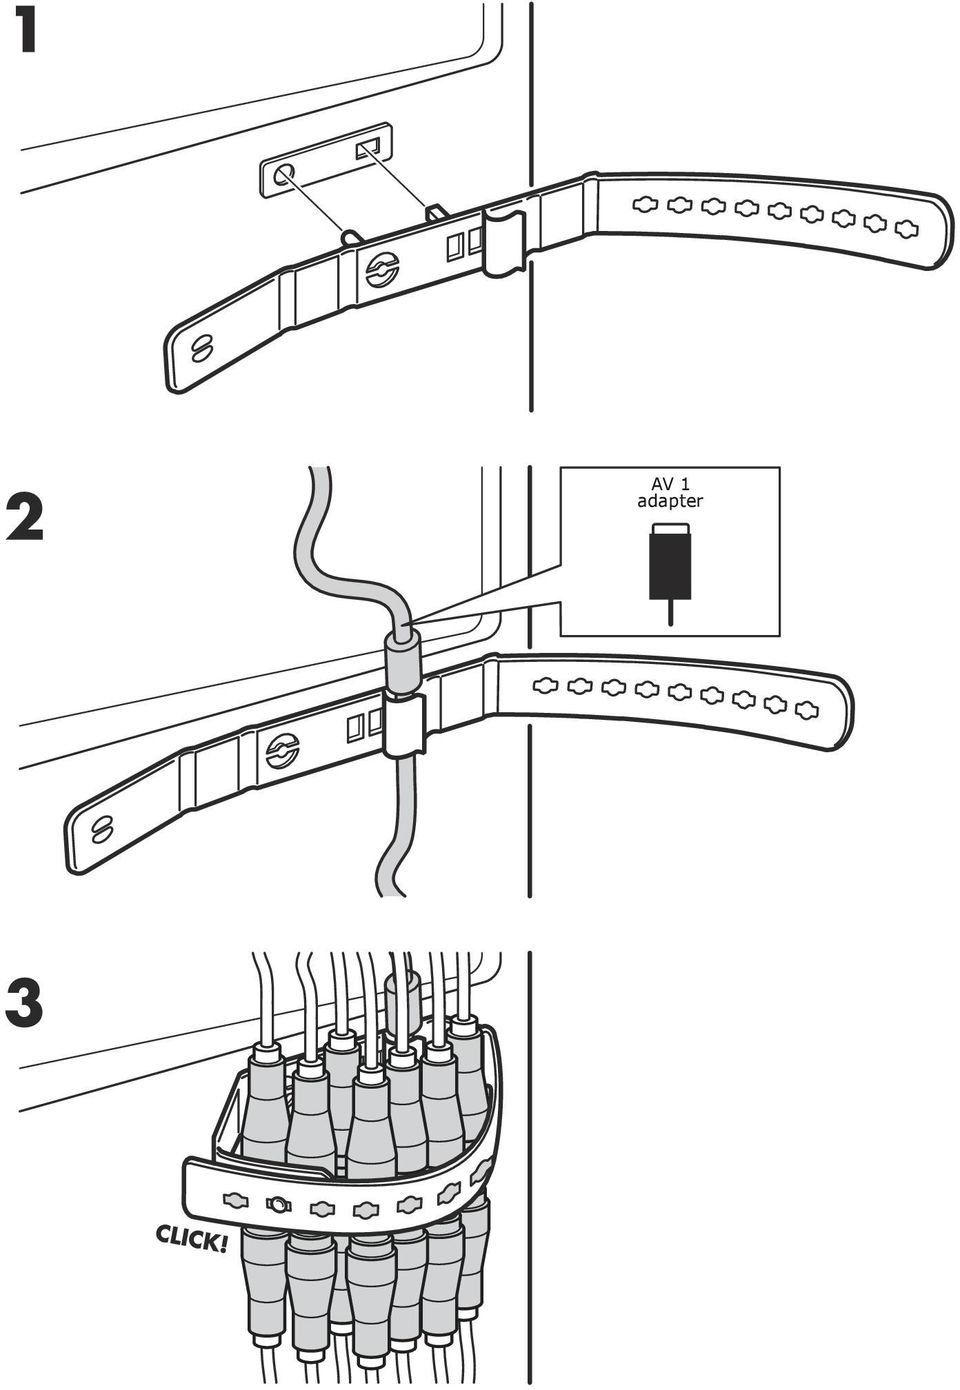
3 BACK EXIT INITIAL SETUP BACK EXIT BACK EXIT WELCOME CHANNEL INSTALL Automatic Search... Welcome to use the Wizard for Initial Setup!! Please press [OK] to start the wizard. SETUP Automatic Update... Analogue Manual Scan... Antenna Manual Installation... Clean Channel List... Enter Select Back Exit Figure 1 Figure 2 SUBTITLE Subtitle On Digital Subtitle Language English PICTURE SOUND PAP OPTIONS OPTIONS Digital Subtitle Language 2nd English Subtitle Type Normal MEDIA SMART TV LOCK SETUP Select Back Exit Figure 3 Figure 4 Location Home Software Update... OPTIONS HBBTV mode On DivX Registration... DivX Deregistration... Enter Timer... Select Back Exit Figure 5

4
5 ENGLISH 4 DANSK 24 SUOMI 44 SVENSKA 64

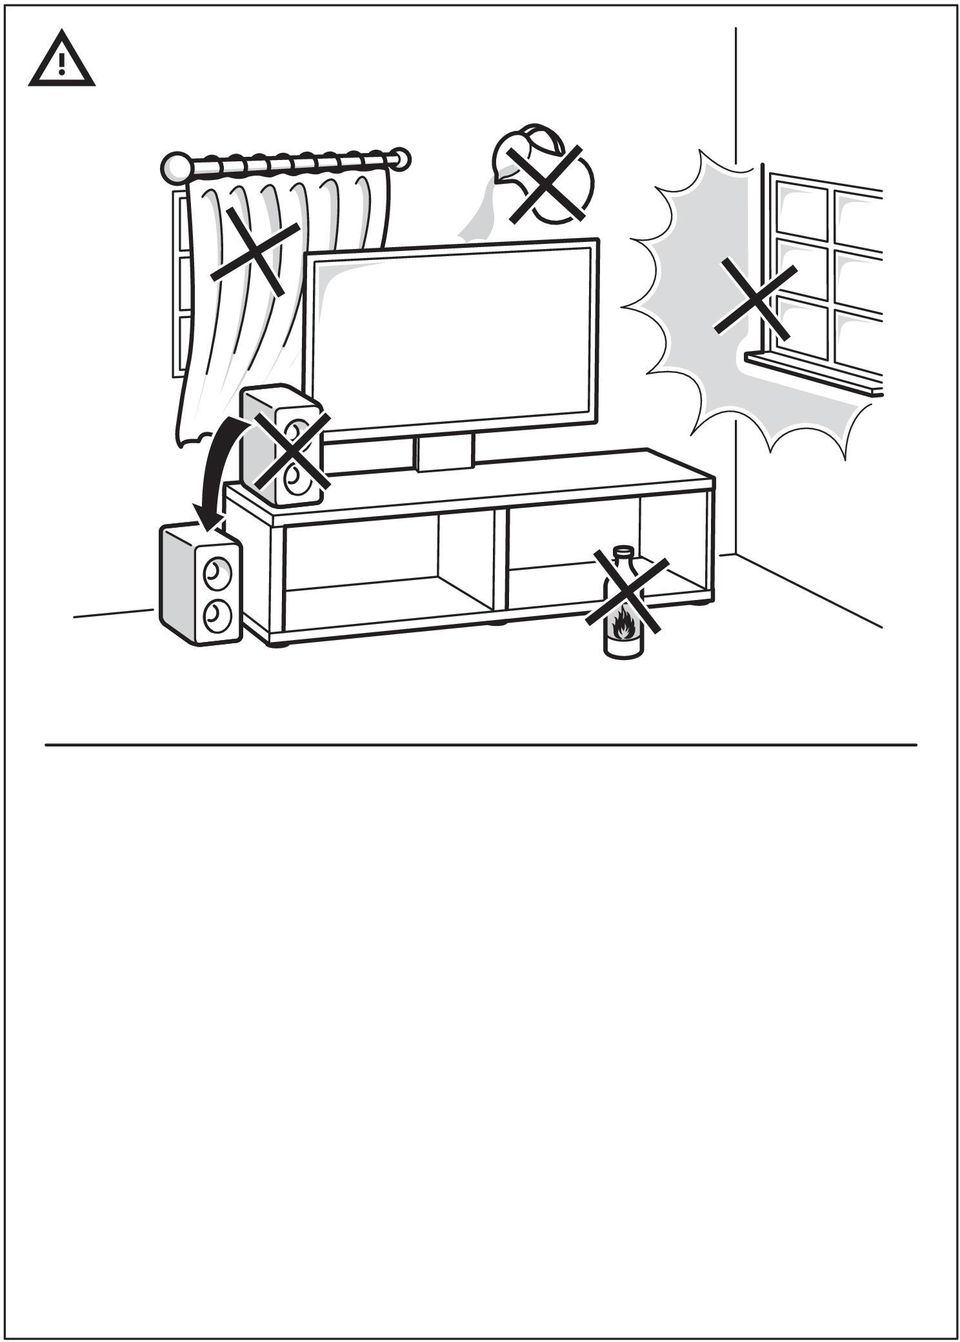
6 ENGLISH 4 Important information Safety Ensure that your domestic mains supply voltage matches the voltage indicated on the identification sticker located at the back of your set. Where the mains plug or an appliance coupler is used as disconnect device, the disconnect device shall remain readily operable. On certain models, the light indicator is located at the side of the TV set. The absence of a light indication at the front does not mean that the TV set is fully disconnected from the mains. To disconnect the TV set completely, the mains plug must be pulled out. The TV set s components are sensitive to heat. The maximum ambient temperature should not exceed 35º Celsius. Do not cover the vents at the back or sides of the TV set. Leave sufficient space around it to allow adequate ventilation. Install the appliance away from any source of heat (fireplace,...) or appliances creating strong magnetic or electric fields. Moisture in rooms where the set is installed should not exceed 85% humidity. Apparatus shall not be exposed to dripping or splashing and no objects filled with liquids, such as vases, shall be placed on the apparatus. Moving the set from a cold place to a warm one can cause condensation on the screen (and on some components inside the TV set). Let the condensation evaporate before switching the TV set on again. WARNING To prevent the spread of fire, keep candles or other open flames away from this product at all times. time, switch it off completely by removing the plug from the mains power socket. During thunderstorms, we recommend that you disconnect the TV set from the mains and aerial so that it is not affected by electrical or electromagnetic surges that could damage it. For this reason, keep the mains and aerial sockets accessible so they can be disconnected, if necessary. Unplug the TV set immediately if you notice it giving off a smell of burning or smoke. You must never, under any circumstances, open the TV set yourself, as you run the risk of an electric shock in doing so. TV screen The TV screen used in this product is made of glass. Therefore, it can break when the product is dropped or impacted upon by other objects. The TV screen is a very high technology product, giving you finely detailed pictures. Occasionally, a few nonactive pixels may appear on the screen as a fixed point of blue, green or red. This does not affect the performance of your product. Care Use a glass-cleaning product to clean the screen and a soft cloth and mild detergent to clean the rest of the set. Important: Using strong detergents, alcohol-based and abrasive products may damage the screen. Dust the vents at the back and sides regularly. Using solvents, abrasive or alcohol-based products could damage the TV set. If an object or liquid enters inside the appliance, unplug it immediately and have it checked by an authorized engineer. Never open the appliance yourself since this may put you at risk or damage the appliance. The or POWER/ button on the TV set or the button on the remote control can be used to switch it on and put it into standby mode. If you are not going to be watching the TV for a lengthy period of

7 5 Hanging the TV set on the wall WARNING: This operation requires two people. To ensure a safe installation, observe the following safety notes: Check that the wall can support the weight of the TV set and wall mount assembly. Follow the mounting instructions provided with the wall mount. For certain models, make sure to screw the hexagonal VESA wall mounting screw bosses (and screws) provided with the set into the nuts for the wall mount at the back of your set before your wall mounting. The TV set must be installed on a vertical wall. Make sure to use only screws suitable for the material of the wall. Make sure that the TV set cables are placed so that there is not danger of tripping over them. This product is designed and manufactured with high quality materials and components which can be recycled and reused. This symbol means that electrical and electronic equipment, at their end-of-life, should be disposed of separately from your household waste to prevent potential negative consequences for the environment and human health. Please, dispose of this equipment at your local community waste collection/recycling centre. In the European Union there are separate collection systems for used electrical and electronic product. Please, help us to conserve the environment we live in! All other safety instructions about our TV sets are also applicable here. Handling the TV set on the table Before setting up your television set, make sure that the surface you want to put the set on can support its weight. Don t place the set on an unstable surface (e.g. moving shelf, very edge of a unit) and make sure that the front of the television set does not overhang the surface it is sitting on.
 provided with the set into the nuts for the wall mount at the back of your set before your wall")
8 6 Remote control functions Most of your TV's functions are available via the menus that appear on the screen. The remote control supplied with your TV can be used to navigate through the menus and to configure all the general settings. 1. Standby / quit standby To switch the remote for TV use. 3. BACK To return to the previous menu. To return to the previous channel. 4. To navigate through the menus. To set functions and change values. can also be used to open the corresponding submenu. 5. EXIT/ To exit the menu structure or Teletext; to stop some functions To fast forward or reverse (press and hold in Media function);and to move to the previous or next photo, song or video CH+/- To change channels. 8. Colour buttons To select tasks or Teletext pages. The red button can also be used for MHEG function. 9. MUTE To switch the sound off and back on again. 10. REC To record programme. 11. IPTV No function.

9 7 12. SUBT To select a subtitle language available for selected digital TV programme. 13. GUIDE To toggle the Electronic Programme Guide on or off (only available for digital channels) To enter channel numbers. To enter a letter, a digit or a symbol in some functions. 15. DISK MENU No function. 16. SOUND To select a preset sound mode. 17. To switch the remote for sound system use. 18. MENU To access the main menu. To access or exit the virtual keyboard in smart TV function. 19. OK To confirm an entry or selection. To freeze/unfreeze the picture in digital TV mode. 25. OPTION To display the function menu.to perform certain operations. To display the Teletext page in different modes. 26. SOURCE To select connected devices. 27. ECO To select desired power saving mode. 28. INFO To display programme information, if available. 29. CH.LIST To display the channel list. 30. TEXT/MEDIA CENTER To toggle Teletext on or off. 31. REPEAT No function. 32. To select the picture format. Note: We recommended you use the full screen mode. Do not use the display mode with black bars on both sides of the picture (such as 4:3) for a prolonged period of time; this may result in permanent damage to the TV screen may be damaged permanently. 20. To navigate through the menus. To select menu options. 21. SMART TV To display the smart TV homepage. 22. To play/pause. 23. VOL+/- To control the volume. 24. LANG To select a sound type available for selected Analogue TV programme. To select an audio language available for selected digital TV programme.

10 8 Connect the power and antenna To switch on the TV after connecting the power cord, press or POWER/. Note: The location of the power socket varies depending on the TV model. On some models, you have to turn on the power switch first. Antenna/Cable input Cable Game console, PC Note: Before connecting a PC, set the PC monitor refresh rate to 60Hz. AV 2 adapter VGA audio in Game console LAN AV 1 adapter VGA Or use an HDMI connection. Network connection

11 9 DVD player, home theatre system DVD player/ Home theatre system CMP adapter AUDIO in adapter OUT Pr Pb Y R L Blu-ray Disc player, headphones, HD game console & HD camcorder Notes: USB connectors are for data input from USB storage devices. Only USB 1 port can be connected to your USB memory stick. Exposure to excessive sound levels from earphones and headphones can result in hearing loss. Number of HDMI may vary. ARC (Audio Return Channel) function is only supported on HDMI 4 (ARC) port. It is recommended to connect your home theatre to the HDMI ARC connector to send sound from the TV to the sound system via an HDMI cable. COMMON INTERFACE HDMI 1 HD Camcorder HDMI 2 HDMI 3 Blu-ray Disc player USB HD game console
 function is only supported on HDMI 4 (ARC) port.")
12 10 DVD player, cable receiver Note: Remove the power cord before connecting devices. CMP adapter AUDIO in adapter Antenna/Cable input OUT Pr Pb Y R L Set-top box Cable DVD recorder IN OUT Pr Pb Y R L Pr Pb Y R L Notes: These illustrations are for reference only. Your model may differ in appearance or may not include all connections shown. The location of the power socket on the TV may vary depending on the model. The location and names of the function buttons and connectors on the TV may vary depending on the model.

13 11 Important: If the remote control is not used for a long period, remove the batteries and store them properly. Handle damaged or leaking batteries carefully. If your remote control has two batteries, do not mix new and old batteries. Batteries shall not be exposed to excessive heat such as sunshine, fire or the like. Danger of explosion if battery is incorrectly replaced. Replace only with the same or equivalent type recommended by the manufacturer. Discard used batteries according to manufacturer s instructions. Refer to your local recycling or waste disposal rules and contact a local waste disposal vendor to dispose of used batteries. If the batteries in your remote control are run down you can use the buttons on your TV. In TV mode, they have the same functions as the corresponding buttons on the remote control. In the menus they have the following functions: CH CH VOL VOL MENU/ OK/ MENU OK Switch the TV on and off 1. When powered on, the TV will be turned on directly or be in standby mode. If the TV is in standby mode, press the or POWER/ button on the TV or the button on the remote control to turn it on. 2. To put the TV into standby mode, press the or POWER/ button on the TV or the button on the remote control. The TV remains powered up, but with low energy consumption. 3. To switch the TV off, unplug the mains plug from the mains outlet. (*On certain models, you have to turn on the power switch first.) Initial setup Initial setup involves selecting all the settings required to be able to search for and store all the Analogue and digital channels you can receive. Make sure the TV is switched on and follow all the steps below in the order given. Note: If the channel search retrieved only the analogue channels it could be caused by weak broadcasting signals and therefore is not covered by the manufacturer warranty. Manufacturers cannot be held responsible for the lack of or weak broadcasting signals that can be found in some areas. The first time you switch the TV on, the Initial Setup wizard opens, which guides you through the initial setup process. (Refer to Figure 1.) Press OK to start your initial setup. 1. Press / to select your language, then press OK/ to enter the next step. 2. Press / to select your country, then press OK/ to enter the next step. Note: If you select France, you will have to enter the Password Setting menu here in order to set a password. Use the digit buttons to enter a four-digit number for your password. (0000 is too simple to be set as your password.) Re-enter the same code to confirm the password. After that, you will enter the next step automatically. (In this step, you can only press BACK to return to the previous step.) 3. Press / to select your tuner mode Antenna or Cable or Satellite. (Note: For some models, this option may not be available.) Select Antenna. Press OK/ to enter. Select Digital & Analogue, Digital or Analogue, then press OK/. Press / to select Scan, then press OK/ to start the automatic search for all DVB-T digital and/or analogue channels. Select Cable. Press OK/ to enter. Select Digital & Analogue, Digital or Analogue, then press OK/. Press / to select Scan, then press OK/ to directly start your initial setup or enter below step. Select Full if available to search for and store all DVB-C digital and analogue channels. You may select another advanced scan mode if available (for example, Advanced), then configure proper cable information as described below. Use the digit buttons to adjust the values for frequency, symbol rate and network ID;

14 12 use / to select a modulation mode. Press OK to start initial setup relating to all DVB-C digital and analogue channels. Note: For some models, this option may not be available. Select Satellite. Press OK/ to enter. Press / to select Scan, then press OK/ to enter the next step to configure proper information relating to satellite and antenna. Press OK to start initial setup relating to all satellite channels. Note: To prevent the channel setup process from being interrupted, wait for the message indicating that the setup is complete. 4. Before starting the scanning, you can also select Skip Scan to skip the initial setup process. 5. During the setup, you can follow the instructions at the bottom of the screen and return to the previous step by pressing BACK. Or press EXIT to exit or interrupt the search halfway. 6. Once the automatic search ends, the TV enters the next step automatically. Press / to select your location Shop or Home. Press OK/ to confirm your selection and enter the last step. 7. In this step, you can press OK to exit the initial setup. The channels are arranged in a preset order. If you wish to skip channels, modify the preset order or rename channels, select SETUP > Organiser and press OK/ to enter. In this step, you can also press BACK to return to the previous step. Automatically install channels This section describes how to search and store channels automatically. Instructions are for both analogue and digital channels. 1. Press MENU on the remote control and select SETUP > Language > Menu Language. Press / to select your desired menu language. 2. Press BACK to return to SETUP, press / to select Country, then press / to select your country. The TV installs and arranges channels according to your country. 3. Press / to select Tuner Mode, then press / to select Antenna, Cable or Satellite. (For some models, this option may not be avialable.) Select Antenna. Press / to select Channel Install, and press OK/ to enter. Select Automatic Search (Refer to Figure 2.), then press OK/ to display Automatic Search. Press OK to skip the country selection and enter the next step. Or use / to reselect your country, then press OK to enter. Select Digital & Analogue, Digital or Analogue, then press OK/ to start the automatic search, which relates to all DVB-T digital and/or analogue channels. Select Cable. Press / to select Channel Install, and press OK/ to enter. Select Automatic Search, then press OK/ to display Automatic Search. Press OK to skip the country selection and enter the next step. Or use / to reselect your country, then press OK to enter. Select Digital & Analogue, then press OK/ to enter. Select your scan mode if available and configure proper cable information in the same way as in Initial setup. Select Scan and press OK/ to start your automatic search relating to all DVB-C digital and analogue channels. Select Digital, then follow the same process as above to start your automatic search relating to all DVB-C digital channels. Select Analogue, then press OK/ to start your automatic search relating to all analogue channels. Select Satellite. Note: For some models, this option may not be available. Press / to select Satellite Setup, and press OK/ to enter. Press / to select a proper satellite or add new satellites if needed, then press OK to enter and configure proper information relating to satellite and antenna. Select SETUP > Channel Install > Automatic Search, then press OK/ to enter. Select Country, and use / to reselect your desired country, if necessary. Select Satellite Tuning, press

15 13 OK/ to display the SATELLITE TUNING menu. Configure the proper information. Select Scan, and press OK/ to start initial setup relating to all satellite channels. Note: For some models, this option may not be available. 4. The search may take a few minutes. During the process, you can press EXIT to abort halfway. 5. Once the automatic search ends, press BACK to return to the previous step or press OK to restart your channel search. 6. After the automatic search, channels are arranged in a preset order. You can skip channels, modify the preset order or rename channels. Use your TV Access channels Using the digit buttons: press the corresponding digit buttons to access the channels. Using the CH+/- or CH / buttons: scroll through the channels. Watch connected devices Repeatedly press SOURCE on the remote control or OK on the TV to toggle between TV and other input sources. To resume TV viewing, press any digit button to enter the channel, while CH+/- will cycle through all TV channels and other input sources. Note: Not all models have an OK button on the TV. Volume Volume control: use the VOL / buttons on the TV or VOL+/- buttons on the remote control to increase or decrease the volume. Sound mute: press the MUTE button to temporarily mute the sound. Press this button again or the VOL+ button to restore it. Use TV menus 1. Press MENU to display the main menu. (Refer to Figure 3.) 2. Press / / / to select the desired item, then press OK to open the corresponding submenu. 3. In submenus, use / to select menu options, use / to set functions or change values. Use OK to activate a setting. Use OK/ to open the corresponding submenu. 4. Press BACK to return to the previous menu. 5. Press EXIT to close the menu. Note: Some options may not be available for certain signal sources. Select menu language You can choose your preferred menu language following the instructions below. 1. Press MENU to display the main menu. 2. Press / / / to select SETUP, then press OK to enter. 3. Select Language and press OK/ to enter. 4. Select Menu Language and press / to select your desired language to display the menus. 5. Press EXIT to close the menu. Use more of your TV Setup your favourite channels You can create a list of your favourite TV channels. 1. Press CH.LIST. 2. Press the yellow button to enter CHANNEL LIST SELECTION. Press / to select the favourite list and press OK to enter. 3. Press the blue button to start editing your favourite list. Press / to scroll through the channel list and press OK to select or deselect it. 4. Repeat this procedure to setup other favourite channels. 5. Press CH.LIST/EXIT to exit. Energy Saving 1. Press MENU on the remote control and select PICTURE > ECO Settings > Energy Saving. 2. Press / to select desired power saving mode to achieve the desired power saving effect. 3. Press EXIT to close the menu. Shortcut operation: Press ECO on the remote control to select desired power saving mode directly. PAP function To display the pictures from different source inputs side by side. Note that one window is for both analogue and digital TV inputs, the other is for VGA, HDMI and CMP inputs. (Note: Not available for AV-Scart on both windows.)

16 14 1. Press MENU to display the main menu. 2. Select PAP and press OK to enter. 3. Select the PAP option, and press / to turn on/off PAP function. 4. Select TV Position, press / to reposition the TV window. 5. Press / to toggle the focus window. 6. When the focus is on the TV window, the digit buttons and CH+/- work in TV. When the focus is on the other window, CH+/- switches available external sources. Use subtitles You can enable subtitles for each TV channel. Subtitles are broadcast via Teletext or DVB-T/DVB-C digital broadcasts. With digital broadcasts, you have the additional option of selecting a preferred subtitle language. Turn on/off subtitles 1. Press MENU on the remote control and select OPTIONS > Subtitle. 2. Press OK/ to enter. (Refer to Figure 4.) 3. Select the Subtitle option, and press / to select On/Off to turn on/off subtitles. Enable subtitle languages on digital TV channels 1. Press MENU on the remote control and select OPTIONS > Subtitle > Digital Subtitle Language. 2. Press / to select a subtitle language as your preferred language. 3. Press / to select Digital Subtitle Language 2nd. 4. Press / to select a secondary subtitle language. 5. Press EXIT to close the menu. Shortcut operation: Press SUBT on the remote control to directly select a subtitle language available for the selected digital TV programme. Select a subtitle type on digital TV channels 1. Press MENU on the remote control and select OPTIONS > Subtitle > Subtitle Type. 2. Press / to select a subtitle type. You can select Hearing Impaired to display the hearing impaired subtitles with your selected language. Select decoding page language in Teletext Press MENU on the remote control and select OPTIONS > Teletext > Decoding Page Language. Select a proper type of language in which Teletext will display. Digital Teletext language For digital TV channels, your TV could zap to a service with multiple initial Teletext pages in different languages. This function allows you to select an available language as primary language, which relates to different initial Teletext pages. Press MENU on the remote control and select OPTIONS > Teletext > Digital Teletext Language. Press / to select. SPDIF type Connect to an audio device through the SPDIF output. Press MENU on the remote control and select OPTIONS > SPDIF Type. Select a proper sound type from the list for digital programmes. If the current programme outputs sound in Dolby D format, then either PCM or Dolby D can be selected. If the current programme does not output sound in Dolby D format, only PCM can be selected. Otherwise no sound will be output. Select Off to turn off the audio output from the audio device connected to the SPDIF output. Note: The options you may choose depend on the programme you are watching. If you select PCM and the sound is ahead of the picture, you can select SPDIF Delay from the OPTIONS menu and press / to adjust the delay time to synchronize the sound with the picture. T-Link To search for CEC devices connected to the HDMI sockets in your TV and enable onetouch play and one-touch standby between CEC devices. Enable or disable T-Link 1. Press MENU on the remote control, then select OPTIONS > T-Link. 2. Press / to select On or Off.

17 15 Use one-touch play One-touch play enables you to press the play button on, for example, your DVD remote control. This starts playback on your DVD device and automatically switches your TV to the correct source, displaying DVD content. Use system standby System standby enables you to press the button on, for example, your TV remote control. This switches your TV and all connected HDMI devices to standby mode. Network update Press MENU on the remote control, then select OPTIONS > Network Update. Select On/Off to enable or disable the Network update function. When this function is on, the TV will automatically update channels if your DTV service provider updates his DTV network. When this function is off, you need to run the channel search again to get new channels or remove unavailable channels if your DTV service provider adds or removes channels from their DTV network. Common interface Encrypted digital TV channels can be decoded with a common interface module and a card provided by a digital TV service operator. The common interface module may enable several digital services, depending on the operator and services you choose (for example, pay TV). Contact your digital TV service operator for more information about services and terms. Use the common interface module WARNING: Switch off your TV before inserting a common interface module. Be sure to follow the instruction described below. Wrong insertion of a common interface module may damage both the module and your TV. 1. Following the directions printed on the common interface module, gently insert the module into the common interface slot on the TV. 2. Push the module in as far as it will go. 3. Turn on the TV and wait for the common interface function to be activated. This may take several minutes. Note: Do not remove the common interface module from the slot. Removing the module will deactivate the digital services. Access common interface services After inserting and activating the common interface module, press MENU on the remote control and select OPTIONS > Common Interface. This menu option is only available if the common interface module is correctly inserted and activated. On-screen applications and content are provided by your digital TV service operator. Software update Press MENU on the remote control and select OPTIONS > Software Update. Press OK/ to enter. Current Version: Checks the current version of the software. Product Name: Displays the product name of your TV. Serial Number(if available): Displays the serial number of your TV. By Network: Enables you to download and install the latest software version from the Internet. Make sure to set up a wired or wireless network connection first, then select By Network and press OK/ to enter. Follow the on-screen instructions to continue. Note: Connect a USB device to your TV before you start software update. By Channel: Enables you to install the latest version of the software if available. Select By Channel and press OK/ to enter. Use / to select Yes under Auto Download to automatically download the latest software if available. After the software has been downloaded successfully, you will be prompted to decide if you want to install it right now. If yes, follow the on-screen instructions to complete your installation. You can also select to ignore the installation here. Select No under Auto Download to decline the automatic download. Select Manual Download and press OK/ to start manual scanning the latest software. Follow the on-screen

18 16 instructions to complete. During the scan, press OK/EXIT to cancel or exit the process. Change to Shop or Home mode 1. Press MENU on the remote control and select OPTIONS > Location. 2. Press / to select your location Shop or Home. 3. Press EXIT to exit. Note: According to the regulation of European Commission 2009/125/EC, in Home mode the TV will be put into standby mode automatically if there is no operation in 4 hours. This feature can be deactivated in OPTIONS menu. MHEG function Some digital TV broadcasters offer dedicated digital text or interactive services (for example, BBC1). These services work like normal Teletext with the addition of number, colour and navigation buttons. 1. Press MENU on the remote control and select OPTIONS > Subtitle > Subtitle. 2. Press / to set Subtitle to Off. Note: MHEG and subtitles are mutually exclusive and cannot coexist on the same screen. If Subtitle is set to On, MHEG will not appear. 3. Press the red button or TEXT on the remote control. 4. Press / / / to select or highlight items. 5. Press OK to confirm or activate. 6. Press one of the colour buttons to select an option. 7. Press TEXT or EXIT to exit. View photos, play music and watch videos from a USB memory stick Your TV is fitted with a USB connector that enables you to view photos, listen to music or watch videos stored on a USB storage device. Supported file formats: Photo JPEG Music Video MP3 AVI, MP4, MPG, MPEG, TS, DIVX, MKV Notes: Some USB keys and USB products like digital cameras or mobile phones are not fully compatible with USB 2.0 standard so they may not work with the TV multimedia player. Not all USB keys or devices are compatible with the USB function. Not all above formats are supported. The encoding formats of your files will determine whether or not they can be used. When a USB device is detected, it enters the MEDIA menu directly. (Alternative: Select MEDIA in the main menu and press OK to enter.) Photo To display photos, if available. 1. Select MEDIA > PHOTO, then press OK to enter the main file content browser. 2. In the main file content browser, use / / / to select a photo or an inner file folder. 3. Select an inner file folder, press OK to enter a sub file content browser. 4. Use / / to select a photo in either main or sub file content browser, press MENU to display the photo menu in folder mode. Sort: Sort folders and photos by modification Date or Name. Edit: Copy, paste or delete a selected photo. Parser: You can select Recursive to display photos from all sub file folders. 5. Select a photo, press OK to watch, and a slide show begins from the selected photo. Press to pause the photo if you want to rotate the paused photo. Press MENU to display the photo menu in the browser mode. You can play, pause or rotate the photo, select different play modes and displaying effects, etc. 6. Press the related buttons on the remote control to perform the available functions shown on the function bar at the bottom of the TV screen. Music To playback music, if available. 1. Select MEDIA > MUSIC, then press OK to enter the main file content browser. 2. Use / / / to select a song in either main or sub file content browser in the same way as in photo display function, press MENU to display the music menu in folder mode. Sort: Sort folders and songs by Name, Genre, Artist or Album. Edit: Copy, paste or delete a selected song. Parser: You can select Recursive to
.")
19 17 display songs from all sub file folders. 3. Select a song, press OK to play, and automatic playback begins from the selected song. Press MENU to display the music menu in the browser mode. You can play or pause the song, select different play modes, etc. Show Lyrics: This option is available for the songs with lyrics. Select it and use / to turn on/off lyrics synchronized display. Audio Only: Select and press OK to listen to the music with the screen turned off. Any key press will turn the screen on. 4. Press the related buttons on the remote control to perform the available functions shown on the function bar at the bottom of the TV screen. Video To watch videos, if available. 1. Select MEDIA > VIDEO, then press OK to enter the main file content browser. 2. Use / / / to select a video in either main or sub file content browser in the same way as in photo display function, press MENU to display the video menu in folder mode. Sort: Sort folders and videos by Type, modification Date or Name. Edit: Copy, paste or delete a selected video. Parser: You can select Recursive to display videos from all sub file folders. 3. Select a video, press OK to watch, and automatic playback begins from the selected video. Press MENU to display the video menu in the browser mode. You can play or pause the video, select different play modes, screen modes and preset picture settings, etc. 4. Press the related buttons on the remote control to perform the available functions shown on the function bar at the bottom of the TV screen. DivX video (* not available for some models) ABOUT DIVX VIDEO: DivX is a digital video format created by DivX, LLC, a subsidiary of Rovi Corporation. This is an official DivX Certified device that plays DivX video. Visit divx.com for more information and software tools to convert your files into DivX videos. ABOUT DIVX VIDEO-ON-DEMAND: This DivX Certified device must be registered in order to play purchased DivX Video-on- Demand (VOD) movies. Obtain your registration code: Press MENU on the remote control. Select OPTIONS > DivX(R) Registration. Press OK/ and your registration code will be displayed. Go to vod.divx.com for more information on how to complete your registration. Deregister your TV: If you wish to deregister your TV, Press MENU on the remote control. Select OPTIONS > DivX(R) Deregistration. Press OK/ and a message will guide you. DivX, DivX Certified and associated logos are trademarks of Rovi Corporation or its subsidiaries and are used under license. Time detection You can detect the time from digital channels through following operations. 1. Press MENU on the remote control and select OPTIONS >Timer > Clock > Auto Synchronization. 2. Press / to select On. Assign a channel decoder Decoders that decode analogue channels can be connected to the AV connector. Assign the TV channel as a channel to be decoded. Then assign the connection where the decoder is connected. 1. Press MENU on the remote control and select SETUP > Decode. 2. Press OK/ to enter the list. 3. Press / to select the channel to decode. 4. Press OK to select or unselect the channel. 5. Press BACK to return to the previous menu.

20 18 Diagnostics on digital TV channels 1. Press MENU on the remote control and select SETUP > Diagnostics. 2. Press OK/ to display some signal information on the current digital channel, such as signal strength, frequency, etc. Time Shift Allows you to pause, rewind and forward in a programme. The first time you use this function, make sure to connect a USB memory stick. Note: Due to specific country requirements, the Time Shift function is not available for Finland. 1. Press MENU on the remote control and select SETUP > Time Shift. 2. Press / to select On to switch on the Time Shift function, then press EXIT to close the menu. 3. Press OPTION on the remote control and select Time Shift, then press OK to confirm. 4. Follow the directions on the screen to do the setup. 5. After the disk setup is done, press OPTION and select Time Shift. 6. Press OK to display the Time Shift menu. Press the button to pause the picture and begin the Time Shift. Press the button to play the recorded part. When the Time Shift menu disappears and only the timing of the Time Shift remains on the screen, you can press the button or OK to access the Time Shift menu. Press the button to fast backward or the button to fast forward. Press the button to quit the Time Shift function. Notes: Before you connect the USB memory stick to the TV, make sure you have backed up the data in the device to avoid the risk of losing important data due to unforeseen malfunction. We recommend you use a USB device with free capacity above 1GB and disk speed faster than 5.0MB/sec. The bigger the file size for Time Shift, the longer the recording time. If you change the channel in Time Shift mode, a message prompts you to select Yes or No. You can select Yes to exit the Time Shift function and execute the channel change. Reset shop Allows you to reset the TV to factory default settings. 1. Press MENU on the remote control and select SETUP, then press OK to confirm. 2. Select Reset Shop and press OK/ to enter. 3. Use the digit buttons to enter the password. 4. Press / to select OK and press OK to confirm. 5. The Initial Setup menu appears. Follow the related instructions. Customising the input settings Allows you to configure your TV for external input devices, such as a set-top box, Blu- Ray player, computer or game console. 1. Press MENU on the remote control and select SETUP > Input Settings. 2. Press OK/ to enter Input Settings. 3. Press / to select the port the input device is connected to. 4. Press / to select the type of device. Press / to assign a name to the device. 5. Press BACK to return to the SETUP menu. After configuring, the selected source label will be displayed after the name of the related connector in the source list when pressing SOURCE on the remote control or OK on the TV. Use Electronic programme guide EPG is an on-screen guide that displays scheduled TV programmes. You can navigate, select, view and record programmes. 1. Press GUIDE on the remote control, the Now and Next EPG menu will appear, which allows you to get information about the current or next programme playing on each channel. Navigate through the different programmes using the navigation buttons on the remote control. 2. Use the colour buttons to view the 8 Days EPG.

UPPLEVA. Design and Quality IKEA of Sweden
 UPPLEVA Design and Quality IKEA of Sweden Initial setup Language Please select your language: English Hrvatski Dansk Automatic search Automatic update Analogue manual scan Antenna manual installation
WPS/Reset Hold i 5 sekunder for å automatisk konfigurere med WPS. Hold i 10 Seoncds å tilbakestille WiFi å faktor standardinnstillingene.
 WiFi Push the front button you get the status of the WiFi device Trykk foran knappen får du status for WiFi-enhet Työnnä eteen painiketta saat tilan WiFi laitteen When the button blinks blue the WiFi is
1. SIT. The handler and dog stop with the dog sitting at heel. When the dog is sitting, the handler cues the dog to heel forward.
 START START SIT 1. SIT. The handler and dog stop with the dog sitting at heel. When the dog is sitting, the handler cues the dog to heel forward. This is a static exercise. SIT STAND 2. SIT STAND. The
Lab SBS3.FARM_Hyper-V - Navigating a SharePoint site
 Lab SBS3.FARM_Hyper-V - Navigating a SharePoint site Note! Before starting download and install a fresh version of OfficeProfessionalPlus_x64_en-us. The instructions are in the beginning of the exercise.
Choose Finland-Helsinki Valitse Finland-Helsinki
 Write down the Temporary Application ID. If you do not manage to complete the form you can continue where you stopped with this ID no. Muista Temporary Application ID. Jos et onnistu täyttää lomake loppuun
Microsoft Lync 2010 Attendee
 VYVI MEETING Lync Attendee 2010 Instruction 1 (15) Microsoft Lync 2010 Attendee Online meeting VYVI MEETING Lync Attendee 2010 Instruction 2 (15) Index 1 Microsoft LYNC 2010 Attendee... 3 2 Acquiring Lync
FinFamily PostgreSQL installation ( ) FinFamily PostgreSQL
 FinFamily PostgreSQL") FinFamily PostgreSQL 1 Sisällys / Contents FinFamily PostgreSQL... 1 1. Asenna PostgreSQL tietokanta / Install PostgreSQL database... 3 1.1. PostgreSQL tietokannasta / About the PostgreSQL database...
FinFamily PostgreSQL 1 Sisällys / Contents FinFamily PostgreSQL... 1 1. Asenna PostgreSQL tietokanta / Install PostgreSQL database... 3 1.1. PostgreSQL tietokannasta / About the PostgreSQL database...
Lab A1.FARM_Hyper-V.v3
 Lab A1.FARM_Hyper-V Installing SharePoint Server 2013 SharePoint Server 2013 -asennus Scenario To install and configure SharePoint 2013 on a single server (Server 2012, AD and SQL Server), you will follow
FinFamily Installation and importing data (11.1.2016) FinFamily Asennus / Installation
 FinFamily Asennus / Installation") FinFamily Asennus / Installation 1 Sisällys / Contents FinFamily Asennus / Installation... 1 1. Asennus ja tietojen tuonti / Installation and importing data... 4 1.1. Asenna Java / Install Java... 4 1.2.
FinFamily Asennus / Installation 1 Sisällys / Contents FinFamily Asennus / Installation... 1 1. Asennus ja tietojen tuonti / Installation and importing data... 4 1.1. Asenna Java / Install Java... 4 1.2.
Information on preparing Presentation
 Information on preparing Presentation Seminar on big data management Lecturer: Spring 2017 20.1.2017 1 Agenda Hints and tips on giving a good presentation Watch two videos and discussion 22.1.2017 2 Goals
TW-WLAN 802.11g/n MIMO PCI-sovitin Asennusohje
 TW-WLAN 802.11g/n MIMO PCI-sovitin Asennusohje CE Copyright Telewell Oy Esittely TW-WLAN PCI-sovitin on ulkoinen Wlan-sovitin PCIväylään. Ominaisuudet Yhteensopiva sekä IEEE 802.11b, 802.11g, että 802.11n
National Building Code of Finland, Part D1, Building Water Supply and Sewerage Systems, Regulations and guidelines 2007
 National Building Code of Finland, Part D1, Building Water Supply and Sewerage Systems, Regulations and guidelines 2007 Chapter 2.4 Jukka Räisä 1 WATER PIPES PLACEMENT 2.4.1 Regulation Water pipe and its
colour television Färg-tv 32FLD882H väri-tv Owner s manual Bruksanvisningen
 colour television Färg-tv 32FLD882H väri-tv Owner s manual Bruksanvisningen Käyttöohje Contents Accessories... 2 Features... 2 Introduction... 2 Preparation... 2 Safety Precautions... 2 Power Source...
OFFICE 365 OPISKELIJOILLE
 OFFICE 365 OPISKELIJOILLE Table of Contents Articles... 3 Ohjeet Office 365 käyttöönottoon... 4 One Driveen tallennetun videon palauttaminen oppimisympäristön palautuskansioon... 5 Changing default language
TW-WLAN 802.11g/n MIMO USB-sovitin Asennusohje
 TW-WLAN 802.11g/n MIMO USB-sovitin Asennusohje CE Copyright Telewell Oy Esittely TW-WLAN USB-sovitin on ulkoinen Wlan-sovitin USBväylään. Ominaisuudet Yhteensopiva sekä IEEE 802.11b, 802.11g, että 802.11n
TW-LTE 4G/3G. USB-modeemi (USB 2.0)
") TW-LTE 4G/3G USB-modeemi (USB 2.0) Tiedonsiirtonopeus: 100 Mbps/50 Mbps LTE: 1800/2100/2600 MHz GSM/GPRS/EDGE: 850/900/1800/1900 MHz UMTS: 900/2100 MHz Pikaohje (Finnish) CE Käyttöönotto- ohje SIM- kortin
TW-LTE 4G/3G USB-modeemi (USB 2.0) Tiedonsiirtonopeus: 100 Mbps/50 Mbps LTE: 1800/2100/2600 MHz GSM/GPRS/EDGE: 850/900/1800/1900 MHz UMTS: 900/2100 MHz Pikaohje (Finnish) CE Käyttöönotto- ohje SIM- kortin
Contents. English - 1 -
 Contents Features... 2 Introduction... 2 Preparation... 2 Safety Precautions... 2 Package Contents... 4 Environmental Information... 5 Repair Information... 5 Remote Control Buttons... 6 LCD TV and Operating
On instrument costs in decentralized macroeconomic decision making (Helsingin Kauppakorkeakoulun julkaisuja ; D-31)
") On instrument costs in decentralized macroeconomic decision making (Helsingin Kauppakorkeakoulun julkaisuja ; D-31) Juha Kahkonen Click here if your download doesn"t start automatically On instrument costs
On instrument costs in decentralized macroeconomic decision making (Helsingin Kauppakorkeakoulun julkaisuja ; D-31) Juha Kahkonen Click here if your download doesn"t start automatically On instrument costs
Uusi Ajatus Löytyy Luonnosta 4 (käsikirja) (Finnish Edition)
 (Finnish Edition)") Uusi Ajatus Löytyy Luonnosta 4 (käsikirja) (Finnish Edition) Esko Jalkanen Click here if your download doesn"t start automatically Uusi Ajatus Löytyy Luonnosta 4 (käsikirja) (Finnish Edition) Esko Jalkanen
Uusi Ajatus Löytyy Luonnosta 4 (käsikirja) (Finnish Edition) Esko Jalkanen Click here if your download doesn"t start automatically Uusi Ajatus Löytyy Luonnosta 4 (käsikirja) (Finnish Edition) Esko Jalkanen
Parental Settings Menu Operation (*)... 28 Input Selection... 12. Timers... 28 Operation with the Buttons on the TV... 12
... 28 Input Selection... 12. Timers... 28 Operation with the Buttons on the TV... 12") Contents Features... 2 Viewing Photos via USB... 20 Introduction... 2 Slideshow Options... 20 Preparation... 2 Playing Music via USB... 20 Safety Precautions... 2 Recordings Library... 21 Media Browser
Contents Features... 2 Viewing Photos via USB... 20 Introduction... 2 Slideshow Options... 20 Preparation... 2 Playing Music via USB... 20 Safety Precautions... 2 Recordings Library... 21 Media Browser
TW- WLAN 802.11ac SOVITTIMEN ASENNUSOHJE
 TW- WLAN 802.11ac SOVITTIMEN ASENNUSOHJE Copyright TeleWell Oy Tekniset tiedot: - - - - - - - Yhteensopiva IEEE 802.11b/g/n/ac - standardien kanssa Taajuusalueet 2.4 GHz ja 5 GHz Maksiminopeus: 300 Mbps
On instrument costs in decentralized macroeconomic decision making (Helsingin Kauppakorkeakoulun julkaisuja ; D-31)
") On instrument costs in decentralized macroeconomic decision making (Helsingin Kauppakorkeakoulun julkaisuja ; D-31) Juha Kahkonen Click here if your download doesn"t start automatically On instrument costs
On instrument costs in decentralized macroeconomic decision making (Helsingin Kauppakorkeakoulun julkaisuja ; D-31) Juha Kahkonen Click here if your download doesn"t start automatically On instrument costs
LYTH-CONS CONSISTENCY TRANSMITTER
 LYTH-CONS CONSISTENCY TRANSMITTER LYTH-INSTRUMENT OY has generate new consistency transmitter with blade-system to meet high technical requirements in Pulp&Paper industries. Insurmountable advantages are
Efficiency change over time
 Efficiency change over time Heikki Tikanmäki Optimointiopin seminaari 14.11.2007 Contents Introduction (11.1) Window analysis (11.2) Example, application, analysis Malmquist index (11.3) Dealing with panel
TW- LTE 4G/3G. USB- sovitin (USB 2.0)
") TW- LTE 4G/3G USB- sovitin (USB 2.0) Tiedonsiirtonopeus: 100 Mbps/50 Mbps LTE: 800/1800/2600 MHz GSM/GPRS/EDGE: 850/900/1800/1900 MHz UMTS: 900/2100 MHz Pikaohje (Finnish) CE Käyttöönotto- ohje SIM- kortin
TW- LTE 4G/3G USB- sovitin (USB 2.0) Tiedonsiirtonopeus: 100 Mbps/50 Mbps LTE: 800/1800/2600 MHz GSM/GPRS/EDGE: 850/900/1800/1900 MHz UMTS: 900/2100 MHz Pikaohje (Finnish) CE Käyttöönotto- ohje SIM- kortin
KONEISTUSKOKOONPANON TEKEMINEN NX10-YMPÄRISTÖSSÄ
 KONEISTUSKOKOONPANON TEKEMINEN NX10-YMPÄRISTÖSSÄ https://community.plm.automation.siemens.com/t5/tech-tips- Knowledge-Base-NX/How-to-simulate-any-G-code-file-in-NX- CAM/ta-p/3340 Koneistusympäristön määrittely
You can check above like this: Start->Control Panel->Programs->find if Microsoft Lync or Microsoft Lync Attendeed is listed
 Online Meeting Guest Online Meeting for Guest Participant Lync Attendee Installation Online kokous vierailevalle osallistujalle Lync Attendee Asennus www.ruukki.com Overview Before you can join to Ruukki
Security server v6 installation requirements
 CSC Security server v6 installation requirements Security server version 6.4-0-201505291153 Pekka Muhonen 8/12/2015 Date Version Description 18.12.2014 0.1 Initial version 10.02.2015 0.2 Major changes
SpeechMike III sarjan sanelumikrofonien (mallit LFH3200 ja LFH3220) yhteensopivuus SpeechMagic Executive saneluohjelman kanssa
 yhteensopivuus SpeechMagic Executive saneluohjelman kanssa") SpeechMike III sarjan sanelumikrofonien (mallit LFH3200 ja LFH3220) yhteensopivuus SpeechMagic Executive saneluohjelman kanssa Jotta SpeechMike III sarjan sanelumikrofonia voidaan käyttää Executive saneluohjelmassa,
SpeechMike III sarjan sanelumikrofonien (mallit LFH3200 ja LFH3220) yhteensopivuus SpeechMagic Executive saneluohjelman kanssa Jotta SpeechMike III sarjan sanelumikrofonia voidaan käyttää Executive saneluohjelmassa,
Capacity Utilization
 Capacity Utilization Tim Schöneberg 28th November Agenda Introduction Fixed and variable input ressources Technical capacity utilization Price based capacity utilization measure Long run and short run
Security server v6 installation requirements
 CSC Security server v6 installation requirements Security server version 6.x. Version 0.2 Pekka Muhonen 2/10/2015 Date Version Description 18.12.2014 0.1 Initial version 10.02.2015 0.2 Major changes Contents
24FLHTR160L. colour television betjeningsvejledning väri - tv. owner s manual lcd tv med fjernbetjening käyttöohje
 24FLHTR160L colour television betjeningsvejledning väri - tv owner s manual lcd tv med fjernbetjening käyttöohje Contents Safety Precautions... 1 Accessories included... 3 Environmental Information...
Salasanan vaihto uuteen / How to change password
 Salasanan vaihto uuteen / How to change password Sisällys Salasanakäytäntö / Password policy... 2 Salasanan vaihto verkkosivulla / Change password on website... 3 Salasanan vaihto matkapuhelimella / Change
32FLTR160V. colour television betjeningsvejledning väri - tv. owner s manual lcd tv med fjernbetjening käyttöohje
 32FLTR160V colour television betjeningsvejledning väri - tv owner s manual lcd tv med fjernbetjening käyttöohje Contents Safety Precautions... 1 Accessories included... 3 Environmental Information... 3
Contents. English - 1 -
 Contents Features... 2 Introduction... 2 Preparation... 2 Safety Precautions... 3 Connection to a Television Distribution System (Cable TV etc.) from Tuner... 4 Package Contents... 4 Environmental Information...
7.4 Variability management
 7.4 Variability management time... space software product-line should support variability in space (different products) support variability in time (maintenance, evolution) 1 Product variation Product
Contents. Safety Precautions. Preparation. Intended Use. Power source. Positioning the TV
 Contents Safety Precautions... 1 Accessories included... 2 Environmental Information... 3 TV - Features... 3 Viewing the TV... 4 TV Control button & Operation... 4 Remote Control... 5 Using a Conditional
Contents. Safety Precautions. Preparation. Intended Use. Power source. Positioning the TV
 Contents Safety Precautions... 1 Accessories included... 2 Environmental Information... 3 TV - Features... 3 Viewing the TV... 4 TV Control button & Operation... 4 Remote Control... 5 Using a Conditional
Contents. English - 1 -
 Contents Features... 2 Introduction... 2 Preparation... 2 Safety Precautions... 3 Power... 3 Package Contents... 5 Environmental Information... 5 Repair Information... 5 Remote Control Buttons... 6 LED
Contents. Safety Precautions. Preparation. Intended Use. Please read these instructions fully before installing or operating.
 Contents Safety Precautions... 1 Preparation... 1 Intended Use... 1 Power source... 2 Environmental Information... 3 Accessories included... 3 TV - Features... 4 Viewing the TV... 4 TV Control button &
Sisällysluettelo Table of contents
 Sisällysluettelo Table of contents OTC:n Moodlen käyttöohje suomeksi... 1 Kirjautuminen Moodleen... 2 Ensimmäinen kirjautuminen Moodleen... 2 Salasanan vaihto... 2 Oma käyttäjäprofiili... 3 Työskentely
GPRS-lisäpalvelu INTERNET-ASETUKSET
 GPRS-lisäpalvelu INTERNET-ASETUKSET GPRS-lisäpalvelu Internet-asetukset 2(22) Sisällysluettelo 1 INTERNET-ASETUKSET MICROSOFT WINDOWS 95/98... 3 1.1 MODEEMIN ASENNUS... 3 1.2 APN:N ASETTAMINEN... 3 1.3
colour television väri-tv 22FLHY905LVD owner s manual käyttöohje
 colour television 22FLHY905LVD väri-tv owner s manual käyttöohje Contents Features... 2 Introduction... 2 Preparation... 2 Safety Precautions... 3 Power... 3 Package Contents... 5 Environmental Information...
PAINEILMALETKUKELA-AUTOMAATTI AUTOMATIC AIR HOSE REEL
 MAV4 MAV5 MAV6 PAINEILMALETKUKELA-AUTOMAATTI AUTOMATIC AIR HOSE REEL Käyttöohje Instruction manual HUOMIO! Lue käyttöohjeet huolellisesti ennen laitteen käyttöä ja noudata kaikkia annettuja ohjeita. Säilytä
C470E9AC686C
 INVENTOR 17 VALUOSAN SUUNNITTELU http://help.autodesk.com/view/invntor/2017/enu/?guid=guid-b3cd4078-8480-41c3-9c88- C470E9AC686C About Mold Design in Inventor Mold Design provides integrated mold functionality
anna minun kertoa let me tell you
 anna minun kertoa let me tell you anna minun kertoa I OSA 1. Anna minun kertoa sinulle mitä oli. Tiedän että osaan. Kykenen siihen. Teen nyt niin. Minulla on oikeus. Sanani voivat olla puutteellisia mutta
Rekisteröiminen - FAQ
 Rekisteröiminen - FAQ Miten Akun/laturin rekisteröiminen tehdään Akun/laturin rekisteröiminen tapahtuu samalla tavalla kuin nykyinen takuurekisteröityminen koneille. Nykyistä tietokantaa on muokattu niin,
CONVERSION KITS FOR FRAMES MR8 AND MR9 INSTALLATION INSTRUCTIONS
 CONVERSION KITS FOR FRAMES MR8 AND MR9 INSTALLATION INSTRUCTIONS MR8 AND MR9 CONVERSION KIT - INSTALLATION INSTRUCTION Document ID: DPD01787, Revision: A, Release date: 17.11.2015 1.1 MR8 kit contents
On instrument costs in decentralized macroeconomic decision making (Helsingin Kauppakorkeakoulun julkaisuja ; D-31)
") On instrument costs in decentralized macroeconomic decision making (Helsingin Kauppakorkeakoulun julkaisuja ; D-31) Juha Kahkonen Click here if your download doesn"t start automatically On instrument costs
On instrument costs in decentralized macroeconomic decision making (Helsingin Kauppakorkeakoulun julkaisuja ; D-31) Juha Kahkonen Click here if your download doesn"t start automatically On instrument costs
dupol.eu - WIFI based remote gate control unit - Hungarian product
 WIFI based remote gate control unit User manual v1.0 1 EN Basic information A is a innovative device, designed to fulfill the modern request for comfortable environment. Using a local Wi-Fi network, it
WELCOME TO DIGITAL TELEVISION
 English WELCOME TO DIGITAL TELEVISION Congratulations on choosing the Philips DTR 2000 digital terrestrial receiver. The DTR 2000 will allow you: - To access to a wider variety of digital terrestrial television
5.1CH Blu-ray Home Entertainment System
 HT-J5150 User manual 5.1CH Blu-ray Home Entertainment System imagine the possibilities Thank you for purchasing this Samsung product. To receive more complete service, please register your product at www.samsung.com/register
Secto Design Oy Kauppalantie 12 02700 Kauniainen Finland tel. +358 9 5050598 fax +358 9 5475 2535 info@sectodesign.fi www.sectodesign.
 Secto Design Oy Kauppalantie 12 02700 Kauniainen Finland tel. +358 9 5050598 fax +358 9 5475 2535 info@sectodesign.fi www.sectodesign.fi Secto 4200 pendant natural birch, black or white laminate, walnut
AYYE 9/ HOUSING POLICY
 AYYE 9/12 2.10.2012 HOUSING POLICY Mission for AYY Housing? What do we want to achieve by renting apartments? 1) How many apartments do we need? 2) What kind of apartments do we need? 3) To whom do we
Table of Contents. Digital SD Sat Receiver SSR 576 A1. English - 1
 Digital SD Sat Receiver SSR 576 A1 Table of Contents Safety Instructions... 3 Operating Environment... 3 Notice on Mains Separation... 4 Batteries... 4 Cables... 4 Children and Persons with Disabilities...
WINE COOLER TFW METOS TFW 160S, TFW 365-2S, TFW 375S MG ,
 WINE COOLER TFW METOS TFW 160S, TFW 365-2S, TFW 375S MG4116794, 4116798, 4116797 Instruction manual TWF 365-2S TWF 375S TWF 160S 01.09.2015 Table if Contents 1. Important safety instructions...3 2. Unpacking
PhotoFrame. Register your product and get support at SPF2307 SPF2327
 PhotoFrame Register your product and get support at www.philips.com/welcome SPF2307 SPF2327 21 22 8 22 22 22 / 23 SmartPower 24 PhotoFrame 25 25 / 26 28 PhotoFrame 29 30 PhotoFrame 9 31 10 33 11 4 : 1
1/4. Resetointi ja vianmääritys. 22.11.2013 ntr
 A400-64176 Sähköpöydät 1/4 Resetointi ja vianmääritys Pöydän resetointi tehdään aina ennen käyttöönottoa ja tarvittaessa häiriötilanteessa. Määritä pöydän tyyppi käyttökytkimen ja jalustan mukaan ja tee
Recirkulering. El-tilslutning. Kontrolpanel. Dansk. Timerfunktion
 1 2 Dansk Recirkulering Luften renses ved hjælp at aktive kulfiltre hvorefter den returneres til rummet. Kulfiltre bestilles separat. El-tilslutning Emhætten skal tilsluttes 230 V i henhold til stærkstrømsreglementet.
4x4cup Rastikuvien tulkinta
 4x4cup Rastikuvien tulkinta 4x4cup Control point picture guidelines Päivitetty kauden 2010 sääntöihin Updated for 2010 rules Säännöt rastikuvista Kilpailijoiden tulee kiinnittää erityistä huomiota siihen,
Solar Water Heater Kit. EcoStyle. 1 User Manual/Operating Instructions. Contents FREE LESSON PLANS AVAILABLE.
 EcoStyle 1 User Manual/Operating Instructions Contents 1 Contents 2 What s in the box? 3 Setting up the 4 Heating water 5 Measuring water temperature with the digital thermometer 6 Maximum/minimum temperature
Miksi Suomi on Suomi (Finnish Edition)
") Miksi Suomi on Suomi (Finnish Edition) Tommi Uschanov Click here if your download doesn"t start automatically Miksi Suomi on Suomi (Finnish Edition) Tommi Uschanov Miksi Suomi on Suomi (Finnish Edition)
Miksi Suomi on Suomi (Finnish Edition) Tommi Uschanov Click here if your download doesn"t start automatically Miksi Suomi on Suomi (Finnish Edition) Tommi Uschanov Miksi Suomi on Suomi (Finnish Edition)
LANSEERAUS LÄHESTYY AIKATAULU OMINAISUUDET. Sähköinen jäsenkortti. Yksinkertainen tapa lähettää viestejä jäsenille
 tiedote 2 / 9.3.2017 LANSEERAUS LÄHESTYY AIKATAULU 4.3. ebirdie-jäsenkortti esiteltiin Golfliiton 60-vuotisjuhlaseminaarissa 17.3. ebirdie tulee kaikkien ladattavaksi Golfmessuilla 17.3. klo 12:00 alkaen
Owner s Manual GREE Electric Appliances,Inc.of zhuhai
 Ilmalämpöpumppu Split air conditioner wall mounted model Käyttäjän opas Owner s Manual GREE Electric Appliances,Inc.of zhuhai Ultra-thin GWHD09A3NK3DF KFR-25GW/NaA12FA GWHD12B2NK3AD KFR-32GW/NaA12FA Please
Travel Getting Around
 - Location Olen eksyksissä. Not knowing where you are Voisitko näyttää kartalta missä sen on? Asking for a specific location on a map Mistä täällä on? Asking for a specific...wc?...pankki / rahanvaihtopiste?...hotelli?...huoltoasema?...sairaala?...apteekki?...tavaratalo?...ruokakauppa?...bussipysäkki?
dupol.eu - smart home product comparison
 DUPOL KFT HUNGARY SINGULAR WIFI WIFI alarm communicator for signal to smartphone App, working with any alarm panel Connection to alarm panel through Ring/Tip terminals (emulates phone line) Forwards Contact
WNR Pika-asennusohje ------------- pages 2-10 Quick Installation Guide ---- pages 11-20 Web Configuration Guide --- pages 21 ->
 WNR Pika-asennusohje ------------- pages 2-10 Quick Installation Guide ---- pages 11-20 Web Configuration Guide --- pages 21 -> Pika-asennusohje Pakkaus sisältää: - WNR toistin - Asennusohje Liittimet
Network to Get Work. Tehtäviä opiskelijoille Assignments for students. www.laurea.fi
 Network to Get Work Tehtäviä opiskelijoille Assignments for students www.laurea.fi Ohje henkilöstölle Instructions for Staff Seuraavassa on esitetty joukko tehtäviä, joista voit valita opiskelijaryhmällesi
Asennusohje CAB Service Platform
 Asennusohje CAB Service Platform CABInstall JOHDANTO... 2 ASENNUS... 3 ADVANCED INSTALLATION... 10 ADDITIONAL INFORMATION... 12 Proxy... 12 Sivu 1 / 12 Johdanto Tämä on CAB Service Platformin asennusohje
Box 1. Things you have/ Pakkaus sisältää. x 4 x 16 x 4 x 4. 300mm. 1700mm. 300mm 1. Things you should know / Sinun Tulee Tietää
 Phobos 30 Things you should know / Sinun Tulee Tietää Things you prepare / Näitä Tarvitset DURING INSTALLATION ALL PRODUCTS: use protective gloves at all times use eye protection at all times never install
Tietorakenteet ja algoritmit
 Tietorakenteet ja algoritmit Taulukon edut Taulukon haitat Taulukon haittojen välttäminen Dynaamisesti linkattu lista Linkatun listan solmun määrittelytavat Lineaarisen listan toteutus dynaamisesti linkattuna
Tilausvahvistus. Anttolan Urheilijat HENNA-RIIKKA HAIKONEN KUMMANNIEMENTIE 5 B RAHULA. Anttolan Urheilijat
 7.80.4 Asiakasnumero: 3000359 KALLE MANNINEN KOVASTENLUODONTIE 46 51600 HAUKIVUORI Toimitusosoite: KUMMANNIEMENTIE 5 B 51720 RAHULA Viitteenne: Henna-Riikka Haikonen Viitteemme: Pyry Niemi +358400874498
MEETING PEOPLE COMMUNICATIVE QUESTIONS
 Tiistilän koulu English Grades 7-9 Heikki Raevaara MEETING PEOPLE COMMUNICATIVE QUESTIONS Meeting People Hello! Hi! Good morning! Good afternoon! How do you do? Nice to meet you. / Pleased to meet you.
Voice Over LTE (VoLTE) By Miikka Poikselkä;Harri Holma;Jukka Hongisto
 By Miikka Poikselkä;Harri Holma;Jukka Hongisto") Voice Over LTE (VoLTE) By Miikka Poikselkä;Harri Holma;Jukka Hongisto If you are searched for a book by Miikka Poikselkä;Harri Holma;Jukka Hongisto Voice over LTE (VoLTE) in pdf form, then you have come
Voice Over LTE (VoLTE) By Miikka Poikselkä;Harri Holma;Jukka Hongisto If you are searched for a book by Miikka Poikselkä;Harri Holma;Jukka Hongisto Voice over LTE (VoLTE) in pdf form, then you have come
Smart access control.
 Smart access control. www.topkodas.lt zivile@topkodas.lt UPC: 99989897969062 Door control with Wiegand keypad, ibutton key. Door control during specified time interval. Remote control via mobile phone,
PSSA-8/PSSA-8UK OWNERS MANUAL
 PSSA-8/PSSA-8UK OWNERS MANUAL LED indicator Test Button Art. 36.3066 / Art. 8.40 GB Power Switch (PSSA-8 / PSSA-8UK) Identifying the parts LED indicator Test Button Getting Started Plug the Power Switch
TeleWell TW-PLA522. Ethernet-sovitin Sähköverkkoon. Copyright TeleWell Oy
 TeleWell TW-PLA522 Ethernet-sovitin Sähköverkkoon Copyright TeleWell Oy 1. Laitteen esittely TW-PLA522-sovittimen avulla voidaan muodostaa langallinen lähiverkko ilman erillisiä kaapelointeja liittämällä
2017/S Contract notice. Supplies
 Supplies 153936 2017 25/04/2017 S80 - - Supplies - Contract notice - Open procedure I. II. III. IV. VI. -: Medical equipments, pharmaceuticals and personal care products 2017/S 080-153936 Contract notice
5.1CH Blu-ray Home Entertainment System
 HT-J5500 HT-J5550W User manual 5.1CH Blu-ray Home Entertainment System imagine the possibilities Thank you for purchasing this Samsung product. To receive more complete service, please register your product
TÄYTTÖAUTOMAATIT TÄYTTÖAUTOMAATIT COMPUTER INFLATORS
 31 S AHCON computer inflators are designed with a view to high quality, precision and long service life. The inflation computers are designed in Denmark and manufactured and tested in our own workshop.
Tork Paperipyyhe. etu. tuotteen ominaisuudet. kuvaus. Väri: Valkoinen Malli: Vetopyyhe
 etu Monikäyttöpaperi hoitaa useimmat pyyhintätehtävät Sopiva lasipintojen pyyhintään Sopii käsien kuivaamiseen Elintarvikekäyttöön hyväksytty Tork Easy Handling, pakkaus, jota on helppo kantaa mukana,
Start Here Start her Aloita tästä Start her Börja här
 Start Here Start her Aloita tästä Start her Börja här 1 Install the software (required for full functionality). Installer softwaren (er nødvendig, for at alle funktionerne kan bruges). Asenna ohjelmisto
HITSAUKSEN TUOTTAVUUSRATKAISUT
 Kemppi ARC YOU GET WHAT YOU MEASURE OR BE CAREFUL WHAT YOU WISH FOR HITSAUKSEN TUOTTAVUUSRATKAISUT Puolitetaan hitsauskustannukset seminaari 9.4.2008 Mikko Veikkolainen, Ratkaisuliiketoimintapäällikkö
Uusi Ajatus Löytyy Luonnosta 3 (Finnish Edition)
") Uusi Ajatus Löytyy Luonnosta 3 (Finnish Edition) Esko Jalkanen Click here if your download doesn"t start automatically Uusi Ajatus Löytyy Luonnosta 3 (Finnish Edition) Esko Jalkanen Uusi Ajatus Löytyy
Uusi Ajatus Löytyy Luonnosta 3 (Finnish Edition) Esko Jalkanen Click here if your download doesn"t start automatically Uusi Ajatus Löytyy Luonnosta 3 (Finnish Edition) Esko Jalkanen Uusi Ajatus Löytyy
Särmäystyökalut kuvasto Press brake tools catalogue
 Finnish sheet metal machinery know-how since 1978 Särmäystyökalut kuvasto Press brake tools catalogue www.aliko.fi ALIKO bending chart Required capacity in kn (T) in relation to V-opening. V R A S = plates
The necessary product key can be found in the hand out given to you.
 205 Tietokoneet ja verkot: tietoturva 205 Computers and networks: data security Tehtävän yleinen osuus (1,5p) General information Yritys on hankkinut F-Secure Protection Service for Business-lisenssin.
TeleWell TW-LTE/4G/3G USB -modeemi Cat 4 150/50 Mbps
 TeleWell TW-LTE/4G/3G USB -modeemi Cat 4 150/50 Mbps Pikaohje Laite toimii Windows XP SP3, Windows 7,8,10 ja Mac OSx 10.5 tai käyttöjärjestelmissä, Linux tuki netistä ladattavilla ajureilla USB portin
HY-käyttäjät HUS/HYKS käyttäjät
 EndNote Pikaohje Peruskäytön vaiheet Kun EndNote on asennettu koneelle/koneille: 1. Perusta kirjasto (vastaa tiedostojenhallinnassa kahta tiedostoa.enl ja.data tiedostot) 2. Vie viitteet tietokannoista
Kilpailutoiminta. Klo 13-14 Kilpailutoiminnan turvallisuuskoulutus Timo Mustakallio Klo 14-14.30 Kahvitauko. Kilpailutapahtumatrekisteri, koulutus
 Kilpailutoiminta Klo 13-14 Kilpailutoiminnan turvallisuuskoulutus Timo Mustakallio Klo 14-14.30 Kahvitauko Klo 14.30 15.15 Klo 15.15 16.00 Kilpailutapahtumatrekisteri, koulutus Trax Meet, GPS-seuranta
Blu-ray Home Entertainment System
 HT-J7500W HT-J7750W User manual Blu-ray Home Entertainment System imagine the possibilities Thank you for purchasing this Samsung product. To receive more complete service, please register your product
SAGA 150. Asennusohjeet. Mittaa oven korkeus. Piirrä seinään oven kiinni -päätyyn seinäkannattimen kohdalle vaakaviiva korkeudelle ovi + 75mm + 20 mm.
 SAGA 150 Asennusohjeet 500 1 2 Mittaa oven korkeus. Piirrä seinään oven kiinni -päätyyn seinäkannattimen kohdalle vaakaviiva korkeudelle ovi + 75mm + 20 mm. 3 Piirrä vesivaa an avulla viiva myös kiskon
TIEKE Verkottaja Service Tools for electronic data interchange utilizers. Heikki Laaksamo
 TIEKE Verkottaja Service Tools for electronic data interchange utilizers Heikki Laaksamo TIEKE Finnish Information Society Development Centre (TIEKE Tietoyhteiskunnan kehittämiskeskus ry) TIEKE is a neutral,
PhotoFrame. Register your product and get support at SPF4308 SPF4328
 PhotoFrame Register your product and get support at www.philips.com/welcome SPF4308 SPF4328 24 25 / 25 27 PhotoFrame 28 29 PhotoFrame 9 4 : 1 4 4 5 5 II 30 10 32 11 33 12 6 PhotoFrame 2 6 6 7 PhotoFrame
Curriculum. Gym card
 A new school year Curriculum Fast Track Final Grading Gym card TET A new school year Work Ethic Detention Own work Organisation and independence Wilma TMU Support Services Well-Being CURRICULUM FAST TRACK
Installation instruction PEM
 Installation instruction ASENNUSOHJE PEM1032 2010-02 SURGE ARRESTER SET FOR POLE MOUNT TRANSFORMER YLIJÄNNITESUOJASETTI PYLVÄSMUUNTAJALLE ENGLISH SUOMI 2/8 PEM1032 2010-02 ENGLISH GENERAL INFORMATION -
BDD (behavior-driven development) suunnittelumenetelmän käyttö open source projektissa, case: SpecFlow/.NET.
 suunnittelumenetelmän käyttö open source projektissa, case: SpecFlow/.NET.") BDD (behavior-driven development) suunnittelumenetelmän käyttö open source projektissa, case: SpecFlow/.NET. Pekka Ollikainen Open Source Microsoft CodePlex bio Verkkosivustovastaava Suomen Sarjakuvaseura
BDD (behavior-driven development) suunnittelumenetelmän käyttö open source projektissa, case: SpecFlow/.NET. Pekka Ollikainen Open Source Microsoft CodePlex bio Verkkosivustovastaava Suomen Sarjakuvaseura
The CCR Model and Production Correspondence
 The CCR Model and Production Correspondence Tim Schöneberg The 19th of September Agenda Introduction Definitions Production Possiblity Set CCR Model and the Dual Problem Input excesses and output shortfalls
Blackwire 215/225. Analoginen johdollinen kuuloke. Käyttöopas
 Blackwire 215/225 Analoginen johdollinen kuuloke Käyttöopas Sisällysluettelo Tervetuloa 3 Tarvitsetko ohjeita? 3 Pakkauksen sisältö 4 Johdon säätimet 5 Kuulokkeen käyttäminen 6 Pääsangan säätäminen 6 Puomin
Gaming mouse Pelihiiri Spelmus
 Gaming mouse Pelihiiri Spelmus Button 1 Nappi 1 Knapp 1 Scrollwheel & button 5 Vieritysrulla & nappi 5 Mushjulet & knapp 5 Button 2 Nappi 2 Knapp 2 dpi + / - Buttons 6 & 7 Napit 6 & 7 Knapp 6 & 7 Button
Mobility Tool. Demo 21.8.2013 CIMO
 Mobility Tool Demo 21.8.2013 CIMO 1 Sisältö Korkeakoulukäyttäjä (Beneficiary User) Home Project details Partners Mobilities Working with CSV Import Mobilities Budget 2 Home Find your project Project menu