TW-525 WLAN n. Ethernet Access Point. User Manual
|
|
|
- Jarkko Kokkonen
- 10 vuotta sitten
- Katselukertoja:
Transkriptio
1 TW-525 WLAN n Ethernet Access Point User Manual Last revised on Jan 2011

2 Safety Warnings 1. Do not use the adapter in high humidity or high temperature environment. 2. Do not open or repair the case yourself. 3. Avoid using this product and all its accesories outdoor. 4. Place the adapter on a stable surface. 5. Plug your Ethernet Access Point device directly to the AC outlet on the wall. It is best to avoid using extension power cable as it may possess noise filter or surge protector functions that may cause interference that may impact the performance of the device.

3 Table of Contents Chapter 1: Product Introduction Features...2 Chapter 2: Installing the Adapter Package Content Device Overview Hardware Installation Connecting the Access Point Power Connection LAN & Wireless Connection Product Application...9 Chapter 3: Basic Network Installation Network Configuration Configuring PC in Windows Configuring PC in Windows Vista Configuring PC in Windows XP Configuring PC in Windows Configuring PC in Windows 95/98/Me Configuring PC in Windows NT Factory Default Settings Internet Access Configuration Configuring with your Web Browser...20 Chapter 4: Configuration Status Status Statistic LAN Setting LAN Wireless Settings...25

4 4.3.1 Basic Wireless Settings Wireless Security/Encryption Settings Secuirty Mode Advanced Wireless Settings Wi-Fi Protected Setup AP Client Station List Administration System Management Firmware Upgrade Settings Management Restart...41 Chapter 5: Troubleshooting...42 Appendix: Product Support & Contact...43

5 Chapter 1: Product 1.1 Introduction Thank you for purchasing the Wireless-N Wall Plug Ethernet Access Point. Your new device is an unit that extends your wireless coverage. The Wireless-N Wall Plug Ethernet Access Point can be used to bridge Ethernet devices such as modems, routers, PCs, set-top-boxes, and game consoles, allowing users to share network access via existing in-home power cabling. What s unique is that the device has an extra built-in n Access Point, enabling users to enjoy mobility, high-speed wireless connection and better coverage with no more dead zones. Just plug the adapter into any wall power socket, and you can easily set up a secure wireless network by pressing the Wi-Fi Protected Setup (WPS) button. Thus, the adapter can extend your wireless coverage for multimedia applications such as online games, IPTV and audio streaming from room to room. Extended Wireless Coverage With an integrated n Wireless Access Point, the adapter can bridge wireless connections of up to 6 times the speed and 3 times the wireless coverage of an b / g network device. It supports a data rates up to 300Mbps and is also compatible with b / g equipment g / n Wireless AP with WPA / WPS Support With an integrated g / n Wireless Access Point, the device The supported features of Wi-Fi Protected Access (WPA-PSK/ WPA2-PSK) and Wired Equivalent Privacy (WEP) enhance the security level of data protection and access control via Wireless LAN. The device also supports the Wi-Fi Protected Setup (WPS) standard, allowing users to establish a secure wireless network by simply pushing a button. Rich Management Interfaces It supports flexible management interfaces with LAN and WLAN. Users can use WEB GUI through the above interfaces to configure and manage the device. Web based GUI It supports web based GUI for configuration and management. It is user-friendly. Firmware Upgradeable Device can be upgraded to the latest firmware through the WEB based GUI. 1

6 1.2 Features Provides physical layer data rate of up to 300Mbps over wireless Deliver up to 6 times speed and extended 3 times wireless coverage of a b/g network device WPS (Wi-Fi Protected Setup) for easy setup Auto channel select Supports Triple Play applications such as IPTV, VoIP and high-speed Internet access Supports 10/100 BaseT Ethernet Ideal for residential users 2

7 Chapter 2: Installing the Adapter 2.1 Package Content Wireless-N Wall Plug Ethernet Access Point Quick Start Guide CD (containing user manual and QSG) Ethernet (CAT-5 LAN) cable 3
 Ethernet")
 LED WPS Button Reset Button Ethernet Port Power Plug / AC Power Cord Clip Socket Lit green when the wireless function is enabled.")
8 2.2 Device Overview WLAN LED Power LED Clip Socket ETH LED WPS Button Ethernet Port Reset Button Power Plug The Description of each labeled part is described in the table below. WLAN LED Power LED ETH (Ethernet Link/Act) LED WPS Button Reset Button Ethernet Port Power Plug / AC Power Cord Clip Socket Lit green when the wireless function is enabled. Blinking when data is transmitted or received via WLAN. Blinking quickly when WPS is proceeded. Lit green when the device is power on. Lit off when power is off. Lit green when connected to an Ethernet device. Blinking when data is transmitted or received via Ethernet port. Push this button to trigger Wi-Fi Protected Setup function. Press this button for more than 2 seconds until WLAN LED blinking and then release this button to reset device to factory default settings. Connect the Ethernet Access Point device with an Ethernet device (e.g. computer, router, hub/switch, IP pone, IPTV set-top-box, gaming consoles ), using the RJ-45 Ethernet cable included. Plug into an AC outlet for power supply. Install the clip into this socket. Note: Please DO NOT remove or disassemble the socket clip frequently as this may cause serious damage on your Ethernet Access Point device. 4

9 5

10 2.3 Hardware Installation Refer to the following diagrams and instructions to install the clip with the device: Example 1: EU clip Please check the lock instruction on your clip. If you got the Triangle Lock, refer to right diagram. 6

11 Example 2: UK clip Please check the lock instruction on your clip. If you got the Circle Lock, refer to right diagram. 7

12 2.4 Connecting the Access Point It is easy to connect the device simply by performing the following instructions: Power Connection Plug the device into the wall outlet/socket LAN & Wireless Connection Connect the supplied RJ-45 Ethernet cable to the Ethernet port on the device and the other side to the device s Ethernet interface. You can enable wireless function to connect to the Wi-Fi devices through WPS configuration interface or by pushing the WPS button of your device. Note: For WPS configuration please refer to Wi-Fi Protected Setup section for more detail description. 8


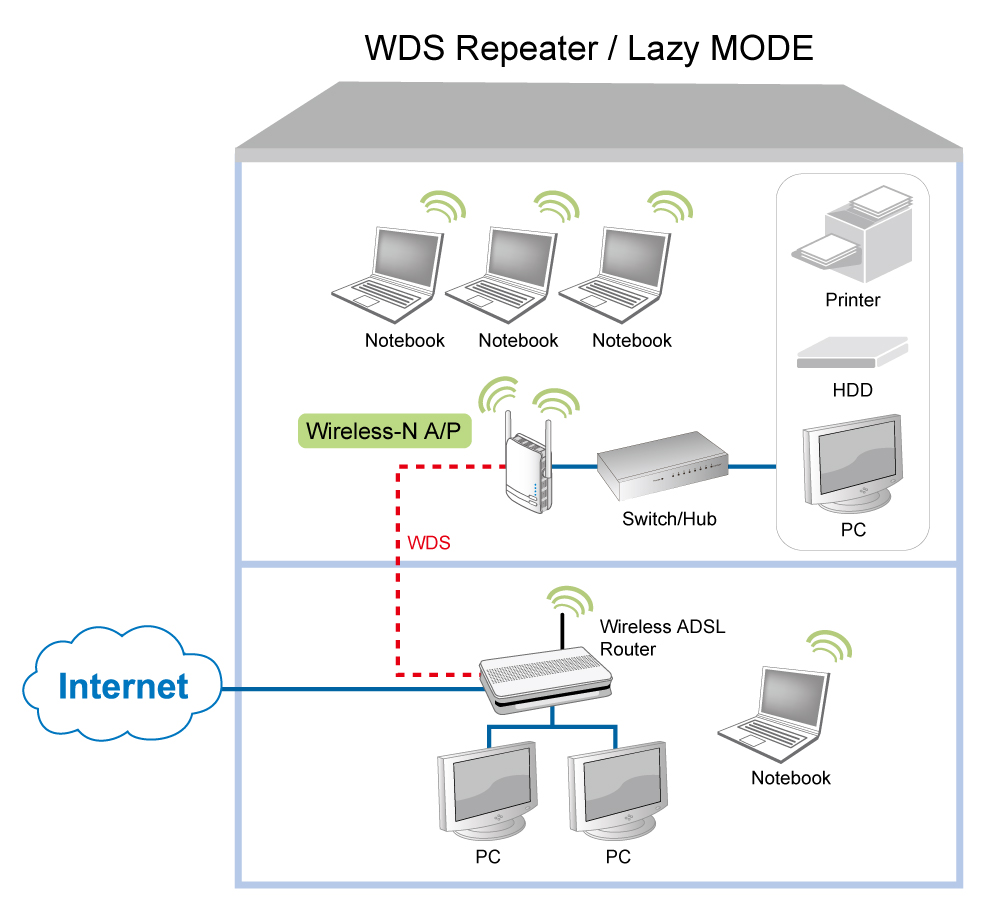
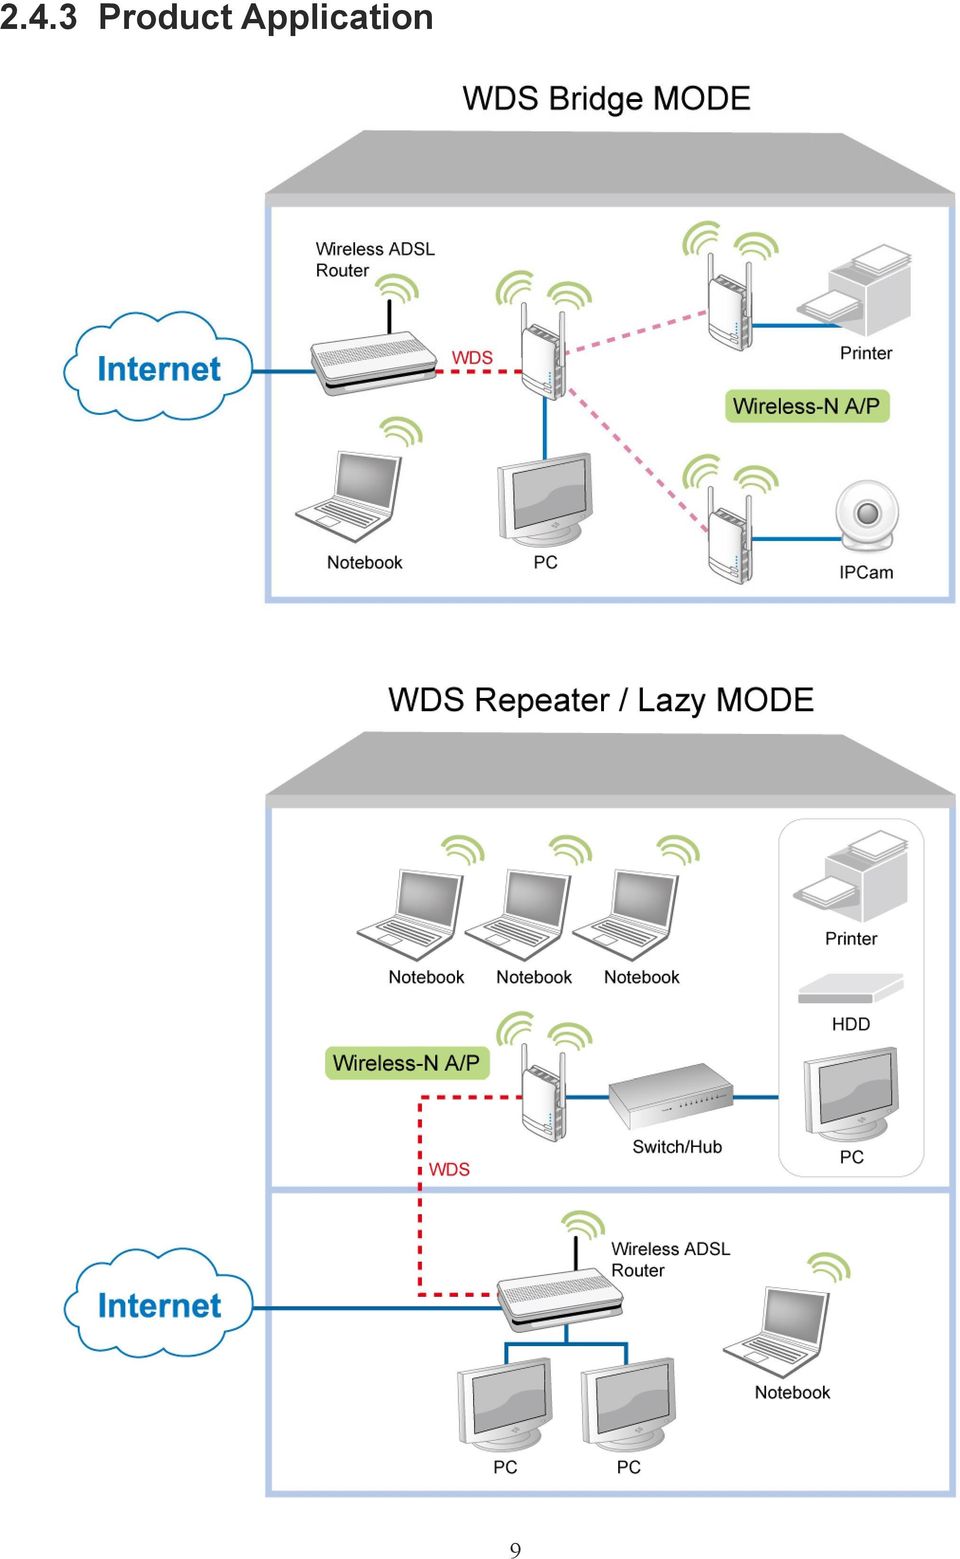
13 2.4.3 Product Application 9
14 Chapter 3: Basic Network Installation The Ethernet Access Point can be configured through your web browser. A web browser is included as a standard application in the following operating systems: Linux, Mac OS, Windows 98/NT/2000/ XP/Me/Vista/7, etc. The product provides an easy and user-friendly interface for configuration. Please check your PC network components. The TCP/IP protocol stack and Ethernet network adapter must be installed. If not, please refer to your Windows-related or other operating system manuals. There are ways to connect the device, either through an external repeater hub or connect directly to your PCs. However, make sure that your PCs have an Ethernet interface installed properly prior to connecting the device. You ought to configure your PCs to obtain an IP address through a fixed IP address that must be in the same subnet as the device. The default IP address of the device is and the subnet mask is (i.e. any attached PC must be in the same subnet, and have an IP address in the range of to ). If you encounter any problem accessing the Ethernet Access Point web interface it is advisable to uninstall your firewall program on your PCs, as they can cause problems accessing the IP address of the device. Users should make their own decisions on what is best to protect their network. Please follow the following steps to configure your PC network environment. 10


15 3.1 Network Configuration Configuring PC in Windows 7 1. Go to Start. Click on Control Panel. 2. Then click on Network and Internet. 3. When the Network and Sharing Center window pops up, select and click on Change adapter settings on the left window panel. 4. Select the Local Area Connection, and right click the icon to select Properties. 11

16 5. Select Internet Protocol Version 4 (TCP/IPv4) then click Properties. 6. In the TCP/IPv4 properties window, click Use the following IP address and Use the following DNS server address radio buttons. Then click OK to exit the setting. 7. Click OK again in the Local Area Connection Properties window to apply the new configuration. 12

17 3.1.2 Configuring PC in Windows Vista 1. Go to Start. Click on Network. 2. Then click on Network and Sharing Center at the top bar. 3. When the Network and Sharing Center window pops up, select and click on Manage network connections on the left window column. 4. Select the Local Area Connection, and right click the icon to select Properties. 13


18 5. Select Internet Protocol Version 4 (TCP/IPv4) then click Properties. 6. In the TCP/IPv4 properties window, click Use the following IP address and Use the following DNS server address radio buttons. Then click OK to exit the setting. 7. Click OK again in the Local Area Connection Properties window to apply the new configuration. 14

 and click Properties. 5.")
19 3.1.3 Configuring PC in Windows XP 1. Go to Start > Control Panel (in Classic View). In the Control Panel, double-click on Network Connections 2. Double-click Local Area Connection. 3. In the Local Area Connection Status window, click Properties. 4. Select Internet Protocol (TCP/IP) and click Properties. 5. Click Use the following IP address and Use the following DNS server address radio buttons. 6. Click OK to finish the configuration. 15
 and click Properties. 5.")
20 3.1.4 Configuring PC in Windows Go to Start > Settings > Control Panel. In the Control Panel, double-click on Network and Dial-up Connections. 2. Double-click Local Area Connection. 3. In the Local Area Connection Status window click Properties. 4. Select Internet Protocol (TCP/IP) and click Properties. 5. Click Use the following IP address and Use the following DNS server address radio buttons. 6. Click OK to finish the configuration. 16
 and click Properties. 5.")
 in your PC. 3. Click Specify an IP address radio button. 4.")
21 3.1.5 Configuring PC in Windows 95/98/Me 1. Go to Start > Settings > Control Panel. In the Control Panel, double-click on Network and choose the Configuration tab. 2. Select TCP/IP > NE2000 Compatible, or the name of your Network Interface Card (NIC) in your PC. 3. Click Specify an IP address radio button. 4. Click OK to finish the configuration. 17


22 3.1.6 Configuring PC in Windows NT Go to Start > Settings > Control Panel. In the Control Panel, double-click on Network and choose the Protocols tab. 2. Select TCP/IP Protocol and click Properties. 3. Click Specify an IP address radio button. 4. Click OK to finish the configuration. 18
23 3.2 Factory Default Settings Before configuring your adapter, you need to know the following default settings. Web Interface (Username and Password) Username: admin Password: admin The default username and password are admin and admin respectively. Device LAN IP settings IP Address: Subnet Mask:


24 3.3 Internet Access Configuration To configure this device for internet access, you must have IE 5.0 / Netscape 4.5 or above installed on your computer. There is basically one way to configure your device before you are able to connect to the internet: Web Interface. Configuration of this method will be discussed in detail in the following section Configuring with your Web Browser Open your web browser, enter the IP address of your Ethernet Adapter which the default is , and click Go. A user name and password window prompt will appear. The default username and password are admin and admin. Congratulations! You are now successfully logon to the Wireless-N Ethernet Access Point! If the authentication succeeds, the homepage will appear on the screen. 20
25 Chapter 4: Configuration Once you have logged on to your adapter GUI via your web browser, you can begin to configure the device according to your needs. On the configuration homepage, the left navigation pane provides the links to different setup pages. They are: Status (Status / Statistic) LAN Setting (LAN Setup) Wireless Settings (Basic / Security / Advanced / WPS / AP Client / Station List) Administration (Management / Firmware Upgrade / Settings Management / Restart) Each of these setup pages will be discussed in detail in the following sections. 21
26 4.1 Status Status System Information Model Name: Displays the model name. Firmware Version: Displays the firmware version for this device. System Up Time: Records system up-time. Home URL: Displays the Internet address for vendor. Click to open the home page LAN LAN IP Address: The current IP on this device. LAN Netmask: The current subnet mask on this device. Note: Click the LAN IP Address or LAN Netmask link to change the settings. LAN MAC Address: The MAC address of the device. Wireless LAN WLAN Service: Status of the WLAN connection. SSID1: A unique name used to identify the wireless LAN to which a user wants to connect. Channel: The current status in WAN interface. Note: Click the WLAN Service, SSID or Channel link to change the settings. 22
27 4.1.2 Statistic Memory Memory total: Displays the total memory size of the device (in bytes). Memory left: Displays the amount of memory left (in bytes). LAN LAN Rx packets: Displays the number of received packets. LAN Rx bytes: Displays the received packet traffic (in bytes). LAN Tx packets: Displays the number of transfered packets. LAN Tx bytes: Displays the transfered packet traffic (in bytes) 23

28 4.2 LAN Setting LAN IP Address: Enter the preferred IP address. Default is Subnet Mask: Enter the preferred subnet mask. Default is LAN2: This function enables the creation of multiple virtual IP interfaces for this device. It helps to connect two or more local networks to the ISP or remote node. In this case, an internal device is not required. Default setting is Disable. If you want to active IP Alias function, please select Enable. LAN2 IP Address: Specify an IP address for this virtual interface. LAN2 Subnet Mask: Specify a subnet mask for this virtual interface. UPNP: UPnP offers peer-to-peer network connectivity for PCs and other network devices, along with the feature to control data transfer between devices. Default is Disable. Enable: Select to activate the device s UPnP function. Disable: Select to inactivate the device s UPnP function. Click Apply to save the changes or Cancel to recover the default setting. 24
29 4.3 Wireless Settings When you click this item, the column will expand to display the sub-items that will allow you to configure your wireless settings. You will see the following five items: Basic Security Advanced WPS AP Client Station List The function of each configuration sub-item is described in the following sections. 25

30 4.3.1 Basic-Basic Wireless Settings Wireless Network Wireless Service: Default setting is Enable. If you do not have any wireless, select Disable. Wireless Mode: The default setting is 11b+g+n mixed mode. You can adjust the wireless mode depend on your system or enviornment. SSID1: The SSID is the unique name of a wireless access point (AP) used to distinguish one from another. For the security purpose, you should change the default SSID to a unique ID name that is difficult to guess. Make sure your wireless clients exactly have the SSID as the device in order to connect to your network. Note: It is case sensitive and can be up to 32 characters. 26
31 Multiple SSID Service: You can select Disable,or 1, 2, 3 Extension SSID to be available at the same time. There are totaly four SSID extensions for you to set. Multiple SSID isolation: If you enable this function, each SSID can not forward packet each other. Client Isolation: The selection of SSIDs will depend on the Multiple SSID Service. Select each SSID, ranging from SSID1, SSID2, SSID3 and SSID4 and set their individual configurations. If you tick the check box, the wireless client that connected the SSID can not forward the packet each other. Hide SSID: If you want to hide your SSID, you can enable it. The defult setting is disable. Country Region: There are seven Country Regions to be chosen, including North America, Europe, France, etc. The Channel Frequency will be different based on this setting. Channel (Frequency): Select the wireless channel ID that you would like to use. Note: Wireless performance may degrade if the selected channel ID is already being occupied by other AP(s). Channel Bandwidth: Select either 20 MHz or 20/40 MHz for the channel bandwidth. The higher the bandwidth the better the performance will be. BSSID: Displays the MAC address of the device. 27
32 Wireless Distribution System (WDS) It is a wireless access point mode that enables wireless link and communication with other access points. It is easy to install simply by defining the peer s MAC address of the connected AP. WDS takes advantage of the cost saving and flexibility which no extra wireless client device is required to bridge between two access points and extending an existing wired or wireless infrastructure network to create a larger network. WDS Mode: Default setting is Disable. You can enable the WDS functionality: Lazy Mode, Bridge Mode and Repeater Mode. Lazy Mode Lazy Mode: Select "Lazy Mode" from the WDS Mode drop-down menu. In this case, the device can be functioned as AP and Bridge. The AP MAC Address of WDS peers can be auto-detected. Please note that you are not allowed to set each AP to Lazy mode. It indicates that there is at least one AP can not be set in Lazy mode and filled the AP MAC address list. Wireless Security: This filed will display the encryption type in which you will set in WEP Keys fields (Please resfer to Wireless Security/Encryption Settings section after setting up the WDS Mode). 28

33 Bridge Mode Bridge Mode: Select Bridge Mode from the WDS Mode drop-down menu. In this case, AP will not send beacon out and deal with probe request packets, so that wireless client will not be possible to connect with this device. The device can use complete bandwidth of WDS connection. AP MAC Address: AP MAC Addresses are displayed in WDS Bridge and Repeater Mode. When Pressing WPS button, other WDS AP MAC Address(es) will be automatically detected and displayed on this section. There are totally four MAC Adresses can be detected at one time. It is important that all of the AP's channel must be the same in WDS to acknowledge and communicate with each other. Note: Please note that the AP MAC address can not duplicate the AP Client. Repeater Mode Repeater Mode: Select Repeater Mode from the WDS Mode drop-down menu. In this case, The packets can be forwarded to other AP(s) via WDS connections. Here, AP functions similarly as that in Lazy Mode. When Pressing WPS button, other WDS AP MAC Address(es) will be automatically detected and displayed on this section. There are totally four MAC Adresses can be detected at one time. The Repeater Mode can establish the connection with other AP(s), and the wireless client(s) can be connected the device too. 29

34 4.3.2 Security-Wireless Security/Encryption Settings Select SSID SSID choice: Select the SSID which you want to configure from the SSID list. SSID1: TW-525 Security Mode: You can disable or enable the wireless security function using WEP or WPA for wireless network protection. The default mode of wireless security is disabled. Please refer to the Security Mode section for detail descriptions (p. 31). Wireless MAC Address Filter Table (The maximum item is 64) Rule: Select from the drop-down menu to choose whether the entered MAC Address should be allowed to pass (Allow) or to be blocked (Reject). You can also disable this function. Add a station MAC address: Enter the MAC address of the wireless client. Then Click the Add button to add this MAC address. Then, click "Apply" to save the settings. Note: When the Rule is selected as Allow, all the MAC addresses you entered in the Add a station MAC address field will be passed; when the Policy is selected as Reject, all the MAC addresses you entered in the Add a station MAC address field will be blocked. 30

35 Secuirty Mode There are six Security Modes to be selected: WEP OPEN, WEP SHARED, WEP AUTO, WPA-PSK, WPA2-PSK, WPA-PSK/WPA2-PSK mixed mode. WEP OPEN / WEP SHARED / WEP AUTO Security Mode: Select WEP OPEN, WEP SHARED or WEP AUTO from the drop-down menu. Encryption Type: Only be available in WEP SHARED mode. You can select WEP or None. WEP Default Key (1~4): Select the encryption key ID. WEP Keys (1~4): Enter the key to encrypt wireless data. To allow encrypted data transmission, the WEP Encryption Key values on all wireless stations must be the same as the device. There are four keys for your selection. The input format is in Hex or ASCII style. You can type 5 and 13 ASCII character required for 64bit and 128bit WEP key or 10 and 26 Hex codes required for 64bit and 128bit WEP key respectively. 31
 WPA Algorithms: There are 3 types of the TKIP, AES & TKIP/AES mix mode (not available in WPA-PSK mode).")
36 WPA-PSK / WPA2-PSK / WPA-PSK/WPA2-PSK mix mode WPA Security Mode: Select WPA-PSK, WPA2-PSK or WPA-PSK/WPA2-PSK mix mode from the drop-down menu. The encryption key should be entered in PSK (Pre-Shared Key) WPA Algorithms: There are 3 types of the TKIP, AES & TKIP/AES mix mode (not available in WPA-PSK mode). TKIP / AES: Enter the encryption key (8~63 ASCII characters or 64 Hex characters). Pass Phrase: Enter a pass phrase to access the network. It can be a password like or a pass phrase, from 8 to 63 case-sensitive characters. Key Renewal Interval: The period of renewal time (in seconds) for changing the security key automatically between wireless client and Access Point (AP). Default value is 3600 seconds. 32
37 4.3.3 Advanced-Advanced Wireless Settings Advanced Settings Tx Power: Tx Power measurement enhances the wireless transmission signal strength. You can adjust this power level from minimum (0) to maximum (100). Default is 100. Tx Burst: This feature is used to activate the transmitted time slot to increase transmission throughput. Default is Enable. Wi-Fi Multimedia WMM Capable: This feature is used to control the prioritization of traffic according to 4 Access categories: Voice, Video, Best Effort and Background. Default is Enable. APSD Capable: Automatic Power Save Delivery (APSD) is an efficient power management mechanism that can help to consume less power and is very useful for phones that support VoIP. You can select enable or disable of this feature. Default is Disable. IGMP Snooping IGMP Snooping Service: IGMP refers to Internet Group Management Protocol. IGMP Snooping Service manages the wireless transmission of any incoming IGMP multicast packet groups between the wireless station and the AP. Default is Enable. The multicast traffic will be forwarded to the links that belong to milticast groups. 33
38 4.3.4 WPS-Wi-Fi Protected Setup WPS feature is designed to ease security setup and enabled WiFi networks in small offices or home. It helps you to set a network and enable security by entering a PIN or pushing the WPS button. WPS Config WPS Service: Default setting is Disable. If you want to activate this function, please select Enable and click Apply to confirm the setting. WPS mode: There are two methods to connect the network via WPS between AP and Stations: PIN code or PBC. PIN: Select PIN (Personal Identification Number) mode to connect to the device.when PIN mode is selected, it allows you to enter the PIN code or select Enrollee to use the default PIN code ( ) which the device uses to authenticate other WPS-enabled wireless devices. PBC: Select PBC (Push Button Communication) mode to connect to the device. Note: You can enable WPS PBC mode through WPS configuration interface as above or by pushing the WPS button of your Wall Plug Ethernet Access Point for more than 2 seconds and release it. The WPS will establish the wireless connection automatically after the wireless station also start WPS PBC process. Click Apply to save the change. 34

39 WPS Summary WPS Current Status: Displays the WPS status. WPS Configured: Displays the current WPS configuration status WPS SSID: Displays the WPS network name. WPS Authentication Mode: Displays the authentication mode for WPS. WPS Encryption Type: Displays the encryption type for WPS. WPS Default Key Index: Displays the Default Key Index. WPS Key(ASCII): Displays the WPS key (ASCII characters). AP PIN: Displays the Access Point's PIN number. 35

40 4.3.5 AP Client The AP Client provides the new function of wireless client for AP. It not only enables one AP to connect to another one within its wireless coverage but keeps its original AP function at the same time. The use of AP client is more convenient than that of WDS for AP connections. Just choose the specified AP which you want to connect to in the AP list, two APs can be connected. Wireless AP List In the AP list,you can see the channel, SSID, MAC Address, Security, Signal and Wireless Mode of the searched working APs in the neighborhood. Click the AP Selection radio button to select the specified AP you want to connect.if the AP selected have security, you need to provide the same security key to build a safety connection. It should be noted that the channel will be changed as the same as the AP selected after pressing Apply button to enable AP Client Service. AP Client Service Click Eanble button If you want to activate the AP Client Service.The default setting is disable. AP Selected: This field displays the AP you select in the AP Selection radio button. It shows the Channel, SSID, MAC Address, Security and Wireless Mode. You should key in the encryption 36
41 4.3.6 Station List The Station List displays the Wireless Network information. Wireless Network MAC Address: The MAC address of the wireless station which connected to the AP. Aid: The association ID. PSM: The power save mode. MimoPS: The MIMO power save mode. MIMO, Multiple-input and multiple-output, is the use of multiple antennas at both the transmitter and receiver to improve communication performance. MCS: The Modulation and Coding Scheme. BW: The wireless channel bandwidth. 37
42 4.4 Administration System Management Administrator Settings Account: You are allowed to set your own account name. Default is admin. Password: You are allowed to set your own password. Default is admin. Click Apply to save the change. 38

43 4.4.2 Firmware Upgrade Upgrading the newly improved version of the firmware allows you to use newly integrated features. Firmware Upgrade Location: Click Browse to select the new firmware image file you have downloaded to your PC. Once the correct file is selected, click Apply to update the firmware of your device. Note: DO NOT perform any actions while the firmware is being upgraded. The system will automatically reboot once the upgrade is complete. You will be returned to the Status page. 39

44 4.4.3 Settings Management These functions allow you to save a backup of the current configuration of your device to a defined location on your PC, to restore a previously saved configuration, and to restart your device with the factory default settings. This is useful if you wish to experiment with different settings, knowing that you have a backup in hand in case any mistakes occur. Export Settings Export Button: Click Export to open or save the backup file. Then, select the location to store the setting file on your PC. You may also change the name of the file if you wish to keep multiple backups. Note: It is advisable that you should backup your device configuration before making any changes to your device configuration. Import Settings Settings file location: Click Browse to select a file from your PC to restore. You should only restore your device setting that has been generated by the Backup function which is created with the current version of the device firmware. Settings files saved to your PC should not be manually edited in any way. Select the settings files you wish to use, and press Import to load the setting into the device. 40
45 4.4.4 Restart These functions allow you to restart the device to factory default setting after you have accidentally changed your settings that may result in undesirable outcome. Restart Restart device with Factory Default Settings or Current Settings to determine how the AP will restart. Click the Restart button to restart your device. The system will automatically reload Status page after reboot complete You may also reset your device to factory settings by holding the small Reset pinhole button for more than 2 seconds until the WLAN LED blinking and then release it. Note: Do NOT perform any actions while the device is being restarted. 41
46 Chapter 5: Troubleshooting If your device does not function properly, please refer to the suggested solutions provided in this chapter. If your problems persist or the suggested solutions do not meet your needs, please kindly contact your service provider for support. Problems with the device Problem I forgot my password. I can not access the LOGIN Web Configuration Interface. How do I reset the Ethernet Access Point? I can not start my Ethernet Access Point device. Suggested Solutions First, try entering the default user name and password: User Name: admin; Password: admin (Both the User Name and Password are case sensitive, so make sure that CAPS LOCK is not on when entering this information). If this fails, restore your device to its factory default settings and then enter the default user name and password. Ensure you are using the correct IP address. (Default is ) Check the hardware connections and ensure all LEDs are behaving as excepted. Ensure your computer s IP address is in the same subnet as the Ethernet Access Point device. Check to see if your browser has Java, JavaScript, or ActiveX enabled. If you are using Internet Explorer, click Refresh to ensure that the Java applet is loaded. Try closing the browser and re-launching it. Reset the device to factory defaults and try to acess the Ethernet Access Point with the default IP address. There are two ways to reset factory default settings: Hardware Reset To perform a hardware reset, hold down the reset button for more than 2 secondsand release it. Software Reset To initiate a software reset, select Administration > Restart, click Factory Default Setting radio box and press Apply button to initiate the restart process. Then wait for about 35 seconds. Note: Restoring to factory default will wipe out all the configurations you have previously set. You are strongly advised to create a backup copy of the settings before resetting the device. Please check your power supply is working. Wall Plug Ethernet Access Point device operates from the power supplied by the home electrical wiring and can not operate without a working power supply. 42
TW- WLAN 802.11ac SOVITTIMEN ASENNUSOHJE
 TW- WLAN 802.11ac SOVITTIMEN ASENNUSOHJE Copyright TeleWell Oy Tekniset tiedot: - - - - - - - Yhteensopiva IEEE 802.11b/g/n/ac - standardien kanssa Taajuusalueet 2.4 GHz ja 5 GHz Maksiminopeus: 300 Mbps
TW-524 WLAN AP 11n + PLA
 TW-524 WLAN AP 11n + PLA Sähköverkon sovitin WLAN-tukiasemalla TW-525 WLAN AP 11n WLAN-tukiasema Ohjekirja Heinäkuu 2009 Sisällysluettelo Kappale 1: Tuote 4 Tietoa laitteesta...4 Ominaisuudet...6 Tekniset
TW-LTE 4G/3G. USB-modeemi (USB 2.0)
") TW-LTE 4G/3G USB-modeemi (USB 2.0) Tiedonsiirtonopeus: 100 Mbps/50 Mbps LTE: 1800/2100/2600 MHz GSM/GPRS/EDGE: 850/900/1800/1900 MHz UMTS: 900/2100 MHz Pikaohje (Finnish) CE Käyttöönotto- ohje SIM- kortin
TW-LTE 4G/3G USB-modeemi (USB 2.0) Tiedonsiirtonopeus: 100 Mbps/50 Mbps LTE: 1800/2100/2600 MHz GSM/GPRS/EDGE: 850/900/1800/1900 MHz UMTS: 900/2100 MHz Pikaohje (Finnish) CE Käyttöönotto- ohje SIM- kortin
TW-WLAN 802.11g/n MIMO USB-sovitin Asennusohje
 TW-WLAN 802.11g/n MIMO USB-sovitin Asennusohje CE Copyright Telewell Oy Esittely TW-WLAN USB-sovitin on ulkoinen Wlan-sovitin USBväylään. Ominaisuudet Yhteensopiva sekä IEEE 802.11b, 802.11g, että 802.11n
TW- EAV510 ketjutustoiminto (WDS): Kaksi TW- EAV510 laitetta
: Kaksi TW- EAV510 laitetta") TW- EAV510 ketjutustoiminto (WDS): Kaksi TW- EAV510 laitetta WDS- VERKON RAKENTAMINEN OSA 1: JOHDANTO WDS- tekniikalla voidaan jatkaa langatonta verkkoa käyttämällä tukiasemia siltana, jolloin verkkoa
TW- EAV510 ketjutustoiminto (WDS): Kaksi TW- EAV510 laitetta WDS- VERKON RAKENTAMINEN OSA 1: JOHDANTO WDS- tekniikalla voidaan jatkaa langatonta verkkoa käyttämällä tukiasemia siltana, jolloin verkkoa
TW-WLAN 802.11g/n MIMO PCI-sovitin Asennusohje
 TW-WLAN 802.11g/n MIMO PCI-sovitin Asennusohje CE Copyright Telewell Oy Esittely TW-WLAN PCI-sovitin on ulkoinen Wlan-sovitin PCIväylään. Ominaisuudet Yhteensopiva sekä IEEE 802.11b, 802.11g, että 802.11n
TeleWell TW-EA711 ADSL modeemi & reititin ja palomuuri. Pikaohje
 TeleWell TW-EA711 ADSL modeemi & reititin ja palomuuri Pikaohje Pikaohje Myyntipaketin sisältö 1. TeleWell TW-EA711 ADSL modeemi & palomuuri 2. AC-DC sähköverkkomuuntaja 3. RJ-11 puhelinjohto ja suomalainen
TW- EAV510 JA TW- LTE REITITIN: WDS- VERKKO
 TW- EAV510 JA TW- LTE REITITIN: WDS- VERKKO Oletus konfiguroinnissa on, että laitteet ovat tehdasasetuksilla WDS- verkko luodaan 2.4G tukiasemien välillä Laite 1 (TW- EAV510 tai TW- EAV510 AC): - Tähän
Network Video Recorder. Pika-asennusohje
 Network Video Recorder Pika-asennusohje 1 Aloitus Paketti sisältää Tarkasta paketin sisältö huolellisesti. Paketin tulisi sisältää seuraavat tarvikkeet. Jos jokin osista puuttuu tai on vahingoittunut,
TeleWell TW-PLA522. Ethernet-sovitin Sähköverkkoon. Copyright TeleWell Oy
 TeleWell TW-PLA522 Ethernet-sovitin Sähköverkkoon Copyright TeleWell Oy 1. Laitteen esittely TW-PLA522-sovittimen avulla voidaan muodostaa langallinen lähiverkko ilman erillisiä kaapelointeja liittämällä
TW- EAV510 v2: WDS- TOIMINTO TW- EAV510 V2 LAITTEEN ja TW- LTE REITITTIMEN VÄLILLÄ. Oletus konfiguroinnissa on, että laitteet ovat tehdasasetuksilla
 TW- EAV510 v2: WDS- TOIMINTO TW- EAV510 V2 LAITTEEN ja TW- LTE REITITTIMEN VÄLILLÄ Oletus konfiguroinnissa on, että laitteet ovat tehdasasetuksilla Laite 1 TW- EAV510 v2: - Tähän laitteeseen tulee ulkoverkon
You can check above like this: Start->Control Panel->Programs->find if Microsoft Lync or Microsoft Lync Attendeed is listed
 Online Meeting Guest Online Meeting for Guest Participant Lync Attendee Installation Online kokous vierailevalle osallistujalle Lync Attendee Asennus www.ruukki.com Overview Before you can join to Ruukki
TW- LTE 4G/3G. USB- sovitin (USB 2.0)
") TW- LTE 4G/3G USB- sovitin (USB 2.0) Tiedonsiirtonopeus: 100 Mbps/50 Mbps LTE: 800/1800/2600 MHz GSM/GPRS/EDGE: 850/900/1800/1900 MHz UMTS: 900/2100 MHz Pikaohje (Finnish) CE Käyttöönotto- ohje SIM- kortin
TW- LTE 4G/3G USB- sovitin (USB 2.0) Tiedonsiirtonopeus: 100 Mbps/50 Mbps LTE: 800/1800/2600 MHz GSM/GPRS/EDGE: 850/900/1800/1900 MHz UMTS: 900/2100 MHz Pikaohje (Finnish) CE Käyttöönotto- ohje SIM- kortin
TW- EAV510 v2: WDS- TOIMINTO KAHDEN TW- EAV510 V2 LAITTEEN VÄLILLÄ
 TWEAV510 v2: WDSTOIMINTO KAHDEN TWEAV510 V2 LAITTEEN VÄLILLÄ Alla kaksi vaihtoehtoista ohjetta WDSverkon luomiseksi Ohje 1: WDSyhteys käyttää WPAsalausta. Tässä ohjeessa WDSyhteys toimii vain, kun tukiasema
VALOKUITULIITTYMÄN PÄÄTELAITE KÄYTTÖOHJE CTS FWR5-3105
 VALOKUITULIITTYMÄN PÄÄTELAITE KÄYTTÖOHJE CTS FWR5-3105 SISÄLLYS 1 JOHDANTO... 2 2 MERKKIVALOT... 3 3 TAKAPANEELIN KUITULIITÄNTÄ... 4 4 ETUPANEELIN LIITTIMET JA LED-PAINIKE... 4 5 OIKEAN SIVUPANEELIN RESET-PAINIKE...
FinFamily PostgreSQL installation ( ) FinFamily PostgreSQL
 FinFamily PostgreSQL") FinFamily PostgreSQL 1 Sisällys / Contents FinFamily PostgreSQL... 1 1. Asenna PostgreSQL tietokanta / Install PostgreSQL database... 3 1.1. PostgreSQL tietokannasta / About the PostgreSQL database...
FinFamily PostgreSQL 1 Sisällys / Contents FinFamily PostgreSQL... 1 1. Asenna PostgreSQL tietokanta / Install PostgreSQL database... 3 1.1. PostgreSQL tietokannasta / About the PostgreSQL database...
Option GlobeSurfer III pikakäyttöopas
 Option GlobeSurfer III pikakäyttöopas Laitteen ensimmäinen käyttöönotto 1. Aseta SIM-kortti laitteen pohjaan pyötätuen takana olevaan SIM-korttipaikkaan 2. Aseta mukana tullut ethernetkaapeli tietokoneen
D-Link DSL-504T ADSL Reitittimen Asennusohje ver. 1.0
 D-Link DSL-504T ADSL Reitittimen Asennusohje ver. 1.0 Tervetuloa D-Link ADSL reitittimen omistajaksi. Tämän ohjeen avulla saat reitittimesi helposti ja nopeasti toimimaan. Tämä ohje kannattaa lukea läpi
6. Langattoman modeemin asennus
 6.1 Langattoman modeemin asetukset Cisco EPC3825 Huom! Langattoman verkon käyttöön liittyviä asetuksia voi muuttaa vain sellaiselta tietokoneelta, joka on liitetty laitteeseen verkkokaapelilla. Nyt olet
Foscam kameran asennus ilman kytkintä/reititintä
 Foscam kameran asennus ilman kytkintä/reititintä IP laitteiden asennus tapahtuu oletusarvoisesti käyttäen verkkokaapelointia. Kaapeli kytketään kytkimeen tai suoraan reittimeen, josta laite saa IP -osoitetiedot,
TeleWell TW-LTE/4G/3G USB -modeemi Cat 4 150/50 Mbps
 TeleWell TW-LTE/4G/3G USB -modeemi Cat 4 150/50 Mbps Pikaohje Laite toimii Windows XP SP3, Windows 7,8,10 ja Mac OSx 10.5 tai käyttöjärjestelmissä, Linux tuki netistä ladattavilla ajureilla USB portin
WNR Pika-asennusohje ------------- pages 2-10 Quick Installation Guide ---- pages 11-20 Web Configuration Guide --- pages 21 ->
 WNR Pika-asennusohje ------------- pages 2-10 Quick Installation Guide ---- pages 11-20 Web Configuration Guide --- pages 21 -> Pika-asennusohje Pakkaus sisältää: - WNR toistin - Asennusohje Liittimet
D-Link DSL-G604T ADSL Reitittimen Asennusohje ver. 0.1
 D-Link DSL-G604T ADSL Reitittimen Asennusohje ver. 0.1 Tervetuloa D-Link ADSL reitittimen omistajaksi. Tämän ohjeen avulla saat reitittimesi helposti ja nopeasti toimimaan. Tämä ohje kannattaa lukea läpi
HAMINETTI WLAN LIITTYMÄN KÄYTTÖÖNOTTO-OHJE
 HAMINETTI WLAN LIITTYMÄN KÄYTTÖÖNOTTO-OHJE Vaihe 1, Client manager ohjelmiston ja sovittimen ajureiden asennus Asennuksen vaiheissa saattaa olla sovitin ja käyttöjärjestelmä kohtaisia eroja. Alla olevassa
Security server v6 installation requirements
 CSC Security server v6 installation requirements Security server version 6.4-0-201505291153 Pekka Muhonen 8/12/2015 Date Version Description 18.12.2014 0.1 Initial version 10.02.2015 0.2 Major changes
Sisällysluettelo Table of contents
 Sisällysluettelo Table of contents OTC:n Moodlen käyttöohje suomeksi... 1 Kirjautuminen Moodleen... 2 Ensimmäinen kirjautuminen Moodleen... 2 Salasanan vaihto... 2 Oma käyttäjäprofiili... 3 Työskentely
WL54AP2. Langattoman verkon laajennusohje WDS
 WL54AP2 Langattoman verkon laajennusohje WDS Näitä ohjeita seuraamalla saadaan langaton lähiverkko laajennettua yksinkertaisesti kahden tai useamman tukiaseman verkoksi. Tukiasemien välinen liikenne(wds)
GPRS-lisäpalvelu INTERNET-ASETUKSET
 GPRS-lisäpalvelu INTERNET-ASETUKSET GPRS-lisäpalvelu Internet-asetukset 2(22) Sisällysluettelo 1 INTERNET-ASETUKSET MICROSOFT WINDOWS 95/98... 3 1.1 MODEEMIN ASENNUS... 3 1.2 APN:N ASETTAMINEN... 3 1.3
Lab SBS3.FARM_Hyper-V - Navigating a SharePoint site
 Lab SBS3.FARM_Hyper-V - Navigating a SharePoint site Note! Before starting download and install a fresh version of OfficeProfessionalPlus_x64_en-us. The instructions are in the beginning of the exercise.
OFFICE 365 OPISKELIJOILLE
 OFFICE 365 OPISKELIJOILLE Table of Contents Articles... 3 Ohjeet Office 365 käyttöönottoon... 4 One Driveen tallennetun videon palauttaminen oppimisympäristön palautuskansioon... 5 Changing default language
KEMI-TORNIONLAAKSON KOULUTUSKUNTAYHTYMÄ LAPPIA LANGATON VIERAILIJAVERKKO 2(7) VERKKOYHTEYDEN MÄÄRITTELY WINDOWS XP:LLE (WINDOWS XP SP3)
 VERKKOYHTEYDEN MÄÄRITTELY WINDOWS XP:LLE (WINDOWS XP SP3)") LANGATON VIERAILIJAVERKKO 1(7) LANGATTOMAN VIERAILIJAVERKON KÄYTTÖ Kemi-Tornionlaakson koulutuskuntayhtymä Lappia tarjoaa vierailijoiden, opiskelijoiden ja henkilökunnan käyttöön suojatun langattoman verkon
LANGATON VIERAILIJAVERKKO 1(7) LANGATTOMAN VIERAILIJAVERKON KÄYTTÖ Kemi-Tornionlaakson koulutuskuntayhtymä Lappia tarjoaa vierailijoiden, opiskelijoiden ja henkilökunnan käyttöön suojatun langattoman verkon
Salasanan vaihto uuteen / How to change password
 Salasanan vaihto uuteen / How to change password Sisällys Salasanakäytäntö / Password policy... 2 Salasanan vaihto verkkosivulla / Change password on website... 3 Salasanan vaihto matkapuhelimella / Change
TW-LTE Wlan Käyttöohje. Copyright TeleWell Oy
 TW-LTE Wlan Käyttöohje Copyright TeleWell Oy 1 1. Kuvaus 1.1 Esittely Symbolien selitys 2 1. LCD-näyttö: Näyttää laitteen tilan 2. USB-liitin: Kiinnitä USB-kaapeli muuntajaan tai tietokoneeseen 3. Verkkoyhteydet:
Ohje Inteno EG101 modeemin ohjelmistopäivitykseen
 1 (8) Ohje Inteno EG101 modeemin ohjelmistopäivitykseen Tätä ohjetta tai sen osaa ei saa kopioida tai välittää missään muodossa ilman DNA Oy:n kirjallista suostumusta. Tavaramerkit ja Inteno ovat Inteno
FinFamily Installation and importing data (11.1.2016) FinFamily Asennus / Installation
 FinFamily Asennus / Installation") FinFamily Asennus / Installation 1 Sisällys / Contents FinFamily Asennus / Installation... 1 1. Asennus ja tietojen tuonti / Installation and importing data... 4 1.1. Asenna Java / Install Java... 4 1.2.
FinFamily Asennus / Installation 1 Sisällys / Contents FinFamily Asennus / Installation... 1 1. Asennus ja tietojen tuonti / Installation and importing data... 4 1.1. Asenna Java / Install Java... 4 1.2.
Kuitupäätelaitteen käyttöohje CTS FWRIII-3015
 1 JOHDANTO CTS FWRIII-3015 on valokuituyhteyksiin tarkoitettu päätelaite. Laite toimitetaan valmiiksi asennettuna ja kytkettynä. Voit käyttää internetiä joko langattomasti tai verkkokaapelin välityksellä.
KÄYTTÖ- JA ASENNUSOHJEET
 Käyttöohje 1 KÄYTTÖ- JA ASENNUSOHJEET KAAPELIMODEEMI CISCO EPC 3825 2 1. EPC3825 takapaneeli 1 2 3 4 5 6 7 1 POWER Virtaliitin 2 ON / OFF Virtakytkin 3 USB USB-liitäntä, vaihtoehtona Ethernet-liitännälle
Inteno FG101 R2 modeemi - päivitysohje
 1 (8) Inteno FG101 R2 modeemi - päivitysohje Tätä ohjetta tai sen osaa ei saa kopioida tai välittää missään muodossa ilman DNA Oy:n kirjallista suostumusta. Tavaramerkit ja Inteno ovat Inteno Broadband
Tekninen Tuki. Access Point asennusohje
 Access Point asennusohje Langattoman signaalin kantoaluetta on kätevä laajentaa Access Pointia ja ns. siltausta käyttämällä. Access Pointin pohjassa on WAN MAC Address (MAC osoite). Kirjoita tämä ylös
Siemens Speedstream 6515
 Siemens Speedstream 6515 Tämä ohje on laadittu helpottamaan uuden langattoman verkkosi käyttöönottoa ta. Ohjeen avulla saat luotua otettua käyttöön suotun langattoman verkkoyhteyden. Ohjeita laitteen lisäasetuksista
Security server v6 installation requirements
 CSC Security server v6 installation requirements Security server version 6.x. Version 0.2 Pekka Muhonen 2/10/2015 Date Version Description 18.12.2014 0.1 Initial version 10.02.2015 0.2 Major changes Contents
JOVISION IP-KAMERA Käyttöohje
 JOVISION IP-KAMERA Käyttöohje 1 Yleistä... 2 2 Kameran kytkeminen verkkoon... 2 2.1 Tietokoneella... 2 2.2 Älypuhelimella / tabletilla... 5 3 Salasanan vaihtaminen... 8 3.1 Salasanan vaihtaminen Windows
Lab A1.FARM_Hyper-V.v3
 Lab A1.FARM_Hyper-V Installing SharePoint Server 2013 SharePoint Server 2013 -asennus Scenario To install and configure SharePoint 2013 on a single server (Server 2012, AD and SQL Server), you will follow
TW-LTE/4G Wlan Käyttöohje
 TW-LTE/4G Wlan Käyttöohje Copyright TeleWell Oy 1. Kuvaus Akkukäyttöinen, kaikki verkkotekniikat (LTE/4G/3G/2G) kattava langaton verkkosovitin. Mahdollistaa LTE/4G/3G-yhteyden jakamisen usealle laitteelle
HUOM: Jos saat punaisen tekstin: Incorrect New Password. Kirjoitit salasanat eri tavalla. Yritä uudelleen
 Option GlobeSurfer III pikakäyttöopas Option GlobeSurfer III pikakäyttöopas... 1 Laitteen ensimmäinen käyttöönotto... 1 USB-tulostimen tai muistitikun jakaminen GlobeSurferin avulla... 3 dyndns (dynaaminen
Inteno DG201R1 / EG500(R1) modeemi - päivitysohje
 modeemi - päivitysohje") 1 (11) Inteno DG201R1 / EG500(R1) modeemi - päivitysohje Tätä ohjetta tai sen osaa ei saa kopioida tai välittää missään muodossa ilman DNA Oy:n kirjallista suostumusta. Tavaramerkit ja Inteno ovat Inteno
1 (11) Inteno DG201R1 / EG500(R1) modeemi - päivitysohje Tätä ohjetta tai sen osaa ei saa kopioida tai välittää missään muodossa ilman DNA Oy:n kirjallista suostumusta. Tavaramerkit ja Inteno ovat Inteno
WPS/Reset Hold i 5 sekunder for å automatisk konfigurere med WPS. Hold i 10 Seoncds å tilbakestille WiFi å faktor standardinnstillingene.
 WiFi Push the front button you get the status of the WiFi device Trykk foran knappen får du status for WiFi-enhet Työnnä eteen painiketta saat tilan WiFi laitteen When the button blinks blue the WiFi is
Microsoft Lync 2010 Attendee
 VYVI MEETING Lync Attendee 2010 Instruction 1 (15) Microsoft Lync 2010 Attendee Online meeting VYVI MEETING Lync Attendee 2010 Instruction 2 (15) Index 1 Microsoft LYNC 2010 Attendee... 3 2 Acquiring Lync
WLAN-laitteen asennusopas
 1 WLAN-laitteen asennusopas Ohje Inteno DG200 käyttöön WLAN-tukiasemana Tässä ohjeessa WLAN ja WIFI tarkoittavat samaa asiaa. 2 1. Myyntipaketin sisältö: -Inteno-modeemireititin (malli DG200) -Virtajohto
Choose Finland-Helsinki Valitse Finland-Helsinki
 Write down the Temporary Application ID. If you do not manage to complete the form you can continue where you stopped with this ID no. Muista Temporary Application ID. Jos et onnistu täyttää lomake loppuun
P-870HN-51b pikaopas. Oletusasetukset LAN-portti: LAN1~LAN4 IP-osoite: 192.168.1.1 Salasana: 1234
 P-870HN-51b pikaopas Oletusasetukset LAN-portti: LAN1~LAN4 IP-osoite: 192.168.1.1 Salasana: 1234 Esittely P-870HN on monipuolinen ja nykyaikainen VDSL2-reititin, jossa yhdistyvät nopea Internet-yhteys,
QUICK INSTALLATION GUIDE
 Wireless AC1200 Dual Band ACCess Point QUICK INSTALLATION GUIDE ASENNUSOPAS PAKKAUKSEN SISÄLTÖ Wireless AC1200 Dual Band Access Point Huomaa: Kaksi irrotettavaa antennia. 12 V, 1A ULKOINEN VIRTALÄHDE (SISÄLTÄÄ
ADSL Wireless N Router
 Asennusohje v.1.5 ADSL Wireless N Router 1 ETUPANEELIN MERKKIVALOT JA SIVUPANEELIN WLAN-PAINIKE PWR Vihreä Virta kytketty LAN 1,2,3 Vihreä Palaa: LAN-liitäntä on kytketty Vilkkuu: Laite lähettää/vastaanottaa
TeleWell TW-WLAN 802.11g/n USB
 TeleWell TW-WLAN 802.11g/n USB V2 Copyright Pikaohje Pakkauksen sisältö. 1 USB-sovittimen asennus Windows Xp.... 2 Windows Vista..... 6 Mac OS X..... 10 Wlan-tukiasemaan yhdistäminen Windows XP / Vista...
Langattoman verkon asennusopas NPD4759-00 FI
 Langattoman verkon asennusopas NPD4759-00 FI Verkon tarkistus Tarkista tietokoneesi verkkoasetukset ja valitse, mitä tehdään seuraavaksi. Noudata sitä verkkoympäristöä koskevia ohjeita, jossa verkkosi
ERICSSON HM410DP ASENNUSOHJE
 ERICSSON HM410DP ASENNUSOHJE 2 ERICSSON HM410DP ASENNUSOHJE... 3 KAAPELEIDEN KYTKENNÄT...3 ASETUKSET JA KONFIGUROINTI...4 TIETOKONEEN ASETUKSET...4 HM410:N KONFIGUROINTI...4 CONFIGURATION WIZARD... 6 Reititetty
Pikaopas. WiFi-kantamanlaajennin AC750. Malli EX3800
 Pikaopas WiFi-kantamanlaajennin AC750 Malli EX3800 Aloittaminen NETGEAR-WiFi-kantamanlaajennin laajentaa WiFi-verkkoa vahvistamalla nykyistä WiFi-signaalia ja parantamalla signaalin laatua pitkillä etäisyyksillä.
Tietoja langattoman lähiverkon käyttäjille
 Tietoja langattoman lähiverkon käyttäjille Русский Norsk Dansk Polski Magyar Čeština Svenska Lue tämä opas huolellisesti ennen laitteen käyttämistä ja pidä se tallessa. Tietoja langattoman lähiverkon käyttäjille
SSH Secure Shell & SSH File Transfer
 SSH Secure Shell & SSH File Transfer TIETOHALLINTO Janne Suvanto 1.9 2002 Sisällysluettelo Sisällysluettelo... 1 Yleistä... 2 SSH Secure Shell ohjelman asetukset... 3 POP3 tunnelin asetukset... 6 Yhteyden
CD-ROM-levy (sisältää ajurit, käsikirjan ja takuutodistuksen) Jos pakkauksesta puuttuu jokin yllämainituista, ota yhteys jälleenmyyjääsi.
 Jos pakkauksesta puuttuu jokin yllämainituista, ota yhteys jälleenmyyjääsi.") Tämä tuote toimii seuraavien käyttöjärjestelmien kanssa: Windows XP, Windows 2000, Windows Me, Windows 98SE DWL-G122 AirPlus G TM langaton USB-väyläinen verkkokortti Ennen kuin aloitat Sinulla täytyy olla
Tämä tuote toimii seuraavien käyttöjärjestelmien kanssa: Windows XP, Windows 2000, Windows Me, Windows 98SE DWL-G122 AirPlus G TM langaton USB-väyläinen verkkokortti Ennen kuin aloitat Sinulla täytyy olla
TW-WLAN 802.11g/n MIMO tukiasema / reititin Pikaohje
 TW-WLAN 802.11g/n MIMO tukiasema / reititin Pikaohje CE Copyright Telewell Oy 1. Esittely TW-WLAN tukiasema toimii Wlan-korttien tukiasemana Ethernet-verkkoon, ADSL-modeemin kanssa Internet-yhteyksille.
RR24APn Pika-asennusohje ------------- pages 2-9 Quick Installation Guide ---- pages 10-17 Web Configuration Guide --- pages 18 ->
 RR24APn Pika-asennusohje ------------- pages 2-9 Quick Installation Guide ---- pages 10-17 Web Configuration Guide --- pages 18 -> Pakkaus sisältää: Pika-asennusohje - RR24APn modeemi - RJ-45 kaapeli (Verkko)
Ohjeita tietokoneverkon käyttöön Latokartano-säätiön ja Metsäylioppilaiden asuntosäätiön asuntoloissa
 Ohjeita tietokoneverkon käyttöön Latokartano-säätiön ja Metsäylioppilaiden asuntosäätiön asuntoloissa 12.9.2011 Osa 1: Perustietoa verkosta Asuntoloiden sisäverkko on yhdistetty Internettiin NATtaavalla
1. Itse IP-kamera Ulkoiset kytkennät. IP kameran asennus v0.1. www.foscam.fi
 Tämä on yleis asennusopas Foscam ip-kameroille. Asennustapoja on useita, tämä lienee perinteisin. Toimii niin tavallisilla kuin P2P (Plug and Play) kameroilla. Pakkauksen sisältö: IP kamera Virtalähde
Verkkoasetusten ohjeet
 Älyvaraajan ohjaus 1 Älyvaraajan liittäminen kodin internet-reitittimeen... 2 1.1 Älyvaraajan liittäminen internetiin Ethernet-kaapelilla... 2 1.2 Älyvaraajan liittäminen internetiin langattomasti WPS
LW154 Wireless 150N Nano Adapter USB
 LW154 Wireless 150N Nano Adapter USB Huomautus! Toimitukseen sisältyvällä CD-ROM-levyllä on ohjattu asennustoiminto. Sen vaiheittaisten ohjeiden avulla sovitin on helppo asentaa. Wireless 150N Nano Adapter
CMP-WNUSB10 Langaton LAN USB 54 Mbps sovitin Käyttöohje SUOMI
 CMP-WNUSB10 Langaton LAN USB 54 Mbps sovitin Käyttöohje SUOMI Pakkauksen sisältö Luku 1: Johdanto 1.1 Tuotteen kuvaus 1.2 Perusominaisuudet 1.3 LED-merkkivalot Luku 2: Asennusohjeet 2.1 Softwaren asennus
Suomenkielinen versio
 LW311 Sweex langaton LAN-korttiväylän sovitin 300 Mbps Älä altista langatonta Sweex LAN-korttiväylän sovitinta 300 Mbps äärilämpötiloille. Älä aseta laitetta suoraan auringonvaloon tai sulje lämmityselementtejä.
3. Laajakaistaliittymän asetukset / Windows XP
 3. Laajakaistaliittymän asetukset / Windows XP 3.1 Laajakaistaliittymän asetusten tarkistus / Windows XP Seuraavien ohjeiden avulla tarkistat Windows XP -käyttöjärjestelmien asetukset ja luot Internet-yhteyden.
sivu 1 Verkkopäätteen muuttaminen Anvian uuteen tekniikkaan Ohje käy seuraaviin verkkopäätteisiin
 sivu 1 Verkkopäätteen muuttaminen Anvian uuteen tekniikkaan Ohje käy seuraaviin verkkopäätteisiin Zyxel Prestige 645 ISP Zyxel Prestige 645 WEB Zyxel Prestige 645R Zyxel Prestige 645 Ennen aloitusta tarkista,
TeleWell TW-EA510v3(c) & 3G/4G
 & 3G/4G") TeleWell TW-EA510v3(c) & 3G/4G ADSL 2+ 3G/4G modeemi reititin palomuuri ja WLAN- tukiasema ( 802.11b/g/n ) Pikaohje TeleWell TW-EA510v3 (c) ADSL 3G/4G Tutustu ohjeeseen huolella ja ota laite käyttöön pikaohjetta
TeleWell TW-EA510v3(c) & 3G/4G ADSL 2+ 3G/4G modeemi reititin palomuuri ja WLAN- tukiasema ( 802.11b/g/n ) Pikaohje TeleWell TW-EA510v3 (c) ADSL 3G/4G Tutustu ohjeeseen huolella ja ota laite käyttöön pikaohjetta
2 Aseta CD-ROM-levy CD-ROM-asemaan.
 Tuotetiedot A: Virta/linkkivalo (Linkki: Valo päällä/vilkkuu B: USB.0 -liitin C: Suojus Asennus Käynnistä Käynnistä PC. Ohjeissa kuvataan asennus Windows XP:lle Asennus Windows 98 SE:lle, Windows ME:lle
eduroamin käyttöohje Windows
 eduroamin käyttöohje eduroamissa liitytään verkkoon käyttäen 802.1x:ää. Tätä varten tarvitaan suplikantti ja tietokoneissa voidaan käyttää Windowsin tai Linuxin oma suplikanttia. eduroamiin voidaan myös
ZYXEL 645R MODEEMIN ASENTAMINEN SILLATTUUN SAUNALAHDEN ADSL- LIITTYMÄÄN
 ZYXEL 645R MODEEMIN ASENTAMINEN SILLATTUUN SAUNALAHDEN ADSL- LIITTYMÄÄN VERSIO 1.0 JIPPII GROUP OYJ 1 DOKUMENTIN TARKOITUS Tervetuloa Saunalahden ADSL-liittymän käyttöönottoon opastavaan ohjeeseen! Tämän
TEHTÄVÄ 3: * Tehtävä 1, ** Tehtävä 2
 TEHTÄVÄ 3: Symantec Endpoint Protection Manager, SEPM asetukset, asennustiedoston tekeminen, asennus asiakaskoneisiin ja niiden keskitetty hallinta Server 2008 käyttöjärjestelmässä Symantec Endpoint Protection
Asennus Windows XP ja Vista -käyttöjärjestelmiin
 LW056V2 Langaton Sweex LAN-korttiväyläsovitin 54 Mbps Johdanto Älä altista langatonta Sweex LAN-korttiväylän sovitinta 54 Mbps äärilämpötiloille. Älä aseta laitetta suoraan auringonvaloon tai sulje lämmityselementtejä.
TeleWell TW-EA716. ADSL modeemi Palomuuri 4 porttinen 10/100 Mbps kytkin. Pikaohje. Copyright Easytel Oy Finland
 TeleWell TW-EA716 ADSL modeemi Palomuuri 4 porttinen 10/100 Mbps kytkin Pikaohje Copyright Easytel Oy Finland Pikaohje Huomautus! Lisäohjeita on englanninkielisessä ohjekirjassa. Paketin sisältö 1. TW-EA716
DI-624+ AirPlus G+ 2.4GHz langaton
 Tämän tuotteen asennuksen voi suorittaa käyttäen mitä tahansa uudehkoa selainta, esim. Internet Explorer 6:ta tai Netscape Navigator 6.2.3:a. DI-624+ AirPlus G+ 2.4GHz langaton laajakaistareititin Ennen
TeleWell TW-VoIP-S2. VoIP-sovitin. Ohjekirja. Copyright TeleWell Oy
 TeleWell TW-VoIP-S2 VoIP-sovitin Ohjekirja Copyright TeleWell Oy 2 SISÄLTÖ 1. LAITTEEN KUVAUS...4 1.1. TIETOJA LAITTEESTA...4 1.2. MYYNTIPAKETIN SISÄLTÖ...4 2. LAITTEEN LIITÄNNÄT...5 3. LAITTEEN VALOT...6
RICOH Ri 100/RICOH Ri 100 Pink/ RICOH Ri 100 Green Lisätietoja langattoman LANin käyttäjille
 RICOH Ri 100/RICOH Ri 100 Pink/ RICOH Ri 100 Green Lisätietoja langattoman LANin käyttäjille Tämä opas antaa tietoa laitteen liittämisestä langattomaan verkkoon infrastruktuuritilassa. Infrastruktuuritilassa
Taloyhtiön laajakaistan käyttöohje, Tekniikka: Ethernet. Käyttöjärjestelmä: Windows Vista
 Taloyhtiön laajakaistan käyttöohje, Tekniikka: Ethernet Käyttöjärjestelmä: Windows Vista Espoon Taloyhtiöverkot, 2010 Tervetuloa Espoon Taloyhtiöverkkojen laajakaistan käyttäjäksi! Tässä ohjeessa opastetaan,
Lue tämä opas huolellisesti ennen laitteen käyttämistä ja pidä se tallessa. Tietoja langattoman lähiverkon käyttäjille
 Lue tämä opas huolellisesti ennen laitteen käyttämistä ja pidä se tallessa. Tietoja langattoman lähiverkon käyttäjille Tietoja langattoman lähiverkon käyttäjille Tässä oppaassa kerrotaan, miten laite yhdistetään
ZYXEL PRESTIGE 660H-61 ASENNUSOHJE
 1 ZYXEL PRESTIGE 660H-61 ASENNUSOHJE 2 ZYXEL PRESTIGE 660H-61 ASENNUSOHJE...3 KAAPELEIDEN KYTKENNÄT... 3 TIETOKONEEN ASETUKSET... 3 INTERNET-YHTEYDEN KÄYTTÖÖNOTTO... 4 MERKKIVALOT... 4 RESET... 4 LISÄTIEDOT
Demo 1: Ciscon BR-350 WLAN-silta
 Demo 1: Ciscon BR-350 WLAN-silta 1: Tehdasasetuksille Sillan IP-osoite, salasana ja muut asetukset voivat olla edellisen ryhmän jäljiltä tuntemattomat. Varminta on palauttaa tehdasasetukset antamalla :resetall
Pikaopas. WiFi-kantaman laajennin N300 Malli EX2700
 Pikaopas WiFi-kantaman laajennin N300 Malli EX2700 Aloittaminen NETGEAR-WiFi-kantamanlaajennin laajentaa WiFi-verkkoa vahvistamalla nykyistä WiFi-signaalia ja parantamalla signaalin laatua pitkillä etäisyyksillä.
ZyXEL VMG1312 ja 3G/4G-mokkulat
 ZyXEL VMG1312 ja 3G/4G-mokkulat VMG1312-modeemi voi käyttää USB-porttiin liitettyjä 3G/4G-tikkuja nettiyhteyden muodostamiseen ja jakaa tämän yhteyden kaikille kotiverkon käyttäjille. Tämän toiminnan käyttöön
Zyxel Prestige 660HW-61
 Zyxel Prestige 660HW-61 Tämä ohje on laadittu helpottamaan uuden langattoman verkkosi käyttöönottoa ta. Ohjeen avulla saat luotua otettua käyttöön suotun langattoman verkkoyhteyden. Ohjeita laitteen lisäasetuksista
Suomenkielinen versio. Johdanto. Näkymä modeemista edestä tai ylhäältä. MO251V2 Sweex langaton ADSL 2/2+ Modeemi/reititin 54 Mbps Liite A
 MO251V2 Sweex langaton ADSL 2/2+ Modeemi/reititin 54 Mbps Liite A Johdanto Älä altista Sweex langatonta ADSL 2/2+ modeemia/reititintä 54 Mbps Liite A äärilämpötiloille. Älä aseta laitetta suoraan auringonvaloon
The necessary product key can be found in the hand out given to you.
 205 Tietokoneet ja verkot: tietoturva 205 Computers and networks: data security Tehtävän yleinen osuus (1,5p) General information Yritys on hankkinut F-Secure Protection Service for Business-lisenssin.
Kytkentäopas. Tuetut käyttöjärjestelmät. Tulostimen asentaminen. Kytkentäopas
 Sivu 1/5 Kytkentäopas Tuetut käyttöjärjestelmät Software and Documentation -CD-levyltä voi asentaa tulostinohjelmiston seuraaviin käyttöjärjestelmiin: Windows 8 Windows 7 SP1 Windows 7 Windows Server 2008
Käyttöopas AE6000. Wireless Dual Band -USB-minisovitin AC580
 Käyttöopas AE6000 Wireless Dual Band -USB-minisovitin AC580 a Sisällys Tuotteen yleiskatsaus Ominaisuudet 1 Asennus Asennus 2 Langattoman verkon määrittäminen Wi-Fi-asetusten automaattinen määritys 3 Langattoman
PA500x2(b) Pika-asennusohje ------------- pages 2-6 Quick Installation Guide ---- pages 7-11 Utility Guide ------------------- pages 12 ->
 Pika-asennusohje ------------- pages 2-6 Quick Installation Guide ---- pages 7-11 Utility Guide ------------------- pages 12 ->") PA500x2(b) Pika-asennusohje ------------- pages 2-6 Quick Installation Guide ---- pages 7-11 Utility Guide ------------------- pages 12 -> Pakkaus sisältää: Pika-asennusohje - PA500x2(b) sovitin - 2x RJ-45
PA500x2(b) Pika-asennusohje ------------- pages 2-6 Quick Installation Guide ---- pages 7-11 Utility Guide ------------------- pages 12 -> Pakkaus sisältää: Pika-asennusohje - PA500x2(b) sovitin - 2x RJ-45
TeleWell TW-EA201. ADSL-modeemi
 TeleWell TW-EA201 ADSL-modeemi RFC 2684(1483) yhteyksille (sillattu ADSL-liittymä) 1 x 10/100 Mbps Ethernet-portti Laite toimii sillatuissa ADSL liittymissä automaattisesti seuraavilla VPI /VCI arvoilla
1 Kytke ADSL-kaapeli ADSL-linjaliitäntään I.
 Tuotetiedot A B C D E F G H I J K L M N O P A: Virtavalo B: LAN-portti -valo C: LAN-portti -valo D: LAN-portti -valo E: LAN-portti 4 -valo F: ADSL-datavalo G: ADSL-liitäntävalo H: Modeemin valmiusvalo
C470E9AC686C
 INVENTOR 17 VALUOSAN SUUNNITTELU http://help.autodesk.com/view/invntor/2017/enu/?guid=guid-b3cd4078-8480-41c3-9c88- C470E9AC686C About Mold Design in Inventor Mold Design provides integrated mold functionality
1 (22) LAAJAKAISTA ASENNUS- JA KÄYTTÖÖNOTTO-OPAS ADSL-, KAAPELIMODEEMI JA KUITUPÄÄTE
 LAAJAKAISTA ASENNUS- JA KÄYTTÖÖNOTTO-OPAS ADSL-, KAAPELIMODEEMI JA KUITUPÄÄTE") 1 (22) LAAJAKAISTA ASENNUS- JA KÄYTTÖÖNOTTO-OPAS ADSL-, KAAPELIMODEEMI JA KUITUPÄÄTE 2 (22) LAAJAKAISTA -ASENNUSOPAS Laajakaista Laajakaistaliittymän lisäksi tarvitaan verkkoyhteyttä tukeva tietokone.
1 (22) LAAJAKAISTA ASENNUS- JA KÄYTTÖÖNOTTO-OPAS ADSL-, KAAPELIMODEEMI JA KUITUPÄÄTE 2 (22) LAAJAKAISTA -ASENNUSOPAS Laajakaista Laajakaistaliittymän lisäksi tarvitaan verkkoyhteyttä tukeva tietokone.
LYTH-CONS CONSISTENCY TRANSMITTER
 LYTH-CONS CONSISTENCY TRANSMITTER LYTH-INSTRUMENT OY has generate new consistency transmitter with blade-system to meet high technical requirements in Pulp&Paper industries. Insurmountable advantages are
SpeechMike III sarjan sanelumikrofonien (mallit LFH3200 ja LFH3220) yhteensopivuus SpeechMagic Executive saneluohjelman kanssa
 yhteensopivuus SpeechMagic Executive saneluohjelman kanssa") SpeechMike III sarjan sanelumikrofonien (mallit LFH3200 ja LFH3220) yhteensopivuus SpeechMagic Executive saneluohjelman kanssa Jotta SpeechMike III sarjan sanelumikrofonia voidaan käyttää Executive saneluohjelmassa,
SpeechMike III sarjan sanelumikrofonien (mallit LFH3200 ja LFH3220) yhteensopivuus SpeechMagic Executive saneluohjelman kanssa Jotta SpeechMike III sarjan sanelumikrofonia voidaan käyttää Executive saneluohjelmassa,
Taloyhtiön laajakaistan käyttöohje, Tekniikka: HomePNA. Käyttöjärjestelmä: Windows Vista
 Taloyhtiön laajakaistan käyttöohje, Tekniikka: HomePNA Käyttöjärjestelmä: Windows Vista Espoon Taloyhtiöverkot, 2011 Tervetuloa Espoon Taloyhtiöverkkojen laajakaistan käyttäjäksi! Tässä ohjeessa opastetaan,
R6300v2 Älykäs Wi-Fi-reititin Asennusopas
 Tavaramerkit NETGEAR, NETGEAR-logo ja Connect with Innovation ovat NETGEAR Inc:n ja/tai sen tytäryhtiöiden tavaramerkkejä ja/tai rekisteröityjä tavaramerkkejä Yhdysvalloissa ja/tai muissa maissa. Tietoja