HF3650, HF3651, HF3653, HF3654
|
|
|
- Lotta Virtanen
- 6 vuotta sitten
- Katselukertoja:
Transkriptio

1 HF3650-HF3654_COVER_A5_sc_06627.pdf HF3650, HF3651, HF3653, HF /08/17 16:41
2
3 English 6 Dansk 21 Norsk 36 Suomi 51 Svenska 67
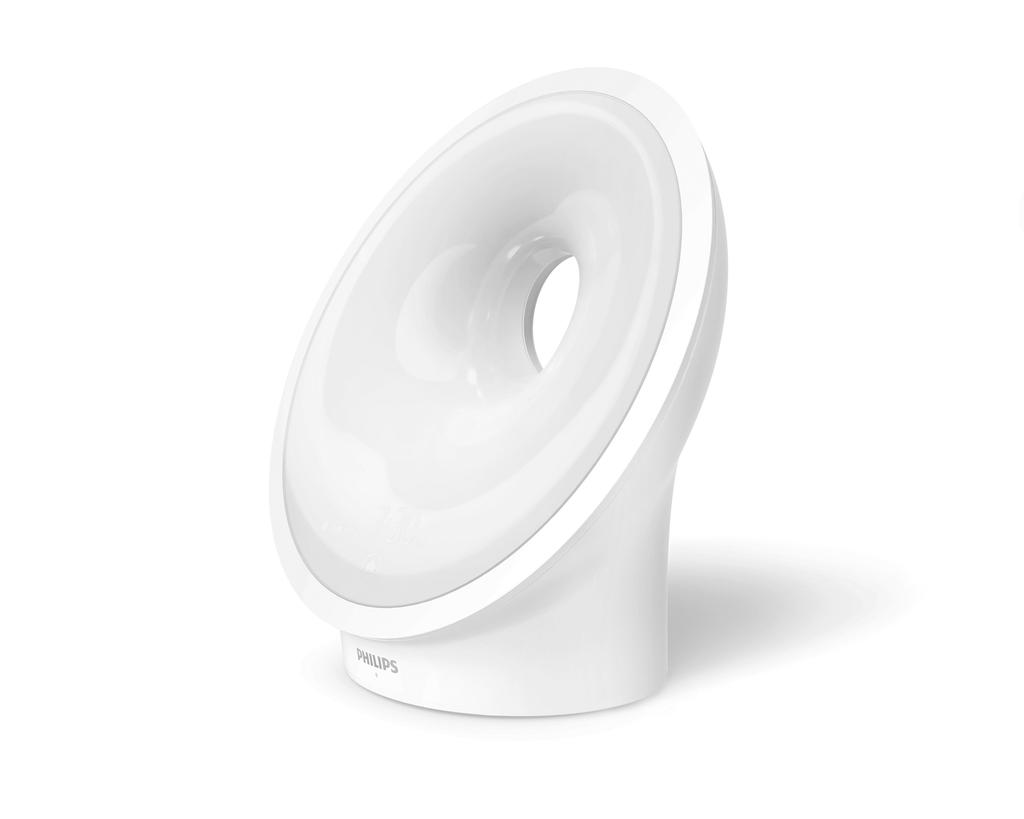
4 6 English Contents Introduction 6 General description 6 Intended use 7 The effects of the Sleep & Wake-Up Light 7 Important safety information 7 Safety and compliance 9 Electromagnetic fields (EMF) 9 Display icons 9 Navigating the menu 10 Set wake-up profiles 10 PowerBackUp+ 11 Snoozing 11 Turning the alarm off 11 Using the Sleep & Wake-Up Light as a bedside lamp 12 Midnight Light 12 Settings 12 Listening to radio* or your own music 14 Wind Down programs 15 Sunset Simulation 15 RelaxBreathe 15 Charging your mobile phone 16 Cleaning and storage 16 Recycling 17 Accessories and spare parts 17 Warranty and support 17 Troubleshooting 17 Specifications 19 Introduction The Philips Sleep & Wake-Up Light helps you wake up more pleasantly. If the Sunrise Simulation is active (default is 30 minutes), the light intensity of the lamp gradually increases to the set level and the light color changes from deep morning red to bright daylight. The light gently prepares your body for waking up at the set time. To make waking up an even more pleasant experience, you can use natural wake-up sounds or the FM radio* to wake up to. *HF3653 does not feature a radio. General description 1 Lamp housing 2 Display 3 USB charging port 4 Reset button 5 Radio antenna* 6 Adapter DC-inlet
5 English 7 7 Auxiliary (AUX) input 8 Speaker 9 Snooze/Midnight Light button 10 Adapter 11 Small plug *HF3653 does not feature a radio. Intended use The Philips Sleep & Wake-up Light is intended to give you a more natural and refreshed wake up and a relaxed feeling before falling asleep. This is not a general illumination product. The effects of the Sleep & Wake-Up Light The Philips Sleep & Wake-Up Light gently prepares your body for waking up during the last 5 to 60 minutes or last period of sleep, depending on the Sunrise Simulation time you set. In the early morning hours our eyes are more sensitive to light than when we are awake. During that period the relatively low light levels of a simulated natural sunrise prepare our body for waking up and getting alert. People who use the Sleep & Wake-Up Light wake up more easily, have a better overall mood in the morning and feel more energetic. Because the sensitivity to light differs per person, you can set the light intensity of your Sleep & Wake-Up Light to a level that matches your light sensitivity for an optimal start of the day. For more information about the Sleep & Wake-Up Light, see Important safety information Read this important information carefully before you use the appliance and save it for future reference. Danger - Water and electricity are a dangerous combination. Do not use this appliance in wet surroundings (e.g. in the bathroom or near a shower or swimming pool). - Keep the adapter dry. - Do not let water run into the appliance or spill water onto the appliance. - Do not immerse the appliance in water or rinse under the tap. - Do not place anything close to the appliance that could cause water or any other liquid to drip or splash onto the appliance. - This appliance is for indoor use only. - The adapter contains a transformer, which converts an unsafe Vac mains voltage to a safe 24Vdc low voltage. Do not cut off the adapter to replace it with another plug, as this causes a hazardous situation.
6 8 English Warning Caution General - Never use the appliance if the lamp housing is damaged, broken or missing. - If the adapter, cord or appliance has been damaged in any way, liquid has spilled or objects have fallen into and/or onto the appliance, the appliance has been exposed to rain or moisture, does not operate normally or has been dropped or damaged, it should not be operated. - If you feel uncomfortable at any point while using RelaxBreathe in the breathing exercise, just go back to breathing normally. - Only use the appliance in combination with the adapter supplied. - If the adapter (cord) is damaged, always have it replaced with one of the original type in order to avoid a hazard. - This appliance is not intended for use by persons (including children) with reduced physical, sensory or mental capabilities, or lack of experience and knowledge, unless they have been given supervision or instruction concerning use of the appliance by a person responsible for their safety. - Consult your doctor before you start using the appliance if you have suffered from or are suffering from depression. - Do not use this appliance as a means to reduce your hours of sleep. The purpose of this appliance is to help you wake up more easily. It does not diminish your need for sleep. - Check if the voltage indicated on the appliance corresponds to the local voltage before you connect the appliance. - Protect the power cord from being walked on or pinched, particularly at plugs, outlet and point where they exit from lamp. - Do not use the adapter in or near wall sockets that contain an electric air freshener to prevent irreparable damage to the adapter. - Do not drop the appliance on the floor, hit it hard or expose it to other heavy shocks - Place the appliance on a stable, level and non-slippery surface. - Do not impair the cooling of the appliance by covering the appliance with items such as blankets, curtains, clothes, papers, etc. - Do not use the appliance at room temperatures lower than 10 C or higher than 35 C. - The appliance has no on/off switch. To disconnect the appliance, remove the plug from the wall socket. The adapter must remain easily accessible at all times. - This appliance is only intended for household use, including similar use for instance in hotels - No naked flame sources, such as lighted candles, should be placed on the appliance. - If you often wake up too early or with a headache reduce the set light intensity level and/or the set Sunrise Simulation time.
7 English 9 - If you often wake up by the alarm sound, increase the set light intensity level or the set Sunrise Simulation time. - If you share a bedroom with someone else, this person may unintentionally wake up from the light of the appliance, even though this person is further removed from the appliance. This phenomenon is the result of differences in light sensitivity between people. - The power consumption of the appliance is lowest if no device is connected to the USB port and the lamp, radio and display are turned off. Safety and compliance This appliance meets the safety requirements in the EU for: - IEC 60598: Luminaires. - IEC 60065: Audio, Video and Similar Electronic Apparatus. - IEC 60950: Information technology equipment. - IEC 62471: Photobiological safety of lamps and lamp systems. Electromagnetic fields (EMF) - This Philips appliance complies with all applicable standards and regulations regarding exposure to electromagnetic fields. Display icons Wake-up profile Display off Audio feedback Unwind program Clock time Sunset Simulation Light intensity and light on/off RelaxBreathe Select your language Radio* Settings Natural sounds AUX socket Sound off
8 10 English Radio presets* Alarm Snooze/Midnight Light Breathing rhythms Display *HF3653 does not feature a radio. Navigating the menu On the display you can select and set the wake-up profile, bedside light, settings, sound (source) or the unwind program. Note: All your personalized settings and profiles will be permanently stored in the memory, they will not be erased by removing the adapter from the electrical outlet. You can change all settings at any time, the last setting will be stored. Note: If the display is blank, move your hand towards the lower part of the Sleep & Wake-up Light to show the display menu. You will see the menu icons. Set wake-up profiles In your wake-up profile you can set the time, the maximum light intensity and the type of wake-up sound you prefer. Note: Press and hold the alarm button for 4 seconds to deactivate all set alarms at once. Press and hold 4 seconds to activate the alarms again. Set wake-up profile You can set two different wake-up profiles. For each profile you can set the time, light intensity, wake-up curve duration, the type of sound and volume. Duration of the wake-up profile The default duration of the wake-up curve (brightness increase to the set maximum light intensity) is 30 minutes. The duration can be changed to your preference.
9 English 11 Light intensity of the wake-up profile The lamp of the Sleep & Wake-Up Light simulates a sunrise. Like a sunrise, the brightness of the lamp increases gradually. During this wake-up curve, the colors of the light changes from soft red to warm orange to bright yellow. You can choose one of the 25 light intensity levels. Note: The main display of the Sleep & Wake-Up Light shows if the alarm has been set. Type of sound You can choose between three options. Select one of the natural sounds, no sound or the FM radio.* *HF3653 does not feature a radio. PowerBackUp+ In the event of a power failure, all functions of the Sleep & Wake-up Light, including the display, do not work. However, the internal clock and a backup alarm remain active for at least 8 more hours. If during the power failure the set alarm time is due, a back-up alarm goes off generating a beeping sound for approximately 1 minute. Snoozing When the wake-up curve has ended (e.g. the set maximum light intensity is reached) and the alarm sound is playing, you can tap the top of the Sleep & Wake-Up Light to snooze. The lamp stays on, but the sound is muted. After 9 minutes, the alarm sound starts playing again. Note: The device automatically switches off (light and sound) 60 minutes after the alarm time or 60 minutes after the last snooze action. Turning the alarm off When the alarm goes off, you can turn off the alarm by pressing this button. If you turn off the alarm, the alarm profile is deactivated for that day.
10 12 English Using the Sleep & Wake-Up Light as a bedside lamp You can use the Sleep & Wake-Up Light as a bedside lamp. Press the bedside lamp button on the display to switch on the bedside lamp. Note: You can increase and decrease the brightness intensity. You can select a brightness between 1 (low) to 25 (high). The default brightness setting is 18. To switch it off press the cross button in the menu. Tip: When the light is on, you can also turn off the light with a single tap on top of the Sleep & Wake-Up Light. All active programs will stop. Set alarms are still active. Midnight Light If you wake up during the night, you can tap the top the Sleep & Wake-Up Light to activate a dim light. This dim, subtle orange light provides you with just enough light to find your way in the dark. Switch off the Midnight Light by tapping the top of the Sleep & Wake-Up Light again. Note: The Midnight Light cannot be activated directly when the main light is already on. In that case, first tap to de-activate the main light.second, tap to activate the Midnight Light. Settings In this menu you adjust the clock time, the audio feedback and the display brightness of the Sleep & Wake-Up Light. Note: Press and hold the settings button for 5 seconds to open a new menu, in which you can select DEMO mode (accelerated wake-up curve) or VERSION (firmware version of the appliance).
11 English 13 Time You can change the time and switch between 12 hour (AM/PM) and a 24 hour clock by clicking on the toggle button (12/24). Audio feedback Display When you press any menu button, you hear a click. If you do not want to hear clicks when you press a button, press this button to switch off the audio feedback. You hear one click as a confirmation. To activate, press this button again. You hear two clicks to confirm that the audio feedback is activated. Display brightness You can adjust the display contrast from level 1 to level 6. Choose a level that is optimal for you to see the display at night. The Sleep & Wake-Up Light automatically adjust the contrast level when the light in your bedroom becomes brighter. Display on/off You can switch off the display completely by pressing the display button, in case you do not want any light - including time indication - coming from the Sleep & Wake-Up Light. Normally, if you do not touch the display for some time in any menu, the display reverts to time and status indication only. When the display is off, no time indication is shown. Press the crossed-out icon to turn on the display again. Tip: If you want to check the time or select a function while the display is off, just place your hand near the display and it turns on for a few seconds.
12 14 English Listening to radio* or your own music Tip: When the radio or music is on, you can turn off the sound with a single tap on top of the Sleep & Wake-Up light. All active programs will stop. Set alarms are still active. Radio* You can listen to the FM radio with the Sleep & Wake-Up Light. If you have set the radio function in the setup wizard, it shows the selected radio station. You can manually change the radio station by selecting the FM frequency of another radio station. Tip: Make sure to unwind the antenna fully and move it around until you receive the best reception. You can preset 5 radio stations. First, select a radio station by setting the the FM frequency. Press and hold the double arrow button to automatically search for the next radio station. After setting a radio station, you can easily add another preset radio station by selecting the toggle button. With this process, you can preset 5 radio stations. Set the preferred volume. To save the radio frequency, select the check mark button. *HF3653 does not feature a radio. Music via Auxiliary (AUX) socket You can use the Sleep & Wake-Up Light as a speaker for music by connecting a music playing device (for instance your mobile phone) to the AUX socket. Note: You cannot wake up to music from an AUX connected device. If the sound is not loud enough if you have set the Sleep & Wake-Up Light to maximum volume, increase the volume of your music playing device. If the sound is too loud or distorted at low volume settings of the Sleep & Wake-Up Light, decrease the volume of your music playing device. Note: Press and hold the music note button for 5 second to activate/deactivate the sound via the menu. You can also deactivate the sound by tapping the top of the Sleep & Wake-Up Light. Note: You need an AUX cable to connect the Sleep & Wake-Up Light to a music playing device.
13 English 15 Wind Down programs The Sleep & Wake-Up Light features two wind down programs to help you relax before you fall asleep. Note: Press and hold the wind down button for 5 seconds to activate/deactivate the Wind Down program via the menu. You can also deactivate the active Wind Down program by tapping the top of the Sleep & Wake-Up Light. Sunset Simulation During the Sunset Simulation, the brightness of the light decreases gradually with colors changing from bright yellow to warm orange to soft red. You can set the duration and light intensity to start with. During the Sunset Simulation you also can select a sound to fade away, accompanying the Sunset Simulation. You can set the source and the volume to start with. You can either choose a natural sound, radio* or no sound. You can also play your own music by connecting a music playing device to the AUX socket. Note: If you have set your Sunset Simulation in the setup wizard, it will start immediately. If you have not set the wake-up profile the Sleep & Wake-Up Light starts with a default Sunset Simulation. *HF3653 does not feature a radio. RelaxBreathe RelaxBreathe uses the belly breathing technique as a basis for the breathing program. You can choose one of breathing programs, guided by light or sound. The combination of the belly breathing exercise and the guidance in the Sleep & Wake-Up Light helps you slow down and feel relaxed. Belly breathing for relaxation Belly breathing is the most recognized breathing exercise technique to help people relax. When you breathe from your belly, automatically your diaphragm pulls down. This pulls down your lungs and allows you to inhale fully and deeply. Caution: If you feel uncomfortable at any point during this breathing exercise, just go back to breathing normally.
14 16 English How to do belly breathing 1 Lie down comfortably on your back. 2 Inhale via your nose, exhale via your nose or mouth. 3 Place one hand on your stomach and your other hand on your chest. You should see your hand on your stomach move up with each inhale and move down with each exhale. The hand on your chest should only move slightly. 4 Your breath should only come from your belly. Try to make your exhale longer than your inhale as this will quickly can make you feel more relaxed. Note: The RelaxBreathe function of the Sleep & Wake-Up Light can guide you during belly breathing. You can select one of seven relaxation programs with preset breathing rhythms. Each relaxation program has a different breathing rhythm. The program '4 breaths' is preset to 4 breaths per minute. Program '5 breaths' is preset to 5 breaths a minute. Each next program has one additional breath per minute. The last program (10 breaths) is preset to 10 breaths per minute. You can select light or sound to guide you during the selected relaxation program. Follow the light or sound when you inhale and exhale. - For guidance with light, inhale when the light intensity increases. In between the two subtle light flashes, hold your breath. Exhale slowly when the light intensity decreases. - For guidance with sound, inhale when the intensity of the sound of the waves increases. When the intensity of the sound pauses, hold your breath. Slowly exhale when the intensity of the sound of the waves decreases. Follow your preferred rhythm with the help of light or sound for a more relaxed feeling. You can even do this with your eyes closed. Charging your mobile phone You can use the USB port (see Fig. 1) to charge your mobile device (max 1000 ma). Cleaning and storage - Clean the appliance with a soft cloth. - Do not use abrasive cleaning agents, pads or cleaning solvents like alcohol, acetone, etc., as this may damage the surface of the appliance. - If you are not going to use the appliance for an extended period of time, remove the adapter from the wall socket and store the appliance in a safe, dry location where it will not be crushed, banged, or subject to damage. - Do not wrap the power cord around the appliance when storing it.
15 English 17 Recycling - This symbol means that this product shall not be disposed of with normal household waste (2012/19/EU). - Follow your country's rules for the separate collection of electrical and electronic products. Correct disposal helps prevent negative consequences for the environment and human health. Accessories and spare parts - This appliance has no user-serviceable parts inside. - The light source of this luminaire is not replaceable; when the light source reaches its end of life the whole luminaire shall be replaced. - To buy accessories or spare parts, visit or go to your Philips dealer. You can also contact the Philips Consumer Care Center in your country (see the international warranty leaflet for contact details). The following accessories are available: - Adapter HF20 EU-version: service code Adapter HF20 UK-version: service code Warranty and support Troubleshooting Problem If you need information or support, please visit or read the international warranty leaflet. This chapter summarizes the most common problems you could encounter with the appliance. If you are unable to solve the problem with the information below, visit for a list of frequently asked questions or contact the Consumer Care Center in your country. Solution The appliance does not work at all. Perhaps the adapter is not inserted properly in the wall socket. Insert the adapter properly in the wall socket. Perhaps the plug is not inserted properly in the appliance. Insert the plug properly in the appliance. Perhaps there is a power failure. Check if the power supply works by connecting another appliance.
16 18 English Problem Solution The appliance functions properly, but the lamp does not work anymore. The appliance uses durable LED technology. The lamp should last a long time. However, if the lamp stops working, go to or contact the consumer care center. The appliance does not respond when I try to set different functions. If you want to go back to factory settings, press the reset button on the back of the appliance (see 'General description'). If you press the reset button, the setup wizard needs to be set again. The lamp does not go on when the alarm goes off. Perhaps you set a light intensity level that is too low. Increase the light intensity level in your wake-up profile (see 'Light intensity of the wake-up profile'). Perhaps you turned off the alarm function. The alarm icon is visible on the display when the alarm function is active (see 'Set wake-up profile'). The lamp does not go on right away when I switch it on. I do not hear the alarm sound when the alarm goes off. It may take between 1 to 5 seconds for the lamp to switch on, depending on the set light intensity level. Perhaps you set a sound level that is too low. To set a higher sound level, increase the volume level of the wake-up sound in your wake-up profile (see 'Set wake-up profiles'). When you have set an alarm, you will first see the light of the wake up curve. The alarm sound only starts playing when the set alarm time is reached. You can change the duration of the wake up light curve (see 'Duration of the wake-up profile'). Perhaps you turned off the alarm function. The alarm icon is visible on the display when the alarm function is active. If you selected the FM radio* as the alarm sound, turn on the FM radio* after you turn off the alarm to check if the FM radio* works. Check if your FM radio* is correctly tuned to a radio station. If necessary, adjust the frequency. If it does not work, call for assistance. The FM radio* does not work. Perhaps you set the volume too low. Increase the volume level. Check if your FM radio* is correctly tuned to a radio station. If necessary, adjust the frequency. Change the position of the antenna by moving it around. Make sure you have unwound the antenna completely. Contact the consumer care center in your country. The FM radio* produces a crackling sound. The alarm went off yesterday, but it did not go off today. Perhaps the broadcast signal is weak. Adjust the frequency and/or change the position of the antenna by moving it around. Make sure you have unwound the antenna completely. Perhaps you turned off the alarm function. The alarm icon is visible on the display when the alarm function is active.
17 English 19 Problem Solution Perhaps you set a volume level and/or light intensity level that is too low. Set a higher volume and/or light intensity level in your wake-up profile (see 'Set wake-up profiles'). When there has been a power failure, the clock time will keep on running up to 8 hours. Perhaps the power failure lasted longer. In this case, you have to set the clock time again. I wanted to snooze, but the alarm did not go off again after 9 minutes. The light wakes me too early. The light wakes me too late. I am unable to turn the Midnight Light function on/off. I am unable to stream music via USB. The aux inlet doesn't work properly. The aux inlet doesn't work properly. Tap on the top of the Sleep and Wake-up light to snooze. If you press the button to dismiss the alarm (see 'Set wake-up profile'), the alarm profile is deactivated for that day. Perhaps the light intensity level you have set is not appropriate for you. Try a lower light intensity level if you wake up too early. You can also change the duration of the wake-up curve (see 'Set wake-up profiles'). If light intensity 1 is not low enough, move the appliance further away from the bed. Perhaps the light intensity you have set is too low. Select a higher light intensity (see 'Light intensity of the wake-up profile'). Perhaps the appliance is positioned at a lower level than your head. Make sure the appliance is located at a height at which the light is not blocked by your bed, comforter, blanket or pillow. Also make sure the appliance is not placed too far away. Make sure you tap on the correct position (top/back) of the appliance. The USB connection is only for charging your mobile phone. You are not able to stream music to the Sleep & Wake-up light. Try to set the volume on your mobile phone either higher or lower. If necessary, adjust the volume level on the appliance as well. Try to set the volume on your mobile phone either higher or lower. If necessary, adjust the volume level on the appliance as well. Suddenly the device makes a beeping sound. The backup alarm went off. This can happen up to 12 hours after you have removed the power (adapter) and a set alarm time is due. The alarm sound stops automatically after approximately 1 minute. You also can stop the alarm sound immediately if you power up the device for a brief moment. To prevent the back-up alarm to go off when the power is removed (e.g. storage) just have the alarms disabled prior to powering down. *HF3653 does not feature a radio. Specifications Model Rated input voltage adapter Rated input frequency adapter No-load power adapter HF3650, HF3651, HF3653, HF Vac 50/60Hz <0.1W
18 20 English Rated output voltage adapter Rated output power adapter Average Standby Power appliance Condition: (All functions suspended, ambient light scenario; day 12h, 500 lux and night 12h, 0 lux) display at maximum brightness setting / display off USB charging port AUX sensitivity Nominal light output (level 1-25) 24Vdc 18W <0.5W / <0.25W 5V, 1000mA 280mV lux at 45cm (1-350* lux at 17.7 in.) depending on model Nominal light color (level 1-25) K Physical characteristics Dimensions (height x width x Depth) Weight main unit / adapter Cord length adapter Classification Main unit Adapter Mode of operation Operating conditions Temperature Relative humidity Storage conditions Temperature Relative humidity 22.5 x 22.0 x 12.0cm (8.8 x 8.7 x 4.7in.) Approx 0.77kg (27.2oz) / 0.14kg (4.9oz) 150cm (4.9ft) Luminaires Class 2 power supply Continuous +5 C to +35 C (41 F to 95 F) 15% to 90% (no condensation) -20 C to +50 C (-4 F to +122 F) 15% to 90% (no condensation)
19 Dansk 21 Indhold Introduktion 21 Generel beskrivelse 21 Beregnet anvendelse 22 Virkningerne ved Sleep & Wake-Up Light 22 Vigtige sikkerhedsoplysninger 22 Sikkerhed og overensstemmelse 24 Elektromagnetiske felter (EMF) 24 Ikoner på displayet 24 Navigering i menuen 25 Indstil vækkeprofiler 25 PowerBackUp+ 26 Snooze-funktion 26 Sådan slår du alarmen fra 27 Brug af Sleep & Wake-Up Light som sengelampe 27 Midnight Light 27 Indstillinger 27 Lyt til radio* eller din egen musik 29 Gear ned-programmer 30 Sunset Simulation 30 RelaxBreathe 30 Opladning af mobiltelefon 31 Rengøring og opbevaring 31 Genanvendelse 32 Tilbehør og reservedele 32 Reklamationsret og support 32 Fejlfinding 32 Specifikationer 34 Introduktion Philips Sleep & Wake-Up Light kan give dig en mere behagelig opvågning. Hvis Sunrise Simulation er aktiveret (standardindstilling er 30 minutter), vil lysintensiteten fra lampen øges gradvist op til det angivne niveau, og lysets farve vil ændres fra dyb morgenrøde til klart dagslys. Lyset forbereder nænsomt din krop på at vågne på det indstillede tidspunkt. For at gøre din opvågning endnu mere behagelig kan du bruge naturlige vækkelyde eller FM-radio* som vækkelyd. *HF3653 er ikke udstyret med en radio. Generel beskrivelse 1 Lampekabinet 2 Display 3 USB-opladerport 4 Reset-knap (nulstilling) 5 Radioantenne* 6 Jævnstrømsindgang til adapter
20 22 Dansk 7 Ekstraindgang (AUX) 8 Højttaler 9 Knappen Snooze/Midnight Light 10 Adapter 11 Lille stik *HF3653 er ikke udstyret med en radio. Beregnet anvendelse Philips Sleep & Wake-up Light er beregnet til at give dig en mere naturlig og frisk opvågning og en mere afslappende fornemmelse, inden du falder i søvn. Dette produkt er ikke beregnet til at give generel belysning. Virkningerne ved Sleep & Wake-Up Light Philips Sleep & Wake-Up Light forbereder nænsomt din krop på at vågne i de sidste 5 til 60 minutter eller den seneste søvnperiode afhængigt af, hvilken tid for Sunrise Simulation du har indstillet. Tidligt om morgenen er øjnene mere følsomme over for lys, end når vi er vågne. I denne periode forbereder de relativt lave lysniveauer i en simuleret naturlig solopgang vores krop på at vågne. Folk, der bruger Sleep & Wake-Up Light, vågner lettere, er i bedre humør generelt om morgenen og føler sig mere energiske. Da lysfølsomheden er forskellig fra person til person, kan du indstille lysintensiteten på Sleep & Wake-Up Light til et niveau, der passer til din egen lysfølsomhed, så du får en optimal start på dagen. Du finder flere oplysninger om Sleep & Wake- Up Light på Vigtige sikkerhedsoplysninger Læs disse vigtige oplysninger omhyggeligt igennem, inden apparatet tages i brug, og gem dem til eventuel senere brug. Fare - Vand og elektricitet er en farlig kombination. Brug ikke apparatet i våde omgivelser (f.eks. i badeværelset eller i nærheden af en bruser eller swimmingpool). - Hold adapteren tør. - Sørg for, at der ikke trænger vand ind i apparatet, og at der ikke spildes vand på det. - Apparatet må aldrig kommes ned i vand eller skylles under vandhanen. - Placer ikke noget i nærheden af apparatet, der kan få vand eller anden væske til at dryppe eller stænke på det. - Apparatet må kun benyttes indendørs. - Adapteren indeholder en transformator, der omformer en farlig V vekselstrømsspænding til en sikker 24 V jævnstrømsspænding. Klip ikke adapteren af for at udskifte den med et andet stik, da dette vil føre til farlige situationer.
21 Dansk 23 Advarsel Forsigtig - Brug aldrig apparatet, hvis lampekabinettet er beskadiget, gået i stykker eller mangler. - Apparatet må ikke benyttes, hvis adapter, ledning eller apparat på nogen måde er beskadiget, hvis der er spildt væsker på det, eller hvis apparatet har været udsat for stødpåvirkninger, hvis apparatet har været udsat for påvirkninger fra regn eller fugt, hvis det ikke fungerer normalt, eller hvis det er blevet tabt eller beskadiget. - Hvis du begynder at føle ubehag i forbindelse med vejrtrækningsøvelsen RelaxBreathe, skal du bare trække vejret normalt igen. - Brug kun apparatet sammen med den medfølgende adapter. - Hvis adapteren (ledningen) beskadiges, skal den altid udskiftes med en original adapter af samme type for at undgå en farlig situation. - Dette apparat er ikke beregnet til at blive brugt af personer (herunder børn) med nedsatte fysiske og mentale evner, nedsat følesans eller manglende erfaring og viden, medmindre de er blevet vejledt eller instrueret i apparatets anvendelse af en person, der er ansvarlig for deres sikkerhed. - Kontakt din læge, før du begynder at bruge apparatet, hvis du har lidt af eller lider af depression. - Brug ikke apparatet som et middel til at reducere dit søvnbehov. Formålet med apparatet er at lette opvågningen. Det reducerer ikke søvnbehovet. - Kontrollér, om den angivne netspænding på apparatet svarer til den lokale netspænding, før du slutter strøm til apparatet. - Sørg for, at netledningen ikke trædes på eller klemmes, navnlig ved stik og udgange samt ved det sted, hvor ledningen føres ud af lampen. - For at forhindre varige beskadigelser af adapteren må den ikke bruges i eller i nærheden af stikkontakter, hvori der sidder en elektrisk luftfrisker. - Undlad at tabe apparatet på gulvet, og udsæt det ikke for kraftige slag eller andre voldsomme stød. - Anbring apparatet på et stabilt, vandret og skridsikkert underlag. - Pas på ikke at forhindre kølingen af dette apparat ved f.eks. at tildække det med tæpper, gardiner, tøj, papir mv. - Undlad at anvende apparatet, hvis rumtemperaturen er under 10 C eller højere end 35 C. - Apparatet har ikke en on/off-knap. Tag stikket ud af stikkontakten for at afbryde forbindelsen til lysnettet. Adapteren skal være let tilgængelig til enhver tid. - Dette apparat er kun beregnet til husholdningsbrug, herunder lignende brug f.eks. på hoteller. - Der må ikke sættes nogen form for åben ild, som f.eks. tændte stearinlys, på apparatet.
22 24 Dansk Generelt - Hvis du ofte vågner for tidligt eller med hovedpine, skal du reducere det indstillede lysintensitetsniveau og/eller den indstillede tid til Sunrise Simulation. - Hvis du ofte bliver vækket af alarmlyden, kan du øge det indstillede lysintensitetsniveau eller den indstillede tid til Sunrise Simulation. - Hvis du deler soveværelse med andre, kan vedkommende blive vækket utilsigtet, selvom han/hun ligger længere væk fra apparatet. Dette skyldes, at mennesker ikke nødvendigvis har samme lysfølsomhed. - Apparatets strømforbrug er lavest, hvis der ikke er sluttet nogen enheder til USB-porten, og lampe, radio og display er slukket. Sikkerhed og overensstemmelse Dette apparat opfylder sikkerhedskravene i EU for: - IEC 60598: Armaturer. - IEC 60065: Audio, video og lignende elektroniske apparater. - IEC 60950: Kontorudstyr. - IEC 62471: Fotobiologisk sikkerhed for lamper og lampesystemer. Elektromagnetiske felter (EMF) - Dette Philips-apparat overholder alle branchens gældende standarder og regler angående eksponering for elektromagnetiske felter. Ikoner på displayet Vækkeprofil Sluk display Lyd-feedback Gear ned-program Klokkeslæt Sunset Simulation Lysintensitet og lys tænd/sluk RelaxBreathe Vælg dit sprog Radio* Indstillinger Naturlige lyde AUX-stik Lyd fra
23 Dansk 25 Forudindstillinger for radio* Alarm Snooze/Midnight Light Vejrtrækningsrytmer Display *HF3653 er ikke udstyret med en radio. Navigering i menuen På displayet kan du vælge og indstille vækkeprofil, sengelampe, indstillinger, lyd (kilde) eller afslapningsprogram. Bemærk: Alle dine personlige indstillinger og profiler bliver permanent lagret i hukommelsen. De bliver ikke slettet, når du tager adapteren ud af stikkontakten. Du kan når som helst ændre indstillingen. Den sidste indstilling bliver lagret. Bemærk: Hvis displayet er tomt, skal du flytte hånden hen mod den nederste del af Sleep & Wake-up-lyset for at få vist displaymenuen. Menuikonerne bliver vist. Indstil vækkeprofiler I din vækkeprofil kan du indstille klokkeslættet, den maksimale lysintensitet og den type vækkelyd, du foretrækker. Bemærk: For at deaktivere alle de indstillede alarmer på én gang skal du trykke på alarmknappen og holde den nede i 4 sekunder. Du kan aktivere alarmerne igen ved at trykke og holde alarmknappen nede i mindst 4 sekunder. Indstil vækkeprofil Du kan indstille to forskellige vækkeprofiler. For hver profil kan du indstille klokkeslet, lysintensitet, varighed for vækkekurve, type vækkelyd og lydstyrke.
24 26 Dansk Varighed af vækkeprofil Standardvarigheden for vækkekurven (lysstyrkestigningen til den indstillede maksimale lysintensitet) er 30 minutter. Varigheden kan ændres efter eget valg. Lysintensitet i vækkeprofilen Lampen i Sleep & Wake-Up Light simulerer en solopgang. På samme måde som ved en solopgang øges lampens lysstyrke gradvist. I løbet af denne vækkekurve ændrer lysets farver sig fra blød rød til varm orange og til lys gul. Du kan vælge ét af 25 forskellige niveauer for lysintensitet. Bemærk: På hoveddisplayet på Sleep & Wake-Up Light kan du se, om er indstillet en alarm. Type af lyd Du kan vælge mellem tre indstillinger. Du kan vælge mellem naturlig lyd, ingen lyd eller FM-radio.* *HF3653 er ikke udstyret med en radio. PowerBackUp+ Snooze-funktion I tilfælde af strømsvigt er der ingen funktioner i Sleep & Wake-up Light (herunder displayet), der virker. Det indbyggede ur samt backup-alarmen vil dog stadig virke i endnu mindst 8 timer. Hvis alarmen skal udløses under et strømsvigt, vil en backup-alarm blive aktiveret og generere en biplyd i ca. 1 minut. Når vækkekurven er gennemført (når f.eks. den indstillede maksimumlysintensitet er nået), og alarmlyden afgives, kan du trykke på toppen af Sleep & Wake-Up Light for at aktivere snoozefunktionen. Lampen bliver ved at være tændt, men lyden er slået fra. Efter 9 minutter begynder alarmlyden at lyde igen. Bemærk: Apparatet slår automatisk fra (lys og lyd) 60 minutter efter alarmtiden eller 60 minutter efter den seneste snooze.
25 Dansk 27 Sådan slår du alarmen fra Når alarmen går i gang, kan du slå alarmen fra ved at trykke på denne knap. Hvis du slår alarmen fra, deaktiveres alarmprofilen for den pågældende dag. Brug af Sleep & Wake-Up Light som sengelampe Du kan bruge Sleep & Wake-Up Light som sengelampe. Tryk på sengelampeknappen på displayet for at tænde for sengelampen. Bemærk: Du kan forøge og formindske lysstyrken. Du kan vælge en lysstyrke mellem 1 (lav) og 25 (høj). Standardindstillingen for lysstyrken er 18. Lampen slukkes ved at trykke på krydsknappen i menuen. Tip: Når lampen er tændt, kan du også slukke den med et enkelt blidt slag på toppen af Sleep & Wake-Up Light. Alle aktive programmer stopper. Indstillede alarmer forbliver aktive. Midnight Light Hvis du vågner i løbet af natten, kan du trykke på toppen af Sleep & Wake- Up Light for at aktivere en dæmpet belysning. Det dæmpede, bløde orange lys giver dig lige netop lys nok til, at du kan orientere dig i mørket. Du slukker Midnight Light ved at trykke på toppen af Sleep & Wake-Up Light igen. Bemærk: Midnight Light kan ikke aktiveres direkte, når hovedlyset allerede er tændt. I sådanne tilfælde skal du først trykke for at deaktivere hovedlyset. Derefter skal du trykke for at aktivere Midnight Light. Indstillinger I denne menu kan du indstille uret, lydfeedback og displayets lysstyrke på Sleep & Wake-Up Light. Bemærk: Hold indstillingsknappen nede i 5 sekunder for at åbne en ny menu, hvor du kan vælge DEMO-tilstand (accelereret vækkekurve) eller VERSION (apparatets firmwareversion).
26 28 Dansk Tid Du kan indstille klokken og skifte mellem 12-timers ur (AM/PM) og 24-timers ur ved at klikke på skifteknappen (12/24). Lyd-feedback Når du trykker på en knap, hører du et klik. Hvis du ikke ønsker at høre et klik, når du trykker på en knap, skal du trykke på denne knap for at slå lydfeedback fra. Du hører et klik som en bekræftelse. Du aktiverer valget ved at trykke på denne knap igen. Du hører to klik, der bekræfter, at lyd-feedback er aktiveret. Display Skærmlysstyrke Du kan justere displayets kontrast fra niveau 1 til niveau 6. Vælg et niveau, der er optimalt for at du kan se displayet om natten. Sleep & Wake-Up Light vil automatisk justere kontrastniveauet, når dit soveværelse bliver lysere. Tænd/sluk displayet Du kan helt slukke displayet ved at trykke på displayknappen, hvis du slet ikke ønsker noget lys heller ikke visning af klokken fra Sleep & Wake-Up Light. Hvis du ikke berører displayet i et stykke tid i nogen af menuerne, vil det vende tilbage til kun visning af tid og status. Når displayet er slukket, vises klokken ikke. Tryk på det overkrydsede ikon for at tænde displayet igen. Tip: Hvis du vil se, hvad klokken er, eller du vil vælge en funktion, mens displayet er slået fra, skal du blot føre hånden hen til displayet, hvorefter det vises i et par sekunder.
27 Dansk 29 Lyt til radio* eller din egen musik Tip: Når du lytter til radio eller musik, kan du slukke den med et enkelt blidt slag på toppen af Sleep & Wake-Up Light. Alle aktive programmer stopper. Indstillede alarmer forbliver aktive. Radio* Du kan lytte til FM-radio med Sleep & Wake-Up Light. Hvis du har indstillet radiofunktionen i opsætningsguiden, vil den vise den valgte radiostation. Du kan manuelt skifte radiostation ved at vælge FM-frekvensen for en anden radiostation. Tip: Rul antennen helt ud, og sæt den i forskellige retninger, indtil du opnår den bedste modtagelse. Du kan forudindstille 5 faste radiostationer. Først skal du vælge en radiostation ved at indstille stationens FM-frekvens. Tryk på, og hold knappen med dobbeltpilen nede for at foretage automatisk søgning efter den næste radiostation. Efter indstilling af en radiostation kan du nemt tilføje endnu en radiostation ved at vælge med skifteknappen. På den måde kan du forudindstille 5 faste radiostationer. Indstilling af den foretrukne lydstyrke. For at lagre radiofrekvensen skal du trykke på knappen med fluebenet. *HF3653 er ikke udstyret med en radio. Musik via stikket Auxiliary (AUX) Du kan bruge Sleep & Wake-Up Light som højttaler til musik ved at slutte en musikafspiller (f.eks. din mobiltelefon) til AUX-stikket. Bemærk: Du kan ikke blive vækket til musik fra en AUX-tilsluttet enhed. Hvis lyden ikke er høj nok, selvom du har indstillet Sleep & Wake-Up Light til maksimumlydstyrke, skal du skrue op for lydstyrken på din musikafspiller. Hvis lyden er for høj, eller den er forvrænget ved lav lydstyrkeindstilling på Sleep & Wake-Up Light, skal du skrue ned for lydstyrken på din musikafspiller. Bemærk: Tryk på nodeknappen, og hold den inde i 5 sekunder for at aktivere/aktivere lyden via menuen. Du kan også deaktivere lyden ved at trykke på toppen af Sleep & Wake-Up Light. Bemærk: Du skal bruge et AUX-kabel til at slutte Sleep & Wake-Up Light til en musikafspiller.
28 30 Dansk Gear ned-programmer Sleep & Wake-Up Light har to Gear ned-programmer, der kan hjælpe dig med at slappe af, inden du falder i søvn. Bemærk: Tryk på Gear ned-knappen, og hold den inde i 5 sekunder for at aktivere/aktivere Gear ned-programmet via menuen. Du kan også deaktivere Gear ned-programmet ved at trykke på toppen af Sleep & Wake- Up Light. Sunset Simulation I forbindelse med Sunset Simulation vil lysniveauet falde gradvist med farver, der skifter fra lys gul til varm orange og blød rød. Du kan indstille den varighed og lysintensitet, der skal startes med. I forbindelse med Sunset Simulation kan du også vælge en lyd, der langsomt skal fade ud og akkompagnere Sunset Simulation. Du kan indstille kilde og den lydstyrke, der skal startes med. Du kan vælge enten en naturlig lyd, radio* eller ingen lyd. Du kan også afspille din egen musik ved at tilslutte en musikafspilningsanordning til AUX-kontakten. Bemærk: Hvis du har indstillet din Sunset Simulation i opsætningsguiden, vil den starte omgående. Hvis du ikke har indstillet vækkeprofilen, starter Sleep & Wake-Up Light med en standard Sunset Simulation. *HF3653 er ikke udstyret med en radio. RelaxBreathe RelaxBreathe gør brug af en mavevejrtrækningsteknik som udgangspunkt for vejrtrækningsprogrammet. Du kan vælge et af vejrtrækningsprogrammerne, hvor du bliver guidet af lys eller lyd. Kombinationen af mavevejrtrækningsøvelsen og vejledningen i Sleep & Wake-Up Light hjælper dig med at falde til ro og føle dig afslappet. Mavevejrtrækning for afslapning Mavevejrtrækning er en anerkendt vejrtrækningsteknik, der hjælper med at slappe af. Når du trækker vejret med maven, vil dit mellemgulv automatisk blive trukket ned. Derved bliver lungerne trukket ned, så du kan tage en fuld og dyb indånding. Forsigtig: Hvis du begynder at føle ubehag i forbindelse med denne vejrtrækningsøvelse, skal du bare trække vejret normalt igen.
29 Dansk 31 Sådan udfører du mavevejrtrækning 1 Læg dig behageligt på ryggen. 2 Indånd via næsen, og udånd via næse eller mund. 3 Læg den ene hånd på maven og den anden hånd på brystet. Hånden på maven skal bevæge sig op ved indånding og ned ved udånding. Hånden på brystet skal kun bevæge sig lidt. 4 Vejrtrækningen skal kun ske ved hjælp af maven. Prøv at gøre udåndingen længere end indåndingen. På den måde vil du hurtigt føle dig mere afslappet. Bemærk: RelaxBreathe-funktionen i Sleep & Wake-Up Light kan vejlede dig i forbindelse med mavevejrtrækning. Du kan vælge én af syv adslapningsprogrammer med forudindstillede vejrtrækningsrytmer. Hvert enkelt afslapningsprogram har sin egen vejrtrækningsrytme. Programmet "4 breaths" er forudindstillet til 4 vejrtrækninger pr. minut. Programmet "5 breaths" er forudindstillet til 5 vejrtrækninger pr. minut. Hvert af de følgende programmer har én ekstra vejrtrækning pr. minut. Det sidste program (10 breaths) er forudindstillet til 10 vejrtrækninger pr. minut. Du kan vælge lyd eller lys til at vejlede dig i forbindelse med det valgte afslapningsprogram. Følg lyset eller lyden, når du indånder og udånder. - Når du følger lyset, skal du indånde, når lysintensiteten stiger. Mellem de to korte lysglimt skal du holde vejret. Udånd langsomt, når lysintensiteten falder. - Når du følger lyden, skal du indånde, når lyden af bølger bliver kraftigere. Når lydstyrken ikke ændres, skal du holde vejret. Du skal udånde, når lyden af bølger bliver svagere. Følg din foretrukne rytme ved hjælp af lys eller lyd, og få en mere afslappende følelse. Det kan endda gøres med lukkede øjne. Opladning af mobiltelefon Ved hjælp af USB-porten (se fig. 1) kan du oplade din mobilenhed (maks ma). Rengøring og opbevaring - Rengør apparatet med en blød klud. - Brug aldrig slibende rengøringsmidler, skuresvampe eller rengøringsmidler såsom sprit, acetone mv., idet de vil kunne beskadige apparatets overflade. - Hvis du ikke skal bruge apparatet i en længere periode, skal adapteren tages ud af stikkontakten. Opbevar apparatet på et sikkert, tørt sted, hvor det ikke bliver udsat for stød og ikke bliver beskadiget. - Lysnetledningen må ikke vikles om apparatet under opbevaring.
30 32 Dansk Genanvendelse - Dette symbol betyder, at dette produkt ikke må bortskaffes sammen med almindeligt husholdningsaffald (2012/19/EU). - Følg den nationale lovgivning om særskilt indsamling af elektriske og elektroniske produkter. Korrekt bortskaffelse er med til at forhindre negativ påvirkning af miljøet og menneskers helbred. Tilbehør og reservedele - Dette apparat indeholder ingen dele, der kan repareres af brugeren. - Lyskilden til denne armatur er ikke udskiftelig. Når lyskilden når sin levetid, skal hele armaturet udskiftes. - Du kan købe tilbehør og reservedele på eller hos din Philips-forhandler. Du kan også kontakte det lokale Philipskundecenter (du kan finde kontaktoplysninger i folderen "World-Wide Guarantee"). Der findes følgende tilbehør: - Adapter HF20 EU-version: servicekode Adapter HF20 UK-version: servicekode Reklamationsret og support Hvis du har brug for hjælp eller support, bedes du besøge eller læse i folderen om international garanti. Fejlfinding Problem Apparatet virker slet ikke. Dette afsnit opsummerer de mest almindelige problemer, der kan forekomme ved brug af apparatet. Har du brug for yderligere hjælp og vejledning, så besøg for at se en liste med ofte stillede spørgsmål, eller kontakt dit lokale Philips Kundecenter. Løsning Måske er adapteren ikke sat korrekt i stikkontakten. Sæt adapteren korrekt i stikkontakten. Måske er stikket er ikke sat rigtigt i apparatet. Sæt stikket korrekt i apparatet. Måske er der opstået strømsvigt. Kontroller, at strømforsyningen er i orden ved at tilslutte et andet apparat.
31 Dansk 33 Problem Apparatet fungerer korrekt, men pæren tænder ikke længere. Apparatet reagerer ikke, når jeg forsøger at indstille de forskellige funktioner. Lampen tændes ikke, når alarmen går i gang. Løsning Apparatet gør brug af holdbar LED-teknologi. Lampen skal kunne holde i lang tid. Hvis lampen alligevel holder op med at lyse, skal du gå til eller kontakte kundecenteret. Du kan gå tilbage til fabriksindstillingerne ved at trykke på nulstillingsknappen bag på apparatet (see 'Generel beskrivelse'). Hvis du trykker på nulstillingsknappen, skal opsætningsguiden indstilles igen. Måske har du valgt en lysintensitet, der er for lav. Sæt lysintensiteten op i din vækkeprofil (see 'Lysintensitet i vækkeprofilen'). Lampen lyser ikke op med det samme, når jeg tænder for den. Måske har du slået alarmfunktionen fra. Alarmikonet vises på displayet, når alarmfunktionen er aktiv (see 'Indstil vækkeprofil'). Det kan tage mellem 1 og 5 sekunder at tænde lampen, afhængigt af den valgte lysintensitet. Jeg kan ikke høre vækkelyden, når alarmen går i gang. Måske har du valgt et lydniveau, der er for lavt. Du indstiller til et højere lydniveau ved at forøge lydniveauet for vækkelyden i din vækkeprofil (see 'Indstil vækkeprofiler'). Når du har indstillet en alarm, vil du først se lyset for vækkekurven. Alarmlyden begynder ikke at lyde, inden den indstillede alarmtid. Du kan ændre varigheden af kurven (see 'Varighed af vækkeprofil') for vækkelyset. Måske har du slået alarmfunktionen fra. Alarmikonet vises på displayet, når alarmfunktionen er aktiv. Hvis du har valgt FM-radio* som alarmlyd, skal du tænde FM-radioen*, efter du har slået alarmen fra for at kontrollere, om FM-radioen* virker. Kontrollér, om FM-radioen* er korrekt indstillet på en radiostation. Ellers skal frekvensen indstilles. Hvis det ikke virker, kan du ringe på for at få hjælp. FM-radioen* virker ikke. Lydstyrken er muligvis indstillet for lavt. Skru op for lydstyrken. Kontrollér, om FM-radioen* er korrekt indstillet på en radiostation. Ellers skal frekvensen indstilles. Drej antennen i en anden retning. Kontrollér, at antennen er helt rullet ud. Kontakt det lokale kundecenter. Der kommer en knasende lyd fra FMradioen*. Alarmen gik i gang i går, men ikke i dag. Måske er radiosignalet svagt. Indstil frekvensen, og/eller drej antennen i en anden retning. Kontrollér, at antennen er helt rullet ud. Måske har du slået alarmfunktionen fra. Alarmikonet vises på displayet, når alarmfunktionen er aktiv. Måske har du valgt et lydniveau og/eller en lysintensitet, der er for lav. Vælg et højere lydniveau og/eller en højere lysintensitet i din vækkeprofil (see 'Indstil vækkeprofiler').
32 34 Dansk Problem Løsning I forbindelse med strømsvigt vil uret gå videre i op til 8 timer. Måske strømsvigtet varet længere. I så tilfælde skal du indstille klokkeslættet igen. Jeg ville bruge snoozefunktionen, men alarmen gik ikke i gang igen efter 9 minutter. Lyset vækker mig for tidligt. Lyset vækker mig for sent. Jeg kan ikke slå funktionen Midnight Light til eller fra. Jeg kan ikke streame musik via USB. AUX-indgangen fungerer ikke korrekt. AUX-indgangen fungerer ikke korrekt. Apparatet udsender pludselig en biplyd. Tryk oven på Sleep & Wake-Up Light for at vælge snooze. Hvis du trykker på knappen for at slå alarmen (see 'Indstil vækkeprofil') fra, deaktiveres alarmprofilen for den pågældende dag. Måske er den lysintensitet, du har indstillet, ikke den, der passer bedst til dig. Prøv med en lavere lysintensitet, hvis du vågner for tidligt. Du kan også ændre varigheden af kurven (see 'Indstil vækkeprofiler') for vækkelyset. Hvis lysintensitet 1 ikke er lav nok, kan du flytte apparatet længere væk fra sengen. Måske har du valgt en for lav lysintensitet. Vælg en højere lysintensitet (see 'Lysintensitet i vækkeprofilen'). Måske er apparatet placeret i lavere højde end dit hoved. Sørg for at apparatet er placeret således, at lyset ikke blokeres af sengen, dynen, tæppet eller puden. Sørg også for, at apparatet ikke er placeret for langt væk. Sørg for, at du trykker det rigtige sted (øverst på bagsiden) på apparatet. USB-stikket er kun beregnet til opladning af mobiltelefonen. Du kan ikke streame musik til Sleep & Wake-Up Light. Prøv at skrue op eller ned for lydstyrken på din mobiltelefon. Prøv eventuelt også at justere lydstyrken på apparatet. Prøv at skrue op eller ned for lydstyrken på din mobiltelefon. Prøv eventuelt også at justere lydstyrken på apparatet. Det er backup-alarmen, der er gået i gang. Det kan ske op til 12 timer, efter du har slukket for strømmen (adapteren), og der er en indstillet alarm, der udløses. Alarmlyden stopper automatisk efter ca. 1 minut. Du kan også straks stoppe alarmlyden, hvis du tænder for strømmen til apparatet et kort øjeblik. Du kan undgå, at backup-alarmen bliver udløst, når strømmen er slukket (f.eks. i forbindelse med opbevaring) ved at slå alarmerne fra, inden du slukker for strømmen. *HF3653 er ikke udstyret med en radio. Specifikationer Model Nominel indgangsspænding adapter Nominel indgangsfrekvens adapter Ubelastet effekt adapter Nominel udgangsspænding adapter HF3650, HF3651, HF3653, HF V AC 50/60 Hz <0,1 W 24 V DC
acette Luxaflex Facette Monteringsvejledning
 acette Monteringsvejledning Indhold Forberedelse Montering Betjening Afmontering ADVARSEL Små børn kan blive kvalt i løkken af kæder, bånd og snore, der bruges til betjening af gardinprodukter. De kan
On instrument costs in decentralized macroeconomic decision making (Helsingin Kauppakorkeakoulun julkaisuja ; D-31)
") On instrument costs in decentralized macroeconomic decision making (Helsingin Kauppakorkeakoulun julkaisuja ; D-31) Juha Kahkonen Click here if your download doesn"t start automatically On instrument costs
On instrument costs in decentralized macroeconomic decision making (Helsingin Kauppakorkeakoulun julkaisuja ; D-31) Juha Kahkonen Click here if your download doesn"t start automatically On instrument costs
1. SIT. The handler and dog stop with the dog sitting at heel. When the dog is sitting, the handler cues the dog to heel forward.
 START START SIT 1. SIT. The handler and dog stop with the dog sitting at heel. When the dog is sitting, the handler cues the dog to heel forward. This is a static exercise. SIT STAND 2. SIT STAND. The
Uusi Ajatus Löytyy Luonnosta 4 (käsikirja) (Finnish Edition)
 (Finnish Edition)") Uusi Ajatus Löytyy Luonnosta 4 (käsikirja) (Finnish Edition) Esko Jalkanen Click here if your download doesn"t start automatically Uusi Ajatus Löytyy Luonnosta 4 (käsikirja) (Finnish Edition) Esko Jalkanen
Uusi Ajatus Löytyy Luonnosta 4 (käsikirja) (Finnish Edition) Esko Jalkanen Click here if your download doesn"t start automatically Uusi Ajatus Löytyy Luonnosta 4 (käsikirja) (Finnish Edition) Esko Jalkanen
On instrument costs in decentralized macroeconomic decision making (Helsingin Kauppakorkeakoulun julkaisuja ; D-31)
") On instrument costs in decentralized macroeconomic decision making (Helsingin Kauppakorkeakoulun julkaisuja ; D-31) Juha Kahkonen Click here if your download doesn"t start automatically On instrument costs
On instrument costs in decentralized macroeconomic decision making (Helsingin Kauppakorkeakoulun julkaisuja ; D-31) Juha Kahkonen Click here if your download doesn"t start automatically On instrument costs
LYTH-CONS CONSISTENCY TRANSMITTER
 LYTH-CONS CONSISTENCY TRANSMITTER LYTH-INSTRUMENT OY has generate new consistency transmitter with blade-system to meet high technical requirements in Pulp&Paper industries. Insurmountable advantages are
Choose Finland-Helsinki Valitse Finland-Helsinki
 Write down the Temporary Application ID. If you do not manage to complete the form you can continue where you stopped with this ID no. Muista Temporary Application ID. Jos et onnistu täyttää lomake loppuun
Capacity Utilization
 Capacity Utilization Tim Schöneberg 28th November Agenda Introduction Fixed and variable input ressources Technical capacity utilization Price based capacity utilization measure Long run and short run
anna minun kertoa let me tell you
 anna minun kertoa let me tell you anna minun kertoa I OSA 1. Anna minun kertoa sinulle mitä oli. Tiedän että osaan. Kykenen siihen. Teen nyt niin. Minulla on oikeus. Sanani voivat olla puutteellisia mutta
Information on preparing Presentation
 Information on preparing Presentation Seminar on big data management Lecturer: Spring 2017 20.1.2017 1 Agenda Hints and tips on giving a good presentation Watch two videos and discussion 22.1.2017 2 Goals
PAINEILMALETKUKELA-AUTOMAATTI AUTOMATIC AIR HOSE REEL
 MAV4 MAV5 MAV6 PAINEILMALETKUKELA-AUTOMAATTI AUTOMATIC AIR HOSE REEL Käyttöohje Instruction manual HUOMIO! Lue käyttöohjeet huolellisesti ennen laitteen käyttöä ja noudata kaikkia annettuja ohjeita. Säilytä
PSSA-8/PSSA-8UK OWNERS MANUAL
 PSSA-8/PSSA-8UK OWNERS MANUAL LED indicator Test Button Art. 36.3066 / Art. 8.40 GB Power Switch (PSSA-8 / PSSA-8UK) Identifying the parts LED indicator Test Button Getting Started Plug the Power Switch
OFFICE 365 OPISKELIJOILLE
 OFFICE 365 OPISKELIJOILLE Table of Contents Articles... 3 Ohjeet Office 365 käyttöönottoon... 4 One Driveen tallennetun videon palauttaminen oppimisympäristön palautuskansioon... 5 Changing default language
Network to Get Work. Tehtäviä opiskelijoille Assignments for students. www.laurea.fi
 Network to Get Work Tehtäviä opiskelijoille Assignments for students www.laurea.fi Ohje henkilöstölle Instructions for Staff Seuraavassa on esitetty joukko tehtäviä, joista voit valita opiskelijaryhmällesi
KONEISTUSKOKOONPANON TEKEMINEN NX10-YMPÄRISTÖSSÄ
 KONEISTUSKOKOONPANON TEKEMINEN NX10-YMPÄRISTÖSSÄ https://community.plm.automation.siemens.com/t5/tech-tips- Knowledge-Base-NX/How-to-simulate-any-G-code-file-in-NX- CAM/ta-p/3340 Koneistusympäristön määrittely
National Building Code of Finland, Part D1, Building Water Supply and Sewerage Systems, Regulations and guidelines 2007
 National Building Code of Finland, Part D1, Building Water Supply and Sewerage Systems, Regulations and guidelines 2007 Chapter 2.4 Jukka Räisä 1 WATER PIPES PLACEMENT 2.4.1 Regulation Water pipe and its
AYYE 9/ HOUSING POLICY
 AYYE 9/12 2.10.2012 HOUSING POLICY Mission for AYY Housing? What do we want to achieve by renting apartments? 1) How many apartments do we need? 2) What kind of apartments do we need? 3) To whom do we
Sisällysluettelo Table of contents
 Sisällysluettelo Table of contents OTC:n Moodlen käyttöohje suomeksi... 1 Kirjautuminen Moodleen... 2 Ensimmäinen kirjautuminen Moodleen... 2 Salasanan vaihto... 2 Oma käyttäjäprofiili... 3 Työskentely
FinFamily PostgreSQL installation ( ) FinFamily PostgreSQL
 FinFamily PostgreSQL") FinFamily PostgreSQL 1 Sisällys / Contents FinFamily PostgreSQL... 1 1. Asenna PostgreSQL tietokanta / Install PostgreSQL database... 3 1.1. PostgreSQL tietokannasta / About the PostgreSQL database...
FinFamily PostgreSQL 1 Sisällys / Contents FinFamily PostgreSQL... 1 1. Asenna PostgreSQL tietokanta / Install PostgreSQL database... 3 1.1. PostgreSQL tietokannasta / About the PostgreSQL database...
FinFamily Installation and importing data (11.1.2016) FinFamily Asennus / Installation
 FinFamily Asennus / Installation") FinFamily Asennus / Installation 1 Sisällys / Contents FinFamily Asennus / Installation... 1 1. Asennus ja tietojen tuonti / Installation and importing data... 4 1.1. Asenna Java / Install Java... 4 1.2.
FinFamily Asennus / Installation 1 Sisällys / Contents FinFamily Asennus / Installation... 1 1. Asennus ja tietojen tuonti / Installation and importing data... 4 1.1. Asenna Java / Install Java... 4 1.2.
1. Liikkuvat määreet
 1. Liikkuvat määreet Väitelauseen perussanajärjestys: SPOTPA (subj. + pred. + obj. + tapa + paikka + aika) Suora sanajärjestys = subjekti on ennen predikaattia tekijä tekeminen Alasääntö 1: Liikkuvat määreet
WPS/Reset Hold i 5 sekunder for å automatisk konfigurere med WPS. Hold i 10 Seoncds å tilbakestille WiFi å faktor standardinnstillingene.
 WiFi Push the front button you get the status of the WiFi device Trykk foran knappen får du status for WiFi-enhet Työnnä eteen painiketta saat tilan WiFi laitteen When the button blinks blue the WiFi is
Miksi Suomi on Suomi (Finnish Edition)
") Miksi Suomi on Suomi (Finnish Edition) Tommi Uschanov Click here if your download doesn"t start automatically Miksi Suomi on Suomi (Finnish Edition) Tommi Uschanov Miksi Suomi on Suomi (Finnish Edition)
Miksi Suomi on Suomi (Finnish Edition) Tommi Uschanov Click here if your download doesn"t start automatically Miksi Suomi on Suomi (Finnish Edition) Tommi Uschanov Miksi Suomi on Suomi (Finnish Edition)
Solar Water Heater Kit. EcoStyle. 1 User Manual/Operating Instructions. Contents FREE LESSON PLANS AVAILABLE.
 EcoStyle 1 User Manual/Operating Instructions Contents 1 Contents 2 What s in the box? 3 Setting up the 4 Heating water 5 Measuring water temperature with the digital thermometer 6 Maximum/minimum temperature
1/4. Resetointi ja vianmääritys. 22.11.2013 ntr
 A400-64176 Sähköpöydät 1/4 Resetointi ja vianmääritys Pöydän resetointi tehdään aina ennen käyttöönottoa ja tarvittaessa häiriötilanteessa. Määritä pöydän tyyppi käyttökytkimen ja jalustan mukaan ja tee
Salasanan vaihto uuteen / How to change password
 Salasanan vaihto uuteen / How to change password Sisällys Salasanakäytäntö / Password policy... 2 Salasanan vaihto verkkosivulla / Change password on website... 3 Salasanan vaihto matkapuhelimella / Change
Efficiency change over time
 Efficiency change over time Heikki Tikanmäki Optimointiopin seminaari 14.11.2007 Contents Introduction (11.1) Window analysis (11.2) Example, application, analysis Malmquist index (11.3) Dealing with panel
Gaming mouse Pelihiiri Spelmus
 Gaming mouse Pelihiiri Spelmus Button 1 Nappi 1 Knapp 1 Scrollwheel & button 5 Vieritysrulla & nappi 5 Mushjulet & knapp 5 Button 2 Nappi 2 Knapp 2 dpi + / - Buttons 6 & 7 Napit 6 & 7 Knapp 6 & 7 Button
SmartWi II Installation Guide. 中 文 Svenska Suomalainen Dansk
 SmartWi II Installation Guide 中 文 Svenska Suomalainen Dansk 1 4 10-15 M 2 5 3 6 1 请 将 斯 马 特 维 主 机 安 置 在 你 家 的 中 心 位 置 斯 马 特 维 主 机 距 机 顶 盒 / 斯 马 特 维 客 戶 卡 之 间 的 最 大 距 离 为 10 至 15 米 2 斯 马 特 维 机 可 以 使 用 12v
INSTALLATION INSTRUCTION ASENNUSOHJE PEM SJTK31 SJTK46 ENGLISH SUOMI
 INSTALLATION INSTRUCTION ASENNUSOHJE PEM1256 2010-2 SJTK31 SJTK46 ENGLISH SUOMI GB GENERAL INFORMATION - Check that the kit is suitable for the cable type. - Check the materials listed in the bill of materials
You can check above like this: Start->Control Panel->Programs->find if Microsoft Lync or Microsoft Lync Attendeed is listed
 Online Meeting Guest Online Meeting for Guest Participant Lync Attendee Installation Online kokous vierailevalle osallistujalle Lync Attendee Asennus www.ruukki.com Overview Before you can join to Ruukki
Secto Design Oy Kauppalantie 12 02700 Kauniainen Finland tel. +358 9 5050598 fax +358 9 5475 2535 info@sectodesign.fi www.sectodesign.
 Secto Design Oy Kauppalantie 12 02700 Kauniainen Finland tel. +358 9 5050598 fax +358 9 5475 2535 info@sectodesign.fi www.sectodesign.fi Secto 4200 pendant natural birch, black or white laminate, walnut
Owner s Manual GREE Electric Appliances,Inc.of zhuhai
 Ilmalämpöpumppu Split air conditioner wall mounted model Käyttäjän opas Owner s Manual GREE Electric Appliances,Inc.of zhuhai Ultra-thin GWHD09A3NK3DF KFR-25GW/NaA12FA GWHD12B2NK3AD KFR-32GW/NaA12FA Please
Käyttöohje CRL Ennen tämän tuotteen käyttöä lue tämä käyttöohje huolellisesti ja kokonaan.
 Käyttöohje Kelloradio CRL-330 www.denver-electronics.com Ennen tämän tuotteen käyttöä lue tämä käyttöohje huolellisesti ja kokonaan. Tuotetiedot EN FI Correctly set the stand in specially design for it
Matkustaminen Majoittuminen
 - Majoituspaikan löytäminen Where can I find? Ohjeiden kysyminen majoituspaikan löytämiseksi Where can I find?... a room to rent?... a room to rent?... a hostel?... a hostel?... a hotel?... a hotel?...
WINE COOLER TFW METOS TFW 160S, TFW 365-2S, TFW 375S MG ,
 WINE COOLER TFW METOS TFW 160S, TFW 365-2S, TFW 375S MG4116794, 4116798, 4116797 Instruction manual TWF 365-2S TWF 375S TWF 160S 01.09.2015 Table if Contents 1. Important safety instructions...3 2. Unpacking
Matkustaminen Majoittuminen
 - Majoituspaikan löytäminen Where can I find? Ohjeiden kysyminen majoituspaikan löytämiseksi... a room to rent?... a hostel?... a hotel?... a bed and breakfast?... a camping site? What are the prices like
Lab SBS3.FARM_Hyper-V - Navigating a SharePoint site
 Lab SBS3.FARM_Hyper-V - Navigating a SharePoint site Note! Before starting download and install a fresh version of OfficeProfessionalPlus_x64_en-us. The instructions are in the beginning of the exercise.
Elektronisk rörelsevakt med PIR-sensor. Elektroninen liiketunnistin PIRtunnistimella. Electronic Motion Detector with PIR Sensor KÄYTTÖOHJE
 Direkt inkoppling / Suora kytkentä / Direct connection MJ-JZ/JA-140206 13 000 00 Bruksanvisning Elektronisk rörelsevakt med PIR-sensor KÄYTTÖOHJE Elektroninen liiketunnistin PIRtunnistimella Instruction
Recirkulering. El-tilslutning. Kontrolpanel. Dansk. Timerfunktion
 1 2 Dansk Recirkulering Luften renses ved hjælp at aktive kulfiltre hvorefter den returneres til rummet. Kulfiltre bestilles separat. El-tilslutning Emhætten skal tilsluttes 230 V i henhold til stærkstrømsreglementet.
Nuku hyvin, pieni susi -????????????,?????????????????. Kaksikielinen satukirja (suomi - venäjä) (www.childrens-books-bilingual.com) (Finnish Edition)
 (www.childrens-books-bilingual.com) (Finnish Edition)") Nuku hyvin, pieni susi -????????????,?????????????????. Kaksikielinen satukirja (suomi - venäjä) (www.childrens-books-bilingual.com) (Finnish Edition) Click here if your download doesn"t start automatically
Nuku hyvin, pieni susi -????????????,?????????????????. Kaksikielinen satukirja (suomi - venäjä) (www.childrens-books-bilingual.com) (Finnish Edition) Click here if your download doesn"t start automatically
TIETEEN PÄIVÄT OULUSSA 1.-2.9.2015
 1 TIETEEN PÄIVÄT OULUSSA 1.-2.9.2015 Oulun Yliopisto / Tieteen päivät 2015 2 TIETEEN PÄIVÄT Järjestetään Oulussa osana yliopiston avajaisviikon ohjelmaa Tieteen päivät järjestetään saman konseptin mukaisesti
Snabbstartguide/Kvikstartvejledning/Pikaopas
 Snabbstartguide/Kvikstartvejledning/Pikaopas DVD RDS AV-MOTTAGARE DVD RDS AV-MODTAGER DVD RDS AV -VASTAANOTIN AVH-270BT AVH-170DVD Svenska Syftet med den här guiden är att leda dig genom enhetens mest
Security server v6 installation requirements
 CSC Security server v6 installation requirements Security server version 6.x. Version 0.2 Pekka Muhonen 2/10/2015 Date Version Description 18.12.2014 0.1 Initial version 10.02.2015 0.2 Major changes Contents
SpeechMike III sarjan sanelumikrofonien (mallit LFH3200 ja LFH3220) yhteensopivuus SpeechMagic Executive saneluohjelman kanssa
 yhteensopivuus SpeechMagic Executive saneluohjelman kanssa") SpeechMike III sarjan sanelumikrofonien (mallit LFH3200 ja LFH3220) yhteensopivuus SpeechMagic Executive saneluohjelman kanssa Jotta SpeechMike III sarjan sanelumikrofonia voidaan käyttää Executive saneluohjelmassa,
SpeechMike III sarjan sanelumikrofonien (mallit LFH3200 ja LFH3220) yhteensopivuus SpeechMagic Executive saneluohjelman kanssa Jotta SpeechMike III sarjan sanelumikrofonia voidaan käyttää Executive saneluohjelmassa,
Security server v6 installation requirements
 CSC Security server v6 installation requirements Security server version 6.4-0-201505291153 Pekka Muhonen 8/12/2015 Date Version Description 18.12.2014 0.1 Initial version 10.02.2015 0.2 Major changes
MEETING PEOPLE COMMUNICATIVE QUESTIONS
 Tiistilän koulu English Grades 7-9 Heikki Raevaara MEETING PEOPLE COMMUNICATIVE QUESTIONS Meeting People Hello! Hi! Good morning! Good afternoon! How do you do? Nice to meet you. / Pleased to meet you.
Käyttöohje. USB Charger UCH20
 Käyttöohje USB Charger UCH20 Sisältö Johdanto... 3 USB Charger: Tietoja... 3 USB-laturin käyttäminen... 4 Laitteen akun lataaminen...4 Juridiset tiedot...5 Declaration of Conformity...6 2 Johdanto USB
Microsoft Lync 2010 Attendee
 VYVI MEETING Lync Attendee 2010 Instruction 1 (15) Microsoft Lync 2010 Attendee Online meeting VYVI MEETING Lync Attendee 2010 Instruction 2 (15) Index 1 Microsoft LYNC 2010 Attendee... 3 2 Acquiring Lync
AquaTrio FC7070. EN User manual 5. DA Brugervejledning 29. FI Käyttöopas 53. NO Brukerhåndbok 76. SV Användarhandbok 100
 Register your product and get support at AquaTrio FC7070 EN User manual 5 DA Brugervejledning 29 FI Käyttöopas 53 NO Brukerhåndbok 76 SV Användarhandbok 100 2.3 2.4 2.2 Table of contents 1 Important 5
Micro Hi-Fi Component System
 4-246-843-12(1) Micro Hi-Fi Component System Betjeningsvejledning DK Käyttöohjeet FI CMT-GP5 2003 Sony Corporation ADVARSEL Udsæt ikke enheden for regn eller fugt for at undgå risikoen for brand eller
Oma sininen meresi (Finnish Edition)
") Oma sininen meresi (Finnish Edition) Hannu Pirilä Click here if your download doesn"t start automatically Oma sininen meresi (Finnish Edition) Hannu Pirilä Oma sininen meresi (Finnish Edition) Hannu Pirilä
Oma sininen meresi (Finnish Edition) Hannu Pirilä Click here if your download doesn"t start automatically Oma sininen meresi (Finnish Edition) Hannu Pirilä Oma sininen meresi (Finnish Edition) Hannu Pirilä
INSTALLATION INSTRUCTION ASENNUSOHJE PEM1417 2012-11 ENGLISH SUOMI CURRENT LIMITING DEVICE VIRTAA RAJOITTAVA SUOJA SDI46.812 & SDI46.
 INSTALLATION INSTRUCTION ASENNUSOHJE PEM1417 2012-11 ENGLISH SUOMI CURRENT LIMITING DEVICE VIRTAA RAJOITTAVA SUOJA SDI46.812 & SDI46.824 2/8 SDI46.812 & SDI46.824 PEM1417 2012-11 ENGLISH GENERAL INFORMATION
Öljytäytteinen sähköpatteri Electric Oil Radiator
 Öljytäytteinen sähköpatteri Electric Oil Radiator KÄYTTÖOHJE Alkuperäisten ohjeiden käännös INSTRUCTIONS MANUAL Original instructions MALLI/MODEL: Holly 1500: ERC2-1507 Holly 2000: ERC2-2009 DT Istr (ERC
TW-LTE 4G/3G. USB-modeemi (USB 2.0)
") TW-LTE 4G/3G USB-modeemi (USB 2.0) Tiedonsiirtonopeus: 100 Mbps/50 Mbps LTE: 1800/2100/2600 MHz GSM/GPRS/EDGE: 850/900/1800/1900 MHz UMTS: 900/2100 MHz Pikaohje (Finnish) CE Käyttöönotto- ohje SIM- kortin
TW-LTE 4G/3G USB-modeemi (USB 2.0) Tiedonsiirtonopeus: 100 Mbps/50 Mbps LTE: 1800/2100/2600 MHz GSM/GPRS/EDGE: 850/900/1800/1900 MHz UMTS: 900/2100 MHz Pikaohje (Finnish) CE Käyttöönotto- ohje SIM- kortin
The CCR Model and Production Correspondence
 The CCR Model and Production Correspondence Tim Schöneberg The 19th of September Agenda Introduction Definitions Production Possiblity Set CCR Model and the Dual Problem Input excesses and output shortfalls
Box 1. Things you have/ Pakkaus sisältää. x 4 x 16 x 4 x 4. 300mm. 1700mm. 300mm 1. Things you should know / Sinun Tulee Tietää
 Phobos 30 Things you should know / Sinun Tulee Tietää Things you prepare / Näitä Tarvitset DURING INSTALLATION ALL PRODUCTS: use protective gloves at all times use eye protection at all times never install
Kitchen Pendant 2/10/19
 Kitchen Pendant Kitchen Pendant Dining Area Dining Area Living Area Dining Area Bathroom 201 Quantity: 2 W A L L C O L L E C T I O N Voto Wall Square DESCRIPTION The Voto light by Tech Lighting is simply
34-9208-2. Trolley Case. Resväska Trillekoffert Matkalaukku. Push-button locking tele scopic handle. Four 360 multidirectional wheels
 34-9208-2 Trolley Case Resväska Trillekoffert Matkalaukku Push-button locking tele scopic handle Four 360 multidirectional wheels Trolley Case Made of polycarbonate. Push-button locking telescopic handle
Returns to Scale II. S ysteemianalyysin. Laboratorio. Esitelmä 8 Timo Salminen. Teknillinen korkeakoulu
 Returns to Scale II Contents Most Productive Scale Size Further Considerations Relaxation of the Convexity Condition Useful Reminder Theorem 5.5 A DMU found to be efficient with a CCR model will also be
Start Here Start her Aloita tästä Start her Börja här
 Start Here Start her Aloita tästä Start her Börja här 1 Install the software (required for full functionality). Installer softwaren (er nødvendig, for at alle funktionerne kan bruges). Asenna ohjelmisto
Micro Hi-Fi Component System
 4-245-460-11(1) Micro Hi-Fi Component System Betjeningsvejledning DK Käyttöohjeet FI CMT-CQ1 2003 Sony Corporation ADVARSEL Udsæt ikke enheden for regn eller fugt for at undgå risikoen for brand eller
Travel Getting Around
 - Location Olen eksyksissä. Not knowing where you are Voisitko näyttää kartalta missä sen on? Asking for a specific location on a map Mistä täällä on? Asking for a specific...wc?...pankki / rahanvaihtopiste?...hotelli?...huoltoasema?...sairaala?...apteekki?...tavaratalo?...ruokakauppa?...bussipysäkki?
Information on Finnish Language Courses Spring Semester 2018 Päivi Paukku & Jenni Laine Centre for Language and Communication Studies
 Information on Finnish Language Courses Spring Semester 2018 Päivi Paukku & Jenni Laine 4.1.2018 Centre for Language and Communication Studies Puhutko suomea? -Hei! -Hei hei! -Moi! -Moi moi! -Terve! -Terve
4x4cup Rastikuvien tulkinta
 4x4cup Rastikuvien tulkinta 4x4cup Control point picture guidelines Päivitetty kauden 2010 sääntöihin Updated for 2010 rules Säännöt rastikuvista Kilpailijoiden tulee kiinnittää erityistä huomiota siihen,
SAGA 150. Asennusohjeet. Mittaa oven korkeus. Piirrä seinään oven kiinni -päätyyn seinäkannattimen kohdalle vaakaviiva korkeudelle ovi + 75mm + 20 mm.
 SAGA 150 Asennusohjeet 500 1 2 Mittaa oven korkeus. Piirrä seinään oven kiinni -päätyyn seinäkannattimen kohdalle vaakaviiva korkeudelle ovi + 75mm + 20 mm. 3 Piirrä vesivaa an avulla viiva myös kiskon
Register your product and get support at www.saeco.com/welcome
 DANSK SUOMI Type HD8911 Register your product and get support at www.saeco.com/welcome 4219.460.2545.2 HD8911 INCANTO CMF FI, DA COVER A5 BW.indd 1 24-03-16 15:07 ESPRESSO 1 2 3 ESPRESSO LUNGO STEAM HOT
Voice Over LTE (VoLTE) By Miikka Poikselkä;Harri Holma;Jukka Hongisto
 By Miikka Poikselkä;Harri Holma;Jukka Hongisto") Voice Over LTE (VoLTE) By Miikka Poikselkä;Harri Holma;Jukka Hongisto If you are searched for a book by Miikka Poikselkä;Harri Holma;Jukka Hongisto Voice over LTE (VoLTE) in pdf form, then you have come
Voice Over LTE (VoLTE) By Miikka Poikselkä;Harri Holma;Jukka Hongisto If you are searched for a book by Miikka Poikselkä;Harri Holma;Jukka Hongisto Voice over LTE (VoLTE) in pdf form, then you have come
Blackwire 215/225. Analoginen johdollinen kuuloke. Käyttöopas
 Blackwire 215/225 Analoginen johdollinen kuuloke Käyttöopas Sisällysluettelo Tervetuloa 3 Tarvitsetko ohjeita? 3 Pakkauksen sisältö 4 Johdon säätimet 5 Kuulokkeen käyttäminen 6 Pääsangan säätäminen 6 Puomin
RF Dynamisk Fjärrkontroll. RF Dynaaminen Kaukosäädin
 Modell / Malli / Model: Art. no: 99 170 20 SE BRUKSANVISNING RF Dynamisk Fjärrkontroll FI KÄYTTÖOHJEET RF Dynaaminen Kaukosäädin EN INSTRUCTION MANUAL RF Dual Color Remote Controller SE Indikator Tryck
Calisto USB-kaiutinpuhelin. Käyttöopas
 Calisto 7200 USB-kaiutinpuhelin Käyttöopas Sisällysluettelo Yleiskatsaus 3 Connect to PC 4 Päivittäinen käyttö 5 Power 5 Äänenvoimakkuus 5 Mykistys / mykistyksen poisto 5 Puheluun vastaaminen tai puhelun
TW- LTE 4G/3G. USB- sovitin (USB 2.0)
") TW- LTE 4G/3G USB- sovitin (USB 2.0) Tiedonsiirtonopeus: 100 Mbps/50 Mbps LTE: 800/1800/2600 MHz GSM/GPRS/EDGE: 850/900/1800/1900 MHz UMTS: 900/2100 MHz Pikaohje (Finnish) CE Käyttöönotto- ohje SIM- kortin
TW- LTE 4G/3G USB- sovitin (USB 2.0) Tiedonsiirtonopeus: 100 Mbps/50 Mbps LTE: 800/1800/2600 MHz GSM/GPRS/EDGE: 850/900/1800/1900 MHz UMTS: 900/2100 MHz Pikaohje (Finnish) CE Käyttöönotto- ohje SIM- kortin
Information on Finnish Language Courses Spring Semester 2017 Jenni Laine
 Information on Finnish Language Courses Spring Semester 2017 Jenni Laine 4.1.2017 KIELIKESKUS LANGUAGE CENTRE Puhutko suomea? Do you speak Finnish? -Hei! -Moi! -Mitä kuuluu? -Kiitos, hyvää. -Entä sinulle?
Ajettavat luokat: SM: S1 (25 aika-ajon nopeinta)
") SUPERMOTO SM 2013 OULU Lisämääräys ja ohje Oulun Moottorikerho ry ja Oulun Formula K-125ry toivottaa SuperMoto kuljettajat osallistumaan SuperMoto SM 2013 Oulu osakilpailuun. Kilpailu ajetaan karting radalla
SUPERMOTO SM 2013 OULU Lisämääräys ja ohje Oulun Moottorikerho ry ja Oulun Formula K-125ry toivottaa SuperMoto kuljettajat osallistumaan SuperMoto SM 2013 Oulu osakilpailuun. Kilpailu ajetaan karting radalla
16. Allocation Models
 16. Allocation Models Juha Saloheimo 17.1.27 S steemianalsin Optimointiopin seminaari - Sks 27 Content Introduction Overall Efficienc with common prices and costs Cost Efficienc S steemianalsin Revenue
Reliable diagnostic support Ultra-light design
 EN Powerful illumination Intelligent charging management Reliable diagnostic support Ultra-light design VISIOMED Optima UV original scale 1:1 VISIOMED Optima Quality Made Easy and an illumination close
IEC IP V AC. VIZULO Stork Little Brother LED street luminaire / katuvalaisin. Mounting instruction Asennusohjeet. min 40 C.
 VIZULO Stork Little Brother LED street luminaire / katuvalaisin Mounting instruction Asennusohjeet 05 IEC EN 60598 IP66 min 40 C max + 45 C 198-264 V AC PH2 4 6 29/01/2016 SIA VIZULO Ganibu dambis 7a,
 Register your product and get support at www.philips.com/welcome HF3330 1 English 6 Dansk 25 Suomi 44 Norsk 62 Svenska 81 HF3330 6 English Introduction Congratulations on your purchase and welcome to
Micro Hi-Fi Component System
 4-246-167-11(3) Micro Hi-Fi Component System Betjeningsvejledning DK Käyttöohjeet FI CMT-EP315 CMT-EP313 2003 Sony Corporation 4-246-167-11(3) ADVARSEL Udsæt ikke enheden for regn eller fugt for at undgå
IC-optager Ejer-registrering Fejlsøgning ICD-P530F
 Klargøring IC-optager Betjeningsvejledning Ejer-registrering Modelnummeret sidder på bagpanelet, og serienummeret sidder inde i batterirummet. Noter serienummeret på pladsen nedenfor. Henvis til disse
ALOITUSKESKUSTELU / FIRST CONVERSATION
 ALOITUSKESKUSTELU / FIRST CONVERSATION Lapsen nimi / Name of the child Lapsen ikä / Age of the child yrs months HYVINKÄÄN KAUPUNKI Varhaiskasvatuspalvelut Lapsen päivähoito daycare center / esiopetusyksikkö
KLV-20SR3. LCD Colour TV. Betjeningsvejledning. Käyttöohje. Bruksanvisning. Manual de Instrucciones 2-067-275-32 (1) 2004 by Sony Corporation
 2004 by Sony Corporation") 2-067-275-32 (1) R LCD Colour TV Betjeningsvejledning Før fjernsynet betjenes, læses afsnittet Sikkerhedsoplysninger i denne vejledning. Behold denne vejledning til fremtidige opslag. Käyttöohje Lue tämän
2-067-275-32 (1) R LCD Colour TV Betjeningsvejledning Før fjernsynet betjenes, læses afsnittet Sikkerhedsoplysninger i denne vejledning. Behold denne vejledning til fremtidige opslag. Käyttöohje Lue tämän
Installation instruction PEM
 Installation instruction ASENNUSOHJE PEM1032 2010-02 SURGE ARRESTER SET FOR POLE MOUNT TRANSFORMER YLIJÄNNITESUOJASETTI PYLVÄSMUUNTAJALLE ENGLISH SUOMI 2/8 PEM1032 2010-02 ENGLISH GENERAL INFORMATION -
7.4 Variability management
 7.4 Variability management time... space software product-line should support variability in space (different products) support variability in time (maintenance, evolution) 1 Product variation Product
KLV-27HR3 KLV-23HR3. LCD Colour TV. Betjeningsvejledning. Käyttöohje. Bruksanvisning. Manual de Instrucciones 2-349-779-32 (1)
") 2-349-779-32 (1) R LCD Colour TV Betjeningsvejledning Før fjernsynet betjenes, læses afsnittet Sikkerhedsoplysninger i denne vejledning. Behold denne vejledning til fremtidige opslag. Käyttöohje Lue tämän
2-349-779-32 (1) R LCD Colour TV Betjeningsvejledning Før fjernsynet betjenes, læses afsnittet Sikkerhedsoplysninger i denne vejledning. Behold denne vejledning til fremtidige opslag. Käyttöohje Lue tämän
VAROITUKSET. Älä pura laitetta osiin.
 VAROITUKSET Laitteen väärinkäyttö voi johtaa henkilövahinkoihin. Noudata kaikkia tässä ohjekirjassa annettuja ohjeita ja käytä laitetta oikein. Älä koskaan seiso laitteen alapuolella. Älä pura laitetta
S Sähkön jakelu ja markkinat S Electricity Distribution and Markets
 S-18.3153 Sähkön jakelu ja markkinat S-18.3154 Electricity Distribution and Markets Voltage Sag 1) Kolmivaiheinen vastukseton oikosulku tapahtuu 20 kv lähdöllä etäisyydellä 1 km, 3 km, 5 km, 8 km, 10 km
Exercise 1. (session: )
") EEN-E3001, FUNDAMENTALS IN INDUSTRIAL ENERGY ENGINEERING Exercise 1 (session: 24.1.2017) Problem 3 will be graded. The deadline for the return is on 31.1. at 12:00 am (before the exercise session). You
EEN-E3001, FUNDAMENTALS IN INDUSTRIAL ENERGY ENGINEERING Exercise 1 (session: 24.1.2017) Problem 3 will be graded. The deadline for the return is on 31.1. at 12:00 am (before the exercise session). You
TIKIT a) Suorassa tikissä ristiommel jää nahan alle piiloon. b) Ristitikissä ommel jää näkyviin.
 Suorassa tikissä ristiommel jää nahan alle piiloon. b) Ristitikissä ommel jää näkyviin.") CML WHEEL COVER -RUORINAHKAN OMPELUOHJE Liota nahkoja lämpimässä vedessä n. 15 minuuttia ennen ompelua. Pidä nahka kosteana koko ompelun ajan esim. sumutepullolla. Pidä ommellessa kevyt kireys nahkaan,
CML WHEEL COVER -RUORINAHKAN OMPELUOHJE Liota nahkoja lämpimässä vedessä n. 15 minuuttia ennen ompelua. Pidä nahka kosteana koko ompelun ajan esim. sumutepullolla. Pidä ommellessa kevyt kireys nahkaan,
Arbetsplatsarmatur och badrumsarmatur Work-point and Bathroom luminaire Työpiste- ja kylpyhuonevalaisin. Onndeli Onnsani
 Arbetsplatsarmatur och badrumsarmatur Work-point and Bathroom luminaire Työpiste- ja kylpyhuonevalaisin Onndeli Onnsani Arbetsplatsarmatur Work-point luminaire Työpistevalaisin Onndeli Työpistevalaisin
DEUTSCH. Electric 33 8211-0207-07
 DEUTSCH D Electric 8-00-0 S SVENSKA 5 8 6 9 5 5.. SVENSKA S = 0 mm = 0 mm = 0 mm = 50 mm 0 mm 60 mm A C B.. 5.. 6. S SVENSKA 8. 9. INFORMATION OM STRØMFORBRUG Flere og flere maskiner, som f.eks. plæneklippere,
Hotel Pikku-Syöte: accommodation options and booking
 Hotel Pikku-Syöte: accommodation options and booking 13 th European Forest Pedagogics Congress 2-5 October 2018 (Accomodation information in Finnish at the end) Hotel Pikku-Syöte has total of 82 rooms
SELL Student Games kansainvälinen opiskelijaurheilutapahtuma
 SELL Student Games kansainvälinen opiskelijaurheilutapahtuma Painonnosto 13.5.2016 (kansallinen, CUP) Below in English Paikka: Nääshalli Näsijärvenkatu 8 33210 Tampere Alustava aikataulu: Punnitus 12:00-13:00
Tarua vai totta: sähkön vähittäismarkkina ei toimi? 11.2.2015 Satu Viljainen Professori, sähkömarkkinat
 Tarua vai totta: sähkön vähittäismarkkina ei toimi? 11.2.2015 Satu Viljainen Professori, sähkömarkkinat Esityksen sisältö: 1. EU:n energiapolitiikka on se, joka ei toimi 2. Mihin perustuu väite, etteivät
PDP Colour TV KE-P37XS1 KE-P42XS1
 4-102-916-21 (1) R PDP Colour TV KE-P37XS1 KE-P42XS1 Betjeningsvejledning Før fjernsynet betjenes, læses afsnittet Sikkerhedsoplysninger i denne vejledning. Behold denne vejledning til fremtidige opslag.
FIS IMATRAN KYLPYLÄHIIHDOT Team captains meeting
 FIS IMATRAN KYLPYLÄHIIHDOT 8.-9.12.2018 Team captains meeting 8.12.2018 Agenda 1 Opening of the meeting 2 Presence 3 Organizer s personell 4 Jury 5 Weather forecast 6 Composition of competitors startlists
Trådlös laddstation QI. Langaton QI-latausalusta. QI Wireless Charging Pad
 Modell / Malli / Model: T511 99 940 84 SE BRUKSANVISNING Trådlös laddstation QI FI KÄYTTÖOHJEET Langaton QI-latausalusta EN INSTRUCTION MANUAL QI Wireless Charging Pad SE Innehåll Trådlös laddstation USB-kabel
Särmäystyökalut kuvasto Press brake tools catalogue
 Finnish sheet metal machinery know-how since 1978 Särmäystyökalut kuvasto Press brake tools catalogue www.aliko.fi ALIKO bending chart Required capacity in kn (T) in relation to V-opening. V R A S = plates
Wireless Audio System
 4-123-166-11(1) Wireless Audio System Brugsanvisning DK Käyttöohjeet FI AIR-SA20PK 2009 Sony Corporation ADVARSEL For at reducere risikoen for brand og elektrisk stød, må dette apparat ikke udsættes for