Universal Remote Control
|
|
|
- Laura Tikkanen
- 9 vuotta sitten
- Katselukertoja:
Transkriptio
1 3 A Universal Remote Control KH 2157 Universal Remote Control Operating manual Yleiskaukosäädin Käyttöohje KOMPERNASS GMBH BURGSTRASSE 21 D BOCHUM ID-Nr.: KH /09-V2 08/2009 Universalfjärrkontroll Bruksanvisning

2 KH 2157
3 INDEX PAGE Important safety instructions 2 Device summary 3 Initial use 4 Unpacking the device / checking the package contents 4 Inserting the batteries 4 Operating components 5 LCD display 5 Buttons 6 SETUP - System settings 9 Code Setup (Programming the remote control) 11 Programming by brand code search 11 Programming by manual code input 12 Programming by automatic code search 12 System-Setup 14 Setting the time 14 Setting the date 14 Adjust contrast 15 Background Illumination 15 System reset 15 Timer Setup 16 Sleep timer 16 Event timer 16 Learn Setup 17 Code learn function 17 Macro Setup 18 Favourites channel 20 Volume control 21 Vol +/, (Mute switching) 21 For operation 22 All OFF 22 Cleaning and storage 22 Faults / Remedies 23 Disposal 24 Note regarding conformity 24 Importer 24 Technical data 24 Warranty & Service
 21 For operation 22 All OFF 22 Cleaning and storage 22 Faults / Remedies 23 Disposal 24 Note regarding conformity 24 Importer 24")
4 Universal remote control KH2157 This documentation is copyright protected. All rights including those of photographic reproduction, duplication and distribution by means of particular methods (for example data processing, data carriers and data networks), wholly or partially as well as substantive and technical changes are reserved. Read the operating instructions carefully before using the device for the first time and preserve this booklet for later reference. Pass this manual on to whoever might acquire the device at a future date. Important safety instructions Proper use Children may only operate the remote control under adult supervision. The universal remote control can replace a maximum of ten remote controls. It can only be used for entertainment electronics with infrared receivers. The functions of the Universal remote control essentially correspond to those of the original remote control. The universal remote control is intended for private use. It is not suitable for commercial use. Any other use is considered improper use. The manufacturer accepts no responsibility for damage caused by improper handling or unauthorized reconstruction. Warning A warning of this danger level signifies a possible dangerous situation. If the dangerous situation is not avoided it can lead to injuries. The directives in this warning are there to avoid personal injuries. Important A warning of this danger level signifies possible property damage. If the situation is not avoided it can lead to property damage. The directives in this warning are there to avoid property damage. Note A note signifies additional information that assists in the handling of the device. Warning of injury danger as a result of improper handling of batteries! Batteries must be handled with special care. Take note of the following safety instructions: Keep batteries well away from children. Children can put batteries into their mouths and swallow them. If a battery is swallowed medical assistance must be sought IM- MEDIATELY. Do not throw batteries into a fire. Never subject batteries to high temperatures

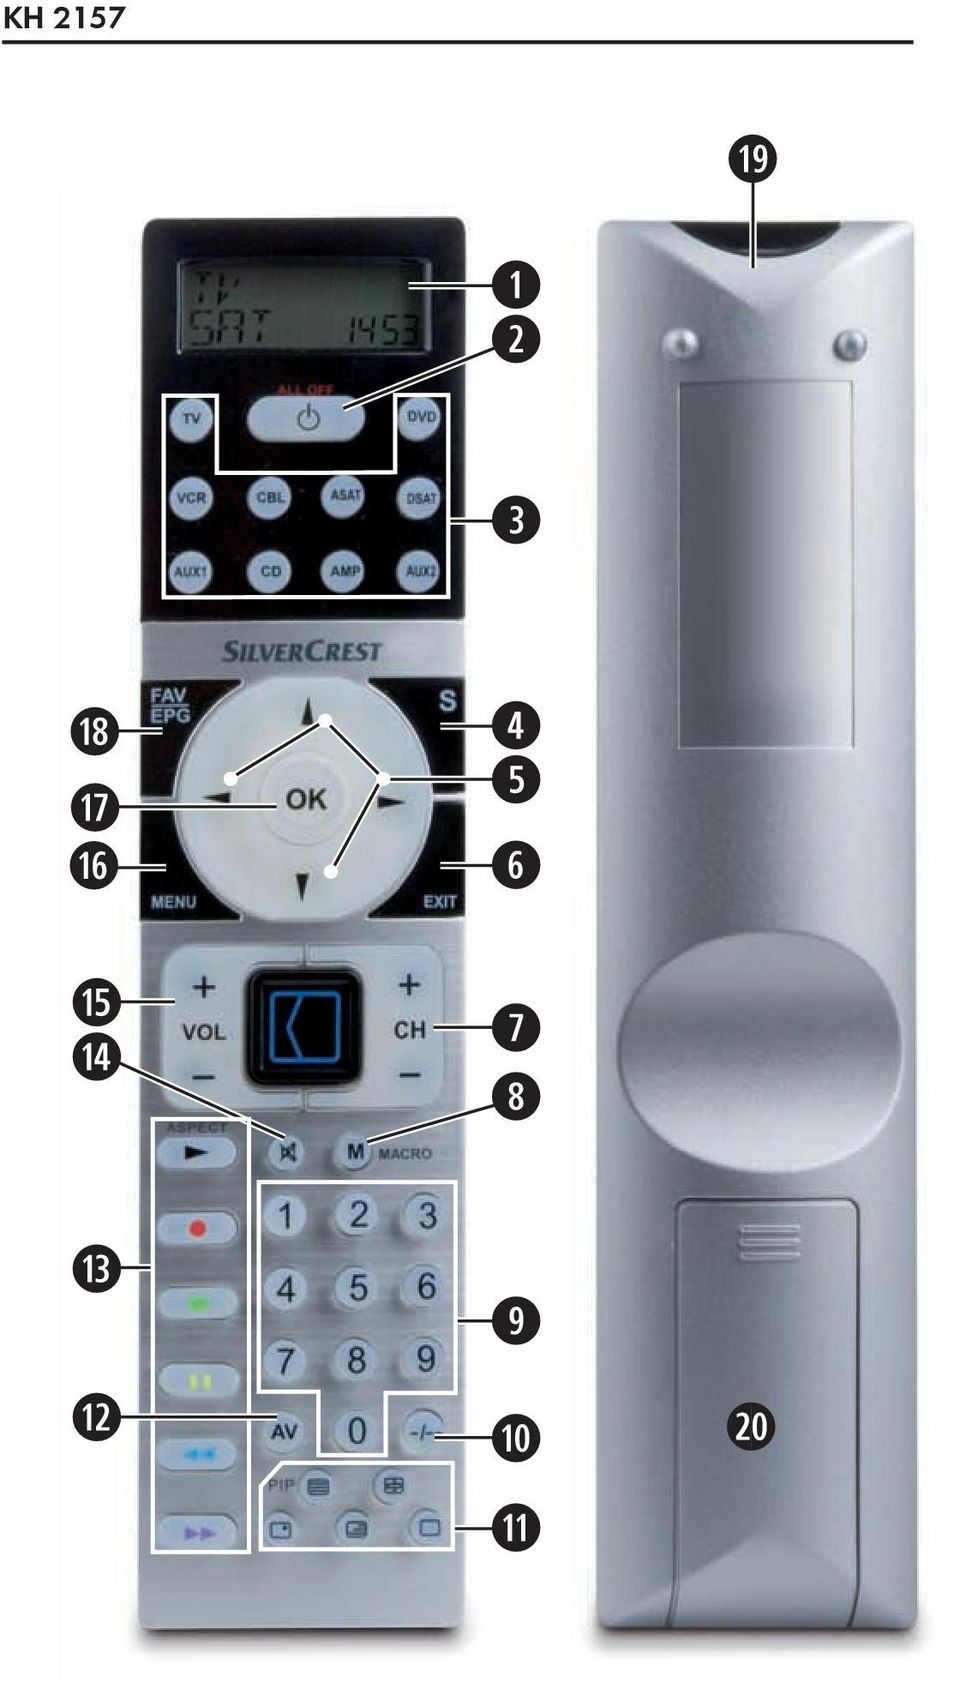
5 Explosion hazard! Non-rechargeable batteries must never be recharged. Do not open the batteries or short-circuit them. Battery acid leaking from a battery can cause inflammation of the skin. In event of contact with the skin, rinse with large amounts of water. If the liquid comes into contact with your eyes, rinse thoroughly with water, do not rub and immediately consult a doctor. Laser warning The Universal remote control contains an infrared diode of laser class 1. A safety system prevents the emmision of dangerous laser radiation during use. To prevent eye injuries, do not modify or damage the safety system of the device. Damage to the device If the device is defective, do not attempt to repair it yourself. In case of damage, contact the manufacturer or the manufacturer's service hotline (see Warranty information). If liquid escapes from the device or if the device has been otherwise damaged, it must be inspected by the manufacturer or the manufacturer's service hotline. Contact the manufacturer or the manufacturer's service hotline (see Warranty information). Take the batteries out of the battery compartment as soon as they are depleted. If you will not be using the device for a long period of time, remove the batteries to prevent them from discharging. Always change all batteries at the same time and always use batteries of the same type. Device summary q LCD display w /ALL OFF button e Device buttons r S button t Arrow buttons y EXIT button u CH +/ buttons i MACRO button o Number buttons a Button for one or two digit programme numbers s Teletext function buttons d AV button f Record/Playback buttons g Mute switching h VOL +/ buttons j MENU button k OK button l FAV / EPG button 1( Infrared sender/receiver 2) Battery compartment cover - 3 -

6 Tips: The functions described here pertain to the theoretically ideal circumstance that the button structure of the respective original remote control is identical to this universal remote control. This only occurs, however, in rare cases. If, therefore, not all of the original remote control's functions can be reproduced it is not due to a dificiency in the Universal remote control. All the brand names used in these instructions or in the accompanying code list are trademarks of the corresponding companies. Initial use Unpacking the device / checking the package contents Warning! Keep the plastic packaging well away from small children. There is a risk of suffocation! Unpack the device and accessories. Check the package contents - Universal remote control (URC), - Operating instructions, - Manufacturers directory with device code list: - 2 x 1,5 V Batteries, type AAA/LR03 (Micro) Remove the protective foil from the LCD display q. Note: Transport damage If you notice any transport damage contact the manufacturer or the manufacturer's Service-Hotline (see warranty information). Inserting the batteries Attention! The Universal remote control must only be operated with 1.5 Volt batteries (Type AAA, LR03). Carry out the battery change as quickly as possible. Preset settings will remain saved for approx. 1 minute. If new batteries have not been installed within this time all of the settings will have to be carried out again. The time of day will, however, in any case be deleted

7 1. Open the battery compartment cover 2) in the direction of the arrow. 2. Insert the batteries as shown in the diagram and close the battery compartment. The LCD display q is activated as long as batteries are installed. The following diagram shows the LCD display q after the batteries have been installed or changed. Note: If no LCD display q is visible check the polarity of the batteries or install new ones. Operating components LCD display The LCD display q is divided into fields. Text field 2! Here is shown the currently selected device, for example DVD, TV VCR etc. Infrared symbol 2@ Every time a button is pressed, with which an infrared signal is to be sent the Infrared symbol illuminates. Code/Time field 2# Here is shown the device code of the relevent selected device or the time of day. With the time of day indicator ":" the numbers blink in the middle. Day of the week field 2$ Here you can read the English shortened form of the current day of the week after you have entered the date

8 MON Tue WED THU FRI SAT SUN = Monday = Tuesday = Wednesday = Thursday = Friday = Saturday = Sunday Standard display: The standard readout of the LCD display q consists of the details for the relevent device, for example, "TV", the initial for the day of the week and the time of day indicator. Buttons Note: All the functions described here can, of course, only be used if they are supported by the device being controlled. /ALL OFF button. w Switch device on/off. hold down for approx. 5 seconds to switch all devices on/off. Device buttons e The device buttons are used to select the device that should be operated. Television Video recorder Accessory unit 1 Cable receiver CD player Analogue satellite receiver Audio amplifier DVD player Digital satellite receiver Accessory unit 2 "S" button r Hold down for 3 seconds to access the SETUP menu

9 Arrow buttons t Move up, right, left and down in menus. EXIT button y Move a level backward in the menu. CH +/ buttons u Change the reception channel. MACRO button i MACRO button i followed by a number button o 1-4 activates a previously saved chain of commands. Number buttons o Enter programme and device code numbers. Button for one/two digit programme numbers a For two digit programme numbers (depending on the device type) first press the a button then via the number buttons o enter the programme number. When pressed again the display becomes single digit once more. Teletext function buttons s In teletext operation the buttons have the following functions: Access the teletext function Stop automatic paging forward for multi-page teletexts. Enlarge page presentation Screen text and TV image one upon the other To end the teletext function

10 Note: The teletext function is only available in the European TV mode and your TV device must have a teletext module. In addition the CH+/- buttons u control the following teletext functions: CH + Leaf one page forward CH Leaf one page backwards In the normal TV mode the -button controls the PIP function (picture in picture) of your television set. AV button d Switch to the AV input. Record/playback buttons f The playback buttons f control devices such as DVD/CD players and video recorders: ASPECT Start playback Image format switching with TV operation. Record Stop Playback/Record/Wind Pause playback Rewind Mute switching g Wind forward Switch sound on/off. VOL+/ buttons h Set volume (Volume). MENU button j Access the menu of the controlled device. OK button k You can confirm a menu selection with the OK button. FAV/EPG button l The FAV/EPG button accesses the electronic programme guide of the device and/or your previously programmed favourite stations

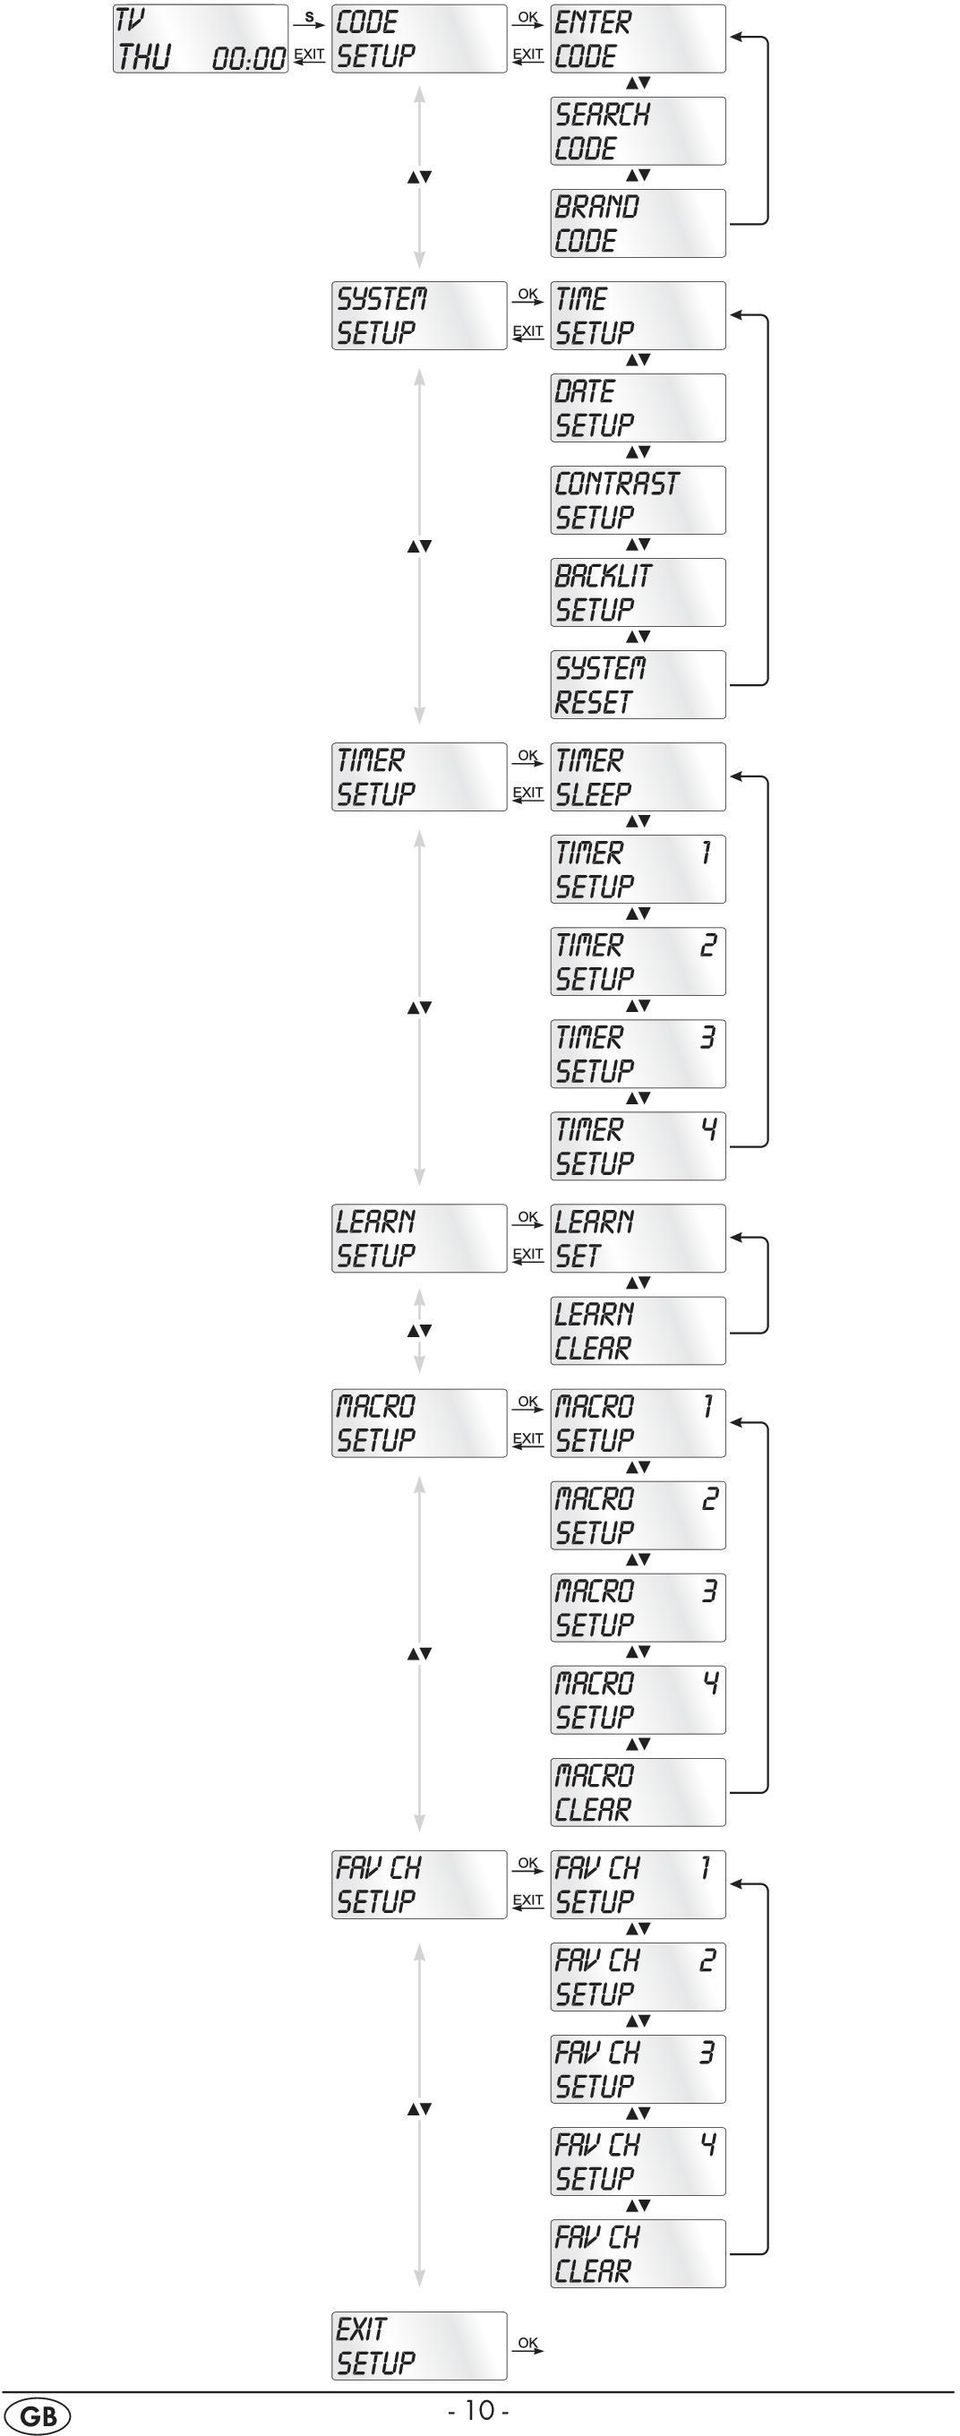
11 SETUP - System settings In the system settings you undertake the following: Programming the remote control to the devices to be controlled Time of day setting, date, display contrast and background illumination as well as system reset Timer settings The "learning" of designated button commands Setting up Macros Assigning favourites On the following page you can see a summary of the menu structure

12 - 10 -
13 Code Setup (Programming the remote control) 3 Programming methods are available for the remote control: Programming by brand code search, by automatic code search and by direct code input (manual). First you should use the brand code search since this method is the fastest way of programming if the manufacturer of your device is itemized in the code list. As second is recommended the direct code input followed by the automatic code search. Programming by brand code search With this method you select the brand and code direct via the LCD display q. Observe the following operational references to programme the remote control 1. Press the device button e for the device that you want to programme the remote control. 2. Hold down the S button r for a little longer than 3 seconds. Carry out entries in the menu quickly because after approx. 15 seconds without an entry the menu will be ended. 3. In the LCD display q "CODE SETUP" appears. Press the OK button k. "ENTER CODE" now appears in the LCD display q. With the buttons t select "BRAND CODE" and confirm with the OK button k. 4. Now appears the alphabetical first brand name from the list of pre-programmed devices. 5. With the 34 buttons t select the various brand names. 6. To make access easier you can skip directly to specific letters of the alphabet with the number buttons o: 2 => A 3 => D 4 => G 5 => J 6 => M 7 => P 8 => T 9 => W Example With button number 5 the display skips to the letter "J". The first brand is "JVC"*. If, for example, you own a "Kenwood"* brand device, continue leafing with the 4 button t until this brand name appears. (* All brand names used here are trademarks of the corresponding manufacturer.) 7. The majority of manufacturers use several different codes for the remote control. You must now ascertain which of the available codes is best suited to your device. On the right underneath the brand name the relevent code will be shown in the LCD display q. 8. Point the remote control to the relevent device and press the function buttons to test the code (except t, OK k, EXIT y, or the number buttons o)

14 9. If most of the buttons function press the OK button k to save the setting. In the LCD display q "OK" appears. Now the mode "BRAND CODE" appears again. 10. If, however, none or only a few of the buttons function select with the 5 or 6 button t the next code and test again as described in step With the EXIT button y you will move one level upwards in the menu. Repeat these operational steps for all devices that you would like to control with the remote control. Programming by manual code input In this mode the remote control can be programmed by direct input of a code number. You can obtain the necessary code number from the enclosed manufacturers directory with device code list. In the event that the new code is invalid the last valid programmed code will be restored. 1. Press the device button e for the device that you want to programme the remote control. 2. Hold down the S button r for a little longer than 3 seconds. 3. In the LCD display q "CODE SETUP" appears. Press the OK button k. "ENTER CODE" now appears in the LCD display q. To access this function press the OK button k. 4. In the LCD display q appears the presently used code for the selected device. Now the first digit of the code blinks and waits for your code input. Enter the new four digit code via the number buttons o. 5. If the entered CODE is valid the code will be saved. In the LCD display q "OK" appears briefly and then again "ENTER CODE". In the event of failure the LCD display q shows briefly "ERROR" and waits for a new code entry. Then you repeat step With the EXIT button y you will move one level upwards in the menu. Programming by automatic code search This process can take several minutes per device since all codes for the selected device have to be gone through. Therefore this method should only be used when the device cannot be programmed via brand code search or direct code input or if your device is not listed at all in the manufacturers directory with device code list. Follow the steps listed below to carry out programming by means of the automatic code search

15 1. Press the device button e for the device that is to be controlled (i.e. VCR). 2. Switch the device that is to be controlled with the remote control on. With VCR/DVD/CD devices please insert a tape and/or disc. 3. Hold down the S button r for a little longer than 3 seconds. 4. In the LCD display q "CODE SETUP" appears. Press the OK button k. "ENTER CODE" now appears in the LCD display q. Press the or button t until "SEARCH CODE" is shown in the LCD display q. Point the remote control to the device and then press the OK button k to access the mode "automatic code search". 5. The search begins. Thereby the device sends, one after the other, the code numbers in ascending order. The infrared symbol 2@ indicates this. 6. When the device reacts by switching off press immediately the OK button k to save the relevent code. The LCD display q shows briefly "OK". 7. Check to see if the majority of your device's functions can now be controlled with the remote contol. If yes you have most probably found the correct code. In the event that a few functions are not working you can start the automatic code search again beginning with step However if the device does not react any more you probably did not press the OK button k quick enough in step 6. Then press repeatedly the EXIT button y to exit the menu and return to the standard display. 9. Now hold down the device button e of the device for which you have just sought the relevent code. Below on the right in the LCD display q will thereby be shown the relevent code. Make a note of this number. 10. Then proceed as described in the preceding chapter "Programming by manual code entry" and check to see if the code with the next lowest number combination will function. Tips: 1. When code search is activated all buttons except OK k and EXIT y are ignored. 2. Should the correct code be found, however the device's original remote control did not have a POWER button then it is possible that the device cannot be switched on or off remotely. Then try the buttons 4 t, CH + u or MUTE SWITCHING 1$. 3. If the automatic search has reached the end of the code list it stops there. The display then returns to "SEARCH CODE"

16 System-Setup Setting the time The LCD display q shows you the time of day. You set this as follows: 1. Hold down the S button r for a little longer than 3 seconds. The notice "CODE SETUP" appears. If appox. 15 seconds passes without an entry the device exits the menu and returns to the standard display. 2. With the or button t select "SYSTEM SETUP" and confirm with the OK button k. 3. In the LCD display q "TIME SETUP" appears. Confirm with the OK button k. The LCD display q now shows "TIME" and the time format (24 HR) blinks. 4. With the or button t you can switch to the other time format (12 HR). After which the time display for the time of day will show an A or P before the time. A stands fpr AM = ante meridium (Morning, 0:00 o clock midnight to 12:00 o clock midday). P stands for PM = post meridium (Afternoon and evening, 12:00 o clock midday to 0:00 o clock midnight). Press the OK button k to confirm. 5. Now the hour indicator blinks. With the or button t select the hour number for the present time of day and press the OK button k. 6. Now the minute indicator blinks. With the or button t select the minute number for the present time of day and press the OK button k to save. The "TIME SETUP" notice appears again. 7. To exit this or the following menus press repeatedly the EXIT button y until the standard display appears in the LCD display q. Setting the date The LCD display q shows you the date when you press the S button r. You set the date in this way: 1. Hold down the S button r for a little longer than 3 seconds. The notice "CODE SETUP" appears. 2. With the or button t select "SYSTEM SETUP" and confirm with the OK button k. 3. In the LCD display q "TIME SETUP" appears. Press the button t to change to "DATE SETUP". Confirm with the OK button k. 4. In the display the year "2009" blinks. With the or button t you can change the year and confirm with the OK button k. With the or button t you can change the now blinking month and confirm with the OK button k. Now the day indicator blinks which you can also change with the or button t. 5. To save press the OK button k. The "DATE SETUP" notice appears again
. After which the time display for the time of day will show an A or P before the time.")
17 Adjust contrast You can set the display's contrast as follows: 1. Hold down the S button r for a little longer than 3 seconds. The notice "CODE SETUP" appears. 2. With the or button t select "SYSTEM SETUP" and confirm with the OK button k. 3. With the or button t select "CONTRAST SETUP" and confirm with the OK button k. 4. In the LCD display q the contrast value now blinks which you can set with the or button t. Display readout: 0 = highest contrast: 15 = lowest contrast 5. With the OK button k you can save the desired setting. The notice "CONTRAST SETUP" appears again. Background Illumination You can set how long the LCD display s q background and the button illuminations remain alight after completion of the operation.. Thereby taking into account that the longer the illumination remains lit the shorter the battery life will be. 1. Hold down the S button r for a little longer than 3 seconds. The notice "CODE SETUP" appears. 2. With the or button t select "SYSTEM SETUP" and confirm with the OK button k. 3. With the or button t select "BACKLIT SETUP" and confirm with the OK button k. 4. In the LCD display q now blinks the second count for the length of time that the light is to be left on which you can set with the buttons t from 0 to 60. If you select "0" the background illumination will shut off completely. 5. With the OK button k you can save the desired setting. The notice "BACKLIT SETUP" appears again. System reset Via this function you can reset the URC to its factory default settings. Thereby all settings made by you will be deleted. 1. Hold down the S button r for a little longer than 3 seconds. The notice "CODE SETUP" appears. 2. With the or button t select "SYSTEM SETUP" and confirm with the OK button k. 3. With the or button t select "SYSTEM RESET" and confirm with the OK button k. 4. In the LCD display q now appears "CONFIRM RESET". Confirm the reset with the OK button k or exit the menu by pressing the EXIT button y. All settings are now deleted and the menu will end

18 Timer Setup The URC offers 2 timer modes, sleep timer and event timer. Sleep timer 1. Press the device button e for the device that is to be controlled (i.e. VCR). 2. Hold down the S button r for a little longer than 3 seconds. The notice "CODE SETUP" appears. 3. Press the or button t until "TIMER SETUP" is shown. Press the OK button k "TIMER SLEEP" appears in the LCD display q. Confirm the selection of this function with the OK button k. 4. Now, below to the right in the LCD display q blinks the minutes for the remaining time of the selected device. Set with the or button t the desired value from 1 to 99 minutes. Press the OK button k to confirm. 5. Position the remote control in such a way that your infrared signal can reach the device to be switched off. After expiration of the set time the remote control will switch the device off. 6. To check if the SLEEP timer is activated press the S button r. Then below to the left in the LCD display q "SL" will be shown. Event timer The remote control has 4 event timers available via which you are allowed to send out specific series of button combinations at designated times. 1. Hold down the S button r for a little longer than 3 seconds. The notice "CODE SETUP" appears. 2. With the or button t select "TIMER SETUP" and confirm with the OK button k. "TIMER SLEEP" appears in the LCD display q. With the or button t select the desired memory slot "TIMER SETUP 1" to "TIMER SETUP 4" and confirm with the OK button k. 3. Now the hour of the time of day, to which the desired button combinations are to be carried out, blinks. Set with the or button t the desired hour and press for confirmation the OK button k. 4. Now the minutes of the time of day, to which the desired button combinations are to be carried out, blinks. Set with the or button t the desired minutes and press for confirmation the OK button k. 5. In the LCD display q you will see "TIMER X KEY" (X stands for the desired timer). Now press the desired device button e followed by the desired sequence of the button commands. 6. Press the S button r to save your entry and to return to the timer menu. 7. Procede in a similar manner in order to, if required, programme the other timer memory slots also

19 Tips: 1. Per timer memory slot a maximum of 14 buttons can be programmed. After entry of the 14th button the sequence will be automatically saved and "FULL" is shown in the LCD display q. 2. In this menu also the device will return to the standard display after approx. 15 seconds without an entry. Learn Setup The Universal remote control (URC) can learn and save button signals of an original remote control. If the URC does not work after applying the programming methods already described or cannot carry out all commands please attempt to teach the URC with the help of the original remote control. Use new batteries for the URC and the original remote control. Maintain a distance of at least one metre from other light sources. The light sources could disrupt the infrared transmission. Place the URC and the original remote control at a distance of 20 to 50 mm from each other on an even surface so that the infrared diodes 1( are facing each other. Tips: 1. Do not use the following buttons for the learn function: all device buttons e, MACRO i, S button r, EXIT y. 2. When teaching please do not release the button of the original remote control until "SUCCESS" or "LEARN ERROR" appears in the LCD display q. 3. If when teaching, during the notice "LEARNING", no button is pressed on the original RC after 25 seconds the learn menu will end. This mode can not be ended by pressing a button on the URC. 4. If the memory is full the LCD display q shows "LEARN FULL" and the learn mode will end. 5. With the EXIT button y you return to the previous status (except with a notice of "LEARN KEY" and/or "LEARN- ING"). Code learn function 1. Press the device button e for the device that the URC should learn a button code. 2. Hold down the S button r for a little longer than 3 seconds. The notice "CODE SETUP" appears. 3. With the or button t select the menu "LEARN SETUP" and then press the OK button k. 4. In the LCD display q "LEARN SET" appears. Then press the OK button k. In the LCD display q "LEARN KEY" appears

20 5. First press the button on the URC that is to be taught. In the LCD display q "LEARNING" appears. The URC now waits for the infrared signal from the original remote control. Note: Should the notice not change to "LEARNING" you have selected a button for which no button code can be taught. 6. Point the infrared sensors 1( of both remote controls towards each other. 7. Now hold down the desired button of the original remote control until "SUCCESS" or "LEARN ERROR" appears in the display q of the URC. 8. If in the LCD display q "SUCCESS" appears (process successful), you can teach further buttons begining with step 5. If "LEARN ERROR" appears (process unsuccessful) repeat the process in any case from step To stop the learning process press, during the display LEARN SET, repeatedly the EXIT button y until the standard display is show in the LCD display q. During the notice "LEARN KEY" and/or "LEARNING" simply allow 25 seconds to pass without any operation then the device will end the menu. Delete all of a device's programmed buttons 1. Press the device button e for the device that you want to delete all taught button codes. 2. Hold down the S button r for a little longer than 3 seconds. The notice "CODE SETUP" appears. 3. With the or button t select the menu "LEARN SETUP" and then press the OK button k. In the LCD display q "LEARN SET" appears. 4. With the or button t select "LEARN CLEAR" (taught delete) and confirm with the OK button k. In the LCD display q "CONFIRM CLEAR" (confirm delete) appears. 5. Confirm with the OK button k. In the LCD display q "SUCCESS" appears. All programmed buttons for the selected device are deleted. Finally the menu will automatically end. Note: When the LCD display shows CONFIRM CLEAR you can stop the deletion with the EXIT button y. Macro Setup With the MACRO function up to 16 button commands can be carried out with the press of a single button, that is to say, several previously saved control commands can be deleted with one MACRO button. There are 4 Macro memory slots available for you
, you can teach further buttons begining with step 5.")
21 To programme a Macro For Macro programming proceed as follows: 1. Hold down the S button r for a little longer than 3 seconds. The notice "CODE SETUP" appears. 2. With the or button t select "MACRO SETUP" and confirm with the OK button k. In the display "MACRO SETUP 1" appears. 3. With the or button t select the memory slot to be programmed (MACRO SETUP 1-4) and confirm with the OK button k. 4. In the LCD display q "MACRO STEP" appears. Now press, one after the other, the desired buttons (max. 16). The sequence should begin with a device button e. 5. When the maximum number of button commands is reached the LCD display q shows "FULL". 6. Save the entry with the S button r. In the LCD display q "MACRO SETUP" appears. 7. If, with the selection of the Macros to be programmed (step 3), you select a memory slot that is already occupied the existing Macro will be overwritten. 8. Repeat the process from step 3 to create further Macros. 9. With the EXIT button y you move a level upwards in the menu except during the entry of the button commands. Tips: 1. A maximum of 16 button commands can be saved in a Macro. After entering the 16 button commands the Macro is automatically saved and in the LCD display q "FULL" appears. 2. To exit the mode without saving allow approx. 15 seconds to pass without an entry. 3. In the mode "MACRO STEP" you can only return to the previous status with the S button r. Example: You want to save a command chain in a Macro. We begin in the mode "MACRO STEP". Desired command chain: Switch on TV => switch to the AV input => switch on DVD and playback. In the mode "MACRO STEP", for this you enter the following button commands: => => => => => Execute a Macro To execute a pre-programmed Macro proceed as follows: 1. Press the MACRO button i. 2. With the corresponding number button o you access the desired Macro (1-4). Example: If Macro 3 is to be implemented press first the Macro button i and then, within 5 seconds, the number button " "
22 To delete all Macros To delete all pre-programmed Macros proceed as follows: 1. Hold down the S button r for a little longer than 3 seconds. The notice "CODE SETUP" appears. 2. With the or button t select "MACRO SETUP" and confirm with the OK button k. In the display "MACRO SETUP 1" appears. 3. With the or button t select "MACRO CLEAR" and confirm with the OK button k. 4. In the LCD display q "CONFIRM CLEAR" (confirm delete) appears. Confirm the delete process with the OK button k. The LCD display q shows "SUCCESS". All Macros are now deleted and the menu will end. Tips: 1. When the LCD display q shows "CONFIRM CLEAR" you can stop the delete process with the EXIT button y. 2. Individual Macros can not be deleted they can only be overwritten. Favourites channel Note: With this function you can save your preferred stations as favourites. To programme favourites Your favourite stations are saved as follows: 1. Press the device button e for the device that you want to save a favourite. 2. Hold down the S button r for a little longer than 3 seconds. The notice "CODE SETUP" appears. 3. With the or button t select "FAV CH SETUP" and confirm with the OK button k. In the display "FAV CH SETUP 1" appears. 4. With the or button t select the memory slot to be programmed (FAV CH SETUP 1-4) and confirm with the OK button k. 5. In the LCD display q "FAV CH STEP" appears. Now press, one after the other, the buttons (max. 4) for access to your desired favourite stations. 6. When the maximum number of button commands is reached the LCD display q shows "FULL". 7. Save the entry with the S button r. In the LCD display q "FAV CH SETUP" appears. 8. If, with the selection of the favourites to be programmed (step 4), you select a memory slot that is already occupied the existing favourite will be overwritten. 9. Repeat the steps to apply further favourites. 10. With the EXIT button y you move a level backwards in the menu except during the entry of the button commands
23 Note: The input of the channel numbers can vary according to the model and brand of the selected devices. If necessary, with multi-digit channel numbers you must first press the button a. To access favourites To access a pre-programmed favourite press the FAV/EPG button l followed by the corresponding number button for the desired memory slot (1-4). Delete All FAV channels To delete all pre-programmed favourites proceed as follows: 1. Hold down the S button r for a little longer than 3 seconds. 2. With the or button t select "FAV CH SETUP" and confirm with the OK button k. In the display "FAV CH SETUP 1" appears. 3. With the or button t select "FAV CH CLEAR" and confirm with the OK button k. 4. In the LCD display q "CONFIRM CLEAR" (confirm delete) appears. Confirm the delete process with the OK button k. The LCD display q shows "SUCCESS". All favourites are now deleted and the menu will end. Tips: 1. When the LCD display q shows "CONFIRM CLEAR" you can stop the delete process with the EXIT button y. 2. Individual favourites can not be deleted they can only be overwritten. Volume control Vol +/, (Mute switching) Press the "VOL+" button to increase the volume. With the "VOL " button you reduce the volume. To mute the sound press the -button g. A further press of this button turns the sound back on. When you activate the VOL +/ buttons h on the URC basically the volume adjustment on the TV device is addressed, regardless thereof, which device button e was pressed previously. This admittedly does not apply to the devices "AMP" and "DSAT" since you can assume that these devices have their own volume adjustment
24 For operation >>To operate one of the programmed devices with the URC first press the corresponding device button e. Then point the URC to this device and press the desired button. > >Put the number buttons o exactly as you do with the original remote control. Before you make a two digit entry press, if necessary, the button a. > >Press the FAV/EPG button l to start the electronic programme guide of a device equipped with this function. > >Whilst you hold down the S button r the date will be superimposed below to the right in the LCD display q. > >Whilst you hold down one of the device buttons e the active code for this device will be superimposed below to the right in the LCD display q. > >Via the MENU button j you access the dialogue for the setting of the respective target device. All OFF Tips: With the button ALL OFF (all off) w all devices that are switched on can be automatically switched off. This function can switch on again devices that have already been switched off (depending on the device). For this hold down the ALL OFF button w for approx. 5 seconds. This will only function under the following circumstances: 1. A visible connection exists between all the devices and the URC. 2. Automatic code search, brand code search and MACRO function are not active. 3. All target devices must be suitable for remote control switch off. To again switch on all devices automatically hold down once more the button w until all devices are switched on. Cleaning and storage Attention! Ensure that moisture cannot permeate into the device during cleaning! Otherwise there is the danger of causing irreparable damage to the device! >>Clean the housing of the device exclusively with a soft moist cloth and a mild dishwashing detergent. >>Store the device exclusively in an environment that complies with the specifications given in the technical data. >>Before storing remove the batteries so that they will not cause damage to the device if, during storage, they happen to leak
25 Faults / Remedies Your device does not react to the URC. >>Check the batteries. They must have enough voltage and be properly installed. > >Firstly have you pressed the correct device button e for the desired target device? >>Check to see that the correct code is programmed in for the target device (see section "Code Setup"). The URC is transmitting the commands incorrectly. > >Press the corresponding device button e to set the URC to the correct mode. >>The batteries must have enough voltage and be properly installed. >>It is possible that you are using the wrong code. Start the brand code search, the automatic code search or the direct code input (manual). The URC does not change the station on the device. > >Press the corresponding device button e to set the URC to the correct mode. >>In the event that the original RC does not have a "-/- -" button, change the programme with the CH+/ buttons u or the number buttons o. >>If this also does not work the child protection for the target device could be activated. Some buttons on the URC do not function properly. >>It is possible that your URC does not have all of the functions that are on the device's original remote control. >>It is possible that you have not programmed in the optimal code. Search for a code that supports more of the target device's functions. The URC stops reacting after a button is pressed. >>The batteries must have enough voltage and be properly installed. >>Point the URC towards your device. The LCD display q shows nothing. >>The batteries must have enough voltage and be properly installed. >>The contrast could be set too low. Increase the contrast setting
26 Disposal Do not dispose of the device in your normal domestic waste. This product is subject to the European directive 2002/96/EC. Universal remote control Have the universal remote control or parts of it disposed of by a professional disposal company or by your communal disposal facility. Observe the currently applicable regulations. In case of doubt contact your disposal facility. Batteries/rechargeable batteries Used batteries/rechargeable batteries may not be disposed of in household waste. Batteries can contain poisons which are damaging to the environment. Therefore, dispose of the batteries/rechargeable batteries in accordance with statutory regulations. Every consumer is legally obliged to surrender batteries/ rechargeable batteries to a community collection centre in their district or to a dealer. The purpose of this obligation is to ensure that batteries are disposed of in a nonpolluting manner. Only dispose of batteries when they are fully discharged. Dispose of packaging materials in an environmentally responsible manner. Note regarding conformity This device satisfies the fundamental requirements and other relevant regulations of the EMC Directive 2004/108/EC. Importer KOMPERNASS GMBH BURGSTRASSE BOCHUM, GERMANY Technical data Controllable devices: 10 Dimensions L x W x H: 212 x 50 x 23 mm Weight : 116 g (without batteries) Infrared LED: Laser class 1 Power supply Batteries: 2 x 1.5 V, type AAA/LR03 (micro) (supplied) Operating temperature: C Storage temperature : C Humidity: 5-90 % (No condensation)
27 Warranty & Service You receive a 3-year warranty for this appliance as of the purchase date. This appliance has been manufactured with care and meticulously examined before delivery. Please retain your receipt as proof of purchase. In the case of a warranty claim, please make contact by telephone with our service department. Only in this way can a post-free despatch for your goods be assured. The warranty covers only claims for material and manufacturing defects, but not for transport damage, wearing parts or for damage to fragile components, e.g. buttons or batteries. This product is for private use only and is not intended for commercial use. The warranty is void in the case of abusive and improper handling, use of force and internal modifications not carried out by our authorized Service Centre. Your statutory rights are not restricted in any way by this warranty. The warranty period is not extended through repairs made under warranty. This applies also for replaced or repaired parts. Any damages or deficiencies found on purchase must be reported as soon as possible after unpacking, at the latest two days after purchase. On expiry of the warranty, all repairs carried out are subject to payment. DES UK LTD Tel.: ( 0.10 / minute) support.uk@kompernass.com Kompernass Service Ireland Tel: (0,082 EUR/Min.) Standard call rates apply. Mobile operators may vary. support.ie@kompernass.com
28 - 26 -
29 Sisällysluettelo Sivu Tärkeitä turvaohjeita 28 Laite 29 Käyttöönotto 30 Laitteen purkaminen pakkauksesta/ Toimituslaajuuden tarkastaminen 30 Paristojen asettaminen paristokoteloon 30 Osat 31 LCD-näyttö 31 Painikkeet 32 SETUP - järjestelmäasetukset 34 Code Setup (Kaukosäätimen ohjelmointi) 36 Ohjelmointi merkkikoodihaun avulla 36 Ohjelmointi koodin käsisyötön avulla 37 Ohjelmointi automaattisen koodihaun avulla 37 System Setup 39 Kellonajan asettaminen 39 Päivämäärän asettaminen 39 Kontrastin säätäminen 40 Taustavalaistus 40 System Reset 40 Timer Setup 41 Sleep-ajastin 41 Tapahtuma-ajastin 41 Learn Setup 42 Koodin opettelutoiminto 42 Macro Setup 43 Suosikkikanava 45 Äänenvoimakkuuden säätö 46 Vol +/, (mykkäasetus) 46 Käytöstä 47 ALL OFF 47 Puhdistus ja varastointi 47 Vika / Apu 48 Hävittäminen 49 Tekniset tiedot 49 Vaatimustenmukaisuuttakoskevia ohjeita 49 Maahantuoja 50 Takuu & huolto
30 Yleiskaukosäädin KH2157 Tämä dokumentti on suojattu tekijänoikeuslain nojalla. Kaikki oikeudet, myös fotomekaaniseen toistoon, monistukseen ja levittämiseen erityisellä menetelmällä (esimerkiksi tietojenkäsittelyllä, tietovälineellä ja tietoverkoissa), myös osittain, sekä sisällöllisiin ja teknisiin muutoksiin pidätetään. Lue käyttöohje ennen ensimmäistä käyttökertaa huolellisesti läpi ja pidä sitä lähettyvillä myös myöhemmissä käytöissä. Jos myyt laitteen, anna ohje myös seuraavalle omistajalle. Tärkeitä turvaohjeita Määräystenmukainen käyttö Lapset saavat käyttää kaukosäädintä ainoastaan aikuisten valvonnassa. Yleiskaukosäädin voi korvata korkeintaan kymmenen kaukosäädintä. Sitä voidaan käyttää ainoastaan infrapunavastaanottimella varustettuihin viihde-elektroniikkalaitteisiin. Yleiskaukosäätimen toiminnot vastaavat suurimmalta osin alkuperäisten kaukosäätimien toimintoja. Yleiskaukosäädin on tarkoitettu yksityiseen käyttöön. Sitä ei ole tarkoitettu kaupalliseen käyttöön. Muu kuin käyttöohjeen mukainen käyttö ei ole määräysten mukaista. Valmistaja ei ota mitään vastuuta määräystenvastaisesta käytöstä tai omatoimisista muutoksista aiheutuneista vahingoista. Varoitus Tämän vaara-asteen varoitus on merkkinä mahdollisesti vaarallisesta tilanteesta. Jos vaarallista tilannetta ei vältetä, se voi johtaa loukkaantumisiin. Noudata tämän varoituksen ohjeita henkilöiden loukkaantumisten välttämiseksi. Huomio Tämän vaara-asteen varoitus on merkkinä mahdollisesta aineellisesta vahingosta. Jos tilannetta ei vältetä, se voi johtaa aineellisiin vahinkoihin. Noudata tämän varoituksen ohjeita aineellisten vahinkojen välttämiseksi. Ohje Ohje on merkkinä lisätiedoista, jotka helpottavat laitteen käsittelyä. Varoitus paristojen virheellisestä käsittelystä aiheutuvasta loukkaantumisvaarasta! Paristoja on käsiteltävä erityisen varovasti. Noudata seuraavia turvaohjeita: Vaihda tarvittaessa aina kaikki paristot samanaikaisesti, äläkä koskaan sekoita erityyppisiä paristoja keskenään. Älä heitä paristoja tuleen. Älä altista paristoja korkeille lämpötiloille. Räjähdysvaara! Paristoja ei saa ladata
31 Älä avaa tai oikosulje paristoja. Paristosta valuva paristohappo saattaa ärsyttää ihoa. Huuhtele ihokosketuksessa kohta runsaalla vedellä. Jos nestettä on päässyt silmiin, huuhtele perusteellisesti vedellä, älä hiero ja hakeudu välittömästi lääkärin hoitoon. Varoitus laserista Yleiskaukosäätimessä on laserluokan 1 infrapunadiodi. Turvajärjestelmä estää vaarallisten lasersäteiden ulospääsyn käytön aikana. Vältä silmävammat, älä muunna tai vaurioita laitteen turvajärjestelmää. Laitevauriot Jos laitteessa on vikaa, älä yritä korjata sitä itse. Ota vauriotapauksissa yhteyttä valmistajaan tai tämän huollon palvelunumeroon (katso takuukortti). Jos laitteeseen on päässyt nestettä tai se on muutoin vahingoittunut, valmistajan tai tämän huollon on tarkastettava laite. Ota yhteyttä valmistajaan tai tämän huollon palvelunumeroon (katso takuuohjeet). Poista paristot paristolokerosta heti niiden tyhjennyttyä. Jos et käytä laitetta pidempään, poista paristot niiden purkautumisen välttämiseksi. Paristoja ei saa jättää lasten käsiin. Lapset saattavat pistää paristot suuhunsa ja niellä ne. Jos paristo on joutunut nieluun, on hakeuduttava välittömästi lääkärin hoitoon. Laite q LCD-näyttö w Painike /ALL OFF e Laitepainikkeet r S-painike t Nuolipainikkeet y Painike EXIT u Painikkeet CH +/ i Painike MACRO o Numeropainikkeet a Painike yksi- tai kaksinumeroisille ohjelmanumeroille s Tekstitelevision toimintopainikkeet d Painike AV f Tallennus-/toistopainikkeet g mykistystoiminto h Painikkeet VOL +/ j Painike MENU k Painike OK l Painike FAV / EPG 1( Infrapunalähetin/-vastaanotin 2) Paristokotelon kansi Ohjeita: Tässä kuvatut toiminnot koskevat sitä teoreettista ihannetapausta, jossa kyseisen alkuperäisen kaukosäätimen pai
32 nikerakenne vastaa täsmälleen tätä yleiskaukosäädintä. Tämä pitää kuitenkin paikkansa vain erittäin harvoissa tapauksissa. Jos siis kaikkia alkuperäisen kaukosäätimen toimintoja voida suorittaa, se ei ole yleiskaukosäätimen puute. Kaikki tässä käyttöohjeessa tai mukana tulevassa koodiluettelossa käytetyt tuotemerkit ovat vastaavien yritysten kauppamerkkejä. Käyttöönotto Laitteen purkaminen pakkauksesta/ Toimituslaajuuden tarkastaminen Varoitus! Pidä myös pakkauksen muovit poissa lasten ulottuvilta. Ne voivat aiheuttaa tukehtumisvaaran. Pura laite ja tarvikkeet pakkauksesta. Tarkista toimituksen laajuus - Yleiskaukosäädin (YKS) - Käyttöohje, - Valmistajahakemisto ja laitekoodiluettelo - 2 x 1,5 V:n paristoa, tyyppiä AAA/LR03 (Micro) Poista suojamuovi LCD-näytöstä q. Ohje: Kuljetusvauriot Jos havaitset kuljetusvaurioita, käänny valmistajan tai tämän huollon palvelunumeron puoleen (katso takuuohjeet). Paristojen asettaminen paristokoteloon Huomio! Yleiskaukosäädintä saa käyttää vain 1,5 voltin paristoilla (koko AAA, LR03). Suorita paristonvaihto nopeasti. Suoritetut asetukset säilyvät muistissa n. 1 minuutin ajan. Jos uusia paristoja ei aseteta tämän ajan kuluessa, on kaikki asetukset suoritettava uudelleen. Kellonaika katoaa kuitenkin joka tapauksessa. 1. Avaa paristokotelon kansi 2) nuolen suuntaan. 2. Aseta paristot paikoilleen kuvan mukaisesti ja sulje paristokotelo
33 LCD-näyttö q on päällä niin kauan, kun laitteessa on paristot. Seuraavassa kuvassa näkyy LCD-näyttö q sen jälkeen, kun paristot on asetettu paikoilleen tai vaihdettu. Ohje: Jos LCD-näyttö q ei tule näkyviin, tarkista paristojen napaisuus tai aseta laitteeseen uudet paristot. Osat LCD-näyttö LCD-näyttö q on jaettu kenttiin. Tekstikenttä 2! Tässä näytetään parhaillaan valittu laite, esimerkiksi DVD, TV, VCR jne. Infrapunasymboli 2@ Jokaisella painikkeen painalluksella, jolla lähetetään infrapunasignaali, infrapunasymboli syttyy palamaan. Koodi-/aikakenttä 2# Tässä näytetään parhaillaan valitun laitteen laitekoodi tai kellonaika. Kellonaikanäytössä numeroiden keskellä vilkkuu ":". Viikonpäiväkenttä 2$ Tässä näet englantilaisen lyhenteen ajankohtaisesta viikonpäivästä, kun olet syöttänyt päiväyksen. MON = Monday = Maanantai TUE = Tuesday = Tiistai WED = Wednesday = Keskiviikko THU = Thursday = Torstai FRI = Friday = Perjantai SAT = Saturday = Lauantai SUN = Sunday = Sunnuntai
34 Vakionäyttö: LCD-näytön q vakionäyttö koostuu ajankohtaisen laitteen tiedoista, esim. "TV", viikonpäivän lyhenteestä ja kellonaikanäytöstä. Painikkeet Ohje: Kaikkia tässä kuvattuja toimintoja voidaan luonnollisesti käyttää vain silloin, jos ohjattava laite tukee niitä. Painike /ALL OFF w Laitteen kytkeminen päälle/pois päältä. Kytke laitteet päälle / pois päältä pitämällä painettuna n. 5 sekunnin ajan. Laitepainikkeet e Laitepainikkeilla valitaan se laite, jota halutaan käyttää. Televisio Videonauhuri Lisälaite 1 Kaapelivastaanotin CD-soitin Analoginen satelliittivastaanotin Audiovahvistin DVD-soitin Digitaalinen satelliittivastaanotin Lisälaite 2 Painike "S" r Kutsu esiin SETUP-valikko pitämällä painettuna 3 sekunnin ajan. Nuolipainikkeet t Valikoissa liikkuminen ylös, oikealle, alas ja vasemmalle
35 Painike EXIT y Valikossa vaihtaminen edelliselle tasolle. Painikkeet CH +/ u Vastaanottokanavan vaihtaminen. Painike MACRO i Painike MACRO i ja sitä seuraava numeropainike o 1-4 aktivoi aikaisemmin tallennetun komentoketjun. Numeropainikkeet o Ohjelma- ja laitekoodinumeroiden syöttö. Yksi-/kaksinumeroisten ohjelmanumeroiden painike a Paina kaksinumeroisia ohjelmanumeroita (laitetyypin mukaan) varten ensin painiketta a, syötä sitten numeropainikkeilla o ohjelmanumero. Näyttö muuttuu jälleen yksipaikkaiseksi uudelleen painamalla. Tekstitelevision toimintapainikkeet s Tekstitelevisiokäytössä painikkeilla on seuraavat toiminnot: Tekstitelevisiotoiminnon kutsuminen esiin Automaattisen vaihdon pysäyttäminen useampisivuisilla tekstitelevisiosivuilla. Sivukuvan suurentaminen Tekstin ja televisiokuvan lomittaminen päällekkäin Tekstitelevisiotoiminnon lopettaminen. Ohjeita: Tekstitelevisiotoiminto on käytettävissä vain eurooppalaisessa TV-tilassa ja televisiolaitteessa on oltava tekstitelevisiomoduuli. Tämän lisäksi CH+/- -painikkeet u ohjaavat seuraavia tekstitelevisiotoimintoja: CH + Selaaminen yksi sivu eteenpäin CH Selaaminen yksi sivu taaksepäin Tavanomaisessa televisiokäytössä -painike ohjaa televisiosi PIP -toimintoa (kuva kuvassa)
36 Painike AV d Vaihto AV-lähtöön. Tallennus-/toistopainikkeet f Toistopainikkeet f ohjaavat DVD-/CD-soittimen ja videonauhurin kaltaisia laitteita: ASPECT: Toiston aloittaminen Kuvaformaatin vaihto televisiokäytössä Tallennus Mykistystoiminto g Painikkeet VOL+/ h Toiston/tallennuksen/kelauksen pysäyttäminen Toiston pysäyttäminen Taaksepäinkelaus Eteenpäinkelaus Äänen kytkeminen päälle/pois päältä. Äänenvoimakkuuden (Volume) säätäminen. Painike MENU j Ohjattavan laitteen valikon kutsuminen esiin. Painike OK k Painikkeella OK vahvistetaan valikossa tehty valinta. Painike FAV/EPG l Painike FAV/EPG kutsuu esiin laitteen elektronisen ohjelmaoppaan tai aikaisemmin ohjelmoidut lempikanavasi. SETUP - järjestelmäasetukset Järjestelmäasetuksissa suoritetaan seuraavat toimet: Kaukosäätimen ohjelmointi ohjattaville laitteille Kellonajan, päiväyksen, näytön kontrastin ja taustavalaistuksen sekä järjestelmän nollauksen asetus Ajastinasetukset Tiettyjen painikekomentojen "opettelu" Makrojen laatiminen Suosikkien määrittäminen Seuraavalla sivulla on yleiskuva valikkorakenteesta
10-in-1 Remote Control
 3 A 10-in-1 Remote Control KH 2158 10-in-1 Remote Control Operating manual Yleiskaukosäädin Käyttöohje KOMPERNASS GMBH BURGSTRASSE 21 D-44867 BOCHUM www.kompernass.com ID-Nr.: KH2158-04/10-V3 Universalfjärrkontroll
1. SIT. The handler and dog stop with the dog sitting at heel. When the dog is sitting, the handler cues the dog to heel forward.
 START START SIT 1. SIT. The handler and dog stop with the dog sitting at heel. When the dog is sitting, the handler cues the dog to heel forward. This is a static exercise. SIT STAND 2. SIT STAND. The
PAINEILMALETKUKELA-AUTOMAATTI AUTOMATIC AIR HOSE REEL
 MAV4 MAV5 MAV6 PAINEILMALETKUKELA-AUTOMAATTI AUTOMATIC AIR HOSE REEL Käyttöohje Instruction manual HUOMIO! Lue käyttöohjeet huolellisesti ennen laitteen käyttöä ja noudata kaikkia annettuja ohjeita. Säilytä
Choose Finland-Helsinki Valitse Finland-Helsinki
 Write down the Temporary Application ID. If you do not manage to complete the form you can continue where you stopped with this ID no. Muista Temporary Application ID. Jos et onnistu täyttää lomake loppuun
Capacity Utilization
 Capacity Utilization Tim Schöneberg 28th November Agenda Introduction Fixed and variable input ressources Technical capacity utilization Price based capacity utilization measure Long run and short run
Salasanan vaihto uuteen / How to change password
 Salasanan vaihto uuteen / How to change password Sisällys Salasanakäytäntö / Password policy... 2 Salasanan vaihto verkkosivulla / Change password on website... 3 Salasanan vaihto matkapuhelimella / Change
Sisällysluettelo Table of contents
 Sisällysluettelo Table of contents OTC:n Moodlen käyttöohje suomeksi... 1 Kirjautuminen Moodleen... 2 Ensimmäinen kirjautuminen Moodleen... 2 Salasanan vaihto... 2 Oma käyttäjäprofiili... 3 Työskentely
Information on preparing Presentation
 Information on preparing Presentation Seminar on big data management Lecturer: Spring 2017 20.1.2017 1 Agenda Hints and tips on giving a good presentation Watch two videos and discussion 22.1.2017 2 Goals
LYTH-CONS CONSISTENCY TRANSMITTER
 LYTH-CONS CONSISTENCY TRANSMITTER LYTH-INSTRUMENT OY has generate new consistency transmitter with blade-system to meet high technical requirements in Pulp&Paper industries. Insurmountable advantages are
Lab SBS3.FARM_Hyper-V - Navigating a SharePoint site
 Lab SBS3.FARM_Hyper-V - Navigating a SharePoint site Note! Before starting download and install a fresh version of OfficeProfessionalPlus_x64_en-us. The instructions are in the beginning of the exercise.
Network to Get Work. Tehtäviä opiskelijoille Assignments for students. www.laurea.fi
 Network to Get Work Tehtäviä opiskelijoille Assignments for students www.laurea.fi Ohje henkilöstölle Instructions for Staff Seuraavassa on esitetty joukko tehtäviä, joista voit valita opiskelijaryhmällesi
anna minun kertoa let me tell you
 anna minun kertoa let me tell you anna minun kertoa I OSA 1. Anna minun kertoa sinulle mitä oli. Tiedän että osaan. Kykenen siihen. Teen nyt niin. Minulla on oikeus. Sanani voivat olla puutteellisia mutta
Rekisteröiminen - FAQ
 Rekisteröiminen - FAQ Miten Akun/laturin rekisteröiminen tehdään Akun/laturin rekisteröiminen tapahtuu samalla tavalla kuin nykyinen takuurekisteröityminen koneille. Nykyistä tietokantaa on muokattu niin,
National Building Code of Finland, Part D1, Building Water Supply and Sewerage Systems, Regulations and guidelines 2007
 National Building Code of Finland, Part D1, Building Water Supply and Sewerage Systems, Regulations and guidelines 2007 Chapter 2.4 Jukka Räisä 1 WATER PIPES PLACEMENT 2.4.1 Regulation Water pipe and its
On instrument costs in decentralized macroeconomic decision making (Helsingin Kauppakorkeakoulun julkaisuja ; D-31)
") On instrument costs in decentralized macroeconomic decision making (Helsingin Kauppakorkeakoulun julkaisuja ; D-31) Juha Kahkonen Click here if your download doesn"t start automatically On instrument costs
On instrument costs in decentralized macroeconomic decision making (Helsingin Kauppakorkeakoulun julkaisuja ; D-31) Juha Kahkonen Click here if your download doesn"t start automatically On instrument costs
SpeechMike III sarjan sanelumikrofonien (mallit LFH3200 ja LFH3220) yhteensopivuus SpeechMagic Executive saneluohjelman kanssa
 yhteensopivuus SpeechMagic Executive saneluohjelman kanssa") SpeechMike III sarjan sanelumikrofonien (mallit LFH3200 ja LFH3220) yhteensopivuus SpeechMagic Executive saneluohjelman kanssa Jotta SpeechMike III sarjan sanelumikrofonia voidaan käyttää Executive saneluohjelmassa,
SpeechMike III sarjan sanelumikrofonien (mallit LFH3200 ja LFH3220) yhteensopivuus SpeechMagic Executive saneluohjelman kanssa Jotta SpeechMike III sarjan sanelumikrofonia voidaan käyttää Executive saneluohjelmassa,
KONEISTUSKOKOONPANON TEKEMINEN NX10-YMPÄRISTÖSSÄ
 KONEISTUSKOKOONPANON TEKEMINEN NX10-YMPÄRISTÖSSÄ https://community.plm.automation.siemens.com/t5/tech-tips- Knowledge-Base-NX/How-to-simulate-any-G-code-file-in-NX- CAM/ta-p/3340 Koneistusympäristön määrittely
You can check above like this: Start->Control Panel->Programs->find if Microsoft Lync or Microsoft Lync Attendeed is listed
 Online Meeting Guest Online Meeting for Guest Participant Lync Attendee Installation Online kokous vierailevalle osallistujalle Lync Attendee Asennus www.ruukki.com Overview Before you can join to Ruukki
OFFICE 365 OPISKELIJOILLE
 OFFICE 365 OPISKELIJOILLE Table of Contents Articles... 3 Ohjeet Office 365 käyttöönottoon... 4 One Driveen tallennetun videon palauttaminen oppimisympäristön palautuskansioon... 5 Changing default language
1/4. Resetointi ja vianmääritys. 22.11.2013 ntr
 A400-64176 Sähköpöydät 1/4 Resetointi ja vianmääritys Pöydän resetointi tehdään aina ennen käyttöönottoa ja tarvittaessa häiriötilanteessa. Määritä pöydän tyyppi käyttökytkimen ja jalustan mukaan ja tee
Efficiency change over time
 Efficiency change over time Heikki Tikanmäki Optimointiopin seminaari 14.11.2007 Contents Introduction (11.1) Window analysis (11.2) Example, application, analysis Malmquist index (11.3) Dealing with panel
Uusi Ajatus Löytyy Luonnosta 4 (käsikirja) (Finnish Edition)
 (Finnish Edition)") Uusi Ajatus Löytyy Luonnosta 4 (käsikirja) (Finnish Edition) Esko Jalkanen Click here if your download doesn"t start automatically Uusi Ajatus Löytyy Luonnosta 4 (käsikirja) (Finnish Edition) Esko Jalkanen
Uusi Ajatus Löytyy Luonnosta 4 (käsikirja) (Finnish Edition) Esko Jalkanen Click here if your download doesn"t start automatically Uusi Ajatus Löytyy Luonnosta 4 (käsikirja) (Finnish Edition) Esko Jalkanen
The CCR Model and Production Correspondence
 The CCR Model and Production Correspondence Tim Schöneberg The 19th of September Agenda Introduction Definitions Production Possiblity Set CCR Model and the Dual Problem Input excesses and output shortfalls
Olet vastuussa osaamisestasi
 Olet vastuussa osaamisestasi Ohjelmistoammattilaisuuden uudet haasteet Timo Vehmaro 02-12-2015 1 Nokia 2015 Mitä osaamista tulevaisuudessa tarvitaan? Vahva perusosaaminen on kaiken perusta Implementaatio
Solar Water Heater Kit. EcoStyle. 1 User Manual/Operating Instructions. Contents FREE LESSON PLANS AVAILABLE.
 EcoStyle 1 User Manual/Operating Instructions Contents 1 Contents 2 What s in the box? 3 Setting up the 4 Heating water 5 Measuring water temperature with the digital thermometer 6 Maximum/minimum temperature
Curriculum. Gym card
 A new school year Curriculum Fast Track Final Grading Gym card TET A new school year Work Ethic Detention Own work Organisation and independence Wilma TMU Support Services Well-Being CURRICULUM FAST TRACK
FinFamily PostgreSQL installation ( ) FinFamily PostgreSQL
 FinFamily PostgreSQL") FinFamily PostgreSQL 1 Sisällys / Contents FinFamily PostgreSQL... 1 1. Asenna PostgreSQL tietokanta / Install PostgreSQL database... 3 1.1. PostgreSQL tietokannasta / About the PostgreSQL database...
FinFamily PostgreSQL 1 Sisällys / Contents FinFamily PostgreSQL... 1 1. Asenna PostgreSQL tietokanta / Install PostgreSQL database... 3 1.1. PostgreSQL tietokannasta / About the PostgreSQL database...
On instrument costs in decentralized macroeconomic decision making (Helsingin Kauppakorkeakoulun julkaisuja ; D-31)
") On instrument costs in decentralized macroeconomic decision making (Helsingin Kauppakorkeakoulun julkaisuja ; D-31) Juha Kahkonen Click here if your download doesn"t start automatically On instrument costs
On instrument costs in decentralized macroeconomic decision making (Helsingin Kauppakorkeakoulun julkaisuja ; D-31) Juha Kahkonen Click here if your download doesn"t start automatically On instrument costs
INSTALLATION INSTRUCTION ASENNUSOHJE PEM SJTK31 SJTK46 ENGLISH SUOMI
 INSTALLATION INSTRUCTION ASENNUSOHJE PEM1256 2010-2 SJTK31 SJTK46 ENGLISH SUOMI GB GENERAL INFORMATION - Check that the kit is suitable for the cable type. - Check the materials listed in the bill of materials
On instrument costs in decentralized macroeconomic decision making (Helsingin Kauppakorkeakoulun julkaisuja ; D-31)
") On instrument costs in decentralized macroeconomic decision making (Helsingin Kauppakorkeakoulun julkaisuja ; D-31) Juha Kahkonen Click here if your download doesn"t start automatically On instrument costs
On instrument costs in decentralized macroeconomic decision making (Helsingin Kauppakorkeakoulun julkaisuja ; D-31) Juha Kahkonen Click here if your download doesn"t start automatically On instrument costs
FinFamily Installation and importing data (11.1.2016) FinFamily Asennus / Installation
 FinFamily Asennus / Installation") FinFamily Asennus / Installation 1 Sisällys / Contents FinFamily Asennus / Installation... 1 1. Asennus ja tietojen tuonti / Installation and importing data... 4 1.1. Asenna Java / Install Java... 4 1.2.
FinFamily Asennus / Installation 1 Sisällys / Contents FinFamily Asennus / Installation... 1 1. Asennus ja tietojen tuonti / Installation and importing data... 4 1.1. Asenna Java / Install Java... 4 1.2.
The Viking Battle - Part Version: Finnish
 The Viking Battle - Part 1 015 Version: Finnish Tehtävä 1 Olkoon kokonaisluku, ja olkoon A n joukko A n = { n k k Z, 0 k < n}. Selvitä suurin kokonaisluku M n, jota ei voi kirjoittaa yhden tai useamman
Security server v6 installation requirements
 CSC Security server v6 installation requirements Security server version 6.4-0-201505291153 Pekka Muhonen 8/12/2015 Date Version Description 18.12.2014 0.1 Initial version 10.02.2015 0.2 Major changes
Bounds on non-surjective cellular automata
 Bounds on non-surjective cellular automata Jarkko Kari Pascal Vanier Thomas Zeume University of Turku LIF Marseille Universität Hannover 27 august 2009 J. Kari, P. Vanier, T. Zeume (UTU) Bounds on non-surjective
Box 1. Things you have/ Pakkaus sisältää. x 4 x 16 x 4 x 4. 300mm. 1700mm. 300mm 1. Things you should know / Sinun Tulee Tietää
 Phobos 30 Things you should know / Sinun Tulee Tietää Things you prepare / Näitä Tarvitset DURING INSTALLATION ALL PRODUCTS: use protective gloves at all times use eye protection at all times never install
TW-LTE 4G/3G. USB-modeemi (USB 2.0)
") TW-LTE 4G/3G USB-modeemi (USB 2.0) Tiedonsiirtonopeus: 100 Mbps/50 Mbps LTE: 1800/2100/2600 MHz GSM/GPRS/EDGE: 850/900/1800/1900 MHz UMTS: 900/2100 MHz Pikaohje (Finnish) CE Käyttöönotto- ohje SIM- kortin
TW-LTE 4G/3G USB-modeemi (USB 2.0) Tiedonsiirtonopeus: 100 Mbps/50 Mbps LTE: 1800/2100/2600 MHz GSM/GPRS/EDGE: 850/900/1800/1900 MHz UMTS: 900/2100 MHz Pikaohje (Finnish) CE Käyttöönotto- ohje SIM- kortin
Returns to Scale II. S ysteemianalyysin. Laboratorio. Esitelmä 8 Timo Salminen. Teknillinen korkeakoulu
 Returns to Scale II Contents Most Productive Scale Size Further Considerations Relaxation of the Convexity Condition Useful Reminder Theorem 5.5 A DMU found to be efficient with a CCR model will also be
Calisto USB-kaiutinpuhelin. Käyttöopas
 Calisto 7200 USB-kaiutinpuhelin Käyttöopas Sisällysluettelo Yleiskatsaus 3 Connect to PC 4 Päivittäinen käyttö 5 Power 5 Äänenvoimakkuus 5 Mykistys / mykistyksen poisto 5 Puheluun vastaaminen tai puhelun
Under-Cabinet Radio SKRD 30 A1
 Under-Cabinet Radio KOMPERNASS GMBH BURGSTRASSE 21 D-44867 BOCHUM www.kompernass.com ID-Nr.: -07/11-V3 IAN: 69030 Under-Cabinet Radio Operating instructions Radio Bruksanvisning Unterbau-Radio Bedienungsanleitung
4x4cup Rastikuvien tulkinta
 4x4cup Rastikuvien tulkinta 4x4cup Control point picture guidelines Päivitetty kauden 2010 sääntöihin Updated for 2010 rules Säännöt rastikuvista Kilpailijoiden tulee kiinnittää erityistä huomiota siihen,
Presenter SNP6000. Register your product and get support at Käyttöopas
 Register your product and get support at www.philips.com/welcome Presenter SNP6000 FI Käyttöopas 1 a b c d e 2 3 4 Federal Communication Commission Interference Statement This equipment has been tested
Microsoft Lync 2010 Attendee
 VYVI MEETING Lync Attendee 2010 Instruction 1 (15) Microsoft Lync 2010 Attendee Online meeting VYVI MEETING Lync Attendee 2010 Instruction 2 (15) Index 1 Microsoft LYNC 2010 Attendee... 3 2 Acquiring Lync
1. Liikkuvat määreet
 1. Liikkuvat määreet Väitelauseen perussanajärjestys: SPOTPA (subj. + pred. + obj. + tapa + paikka + aika) Suora sanajärjestys = subjekti on ennen predikaattia tekijä tekeminen Alasääntö 1: Liikkuvat määreet
Information on Finnish Language Courses Spring Semester 2018 Päivi Paukku & Jenni Laine Centre for Language and Communication Studies
 Information on Finnish Language Courses Spring Semester 2018 Päivi Paukku & Jenni Laine 4.1.2018 Centre for Language and Communication Studies Puhutko suomea? -Hei! -Hei hei! -Moi! -Moi moi! -Terve! -Terve
Installation instruction PEM
 Installation instruction ASENNUSOHJE PEM1032 2010-02 SURGE ARRESTER SET FOR POLE MOUNT TRANSFORMER YLIJÄNNITESUOJASETTI PYLVÄSMUUNTAJALLE ENGLISH SUOMI 2/8 PEM1032 2010-02 ENGLISH GENERAL INFORMATION -
TW- WLAN 802.11ac SOVITTIMEN ASENNUSOHJE
 TW- WLAN 802.11ac SOVITTIMEN ASENNUSOHJE Copyright TeleWell Oy Tekniset tiedot: - - - - - - - Yhteensopiva IEEE 802.11b/g/n/ac - standardien kanssa Taajuusalueet 2.4 GHz ja 5 GHz Maksiminopeus: 300 Mbps
Security server v6 installation requirements
 CSC Security server v6 installation requirements Security server version 6.x. Version 0.2 Pekka Muhonen 2/10/2015 Date Version Description 18.12.2014 0.1 Initial version 10.02.2015 0.2 Major changes Contents
Käyttöohje CRL Ennen tämän tuotteen käyttöä lue tämä käyttöohje huolellisesti ja kokonaan.
 Käyttöohje Kelloradio CRL-330 www.denver-electronics.com Ennen tämän tuotteen käyttöä lue tämä käyttöohje huolellisesti ja kokonaan. Tuotetiedot EN FI Correctly set the stand in specially design for it
Information on Finnish Language Courses Spring Semester 2017 Jenni Laine
 Information on Finnish Language Courses Spring Semester 2017 Jenni Laine 4.1.2017 KIELIKESKUS LANGUAGE CENTRE Puhutko suomea? Do you speak Finnish? -Hei! -Moi! -Mitä kuuluu? -Kiitos, hyvää. -Entä sinulle?
Reliable diagnostic support Ultra-light design
 EN Powerful illumination Intelligent charging management Reliable diagnostic support Ultra-light design VISIOMED Optima UV original scale 1:1 VISIOMED Optima Quality Made Easy and an illumination close
PSSA-8/PSSA-8UK OWNERS MANUAL
 PSSA-8/PSSA-8UK OWNERS MANUAL LED indicator Test Button Art. 36.3066 / Art. 8.40 GB Power Switch (PSSA-8 / PSSA-8UK) Identifying the parts LED indicator Test Button Getting Started Plug the Power Switch
Tarua vai totta: sähkön vähittäismarkkina ei toimi? 11.2.2015 Satu Viljainen Professori, sähkömarkkinat
 Tarua vai totta: sähkön vähittäismarkkina ei toimi? 11.2.2015 Satu Viljainen Professori, sähkömarkkinat Esityksen sisältö: 1. EU:n energiapolitiikka on se, joka ei toimi 2. Mihin perustuu väite, etteivät
1.3 Lohkorakenne muodostetaan käyttämällä a) puolipistettä b) aaltosulkeita c) BEGIN ja END lausekkeita d) sisennystä
 puolipistettä b) aaltosulkeita c) BEGIN ja END lausekkeita d) sisennystä") OULUN YLIOPISTO Tietojenkäsittelytieteiden laitos Johdatus ohjelmointiin 811122P (5 op.) 12.12.2005 Ohjelmointikieli on Java. Tentissä saa olla materiaali mukana. Tenttitulokset julkaistaan aikaisintaan
OULUN YLIOPISTO Tietojenkäsittelytieteiden laitos Johdatus ohjelmointiin 811122P (5 op.) 12.12.2005 Ohjelmointikieli on Java. Tentissä saa olla materiaali mukana. Tenttitulokset julkaistaan aikaisintaan
26. - 27.5.2012. Roadbook
 26. - 27.5.2012 Roadbook Sisällysluettelo - Index - 3 - Sivu Page Reittimerkkien selitteet / Route marker descriptions 4 Roadbook sivun merkintöjen selite / Roadbook entry description 6 Tehtävämerkkien
Other approaches to restrict multipliers
 Other approaches to restrict multipliers Heikki Tikanmäki Optimointiopin seminaari 10.10.2007 Contents Short revision (6.2) Another Assurance Region Model (6.3) Cone-Ratio Method (6.4) An Application of
Recirkulering. El-tilslutning. Kontrolpanel. Dansk. Timerfunktion
 1 2 Dansk Recirkulering Luften renses ved hjælp at aktive kulfiltre hvorefter den returneres til rummet. Kulfiltre bestilles separat. El-tilslutning Emhætten skal tilsluttes 230 V i henhold til stærkstrømsreglementet.
Results on the new polydrug use questions in the Finnish TDI data
 Results on the new polydrug use questions in the Finnish TDI data Multi-drug use, polydrug use and problematic polydrug use Martta Forsell, Finnish Focal Point 28/09/2015 Martta Forsell 1 28/09/2015 Esityksen
AYYE 9/ HOUSING POLICY
 AYYE 9/12 2.10.2012 HOUSING POLICY Mission for AYY Housing? What do we want to achieve by renting apartments? 1) How many apartments do we need? 2) What kind of apartments do we need? 3) To whom do we
C++11 seminaari, kevät Johannes Koskinen
 C++11 seminaari, kevät 2012 Johannes Koskinen Sisältö Mikä onkaan ongelma? Standardidraftin luku 29: Atomiset tyypit Muistimalli Rinnakkaisuus On multicore systems, when a thread writes a value to memory,
IEC IP V AC. VIZULO Stork Little Brother LED street luminaire / katuvalaisin. Mounting instruction Asennusohjeet. min 40 C.
 VIZULO Stork Little Brother LED street luminaire / katuvalaisin Mounting instruction Asennusohjeet 05 IEC EN 60598 IP66 min 40 C max + 45 C 198-264 V AC PH2 4 6 29/01/2016 SIA VIZULO Ganibu dambis 7a,
16. Allocation Models
 16. Allocation Models Juha Saloheimo 17.1.27 S steemianalsin Optimointiopin seminaari - Sks 27 Content Introduction Overall Efficienc with common prices and costs Cost Efficienc S steemianalsin Revenue
SAGA 150. Asennusohjeet. Mittaa oven korkeus. Piirrä seinään oven kiinni -päätyyn seinäkannattimen kohdalle vaakaviiva korkeudelle ovi + 75mm + 20 mm.
 SAGA 150 Asennusohjeet 500 1 2 Mittaa oven korkeus. Piirrä seinään oven kiinni -päätyyn seinäkannattimen kohdalle vaakaviiva korkeudelle ovi + 75mm + 20 mm. 3 Piirrä vesivaa an avulla viiva myös kiskon
Gap-filling methods for CH 4 data
 Gap-filling methods for CH 4 data Sigrid Dengel University of Helsinki Outline - Ecosystems known for CH 4 emissions; - Why is gap-filling of CH 4 data not as easy and straight forward as CO 2 ; - Gap-filling
Data protection template
 Data protection template Aihe: rekisteriseloste ja informointipohja Topic: information about the register and information to users (related to General Data Protection Regulation (GDPR) (EU) 2016/679) Mallina
2017/S Contract notice. Supplies
 Supplies 153936 2017 25/04/2017 S80 - - Supplies - Contract notice - Open procedure I. II. III. IV. VI. -: Medical equipments, pharmaceuticals and personal care products 2017/S 080-153936 Contract notice
Under-Cabinet Radio SKRD 30 A1
 3 Under-Cabinet Radio Under-Cabinet Radio Operating instructions Uppoasennettava radio Käyttöohje Radio Bruksanvisning KOMPERNASS GMBH BURGSTRASSE 21 D-44867 BOCHUM www.kompernass.com ID-Nr.: -09/10-V3
Statistical design. Tuomas Selander
 Statistical design Tuomas Selander 28.8.2014 Introduction Biostatistician Work area KYS-erva KYS, Jyväskylä, Joensuu, Mikkeli, Savonlinna Work tasks Statistical methods, selection and quiding Data analysis
BDD (behavior-driven development) suunnittelumenetelmän käyttö open source projektissa, case: SpecFlow/.NET.
 suunnittelumenetelmän käyttö open source projektissa, case: SpecFlow/.NET.") BDD (behavior-driven development) suunnittelumenetelmän käyttö open source projektissa, case: SpecFlow/.NET. Pekka Ollikainen Open Source Microsoft CodePlex bio Verkkosivustovastaava Suomen Sarjakuvaseura
BDD (behavior-driven development) suunnittelumenetelmän käyttö open source projektissa, case: SpecFlow/.NET. Pekka Ollikainen Open Source Microsoft CodePlex bio Verkkosivustovastaava Suomen Sarjakuvaseura
Miksi Suomi on Suomi (Finnish Edition)
") Miksi Suomi on Suomi (Finnish Edition) Tommi Uschanov Click here if your download doesn"t start automatically Miksi Suomi on Suomi (Finnish Edition) Tommi Uschanov Miksi Suomi on Suomi (Finnish Edition)
Miksi Suomi on Suomi (Finnish Edition) Tommi Uschanov Click here if your download doesn"t start automatically Miksi Suomi on Suomi (Finnish Edition) Tommi Uschanov Miksi Suomi on Suomi (Finnish Edition)
WINE COOLER TFW METOS TFW 160S, TFW 365-2S, TFW 375S MG ,
 WINE COOLER TFW METOS TFW 160S, TFW 365-2S, TFW 375S MG4116794, 4116798, 4116797 Instruction manual TWF 365-2S TWF 375S TWF 160S 01.09.2015 Table if Contents 1. Important safety instructions...3 2. Unpacking
dupol.eu - WIFI based remote gate control unit - Hungarian product
 WIFI based remote gate control unit User manual v1.0 1 EN Basic information A is a innovative device, designed to fulfill the modern request for comfortable environment. Using a local Wi-Fi network, it
ECVETin soveltuvuus suomalaisiin tutkinnon perusteisiin. Case:Yrittäjyyskurssi matkailualan opiskelijoille englantilaisen opettajan toteuttamana
 ECVETin soveltuvuus suomalaisiin tutkinnon perusteisiin Case:Yrittäjyyskurssi matkailualan opiskelijoille englantilaisen opettajan toteuttamana Taustaa KAO mukana FINECVET-hankeessa, jossa pilotoimme ECVETiä
TIEKE Verkottaja Service Tools for electronic data interchange utilizers. Heikki Laaksamo
 TIEKE Verkottaja Service Tools for electronic data interchange utilizers Heikki Laaksamo TIEKE Finnish Information Society Development Centre (TIEKE Tietoyhteiskunnan kehittämiskeskus ry) TIEKE is a neutral,
Ajettavat luokat: SM: S1 (25 aika-ajon nopeinta)
") SUPERMOTO SM 2013 OULU Lisämääräys ja ohje Oulun Moottorikerho ry ja Oulun Formula K-125ry toivottaa SuperMoto kuljettajat osallistumaan SuperMoto SM 2013 Oulu osakilpailuun. Kilpailu ajetaan karting radalla
SUPERMOTO SM 2013 OULU Lisämääräys ja ohje Oulun Moottorikerho ry ja Oulun Formula K-125ry toivottaa SuperMoto kuljettajat osallistumaan SuperMoto SM 2013 Oulu osakilpailuun. Kilpailu ajetaan karting radalla
Lab A1.FARM_Hyper-V.v3
 Lab A1.FARM_Hyper-V Installing SharePoint Server 2013 SharePoint Server 2013 -asennus Scenario To install and configure SharePoint 2013 on a single server (Server 2012, AD and SQL Server), you will follow
Information on Finnish Courses Autumn Semester 2017 Jenni Laine & Päivi Paukku Centre for Language and Communication Studies
 Information on Finnish Courses Autumn Semester 2017 Jenni Laine & Päivi Paukku 24.8.2017 Centre for Language and Communication Studies Puhutko suomea? -Hei! -Hei hei! -Moi! -Moi moi! -Terve! -Terve terve!
Arkkitehtuuritietoisku. eli mitä aina olet halunnut tietää arkkitehtuureista, muttet ole uskaltanut kysyä
 Arkkitehtuuritietoisku eli mitä aina olet halunnut tietää arkkitehtuureista, muttet ole uskaltanut kysyä Esikysymys Kuinka moni aikoo suunnitella projektityönsä arkkitehtuurin? Onko tämä arkkitehtuuria?
MEETING PEOPLE COMMUNICATIVE QUESTIONS
 Tiistilän koulu English Grades 7-9 Heikki Raevaara MEETING PEOPLE COMMUNICATIVE QUESTIONS Meeting People Hello! Hi! Good morning! Good afternoon! How do you do? Nice to meet you. / Pleased to meet you.
TM ETRS-TM35FIN-ETRS89 WTG
 SHADOW - Main Result Assumptions for shadow calculations Maximum distance for influence Calculate only when more than 20 % of sun is covered by the blade Please look in WTG table WindPRO version 2.9.269
SENAATTILA uudistuu keväällä 2015
 SENAATTILA uudistuu keväällä 2015 Senaatti-kiinteistöt yhtenäistää sähköisiä asiointikanaviaan vaiheittain keväästä 2015 alkaen. Senaattila.fi -osoite laajentuu sähköisen asioinnin palvelueteiseksi, jonka
SIMULINK S-funktiot. SIMULINK S-funktiot
 S-funktio on ohjelmointikielellä (Matlab, C, Fortran) laadittu oma algoritmi tai dynaamisen järjestelmän kuvaus, jota voidaan käyttää Simulink-malleissa kuin mitä tahansa valmista lohkoa. S-funktion rakenne
Kysymys 5 Compared to the workload, the number of credits awarded was (1 credits equals 27 working hours): (4)
: (4)") Tilasto T1106120-s2012palaute Kyselyn T1106120+T1106120-s2012palaute yhteenveto: vastauksia (4) Kysymys 1 Degree programme: (4) TIK: TIK 1 25% ************** INF: INF 0 0% EST: EST 0 0% TLT: TLT 0 0% BIO:
Tilasto T1106120-s2012palaute Kyselyn T1106120+T1106120-s2012palaute yhteenveto: vastauksia (4) Kysymys 1 Degree programme: (4) TIK: TIK 1 25% ************** INF: INF 0 0% EST: EST 0 0% TLT: TLT 0 0% BIO:
BYAS START-UP -PAKETIT JA ASPT?BYAS?
 BYAS START-UP -PAKETIT JA ASPT?BYAS? EN WEST FI CASH PARTNEREILLE VOIMASSA 16.06.2017 ALKAEN SUP-PAKETTI FACE SILVER SUP-PAKETTI FACE SILVER SUP-PAKETTI FACE SILVER PLUS* SIS. ASP, 6 KUUKAUTTA Normaalihinta
TM ETRS-TM35FIN-ETRS89 WTG
 SHADOW - Main Result Assumptions for shadow calculations Maximum distance for influence Calculate only when more than 20 % of sun is covered by the blade Please look in WTG table WindPRO version 2.8.579
Tutkimuslääkkeiden GMP. Fimea Pirjo Hänninen
 Tutkimuslääkkeiden GMP Fimea 17.1.2017 Pirjo Hänninen Kliinisiä lääketutkimuksia koskeva EU:n asetus Regulation (EU) No 536/2014 Hyväksytty 16.4.2014 (voimaan 28.5. 2016) Kumoaa nykyisen lääketutkimusdirektiivin
MP3/CD CAR RADIO. Operating instructions. Käyttöohje. Bruksanvisning MP3/CD CAR RADIO MP3- JA CD-SOITTIMELLA VARUSTETTU AUTORADIO MP3-CD-BILRADIO
 3A MP3/CD CAR RADIO Operating instructions Käyttöohje Bruksanvisning GB FI SE MP3/CD CAR RADIO MP3- JA CD-SOITTIMELLA VARUSTETTU AUTORADIO MP3-CD-BILRADIO KOMPERNASS GMBH BURGSTRASSE 21 D-44867 BOCHUM
PORTABLE DVD PLAYER KH PORTABLE DVD PLAYER Operating instructions. KANNETTAVA DVD-SOITIN Käyttöohje. BÄRBAR DVD-SPELARE Bruksanvisning
 3A PORTABLE DVD PLAYER KH 6500 PORTABLE DVD PLAYER Operating instructions KANNETTAVA DVD-SOITIN Käyttöohje BÄRBAR DVD-SPELARE Bruksanvisning KOMPERNASS GMBH BURGSTRASSE 21 D-44867 BOCHUM www.kompernass.com
Metsälamminkankaan tuulivoimapuiston osayleiskaava
 VAALAN KUNTA TUULISAIMAA OY Metsälamminkankaan tuulivoimapuiston osayleiskaava Liite 3. Varjostusmallinnus FCG SUUNNITTELU JA TEKNIIKKA OY 12.5.2015 P25370 SHADOW - Main Result Assumptions for shadow calculations
( ( OX2 Perkkiö. Rakennuskanta. Varjostus. 9 x N131 x HH145
 OX2 9 x N131 x HH145 Rakennuskanta Asuinrakennus Lomarakennus Liike- tai julkinen rakennus Teollinen rakennus Kirkko tai kirkollinen rak. Muu rakennus Allas Varjostus 1 h/a 8 h/a 20 h/a 0 0,5 1 1,5 2 km
colour television Färg-tv 32FLD882H väri-tv Owner s manual Bruksanvisningen
 colour television Färg-tv 32FLD882H väri-tv Owner s manual Bruksanvisningen Käyttöohje Contents Accessories... 2 Features... 2 Introduction... 2 Preparation... 2 Safety Precautions... 2 Power Source...
LUONNOS RT 80260 EN AGREEMENT ON BUILDING WORKS 1 THE PARTIES. May 1998 1 (10)
") RT 80260 EN May 1998 1 (10) AGREEMENT ON BUILDING WORKS This agreement template is based on the General Terms and Conditions of Building Contracts YSE 1998 RT 16-10660, LVI 03-10277, Ratu 417-7, KH X4-00241.
RT 80260 EN May 1998 1 (10) AGREEMENT ON BUILDING WORKS This agreement template is based on the General Terms and Conditions of Building Contracts YSE 1998 RT 16-10660, LVI 03-10277, Ratu 417-7, KH X4-00241.
03 PYÖRIEN SIIRTÄMINEN
 78 03 PYÖRIEN SIIRTÄMINEN Wheels and tyres are heavy. Their handling may involve heavy lifting at the workshop. We have developed a logical ergonomic method for transporting wheels. The focus here is our
Tervetuloa Pika-aloitusopas
 Langaton TV-Linkki FI SLV300 Tervetuloa Pika-aloitusopas Liitä lähetin Liitä vastaanotin 3 Nauti Wireless TV link SLV300 Wireless TV link EN EN NL NL FR FR EN EN NL NL FR FR SLV300 SLV5400 Pakkauksen sisältö
TM ETRS-TM35FIN-ETRS89 WTG
 VE1 SHADOW - Main Result Calculation: 8 x Nordex N131 x HH145m Assumptions for shadow calculations Maximum distance for influence Calculate only when more than 20 % of sun is covered by the blade Please
TÄYTTÖAUTOMAATIT TÄYTTÖAUTOMAATIT COMPUTER INFLATORS
 31 S AHCON computer inflators are designed with a view to high quality, precision and long service life. The inflation computers are designed in Denmark and manufactured and tested in our own workshop.
Tynnyrivaara, OX2 Tuulivoimahanke. ( Layout 9 x N131 x HH145. Rakennukset Asuinrakennus Lomarakennus 9 x N131 x HH145 Varjostus 1 h/a 8 h/a 20 h/a
 , Tuulivoimahanke Layout 9 x N131 x HH145 Rakennukset Asuinrakennus Lomarakennus 9 x N131 x HH145 Varjostus 1 h/a 8 h/a 20 h/a 0 0,5 1 1,5 km 2 SHADOW - Main Result Assumptions for shadow calculations
Gaming mouse Pelihiiri Spelmus
 Gaming mouse Pelihiiri Spelmus Button 1 Nappi 1 Knapp 1 Scrollwheel & button 5 Vieritysrulla & nappi 5 Mushjulet & knapp 5 Button 2 Nappi 2 Knapp 2 dpi + / - Buttons 6 & 7 Napit 6 & 7 Knapp 6 & 7 Button
Työsuojelurahaston Tutkimus tutuksi - PalveluPulssi 11.3.2016. Peter Michelsson Wallstreet Asset Management Oy
 Työsuojelurahaston Tutkimus tutuksi - PalveluPulssi 11.3.2016 Peter Michelsson Wallstreet Asset Management Oy Wallstreet lyhyesti Perustettu vuonna 2006, SiPa toimilupa myönnetty 3/2014 Täysin kotimainen,
Owner s Manual GREE Electric Appliances,Inc.of zhuhai
 Ilmalämpöpumppu Split air conditioner wall mounted model Käyttäjän opas Owner s Manual GREE Electric Appliances,Inc.of zhuhai Ultra-thin GWHD09A3NK3DF KFR-25GW/NaA12FA GWHD12B2NK3AD KFR-32GW/NaA12FA Please
WindPRO version joulu 2012 Printed/Page :47 / 1. SHADOW - Main Result
 SHADOW - Main Result Assumptions for shadow calculations Maximum distance for influence Calculate only when more than 20 % of sun is covered by the blade Please look in WTG table WindPRO version 2.8.579