66149_silv_Energiekosten-Messgerät_Content_GB-FI-SE-DE.indd :06
|
|
|
- Jari Nieminen
- 9 vuotta sitten
- Katselukertoja:
Transkriptio
1 A _silv_Energiekosten-Messgerät_Content_GB-FI-SE-DE.indd :06

2 B _silv_Energiekosten-Messgerät_Content_GB-FI-SE-DE.indd :06
3 Introduction Proper use...page 6 Description of parts and features...page 7 Included items...page 8 Technical data...page 8 Safety instructions...page 11 Safety instructions for batteries...page 17 Before first use...page 19 Preparation for use...page 20 Programming the date / time...page 21 Programming the electricity tariff...page 23 Programming the electricity tariff 1 and 2...Page 27 Switching tariff 2 off...page 30 Connecting a consumer device...page 31 Measuring the mains voltage...page 32 Measuring the current...page 32 Measuring power...page 34 Measuring maximum power...page 34 Programming the overload warning value...page 35 Measuring energy consumption...page 38 Displaying the energy costs...page 39 Displaying the energy consumption history...page 41 Changing the batteries...page 42 Troubleshooting...Page 44 Restoring the factory default settings...page 47 Cleaning...Page 48 Service...Page 49 Disposal...Page 50 GB/IE _silv_Energiekosten-Messgerät_Content_GB-FI-SE-DE.indd :06

4 Energy Monitor Introduction Familiarise yourself with the product before using it for the first time. In addition please refer carefully to the operating instructions below and the safety advice. Use the product only as described and for the indicated purpose. Keep these instructions in a safe place. If you pass the product on to anyone else, please ensure that you also pass on all the documentation. Proper use The appliance is designed to measure the power consumption of electrical appliances 6 GB/IE 66149_silv_Energiekosten-Messgerät_Content_GB-FI-SE-DE.indd :06

5 and to calculate electricity and operating costs. Any other use or modification of the instrument constitute improper use and carry a serious risk of accident. The manufacturer is not liable for damage caused by improper use. The manufacturer cannot guarantee the safety of the device if it is subject to improper use. The instrument is not intended for commercial use. This device is intended for use only in a dry, interior environment. Description of parts and features 1 LC display 2 FUNCTION button ( function ) 3 SET button ( settings ) 4 Socket 5 R button ( reset ) GB/IE _silv_Energiekosten-Messgerät_Content_GB-FI-SE-DE.indd :06
 3 SET button ( settings ) 4 Socket 5 R button ( reset ) GB/IE 7")
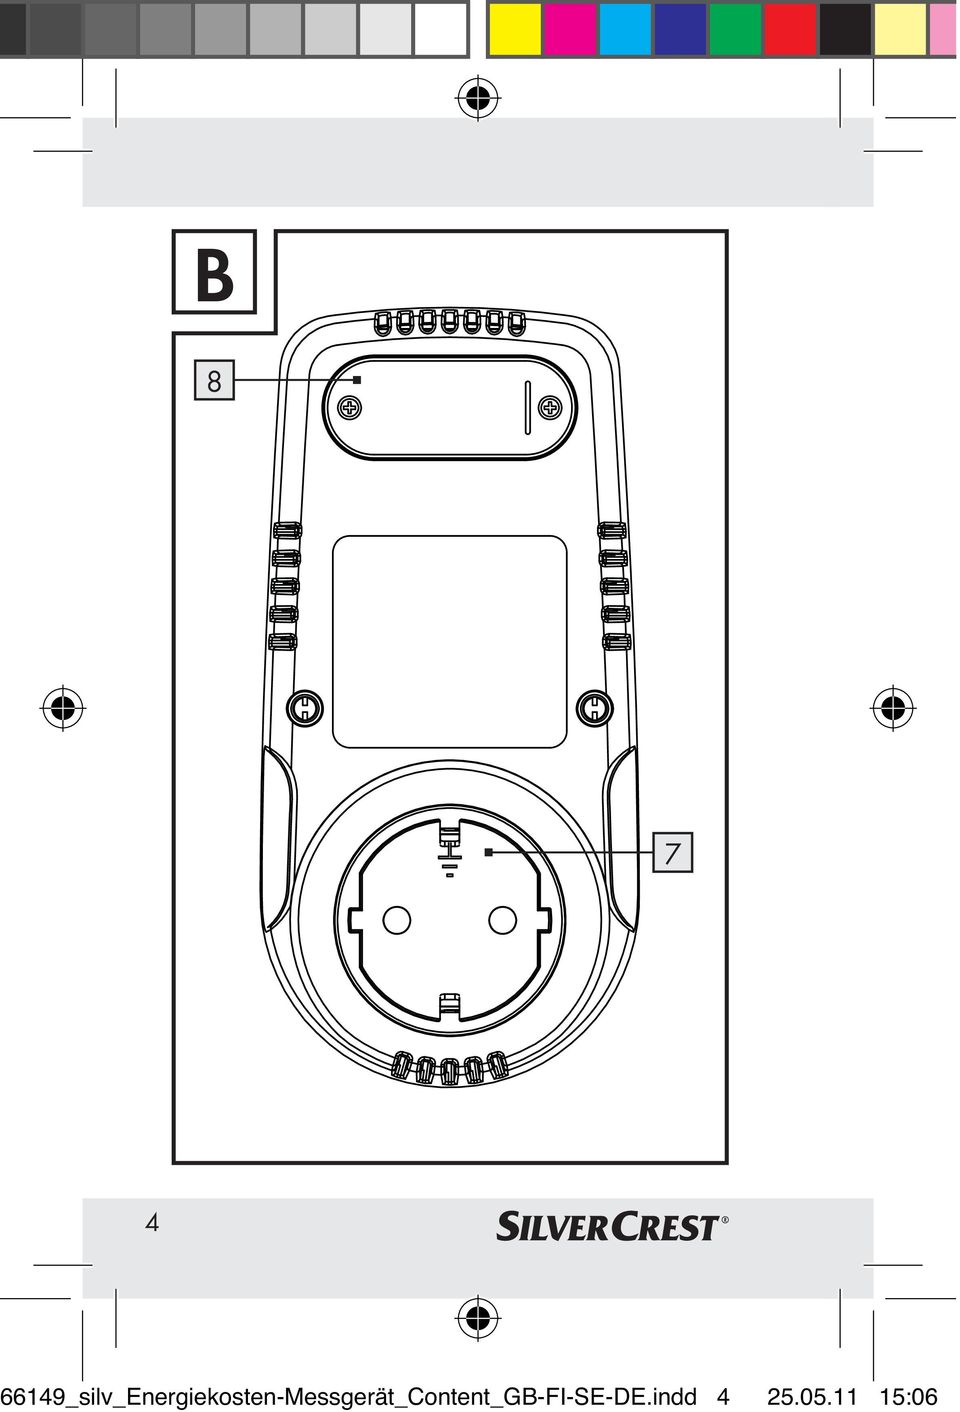
6 6 SELECT button ( select ) 7 Plug 8 Battery compartment cover Included items Check that all the items are present and that the device is in perfect condition immediately after unpacking. 1 Energy cost monitor 3 Batteries 1.5 V, LR44 (pre-installed) 1 Operating instructions Technical data Input voltage: V ~, 50 Hz 8 GB/IE 66149_silv_Energiekosten-Messgerät_Content_GB-FI-SE-DE.indd :06
 1 Operating instructions Technical data Input voltage: 220 240 V ~, 50 Hz 8")
7 Max. permitted load: 16 A Batteries: 3 x 1.5 V (type: LR44, L1154F, A76, AG13 or RW82) Display range volts (mains voltage): V Display range amps (current consumption): 0 16 A Display range watts (power): W Display range kilowatt-hours (power consumption): kwh Display range energy costs: Tolerance: Voltage in volts: ± 3 % of the measured value GB/IE _silv_Energiekosten-Messgerät_Content_GB-FI-SE-DE.indd :06
: 0.00 9999.99 kwh Display range energy costs: 0.")
8 Current in amps: Power in watts: Energy consumption in kwh: ± 3 % of the measured value ± A ± 3 % of the measured value ± 1 W ± 5 % of the measured value ± 0.1 kwh Ambient conditions: Mains frequency: Hz Temperature: 0 40 C Humidity: 0 % to 80 % at 0 30 C 0 % to 50 % at C Altitude: up to 2,000 m Harmonic distortion of current / voltage: ±10 % 10 GB/IE 66149_silv_Energiekosten-Messgerät_Content_GB-FI-SE-DE.indd :06

9 Power factor (cos phi): 0,7 1,0 Degree of pollution: 2 Safety instructions Please read all the safety information and instructions. Failure to observe the safety information and instructions can result in electric shock, fire and / or serious injury. PLEASE RETAIN ALL SAFETY INFOR- MATION AND INSTRUCTIONS FOR FUTURE REFERENCE. How to avoid fatal injury by electric shock! Do not plug in on top of each other! Inspect the energy meter, additional GB/IE _silv_Energiekosten-Messgerät_Content_GB-FI-SE-DE.indd :06

10 equipment and the electrical appliances you wish to test before every use to ensure that they are intact. Damaged electrical appliances and buckled / kinked mains leads or bare wires increase the risk of an electric shock. Do not operate the energy meter if mains leads or mains plugs on the electrical appliances you wish to test are damaged. CAUTION! Damaged mains leads pose a risk of fatal injury by electric shock. The connector plug 7 of the energy meter must fit into the outlet. The connector plug 7 must not be modified in any way. Do not use adapter plugs in conjunction with earthed electrical appliances. Using unmodified mains plugs and proper outlets reduces the risk of an electric shock. 12 GB/IE 66149_silv_Energiekosten-Messgerät_Content_GB-FI-SE-DE.indd :06

11 Take note of the mains voltage! The voltage must agree with the information on the type plate of the appliance ( V ~ ). Keep the energy meter away from rain and moisture. If water enters the energy meter there is an increased risk of an electric shock. Never under any circumstances open up the housing of the energy meter. If the energy meter does not work properly or is damaged, please have it repaired immediately by a specialist. Do not operate the energy meter outdoors. Always remove the electrical appliances you are testing from the socket 4 directly by the mains plug and never using the mains lead. GB/IE _silv_Energiekosten-Messgerät_Content_GB-FI-SE-DE.indd :06

12 Remove the energy meter from the outlet when you have finished using it. Make sure that the device does not become covered by towels, curtains or similar objects, otherwise this could lead to the danger of overheating. Ensure that there is always adequate air circulation. Do not position the device in difficult to access places. Always ensure that the device can be easily and quickly pulled out of the mains socket. How to avoid personal injury and damage to the product! RISK OF FATAL INJURY AND ACCIDENTS FOR INFANTS AND CHILDREN! Never 14 GB/IE 66149_silv_Energiekosten-Messgerät_Content_GB-FI-SE-DE.indd :06

13 leave children unattended with the packaging materials or the product. The packaging material carries a risk of suffocation and there is a risk of fatal injury by electric shock. Children often underestimate dangers. Always keep children away from the product. CAUTION! DANGER OF EXPLOSION! Never operate the energy meter where there is any risk of explosion, i.e. close to inflammable liquids or gases. Never exceed the stated maximum input voltage. Avoid strong vibrations or shocks. Do not expose the energy cost meter to extreme temperatures, extreme solar radiation, moisture or wet conditions. Use the product only if the ambient temperatures are acceptable. GB/IE _silv_Energiekosten-Messgerät_Content_GB-FI-SE-DE.indd :06

14 Never operate the energy meter close to strong magnetic fields such as motors, transformers or similar. Do not place the energy meter face down on workbenches or working surfaces. This helps to prevent damage to the operating elements and the LC 1. Remove the batteries from the energy meter if you do not intend to use if for any length of time. The power meter shall be used only in installation category II (CAT II) according to IEC664, i. e. in which transient voltages do not exceed 2500 V ~, the mains supply for residential area generally belongs to this category. 16 GB/IE 66149_silv_Energiekosten-Messgerät_Content_GB-FI-SE-DE.indd :06
 according to IEC664, i. e.")
15 Safety instructions for batteries Remove batteries that have not been used for any length of time from the instrument. CAUTION! DANGER OF EXPLOSION! Never recharge batteries. Make sure when inserting the batteries that the polarity is correct. This is indicated in the battery compartment. If necessary, clean the battery and instrument contacts before inserting the batteries. Remove spent batteries from the instrument immediately on account of the increased risk of leakage. Batteries must not be disposed of in household waste. Consumers are un- GB/IE _silv_Energiekosten-Messgerät_Content_GB-FI-SE-DE.indd :06

16 der a legal obligation to dispose of batteries properly. Keep batteries out of the reach of children, do not dispose of them in fire, do not short-circuit them, and do not take them apart. Failure to observe these instructions may result in the batteries discharging beyond their end voltage, which carries a risk of leakage. If the batteries in your instrument have leaked, remove them immediately to prevent damage to the instrument. Avoid contact with skin, eyes and mucous membrane. In the event of contact with battery acid, rinse the affected area with plenty of water and / or consult a doctor. Unplug the appliance before changing the batteries. 18 GB/IE 66149_silv_Energiekosten-Messgerät_Content_GB-FI-SE-DE.indd :06

17 The battery compartment cover 8 must be completely inserted before bring into operation. Do not mix battery types. Do not use used and new batteries together. Only use battery type recommended. Battery supply terminal must not be short circuited. Before first use Note: Three batteries (type: 1.5 V LR44, L1154F, A76, AG13 or RW82) are included and already fitted in the device. Remove the isolation strip between the batteries. Press the R button 5 using a pointed object (e.g. pencil). GB/IE _silv_Energiekosten-Messgerät_Content_GB-FI-SE-DE.indd :06
.")
18 The energy cost meter is now ready for use. Preparation for use (Fig. A+B) Note: Ensure that the energy cost meter and the consumer device are switched on, so that measurements can be taken. Note: The LC display 1 switches off after approx. 3 minutes automatically if the energy cost meter is inserted into a mains outlet socket but no button has been pressed. The data is retained. You can reactivate the LC display 1 by pressing the FUNCTION 2, SET 3 or SELECT 6 button. Note: The LC display 1 switches off after approx. 1 minute automatically if the energy cost meter is removed from the mains outlet socket. The data is retained. 20 GB/IE 66149_silv_Energiekosten-Messgerät_Content_GB-FI-SE-DE.indd :06

19 You can reactivate the LC display 1 by pressing the FUNCTION 2, SET 3 or SELECT 6 button. Note: Take the batteries out of the energy cost meter if you are going to remove it from the mains outlet socket for more than 12 hours. By doing this you will prolong the life of the batteries. Note: You can reach the desired values quicker if you press and hold down the SELECT 6 button. This quicker method can also be used for making the following settings. Programming the date / time Note: The time format can be switched between 12- and 24-hour formats and back again in every operating mode in GB/IE _silv_Energiekosten-Messgerät_Content_GB-FI-SE-DE.indd :06

20 which the current time appears in the LC display 1. To do this, press the SELECT button 6. The device s factory setting is the 24-hour format. Note: In the 12-hour format, the indicator PM (post meridiem = after midday) appears in the top right of the LC display 1 between 12:00:00 and 23:59:59 hrs. 1. Press the SET button 3. The CLOCK SET display appears in the LC display 1. The day display flashes. 2. Press the SELECT button 6 repeatedly until the desired day value appears in the LC display 1. The names of the days of the week are shortened as follows: MO = Monday TU = Tuesday WE = Wednesday TH = Thursday 22 GB/IE 66149_silv_Energiekosten-Messgerät_Content_GB-FI-SE-DE.indd :06

21 FR = Friday SA = Saturday SU = Sunday 3. Press the SET button 3 to confirm your settings. The hours display flashes. 4. Press the SELECT button 6 repeatedly until the desired value appears in the LC display Repeat steps 3 and 4 to set the minutes value. 6. Press the SET button 3 to confirm your settings. Programming the electricity tariff Note: You must first program in the current electricity price to use the energy cost metering function. You can find the cost of a kwh of electricity from your electricity bill. GB/IE _silv_Energiekosten-Messgerät_Content_GB-FI-SE-DE.indd :06
22 Note: The LC display 1 switches into the basic mode (voltage display) automatically if about 1 minute passes during programming without you pressing a button. IMPORTANT: In the following example we will use a setting of per / kwh for the electricity price. 1. Press the FUNCTION button 2 repeatedly until the basic mode (voltage display) appears in the LC display Press and hold down the FUNCTION button 2 for approx. 3 seconds to switch to the tariff mode. The LC display 1 shows the COST / kwh (cost / kilowatt-hour) display. 3. Press the SET button 3. The first digit flashes. The SET display appears in the LC display GB/IE 66149_silv_Energiekosten-Messgerät_Content_GB-FI-SE-DE.indd :06
23 4. Press the SELECT button 6 repeatedly until the 0 value appears in the LC display Press the SET button 3 to confirm your settings. The second digit flashes. 6. Press the SELECT button 6 repeatedly until the 1 value appears in the LC display Press the SET button 3 to confirm your settings. The third digit flashes. 8. Press the SELECT button 6 repeatedly until the 5 value appears in the LC display Press the SET button 3 to confirm your settings. The fourth digit flashes. 10. Press the SELECT button 6 repeatedly until the 2 value appears in the LC display Press the SET button 3 to confirm your settings. The decimal point digit flashes. GB/IE _silv_Energiekosten-Messgerät_Content_GB-FI-SE-DE.indd :06
24 12. Press the SELECT button 6 repeatedly until the decimal point is in the desired position in this example before the Press the SET button 3 to confirm your settings. The -:-- display appears in the LC display 1. The COST / kwh (cost / kilowatt-hour) display is no longer illuminated. 14. Press the FUNCTION button 2 to end your input. 15. Press and hold down the FUNCTION button 2 for approx. 3 seconds to switch to the basic mode (voltage display). 26 GB/IE 66149_silv_Energiekosten-Messgerät_Content_GB-FI-SE-DE.indd :06
25 Programming the electricity tariff 1 and 2 Note: You can set two different electricity tariffs on this energy cost meter. To use this function you have to set the start times for tariffs 1 and 2. IMPORTANT! Tariff 1 is automatically the first tariff to be programmed. Example: If the energy cost meter is programmed during the night the current night tariff is programmed as tariff 1. If the energy cost meter is programmed during the day the current day tariff is programmed as tariff 1. Note: The LC display 1 switches into the basic mode (voltage display) automatically if about 1 minute passes during programming without you pressing a button. GB/IE _silv_Energiekosten-Messgerät_Content_GB-FI-SE-DE.indd :06
26 1. Now carry out steps 1 to 12 in the section on Programming the electricity tariff. 2. Press the SET button 3 to confirm your settings. 3. Press the SELECT button 6 to select the combination of days on which tariff 1 applies. The following combinations are available: - SU MO TU... SA = every day - SU or MO or TU etc. = individual day - MO TU... FR = Monday Friday - MO TU WE... SA = Monday Saturday - SU SA = weekend 4. Press the SET button 3 to confirm your settings. The hours display flashes. 5. Press the SELECT button 6 repeatedly until the time at which tariff 1 should start is displayed. 28 GB/IE 66149_silv_Energiekosten-Messgerät_Content_GB-FI-SE-DE.indd :06
27 6. Repeat steps 4 and 5 to set the minutes value. 7. Press the SET button 3 to confirm your settings. 8. Press the FUNCTION button 2. The LC display 1 shows the PRICE 2 (2nd electricity tariff) display. 9. Repeat steps 3 to 12 in the section on Programming the electricity tariff to program the price per kwh for tariff Press the SET button 3 to confirm your settings. 11. Repeat steps 3 to 6 in the section entitled Programming electricity tariff 1 and 2 in order to set the starting time for tariff Press the SET button 3 to confirm your settings. GB/IE _silv_Energiekosten-Messgerät_Content_GB-FI-SE-DE.indd :06
28 13. Press the FUNCTION button 2 to end your input. 14. Press and hold down the FUNCTION button 2 for approx. 3 seconds to switch to the basic mode (voltage display). Switching tariff 2 off 1. Press the FUNCTION button 2 repeatedly until the basic mode (voltage display) appears in the LC display Press and hold down the FUNCTION button 2 for about 3 seconds. The settings for tariff 1 are shown in the LC display Press the FUNCTION button 2. The settings for tariff 2 are shown in the LC display GB/IE 66149_silv_Energiekosten-Messgerät_Content_GB-FI-SE-DE.indd :06
29 4. Press and hold down the FUNCTION button 2 for approx. 3 seconds to switch tariff 1 and tariff 2 off. Connecting a consumer device CAUTION! DANGER OF INJURY! Never exceed the rated maximum supply voltage. Insert the energy cost meter plug into a suitable mains socket. Now insert the mains plug of the consumer device to be tested into the socket 4 on the meter. GB/IE _silv_Energiekosten-Messgerät_Content_GB-FI-SE-DE.indd :06
30 Measuring the mains voltage Press the FUNCTION button 2 repeatedly until the VOLTac display appears in the LC display 1. The current mains voltage in V (volts), frequency in Hz (Hertz) and time are now displayed in the LC display 1. Measuring the current Press the FUNCTION button 2 repeatedly until the AMP display appears in the LC display 1. The current in A (amperes) required for the load is now displayed on the LC display 1. The power factor in cos phi and the time are also displayed. 32 GB/IE 66149_silv_Energiekosten-Messgerät_Content_GB-FI-SE-DE.indd :06
31 Note: The power factor is a measure of the ratio of the actual (real power) and the theoretical (apparent power) power of an electrical device. The power factor can have any value between 0 and 1. The ideal value is 1. When the power factor is less than 1, power is exchanged between the electrical appliance and the grid. In exceptional cases, this can lead to display of the power factor and the power being unstable, depending on the power level and the value of the power factor. This is due to technical reasons and is unavoidable. The energy cost monitor correctly determines the energy used. The mean value around which the changing value displayed hovers represents the calculated value of the current power or the current power factor. GB/IE _silv_Energiekosten-Messgerät_Content_GB-FI-SE-DE.indd :06
32 Measuring power Press the FUNCTION button 2 repeatedly until the WATT display appears in the LC display 1. The current power consumption in W (watts), power factor in cos phi and time are now displayed in the LC display 1. Measuring maximum power Press the FUNCTION button 2 repeatedly until the WATT and MAX displays appear in the LC display 1. - The maximum power consumption in W (watts) measured earlier with the energy cost meter is displayed in the LC display 1. The display also shows 34 GB/IE 66149_silv_Energiekosten-Messgerät_Content_GB-FI-SE-DE.indd :06
33 the time at which the maximum power consumption was measured, along with the power factor in cos phi. Note: The maximum power consumption is stored until a higher value is measured. Only then is the older value overwritten in the meter s memory. Press and hold down the FUNCTION button 2 for approx. 3 seconds to erase the stored values. Programming the overload warning value Note: In addition to a maximum value for the power consumption (W), you can program a maximum value for the current (A). Here again, the energy cost meter carries out further measurements if the maximum value is exceeded. GB/IE _silv_Energiekosten-Messgerät_Content_GB-FI-SE-DE.indd :06
34 Note: The overload warning values are set to 0.00 in the factory. 1. Press the FUNCTION button 2 repeatedly until the basic mode (voltage display) appears in the LC display Press and hold down the FUNCTION button 2 for about 3 seconds. 3. Press the FUNCTION button 2 briefly. The MAX LOAD (maximum load) display appears in the LC display 1. Note: Press the FUNCTION button 2 briefly twice if you have already programmed the electricity prices for tariff 1 and tariff Press the SET button 3. The AMP or WATT display flashes. 5. Press the SELECT button 6 to select either the current (AMP) overload warning or the power consumption 36 GB/IE 66149_silv_Energiekosten-Messgerät_Content_GB-FI-SE-DE.indd :06
35 (WATT) overload warning. 6. Press the SET button 3 to confirm your settings. The first digit flashes. 7. Press the SELECT button 6 repeatedly until the desired value appears. 8. Repeat steps 6 and 7 to program the remaining values. 9. Press the SET button 3 to confirm your settings. 10. Press and hold down the FUNCTION button 2 for approx. 3 seconds to save the entered values. As soon as an overload warning value is exceeded, the OVERLOAD WARN- ING display flashes in the LC display 1 and the meter emits an audible alarm signal. Note: If the overload warning value is set to AMP, then the LC display 1 shows the GB/IE _silv_Energiekosten-Messgerät_Content_GB-FI-SE-DE.indd :06
36 measured value of the current (current consumption). While the measurement is taking place, the OVERLOAD WARNING display flashes. If the overload warning value is set to WATT, then the LC display 1 shows the measured value of the power consumption. While the measurement is taking place, the OVERLOAD WARNING display flashes. Press the FUNCTION button 2 to reset the LC display 1. Measuring energy consumption Press the FUNCTION button 2 repeatedly until the kwh display appears in the LC display GB/IE 66149_silv_Energiekosten-Messgerät_Content_GB-FI-SE-DE.indd :06
37 The total energy in kwh consumed by the connected consumer device since the measurement process started appears on the LC display 1. Press and hold down the FUNCTION button 2 for approx. 3 seconds to erase the stored values. Displaying the energy costs Note: The total cost of the consumed energy is calculated in (euro). Note: The calculated total cost of the consumed energy is calculated by multiplying the set price per kwh (see Programming the electricity tariff, Programming electricity tariff 1 and 2 ). GB/IE _silv_Energiekosten-Messgerät_Content_GB-FI-SE-DE.indd :06
38 Press the FUNCTION button 2 repeatedly until the COST display appears in the LC display 1. The total energy cost and the period for which the connected consumer device was switched on appear in the LC display 1. Note: The display range of the energy cost is to 9,999. If the measured value exceeds the upper display range value, then the upper value will continue to be displayed. Note: The switched-on duration can only be determined if the current is at least A. Press the FUNCTION button 2 to display the energy cost and the switched-on duration for tariff 1. Press the FUNCTION button 2 to display the energy cost and the switched-on duration for tariff GB/IE 66149_silv_Energiekosten-Messgerät_Content_GB-FI-SE-DE.indd :06
39 Press and hold down the FUNCTION button 2 to erase the stored values. Displaying the energy consumption history The energy cost meter measures the energy consumed by the connected devices over a period of seven days. This is shown graphically in the LC display 1. Each column represents one day (-1 = yesterday, -7 = a week ago). The bars in the columns represent the consumption in kwh: The factory default setting for the device is as follows: 1 bar = 1 kwh The device automatically adjusts the kwh value of a bar to suit the amount of electricity consumed. When 6 bars are reached, the device increases the value represented GB/IE _silv_Energiekosten-Messgerät_Content_GB-FI-SE-DE.indd :06
40 by a bar to the next higher kwh value. The following table shows the bar value increments used by the device: 1 bar = 1 kwh (6 bars = 6 kwh) (factory default setting) 1 bar = 2 kwh (6 bars = 12 kwh) 1 bar = 5 kwh (6 bars = 30 kwh) 1 bar = 10 kwh (6 bars = 60 kwh) 1 bar = 15 kwh (6 bars = 90 kwh) Changing the batteries Note: All the stored values are erased automatically as soon as you remove the batteries from the device. Note: To do this you will require a crosshead screwdriver. 42 GB/IE 66149_silv_Energiekosten-Messgerät_Content_GB-FI-SE-DE.indd :06
41 Pull the energy cost meter plug out of the mains socket. Release the two screws on the back of the device using a crosshead screwdriver and take off the battery compartment cover 8. Remove the used batteries. Insert three new batteries (1.5 V, recommended type: LR 44, L1154F, A76, AG13 or RW82 ). Note: Make sure you fit the batteries the right way round (polarity). The correct polarity is shown inside the battery compartment. Put the battery compartment cover 8 back on and tighten the two screws. GB/IE _silv_Energiekosten-Messgerät_Content_GB-FI-SE-DE.indd :06
42 Troubleshooting = Problem = Cause = Solution The LC display 1 is blank. The LC display 1 is in stand-by mode. Press one of the following buttons: FUNCTION 2, SET 3 or SELECT 6. The energy cost meter must be restarted. Press the R button 5 using a pointed object (e.g. pencil). The energy cost meter must be reprogrammed. The batteries are exhausted. Replace the exhausted batteries with new ones. The energy cost meter must be reprogrammed. 44 GB/IE 66149_silv_Energiekosten-Messgerät_Content_GB-FI-SE-DE.indd :06
43 The LC display 1 shows abnormal characters. The energy cost meter must be restarted. Press the R button 5 using a pointed object (e.g. pencil). The energy cost meter must be reprogrammed. The buttons do not work. The energy cost meter must be restarted. Press the R button 5 using a pointed object (e.g. pencil). The energy cost meter must be reprogrammed. The energy cost meter shows no value for current and power although a consumer device is connected. The current is below the minimum display range value of A. GB/IE _silv_Energiekosten-Messgerät_Content_GB-FI-SE-DE.indd :06
44 Ensure that the current required for the load is greater than A. The energy cost meter shows no value for energy cost. The current is below the minimum display range value of A. Ensure that the current required for the load is greater than A. No electricity tariff has been programmed. Program the electricity tariff (see Programming the electricity tariff, Programming electricity tariff 1 and 2 ). The switch-on duration of the energy cost meter is too short. Check the energy cost again at a later point in time. 46 GB/IE 66149_silv_Energiekosten-Messgerät_Content_GB-FI-SE-DE.indd :06
45 Restoring the factory default settings As is the case with exposure to electrostatic discharges, the device may malfunction if it is exposed to a strong high-frequency electromagnetic field. If these malfunctions occur, e.g. the buttons do not work properly or the display is shown incorrectly, press the R button 5 to reset the equipment to the factory default settings. Use a thin, pointed object to do this. The malfunctions should then be eliminated. IMPORTANT! Please note that this will delete all the recorded data. GB/IE _silv_Energiekosten-Messgerät_Content_GB-FI-SE-DE.indd :06
46 Cleaning DANGER TO LIFE FROM ELECTRIC SHOCK! Keep the energy cost meter away from rain or moisture. Water penetration increases the risk of electric shock. DANGER TO LIFE FROM ELECTRIC SHOCK! Before carrying any tasks on the product or the connected consumer device, pull the energy cost meter plug out of the mains socket. Clean the energy cost meter with a dry, fluff-free cloth. 48 GB/IE 66149_silv_Energiekosten-Messgerät_Content_GB-FI-SE-DE.indd :06
47 Service GB Service Great Britain Tel.: (0,10 GBP/Min.) IAN IE Service Ireland Tel: (0,08 EUR/Min. (peak) 0,06 EUR/Min. (off peak)) IAN GB/IE _silv_Energiekosten-Messgerät_Content_GB-FI-SE-DE.indd :06
48 Disposal The packaging is made entirely of recyclable materials, which you may dispose of at local recycling facilities. Contact your local refuse disposal authority for more details of how to dispose of your worn-out product. To help protect the environment, please dispose of the product properly when it has reached the end of its useful life and not in the household waste. Information on collection points and their opening hours can be obtained from your local authority. 50 GB/IE 66149_silv_Energiekosten-Messgerät_Content_GB-FI-SE-DE.indd :06
49 Faulty or used batteries must be recycled in accordance with Directive 2006 / 66 / EC. Please return the batteries and / or the device to the available collection points. Pb Hg Environmental damage through incorrect disposal of the batteries! Batteries may not be disposed of with the usual domestic waste. They may contain toxic heavy metals and are subject to hazardous waste treatment rules and regulations. The chemical symbols for heavy metals are as follows: Cd = cadmium, Hg = mercury, Pb = lead. That is why you should dispose of used batteries at a local collection point. EMC GB/IE _silv_Energiekosten-Messgerät_Content_GB-FI-SE-DE.indd :06
50 Product description: Energy Monitor Model No.: Z30412 Version: 06 / GB/IE 66149_silv_Energiekosten-Messgerät_Content_GB-FI-SE-DE.indd :06
51 Johdanto Määräystenmukainen käyttö... Sivu 54 Osien kuvaus... Sivu 55 Toimitukseen kuuluu... Sivu 56 Tekniset tiedot... Sivu 56 Turvallisuusohjeet... Sivu 59 Paristojen turvallisuusohjeet... Sivu 64 Ennen käyttöönottoa... Sivu 67 Käyttöönotto... Sivu 67 Päiväyksen / kellonajan ohjelmointi... Sivu 69 Sähkötariffin ohjelmointi... Sivu 71 Virtatariffin 1 ja 2 ohjelmointi... Sivu 73 Tariffin 2 poiskytkentä... Sivu 76 Kuluttajien liitäntä... Sivu 77 Verkkojännitteen mittaus... Sivu 78 Sähkövirran voimakkuuden mittaaminen...sivu 78 Tehon mittaaminen... Sivu 80 Maksimi tehon mittaaminen... Sivu 80 Ylikuomitus-varoitusarvon ohjelmointi... Sivu 81 Energiankulutuksen mittaaminen... Sivu 84 Energiakustannusten näyttö... Sivu 85 Energiankulutuksen historian näyttö... Sivu 87 Paristojen vaihto... Sivu 88 Vikojen korjaus... Sivu 89 Palautus tehtaalla asennettuihin arvoihin...sivu 93 Puhdistus... Sivu 94 Houlto... Sivu 95 Jätehuolto... Sivu 95 FI _silv_Energiekosten-Messgerät_Content_GB-FI-SE-DE.indd :06
52 Energiankulutusmittari Johdanto Tutustu laitteeseen ennen ensimmäistä käyttöönottoa. Lue sitä varten tämä käyttöohje ja turvallisuusohjeet. Käytä laitetta ainoastaan kuvatulla tavalla ja mainitussa käyttötarkoituksessa. Säilytä käyttöohje huolellisesti. Anna kaikki asiakirjat laitteen mukana mahdolliselle uudelle omistajalle. Määräystenmukainen käyttö Laite on tarkoitettu sähkölaitteiden energian kulutuksen mittaukseen ja sähkö- ja käyttökustannusten laskentaan. Muunlainen 54 FI 66149_silv_Energiekosten-Messgerät_Content_GB-FI-SE-DE.indd :06
53 käyttö tai muutosten teko laitteeseen on määräystenvastaista ja voi aiheuttaa huomattavia tapaturmavaaroja. Valmistaja ei ota mitään vastuuta määräystenvastaisesta käytöstä aiheutuneista vahingoista. Valmistaja ei voi taata laitteen turvallisuutta, jos sitä käytetään asiantuntemattomasti. Laite ei ole tarkoitettu ammattimaiseen käyttöön. Laite on tarkoitettu käytettäväksi ainoastaan kuivissa sisätiloissa. Osien kuvaus 1 LC-näyttö 2 FUNCTION-painike ( toiminto ) 3 SET-painike ( aseta ) 4 Laitteen pistorasia 5 R-Taste ( palautus ) 6 SELECT-painike ( valitse ) FI _silv_Energiekosten-Messgerät_Content_GB-FI-SE-DE.indd :06
54 7 Liitäntäpistoke 8 Paristotilan kansi Toimitukseen kuuluu Tarkista aina välittömästi toimitusta pakkauksesta purkaessasi, että toimitus on täydellinen ja laite on moitteettomassa kunnossa. 1 energiakustannusmittari 3 paristoa 1,5 V, LR44 (esiasennettu) 1 käyttöohje Tekniset tiedot Sisäänmenojännite: Suurin sallittu kuormitus: V, 50 Hz 16 A 56 FI 66149_silv_Energiekosten-Messgerät_Content_GB-FI-SE-DE.indd :06
55 Paristo: 3 x 1,5 V, (tyyppi: LR44, L1154F, A76, AG13 tai RW82) Näyttöalue volttia (verkkojännite): V Näyttöalue ampeeria (virranotto): 0 16 A Näyttöalue wattia (teho): W Näyttöalue kilowattituntia (virrankulutus): 0, ,99 kwh Näyttöalue energiakustannukset: 0, Toleranssialue: Jännite volttia: ± 3 % mitatusta arvosta FI _silv_Energiekosten-Messgerät_Content_GB-FI-SE-DE.indd :06
56 Virta ampeeria: Teho wattia: Virrankulutus kwh: ± 3 % mitatusta arvosta ± 0,002 A ± 3 % mitatusta arvosta ± 1 W ± 5 % mitatusta arvosta ± 0,1 kwh Ympäristöolosuhteet: Verkkotaajuus: Hz Lämpötila: 0 40 C Ilmankosteus: 0 % 80% kun 0 30 C 0 % 50 % kun C Korkeus: max m Virran / jännitteen harmoninen vääristymä: ± 10 % Tehokerroin (cos Phi): 0,7 1,0 Likaisuusaste: 2 58 FI 66149_silv_Energiekosten-Messgerät_Content_GB-FI-SE-DE.indd :06
57 Turvallisuusohjeet Lue kaikki turvallisuusohjeet ja ohjeet. Mikäli turvallisuusohjeiden ja ohjeiden noudattaminen laiminlyödään siitä voi olla seurauksena sähköisku, tulipalo ja / tai vakavia loukkaantumisia. SÄILYTÄ KAIKKI TURVALLISUUSOHJEET JA KÄYTTÖOHJEET VASTAISUUDEN VARALLE! Vältä hengenvaarallinen sähköisku! Älä pistä laitetta toisen laitteen pistorasiaan. Tarkista ennen jokaista käyttöönottoa, että energiakustannusmittari, lisävarusteet sekä tarkistettavat sähkölaitteet FI _silv_Energiekosten-Messgerät_Content_GB-FI-SE-DE.indd :06
58 ovat moitteettomassa kunnossa. Vaurioituneet sähkölaitteet ja mutkalla olevat verkkojohdot sekä paljaat johtimet kohottavat sähköiskun riskiä. Älä koskaan käytä energiakustannusmittaria, jos verkkojohdot tai pistokkeet tai tarkistettavat sähkölaitteet ovat viallisia. VARO! Vialliset verkkojohdot voivat aiheuttaa sähköiskun ja ovat hengenvaarallisia. Energiakustannusmittarin liitäntäpistokkeen 7 on sovittava pistorasiaan. Liitäntäpistokkeeseen 7 ei saa tehdä minkäänlaisia muutoksia. Älä käytä adapteripistoketta yhdessä suojamaadoitettujen sähkölaitteiden kanssa. Soveltuvat liitäntäpistokkeet, joihin ei ole tehty muutoksia, ja sopivat pistorasiat vähentävät sähköiskuriskiä. 60 FI 66149_silv_Energiekosten-Messgerät_Content_GB-FI-SE-DE.indd :06
59 Huomioi verkkojännite! Jännitteen on vastattava laitteen tyyppikilvellä olevia tietoja ( V ). Pidä energiakustannusmittari loitolla sateelta ja kosteudelta. Veden tunkeutuminen laitteeseen kohottaa sähköiskuriskiä. Älä missään tapauksessa avaa energiakustannusmittarin koteloa. Mikäli energiakustannusmittari ei toimi kunnolla tai se on vaurioitunut, anna vain ammattimiehen korjata se välittömästi. Älä käytä energiakustannusmittaria ulkona. Vedä tarkistettavat sähkölaitteet aina irti pistokkeesta äläkä koskaan laitteen pistorasian 4 verkkojohdosta. Irrota energiankustannusmittari pistorasiasta, kun et käytä sitä enää. Varmistaudu, ettei laitetta peitetä pyyheliinalla, verhoilla tai muilla tämän- FI _silv_Energiekosten-Messgerät_Content_GB-FI-SE-DE.indd :06
60 tapaisilla esineillä. Nämä voivat aiheuttaa laitteen ylikuumenemisen. Huolehdi tästä syystä riittävästä ilmanvaihdosta. Älä sijoita laitetta paikkoihin, joihin on vaikea pääsy. Pidä huoli siitä, että laite voidaan nopeasti ja helposti irrottaa pistorasiasta. Vältä loukkaantumiset ja tuotteen vaurioituminen! HEN- GEN- JA TAPATURMA- VAARA PIKKULAP- SILLE JA LAPSILLE! Älä koskaan päästä lapsia ilman valvontaa pakkausmateriaalin ja tuotteen pariin. Pakkausmateriaali voi aiheuttaa tukehtumisvaaran ja hengenvaarallisen sähköiskuvaaran. Lapset aliarvioivat 62 FI 66149_silv_Energiekosten-Messgerät_Content_GB-FI-SE-DE.indd :06
61 useinkin uhkaavat vaarat. Pidä lapset aina loitolla tuotteesta. VARO! RÄJÄHDYS- VAARA! Älä käytä energiakustannusmittaria räjähdysalttiissa ympäristössä, jossa on syttyviä nesteitä tai kaasuja. Älä milloinkaan ylitä suurinta ilmoitettua sisäänmenojännitettä. Vältä voimakasta tärinää. Älä koskaan altista energiakustannusmittaria äärimmäisille lämpötiloille, äärimmäiselle auringonsäteilylle, ilmankosteudelle tai kosteudelle. Ota se käyttöön vasta, kun se on tottunut ympäristön lämpötilaan. Älä käytä energiakustannusmittari voimakkaiden magneettisten kenttien läheisyydessä, esim. moottorit, muuntajat tms. FI _silv_Energiekosten-Messgerät_Content_GB-FI-SE-DE.indd :06
62 Älä laita energiakustannusmittaria etupuoli alaspäin työpenkille tai työtasoille. Näin vältät ohjauselementtien ja LCD-näytön 1 vahingoittumisen. Poista paristot energiakustannusmittarista, jos et tarvitse sitä pitempään aikaan. Käytä energiakustannusmittaria vain rakennuksissa, jotka vastaavat IEC 664 mukaista asennusluokkaa II. Suurin jännitehuippu ei saa ylittää V. Asuinrakennusten päävirransyöttö kuuluu normaalisti asennusluokkaan II. Paristojen turvallisuusohjeet Poista paristot laitteesta, jos niitä ei ole käytetty pitkään aikaan. 64 FI 66149_silv_Energiekosten-Messgerät_Content_GB-FI-SE-DE.indd :06
63 VARO! RÄJÄHDYS- VAARA! Älä koskaan lataa paristoja uudelleen! Tarkista paristoja paikoilleen asettaessasi, että napaisuus on oikea! Tämä näytetään paristotilassa. Puhdista paristo- ja laitekontaktit tarvittaessa ennen niiden paikoilleenasetusta. Tyhjentyneet paristot on poistettava laitteesta välittömästi. Ne voivat vuotaa paristotilaan! Paristot eivät kuulu talousjätteisiin! Jokainen kuluttaja on lain mukaan velvoitettu hävittämään paristot määräystenmukaisesti! Säilytä paristot lasten ulottumattomissa. Älä koskaan heitä niitä tuleen äläkä oikosulje tai pura niitä! Ellei näitä ohjeita noudateta, paristosta voi tyhjentyä myös loppujännite. Silloin FI _silv_Energiekosten-Messgerät_Content_GB-FI-SE-DE.indd :06
64 on olemassa vuotamisvaara. Jos paristot ovat päässeet vuotamaan laitteeseen, poista ne heti, muuten laite voi vaurioitua! Vältä kosketusta ihoon, silmiin ja limakalvoihin. Huuhtele akkuhapon kanssa kosketuksiin joutunut kohta heti runsaalla vedellä ja / tai mene lääkäriin! Erota laite verkosta ennen paristojen vaihtoa. Pidä huoli siitä, että paristotilan kansi 8 on täysin suljettu, ennen kuin otat laitteen käyttöön. Älä käytä erilaisia paristotyyppejä tai käytettyjä ja uusia paristoja yhdessä. Käytä vain ilmoitetun tyyppisiä paristoja. Älä milloinkaan oikosulje pariston napaa. 66 FI 66149_silv_Energiekosten-Messgerät_Content_GB-FI-SE-DE.indd :06
65 Ennen käyttöönottoa Huomautus: Kolme paristoa (tyyppi: 1,5 V LR44, L1154F, A76, AG13 tai RW82) on jo toimitettaessa valmiiksi asennettu laitteeseen. Poista eristyskaista paristojen välistä. Paina jollain terävällä esineellä (esim. lyijykynällä) R-painiketta. Energiakustannusmittari on nyt käyttövalmis. Käyttöönotto (kuva A+B) Huomautus: Jotta mittaukset voitaisiin suorittaa, on varmistauduttava, että sekä energiakustannusmittari että kuluttajat on kytketty päälle. FI _silv_Energiekosten-Messgerät_Content_GB-FI-SE-DE.indd :06
66 Huomautus: LC-näyttö 1 kytkeytyy noin 3 minuutin kuluttua automaattisesti pois, vaikkakin energiakustannusmittari on pistetty pistorasiaan, mutta mitään painiketta ei ole painettu. Tiedot säilyvät muistissa. Voit taas aktivoida LC-näytön 1 painamalla painikkeita FUNCTION 2, SET 3 tai SELECT 6. Huomautus: LC-näyttö 1 kytkeytyy noin 1 minuutin kuluttua automaattisesti pois, kun energiakustannusmittari irrotetaan pistorasiasta. Tiedot säilyvät muistissa. Voit taas aktivoida LC-näytön 1 painamalla painikkeita FUNCTION 2, SET 3 tai SELECT 6. Huomautus: Ota paristot energiankustannusmittarista, jos poistat sen yli 12 tunniksi pistorasiasta. Tämä pidentää paristojen käyttöikää. Huomautus: Kun pidät SELECT 6 painiketta painettuna, se nopeuttaa tietojen 68 FI 66149_silv_Energiekosten-Messgerät_Content_GB-FI-SE-DE.indd :06
67 säätöä. Tätä pikasäätöä voit käyttää hyväksi myös seuraavissa asetuksissa. Päiväyksen / kellonajan ohjelmointi Huomautus: Kellonajan näyttömuoto voidaan kaikissa käyttötavoissa, joissa aktuelli kellonaika näytetään LC-näytössä 1, vaihtaa 24 tunnista 12 tuntiin tai päinvastoin. Paina tätä varten SELECTpainiketta 6. Laite on toimitettaessa asetettu 24 tunnin näyttömuotoon. Huomautus: 12 tunnin näyttömuodossa tulee kello 12:00:00 ja kello 23:59:59 välillä LC-näyttöön 1 ylös oikealle näyttö PM (Post Meridiem = iltapäivisin). 1. Paina SET-painiketta 3. LC-näyttöön 1 tulee näyttö CLOCK SET (kellon FI _silv_Energiekosten-Messgerät_Content_GB-FI-SE-DE.indd :06
68 asetus). Päivän näyttö vilkkuu. 2. Paina niin usein SELECT-painiketta 6, kunnes haluttu päivä tulee LC-näyttöön 1. Viikonpäivät on lyhennetty seuraavasti: MO = maanantai TU = tiistai WE = keskiviikko TH = torstai FR = perjantai SA = lauantai SU = sunnuntai 3. Vahvista syöttö painamalla SET-painiketta 3. Tuntinäyttö vilkkuu. 4. Paina niin usein SELECT-painiketta 6, kunnes haluttu arvo tulee LC-näyttöön Toista askeleet 3. ja 4., kun haluat asettaa minuutit. 6. Vahvista syöttö painamalla SET-painiketta FI 66149_silv_Energiekosten-Messgerät_Content_GB-FI-SE-DE.indd :06
69 Sähkötariffin ohjelmointi Huomautus: Senhetkinen sähkön hinta on ohjelmoitava ensin, vasta sen jälkeen voidaan energiakustannusten mittaustoimintoa käyttää. Yhden kilowattitunnin kwh hinta löytyy sähkölaskusta. Huomautus: LC-näyttö 1 kytkeytyy automaattisesti perusmoodiin (volttinäyttö), ellet ohjelmoinnin aikana paina mitään painiketta noin yli yhteen minuuttiin. TÄRKEÄÄ: Seuraavassa selvitetään sähkön hintaa esimerkin avulla (0,152 / kwh). 1. Paina niin usein FUNCTION-painiketta 2, kunnes LC-näytössä 1 on perusmoodi (volttinäyttö). 2. Paina FUNCTION-painiketta 2 ja pidä se painettuna noin 3 sekuntia päästäksesi tariffimoodiin. LC-näyttöön 1 tulee näyttö COST / kwh FI _silv_Energiekosten-Messgerät_Content_GB-FI-SE-DE.indd :06
70 (hinta / kilowattitunti). 3. Paina SET-painiketta 3. Ensimmäinen kohta vilkkuu. LC-näyttöön 1 tulee näyttö SET (asetus). 4. Paina niin usein SELECT-painiketta 6, kunnes LC-näyttöön 1 tulee Vahvista syöttö painamalla SET-painiketta 3. Toinen kohta vilkkuu. 6. Paina niin usein SELECT-painiketta 6, kunnes LC-näyttöön 1 tulee Vahvista syöttö painamalla SET-painiketta 3. Kolmas kohta vilkkuu. 8. Paina niin usein SELECT-painiketta 6, kunnes LC-näyttöön 1 tulee Vahvista syöttö painamalla SET-painiketta 3. Neljäs kohta vilkkuu. 10. Paina niin usein SELECT-painiketta 6, kunnes LC-näyttöön 1 tulee Vahvista syöttö painamalla SET-painiketta 3. Pilkkukohta vilkkuu. 72 FI 66149_silv_Energiekosten-Messgerät_Content_GB-FI-SE-DE.indd :06
71 12. Paina niin usein SELECT-painiketta 6, kunnes haluttu pilkkukohta on saavutettu tässä esimerkissä ennen numeroa Vahvista syöttö painamalla SET-painiketta 3. LC-näytössä 1 vilkkuu näyttö -:--. Näyttö COST / kwh (hinta / kilowattitunti) sammuu. 14. Paina FUNCTION-painiketta 2 syötön päättämiseksi. 15. Paina FUNCTION-painiketta 2 ja pidä se painettuna noin 3 sekuntia päästäksesi perusmoodiin (volttinäyttö). Virtatariffin 1 ja 2 ohjelmointi Huomautus: Voit asettaa energiakustannusmittariin kaksi erilaista sähkötariffia. Jotta tätä toimintoa voitaisiin käyttää, säh- FI _silv_Energiekosten-Messgerät_Content_GB-FI-SE-DE.indd :06
72 kötariffille 1 ja 2 on asetettava starttiajat. TÄRKEÄÄ! Tariffi 1 on automaattisesti se tariffi, joka ohjelmoitiin ensimmäisenä. Esimerkki: Mikäli energiakustannusmittari ohjelmoidaan yöllä, aktuelli yötariffi on ohjelmoitu tariffiksi 1. Mikäli energiakustannusmittari ohjelmoidaan päivällä, aktuelli päivätariffi on ohjelmoitu tariffiksi 1. Huomautus: LC-näyttö 1 kytkeytyy automaattisesti perusmoodiin (volttinäyttö), ellet ohjelmoinnin aikana paina mitään painiketta noin yli yhteen minuuttiin. 1. Seuraa ensin askeleita kappaleessa Sähkötariffin ohjelmointi. 2. Vahvista syöttö painamalla SET-painiketta Paina SELECT-painiketta 6, kun haluat valita päivien yhdistelmän, joina tariffi 1 on voimassa. 74 FI 66149_silv_Energiekosten-Messgerät_Content_GB-FI-SE-DE.indd :06
73 Käytettävissä ovat seuraavat yhdistelmät: - SU MO TU... SA = päivittäin - SU tai MO tai TU jne. = yksittäinen päivä - MO TU FR = maanantai - perjantai - MO TU WE... SA = maanantai lauantai - SU SA = viikonloppu 4. Vahvista syöttö painamalla SET-painiketta 3. Tuntinäyttö vilkkuu. 5. Paina niin usein SELECT-painiketta 3, kunnes haluttu aika on saavutettu, jona tariffi 1 alkaa. 6. Toista askeleet 4. ja 5., kun haluat asettaa minuutit. 7. Vahvista syöttö painamalla SET-painiketta Paina FUNCTION-painiketta 2. LCnäyttöön 1 tulee näyttö PRICE 2 (2. sähkötariffi). FI _silv_Energiekosten-Messgerät_Content_GB-FI-SE-DE.indd :06
74 9. Toista askeleita kappaleessa Sähkötariffin ohjelmointi, kun haluat ohjelmoida hinnan / kwh tariffille Vahvista syöttö painamalla SET-painiketta Toista askeleita kappaleessa Sähkötariffin 1 ja 2 ohjelmointi, kun haluat asettaa starttiajan tariffille Vahvista syöttö painamalla SET-painiketta Paina FUNCTION-painiketta 2 syötön päättämiseksi. 14. Paina FUNCTION-painiketta 2 ja pidä se painettuna noin 3 sekuntia päästäksesi perusmoodiin (volttinäyttö). Tariffin 2 poiskytkentä 1. Paina niin usein FUNCTION-painiketta 2, kunnes LC-näytössä 1 on pe- 76 FI 66149_silv_Energiekosten-Messgerät_Content_GB-FI-SE-DE.indd :06
75 rusmoodi (volttinäyttö). 2. Paina FUNCTION-painiketta 2 ja pidä se painettuna noin 3 sekuntia. LC-näytössä 1 näytetään asetukset tariffille Paina FUNCTION-painiketta 2. LC-näytössä 1 näytetään asetukset tariffille Paina FUNCTION-painiketta 2 ja pidä se painettuna noin 3 sekuntia, kun haluat kytkeä tariffin 1 ja tariffin 2 pois. Kuluttajien liitäntä VARO! LOUKKAANTU- MISVAARA! Älä milloinkaan ylitä suurinta ilmoitettua sisäänmenojännitettä. FI _silv_Energiekosten-Messgerät_Content_GB-FI-SE-DE.indd :06
76 Pistä energiakustannusmittari sopivaan pistorasiaan. Pistä nyt tutkittavan kuluttajan verkkopistoke laitteen pistorasiaan 4. Verkkojännitteen mittaus Paina niin usein FUNCTION-painiketta 2, kunnes LC-näytössä 1 on VOLTac. LC-näytössä 1 näytetään nyt senhetkinen verkkojännite V (voltti), taajuus HZ (hertz) ja kellonaika. Sähkövirran voimakkuuden mittaaminen Paina niin usein FUNCTION-painiketta 2, kunnes LC-näyttöön 1 tulee AMP. 78 FI 66149_silv_Energiekosten-Messgerät_Content_GB-FI-SE-DE.indd :06
77 LC-näytössä 1 näytetään nyt aktuelli sähkövirran voimakkuus A (ampeeri), jota kuormitus tarvitsee. Lisäksi näytössä on tehokerroin cos Phi ja kellonaika. Huomautus: Tehokerroin ilmoittaa, mikä on sähkölaitteen todellisen (pätötehon) ja teoreettisen (näennäistehon) tehonoton välinen suhde. Tehokerroin voi olla 0 ja 1 välillä. Ihannetapauksessa tehokerroin on 1. Kun tehokerroin on pienempi kuin 1, teho vaihdetaan sähkölaitteen ja verkon välillä. Tämä voi, riippuen tehon suuruudesta ja tehokertoimen arvosta poikkeustapauksissa johtaa siihen, että tehokertoimen näyttö kuten tehokin on epästabiili. Tämä johtuu teknisistä syistä ja sitä ei voida välttää. Energiakulutusmittari laskee kulutetun energian moitteettomasti. Keskiarvo, jonka ympärillä heilahtelevasti näytetty arvo liikkuu, FI _silv_Energiekosten-Messgerät_Content_GB-FI-SE-DE.indd :06
78 esittää aktuellin tehon tai aktuellin tehokertoimen laskennallisen arvon. Tehon mittaaminen Paina niin usein FUNCTION-painiketta 2, kunnes LC-näyttöön 1 tulee WATT. LC-näytössä 1 näytetään nyt senhetkinen tehonkulutus W (watti), tehokerroin cos Phil ja kellonaika. Maksimi tehon mittaaminen Paina niin usein FUNCTION-painiketta 2, kunnes LC-näytössä 1 on WATT ja MAX. 80 FI 66149_silv_Energiekosten-Messgerät_Content_GB-FI-SE-DE.indd :06
79 LC-näytössä 1 näytetään suurin tehonkulutus W (watti), mikä tähän asti on mitattu energiakustannusmittarilla. Lisäksi näytetään on kellonaika, jona suurin tehonkulutus mitattiin ja tehokerroin cos Phi. Huomautus: Suurin tehonkulutus on niin kauan muistissa, kunnes mitataan korkeampi mittausarvo. Vasta tämän jälkeen pyyhitään vanha mittausarvo. Paina FUNCTION-painiketta 2 ja pidä se painettuna noin 3 sekuntia, kun haluat poistaa tallennetut arvot. Ylikuomitus-varoitusarvon ohjelmointi Huomautus: Voit ohjelmoida sekä virranvoimakkuuden (A) maksimiarvon sekä tehonkulutuksen (W) maksimiarvon. Ener- FI _silv_Energiekosten-Messgerät_Content_GB-FI-SE-DE.indd :06
80 giakulutusmittari suorittaa mittauksia edelleen silloinkin, kun maksimiarvot ylitetään. Huomautus: Ylikuormitus-varoitusarvot on säädetty toimitettaessa arvoon 0, Paina niin usein FUNCTION-painiketta 2, kunnes LC-näytössä 1 on perusmoodi (volttinäyttö). 2. Paina FUNCTION-painiketta 2 ja pidä se painettuna noin 3 sekuntia. 3. Paina hetken FUNCTION-painiketta 2. LC-näyttöön 1 tulee näyttö MAX LOAD (maksimi kuormitus). Huomautus: Paina kaksi kertaa hetken FUNCTION-painiketta 2, kun olet ohjelmoinut sähkön hinnan tariffille 1 ja tariffille Paina SET-painiketta 3. Näytöt AMP tai WATT vilkkuvat. 82 FI 66149_silv_Energiekosten-Messgerät_Content_GB-FI-SE-DE.indd :06
81 5. Paina SELECT-painiketta 6, kun haluat valita joko toiminnon ylikuormitusvaroitusarvo sähkövirran voimakkuus (AMP) tai ylikuormitus-varoitusarvo tehon kulutus (WATT). 6. Vahvista syöttö painamalla SET-painiketta 3. Ensimmäinen numero vilkkuu. 7. Paina SELECT-painiketta 6 niin usein, kunnes olet saavuttanut halutun arvon. 8. Toista askeleita 6. ja 7. muiden arvojen ohjelmointia varten. 9. Vahvista syöttö painamalla SET-painiketta Paina FUNCTION-painiketta 2 ja pidä se painettuna noin 3 sekuntia, kun haluat tallentaa syötetyt arvot. Heti kun ylikuormitus-varoitusarvot on saavutettu, LC-näytössä 1 vilkkuu näyttö OVERLOAD WARNING ja kuuluu hälytysääni. FI _silv_Energiekosten-Messgerät_Content_GB-FI-SE-DE.indd :06
Introduction Proper Use...Page 7 Supply Scope...Page 8 Description of Parts...Page 8 Technical Data...Page 9
 Table of Contents Introduction Proper Use...Page 7 Supply Scope...Page 8 Description of Parts...Page 8 Technical Data...Page 9 Safety Instructions...Page 10 Before you start...page 15 Set the time...page
PAINEILMALETKUKELA-AUTOMAATTI AUTOMATIC AIR HOSE REEL
 MAV4 MAV5 MAV6 PAINEILMALETKUKELA-AUTOMAATTI AUTOMATIC AIR HOSE REEL Käyttöohje Instruction manual HUOMIO! Lue käyttöohjeet huolellisesti ennen laitteen käyttöä ja noudata kaikkia annettuja ohjeita. Säilytä
Capacity Utilization
 Capacity Utilization Tim Schöneberg 28th November Agenda Introduction Fixed and variable input ressources Technical capacity utilization Price based capacity utilization measure Long run and short run
National Building Code of Finland, Part D1, Building Water Supply and Sewerage Systems, Regulations and guidelines 2007
 National Building Code of Finland, Part D1, Building Water Supply and Sewerage Systems, Regulations and guidelines 2007 Chapter 2.4 Jukka Räisä 1 WATER PIPES PLACEMENT 2.4.1 Regulation Water pipe and its
1/4. Resetointi ja vianmääritys. 22.11.2013 ntr
 A400-64176 Sähköpöydät 1/4 Resetointi ja vianmääritys Pöydän resetointi tehdään aina ennen käyttöönottoa ja tarvittaessa häiriötilanteessa. Määritä pöydän tyyppi käyttökytkimen ja jalustan mukaan ja tee
LYTH-CONS CONSISTENCY TRANSMITTER
 LYTH-CONS CONSISTENCY TRANSMITTER LYTH-INSTRUMENT OY has generate new consistency transmitter with blade-system to meet high technical requirements in Pulp&Paper industries. Insurmountable advantages are
Installation instruction PEM
 Installation instruction ASENNUSOHJE PEM1032 2010-02 SURGE ARRESTER SET FOR POLE MOUNT TRANSFORMER YLIJÄNNITESUOJASETTI PYLVÄSMUUNTAJALLE ENGLISH SUOMI 2/8 PEM1032 2010-02 ENGLISH GENERAL INFORMATION -
Choose Finland-Helsinki Valitse Finland-Helsinki
 Write down the Temporary Application ID. If you do not manage to complete the form you can continue where you stopped with this ID no. Muista Temporary Application ID. Jos et onnistu täyttää lomake loppuun
INSTALLATION INSTRUCTION ASENNUSOHJE PEM SJTK31 SJTK46 ENGLISH SUOMI
 INSTALLATION INSTRUCTION ASENNUSOHJE PEM1256 2010-2 SJTK31 SJTK46 ENGLISH SUOMI GB GENERAL INFORMATION - Check that the kit is suitable for the cable type. - Check the materials listed in the bill of materials
PSSA-8/PSSA-8UK OWNERS MANUAL
 PSSA-8/PSSA-8UK OWNERS MANUAL LED indicator Test Button Art. 36.3066 / Art. 8.40 GB Power Switch (PSSA-8 / PSSA-8UK) Identifying the parts LED indicator Test Button Getting Started Plug the Power Switch
On instrument costs in decentralized macroeconomic decision making (Helsingin Kauppakorkeakoulun julkaisuja ; D-31)
") On instrument costs in decentralized macroeconomic decision making (Helsingin Kauppakorkeakoulun julkaisuja ; D-31) Juha Kahkonen Click here if your download doesn"t start automatically On instrument costs
On instrument costs in decentralized macroeconomic decision making (Helsingin Kauppakorkeakoulun julkaisuja ; D-31) Juha Kahkonen Click here if your download doesn"t start automatically On instrument costs
Salasanan vaihto uuteen / How to change password
 Salasanan vaihto uuteen / How to change password Sisällys Salasanakäytäntö / Password policy... 2 Salasanan vaihto verkkosivulla / Change password on website... 3 Salasanan vaihto matkapuhelimella / Change
Solar Water Heater Kit. EcoStyle. 1 User Manual/Operating Instructions. Contents FREE LESSON PLANS AVAILABLE.
 EcoStyle 1 User Manual/Operating Instructions Contents 1 Contents 2 What s in the box? 3 Setting up the 4 Heating water 5 Measuring water temperature with the digital thermometer 6 Maximum/minimum temperature
16. Allocation Models
 16. Allocation Models Juha Saloheimo 17.1.27 S steemianalsin Optimointiopin seminaari - Sks 27 Content Introduction Overall Efficienc with common prices and costs Cost Efficienc S steemianalsin Revenue
Network to Get Work. Tehtäviä opiskelijoille Assignments for students. www.laurea.fi
 Network to Get Work Tehtäviä opiskelijoille Assignments for students www.laurea.fi Ohje henkilöstölle Instructions for Staff Seuraavassa on esitetty joukko tehtäviä, joista voit valita opiskelijaryhmällesi
On instrument costs in decentralized macroeconomic decision making (Helsingin Kauppakorkeakoulun julkaisuja ; D-31)
") On instrument costs in decentralized macroeconomic decision making (Helsingin Kauppakorkeakoulun julkaisuja ; D-31) Juha Kahkonen Click here if your download doesn"t start automatically On instrument costs
On instrument costs in decentralized macroeconomic decision making (Helsingin Kauppakorkeakoulun julkaisuja ; D-31) Juha Kahkonen Click here if your download doesn"t start automatically On instrument costs
KONEISTUSKOKOONPANON TEKEMINEN NX10-YMPÄRISTÖSSÄ
 KONEISTUSKOKOONPANON TEKEMINEN NX10-YMPÄRISTÖSSÄ https://community.plm.automation.siemens.com/t5/tech-tips- Knowledge-Base-NX/How-to-simulate-any-G-code-file-in-NX- CAM/ta-p/3340 Koneistusympäristön määrittely
anna minun kertoa let me tell you
 anna minun kertoa let me tell you anna minun kertoa I OSA 1. Anna minun kertoa sinulle mitä oli. Tiedän että osaan. Kykenen siihen. Teen nyt niin. Minulla on oikeus. Sanani voivat olla puutteellisia mutta
Information on preparing Presentation
 Information on preparing Presentation Seminar on big data management Lecturer: Spring 2017 20.1.2017 1 Agenda Hints and tips on giving a good presentation Watch two videos and discussion 22.1.2017 2 Goals
The CCR Model and Production Correspondence
 The CCR Model and Production Correspondence Tim Schöneberg The 19th of September Agenda Introduction Definitions Production Possiblity Set CCR Model and the Dual Problem Input excesses and output shortfalls
Öljytäytteinen sähköpatteri Electric Oil Radiator
 Öljytäytteinen sähköpatteri Electric Oil Radiator KÄYTTÖOHJE Alkuperäisten ohjeiden käännös INSTRUCTIONS MANUAL Original instructions MALLI/MODEL: Holly 1500: ERC2-1507 Holly 2000: ERC2-2009 DT Istr (ERC
1. SIT. The handler and dog stop with the dog sitting at heel. When the dog is sitting, the handler cues the dog to heel forward.
 START START SIT 1. SIT. The handler and dog stop with the dog sitting at heel. When the dog is sitting, the handler cues the dog to heel forward. This is a static exercise. SIT STAND 2. SIT STAND. The
On instrument costs in decentralized macroeconomic decision making (Helsingin Kauppakorkeakoulun julkaisuja ; D-31)
") On instrument costs in decentralized macroeconomic decision making (Helsingin Kauppakorkeakoulun julkaisuja ; D-31) Juha Kahkonen Click here if your download doesn"t start automatically On instrument costs
On instrument costs in decentralized macroeconomic decision making (Helsingin Kauppakorkeakoulun julkaisuja ; D-31) Juha Kahkonen Click here if your download doesn"t start automatically On instrument costs
VAROITUKSET. Älä pura laitetta osiin.
 VAROITUKSET Laitteen väärinkäyttö voi johtaa henkilövahinkoihin. Noudata kaikkia tässä ohjekirjassa annettuja ohjeita ja käytä laitetta oikein. Älä koskaan seiso laitteen alapuolella. Älä pura laitetta
Efficiency change over time
 Efficiency change over time Heikki Tikanmäki Optimointiopin seminaari 14.11.2007 Contents Introduction (11.1) Window analysis (11.2) Example, application, analysis Malmquist index (11.3) Dealing with panel
Box 1. Things you have/ Pakkaus sisältää. x 4 x 16 x 4 x 4. 300mm. 1700mm. 300mm 1. Things you should know / Sinun Tulee Tietää
 Phobos 30 Things you should know / Sinun Tulee Tietää Things you prepare / Näitä Tarvitset DURING INSTALLATION ALL PRODUCTS: use protective gloves at all times use eye protection at all times never install
WINE COOLER TFW METOS TFW 160S, TFW 365-2S, TFW 375S MG ,
 WINE COOLER TFW METOS TFW 160S, TFW 365-2S, TFW 375S MG4116794, 4116798, 4116797 Instruction manual TWF 365-2S TWF 375S TWF 160S 01.09.2015 Table if Contents 1. Important safety instructions...3 2. Unpacking
Installation instruction PEM
 Installation instruction ASENNUSOHJE PEM1031 2010-04 CURRENT LIMITING DEVICE FOR POLE MOUNT TRANSFORMER VIRTAA RAJOITTAVA SUOJA PYLVÄSMUUNTAJALLE ENGLISH SUOMI 75 2/8 PEM1031 2010-04 ENGLISH GENERAL INFORMATION
Calisto USB-kaiutinpuhelin. Käyttöopas
 Calisto 7200 USB-kaiutinpuhelin Käyttöopas Sisällysluettelo Yleiskatsaus 3 Connect to PC 4 Päivittäinen käyttö 5 Power 5 Äänenvoimakkuus 5 Mykistys / mykistyksen poisto 5 Puheluun vastaaminen tai puhelun
Forehead & Ear Thermometer
 PERSONAL CARE Forehead & Ear Thermometer Before reading, unfold both pages containing illustrations and familiarise yourself with all functions of the device. Käännä ennen lukemista molemmat kuvalliset
Secto Design Oy Kauppalantie 12 02700 Kauniainen Finland tel. +358 9 5050598 fax +358 9 5475 2535 info@sectodesign.fi www.sectodesign.
 Secto Design Oy Kauppalantie 12 02700 Kauniainen Finland tel. +358 9 5050598 fax +358 9 5475 2535 info@sectodesign.fi www.sectodesign.fi Secto 4200 pendant natural birch, black or white laminate, walnut
Returns to Scale II. S ysteemianalyysin. Laboratorio. Esitelmä 8 Timo Salminen. Teknillinen korkeakoulu
 Returns to Scale II Contents Most Productive Scale Size Further Considerations Relaxation of the Convexity Condition Useful Reminder Theorem 5.5 A DMU found to be efficient with a CCR model will also be
Gap-filling methods for CH 4 data
 Gap-filling methods for CH 4 data Sigrid Dengel University of Helsinki Outline - Ecosystems known for CH 4 emissions; - Why is gap-filling of CH 4 data not as easy and straight forward as CO 2 ; - Gap-filling
Lab SBS3.FARM_Hyper-V - Navigating a SharePoint site
 Lab SBS3.FARM_Hyper-V - Navigating a SharePoint site Note! Before starting download and install a fresh version of OfficeProfessionalPlus_x64_en-us. The instructions are in the beginning of the exercise.
Uusi Ajatus Löytyy Luonnosta 4 (käsikirja) (Finnish Edition)
 (Finnish Edition)") Uusi Ajatus Löytyy Luonnosta 4 (käsikirja) (Finnish Edition) Esko Jalkanen Click here if your download doesn"t start automatically Uusi Ajatus Löytyy Luonnosta 4 (käsikirja) (Finnish Edition) Esko Jalkanen
Uusi Ajatus Löytyy Luonnosta 4 (käsikirja) (Finnish Edition) Esko Jalkanen Click here if your download doesn"t start automatically Uusi Ajatus Löytyy Luonnosta 4 (käsikirja) (Finnish Edition) Esko Jalkanen
INSTALLATION INSTRUCTION ASENNUSOHJE PEM1417 2012-11 ENGLISH SUOMI CURRENT LIMITING DEVICE VIRTAA RAJOITTAVA SUOJA SDI46.812 & SDI46.
 INSTALLATION INSTRUCTION ASENNUSOHJE PEM1417 2012-11 ENGLISH SUOMI CURRENT LIMITING DEVICE VIRTAA RAJOITTAVA SUOJA SDI46.812 & SDI46.824 2/8 SDI46.812 & SDI46.824 PEM1417 2012-11 ENGLISH GENERAL INFORMATION
Curriculum. Gym card
 A new school year Curriculum Fast Track Final Grading Gym card TET A new school year Work Ethic Detention Own work Organisation and independence Wilma TMU Support Services Well-Being CURRICULUM FAST TRACK
1. Liikkuvat määreet
 1. Liikkuvat määreet Väitelauseen perussanajärjestys: SPOTPA (subj. + pred. + obj. + tapa + paikka + aika) Suora sanajärjestys = subjekti on ennen predikaattia tekijä tekeminen Alasääntö 1: Liikkuvat määreet
You can check above like this: Start->Control Panel->Programs->find if Microsoft Lync or Microsoft Lync Attendeed is listed
 Online Meeting Guest Online Meeting for Guest Participant Lync Attendee Installation Online kokous vierailevalle osallistujalle Lync Attendee Asennus www.ruukki.com Overview Before you can join to Ruukki
S Sähkön jakelu ja markkinat S Electricity Distribution and Markets
 S-18.3153 Sähkön jakelu ja markkinat S-18.3154 Electricity Distribution and Markets Voltage Sag 1) Kolmivaiheinen vastukseton oikosulku tapahtuu 20 kv lähdöllä etäisyydellä 1 km, 3 km, 5 km, 8 km, 10 km
TM ETRS-TM35FIN-ETRS89 WTG
 SHADOW - Main Result Assumptions for shadow calculations Maximum distance for influence Calculate only when more than 20 % of sun is covered by the blade Please look in WTG table WindPRO version 2.8.579
Rekisteröiminen - FAQ
 Rekisteröiminen - FAQ Miten Akun/laturin rekisteröiminen tehdään Akun/laturin rekisteröiminen tapahtuu samalla tavalla kuin nykyinen takuurekisteröityminen koneille. Nykyistä tietokantaa on muokattu niin,
Metsälamminkankaan tuulivoimapuiston osayleiskaava
 VAALAN KUNTA TUULISAIMAA OY Metsälamminkankaan tuulivoimapuiston osayleiskaava Liite 3. Varjostusmallinnus FCG SUUNNITTELU JA TEKNIIKKA OY 12.5.2015 P25370 SHADOW - Main Result Assumptions for shadow calculations
Tynnyrivaara, OX2 Tuulivoimahanke. ( Layout 9 x N131 x HH145. Rakennukset Asuinrakennus Lomarakennus 9 x N131 x HH145 Varjostus 1 h/a 8 h/a 20 h/a
 , Tuulivoimahanke Layout 9 x N131 x HH145 Rakennukset Asuinrakennus Lomarakennus 9 x N131 x HH145 Varjostus 1 h/a 8 h/a 20 h/a 0 0,5 1 1,5 km 2 SHADOW - Main Result Assumptions for shadow calculations
WindPRO version joulu 2012 Printed/Page :47 / 1. SHADOW - Main Result
 SHADOW - Main Result Assumptions for shadow calculations Maximum distance for influence Calculate only when more than 20 % of sun is covered by the blade Please look in WTG table WindPRO version 2.8.579
Information on Finnish Language Courses Spring Semester 2018 Päivi Paukku & Jenni Laine Centre for Language and Communication Studies
 Information on Finnish Language Courses Spring Semester 2018 Päivi Paukku & Jenni Laine 4.1.2018 Centre for Language and Communication Studies Puhutko suomea? -Hei! -Hei hei! -Moi! -Moi moi! -Terve! -Terve
Fitting instructions. Fitting set for joining all types of DEVI self limiting heating cables to heating cables Art. no. 19805779 SSTL nro 04 312 85
 GB/FI Fitting instructions Fitting set for joining all types of DEVI self limiting heating cables to heating cables Art. no. 19805779 SSTL nro 04 312 85 intelligent varme Contents: GB Connection kits 3
Exercise 1. (session: )
") EEN-E3001, FUNDAMENTALS IN INDUSTRIAL ENERGY ENGINEERING Exercise 1 (session: 24.1.2017) Problem 3 will be graded. The deadline for the return is on 31.1. at 12:00 am (before the exercise session). You
EEN-E3001, FUNDAMENTALS IN INDUSTRIAL ENERGY ENGINEERING Exercise 1 (session: 24.1.2017) Problem 3 will be graded. The deadline for the return is on 31.1. at 12:00 am (before the exercise session). You
Information on Finnish Language Courses Spring Semester 2017 Jenni Laine
 Information on Finnish Language Courses Spring Semester 2017 Jenni Laine 4.1.2017 KIELIKESKUS LANGUAGE CENTRE Puhutko suomea? Do you speak Finnish? -Hei! -Moi! -Mitä kuuluu? -Kiitos, hyvää. -Entä sinulle?
OFFICE 365 OPISKELIJOILLE
 OFFICE 365 OPISKELIJOILLE Table of Contents Articles... 3 Ohjeet Office 365 käyttöönottoon... 4 One Driveen tallennetun videon palauttaminen oppimisympäristön palautuskansioon... 5 Changing default language
,0 Yes ,0 120, ,8
 SHADOW - Main Result Calculation: Alue 2 ( x 9 x HH120) TuuliSaimaa kaavaluonnos Assumptions for shadow calculations Maximum distance for influence Calculate only when more than 20 % of sun is covered
TM ETRS-TM35FIN-ETRS89 WTG
 SHADOW - Main Result Assumptions for shadow calculations Maximum distance for influence Calculate only when more than 20 % of sun is covered by the blade Please look in WTG table WindPRO version 2.8.579
TM ETRS-TM35FIN-ETRS89 WTG
 SHADOW - Main Result Assumptions for shadow calculations Maximum distance for influence Calculate only when more than 20 % of sun is covered by the blade Please look in WTG table WindPRO version 2.8.579
Golfpallon etsijä asennusmanuaali
 Golfpallon etsijä asennusmanuaali Prazza takuu Kaikki Prazza tuotteet on suunniteltu ja valmistettu tiukkojen laatuvaatimusten mukaan, tuotteet ovat helppokäyttöisiä ja helppoja asentaa. Jos sinulla ilmenee
TM ETRS-TM35FIN-ETRS89 WTG
 SHADOW - Main Result Assumptions for shadow calculations Maximum distance for influence Calculate only when more than 20 % of sun is covered by the blade Please look in WTG table WindPRO version 2.9.269
Presenter SNP6000. Register your product and get support at Käyttöopas
 Register your product and get support at www.philips.com/welcome Presenter SNP6000 FI Käyttöopas 1 a b c d e 2 3 4 Federal Communication Commission Interference Statement This equipment has been tested
Alternative DEA Models
 Mat-2.4142 Alternative DEA Models 19.9.2007 Table of Contents Banker-Charnes-Cooper Model Additive Model Example Data Home assignment BCC Model (Banker-Charnes-Cooper) production frontiers spanned by convex
MUSEOT KULTTUURIPALVELUINA
 Elina Arola MUSEOT KULTTUURIPALVELUINA Tutkimuskohteena Mikkelin museot Opinnäytetyö Kulttuuripalvelujen koulutusohjelma Marraskuu 2005 KUVAILULEHTI Opinnäytetyön päivämäärä 25.11.2005 Tekijä(t) Elina
812336A C++ -kielen perusteet, 21.8.2010
 812336A C++ -kielen perusteet, 21.8.2010 1. Vastaa lyhyesti seuraaviin kysymyksiin (1p kaikista): a) Mitä tarkoittaa funktion ylikuormittaminen (overloading)? b) Mitä tarkoittaa jäsenfunktion ylimääritys
Sisällysluettelo Table of contents
 Sisällysluettelo Table of contents OTC:n Moodlen käyttöohje suomeksi... 1 Kirjautuminen Moodleen... 2 Ensimmäinen kirjautuminen Moodleen... 2 Salasanan vaihto... 2 Oma käyttäjäprofiili... 3 Työskentely
( ( OX2 Perkkiö. Rakennuskanta. Varjostus. 9 x N131 x HH145
 OX2 9 x N131 x HH145 Rakennuskanta Asuinrakennus Lomarakennus Liike- tai julkinen rakennus Teollinen rakennus Kirkko tai kirkollinen rak. Muu rakennus Allas Varjostus 1 h/a 8 h/a 20 h/a 0 0,5 1 1,5 2 km
WindPRO version joulu 2012 Printed/Page :42 / 1. SHADOW - Main Result
 SHADOW - Main Result Assumptions for shadow calculations Maximum distance for influence Calculate only when more than 20 % of sun is covered by the blade Please look in WTG table 13.6.2013 19:42 / 1 Minimum
TM ETRS-TM35FIN-ETRS89 WTG
 SHADOW - Main Result Assumptions for shadow calculations Maximum distance for influence Calculate only when more than 20 % of sun is covered by the blade Please look in WTG table WindPRO version 2.8.579
SpeechMike III sarjan sanelumikrofonien (mallit LFH3200 ja LFH3220) yhteensopivuus SpeechMagic Executive saneluohjelman kanssa
 yhteensopivuus SpeechMagic Executive saneluohjelman kanssa") SpeechMike III sarjan sanelumikrofonien (mallit LFH3200 ja LFH3220) yhteensopivuus SpeechMagic Executive saneluohjelman kanssa Jotta SpeechMike III sarjan sanelumikrofonia voidaan käyttää Executive saneluohjelmassa,
SpeechMike III sarjan sanelumikrofonien (mallit LFH3200 ja LFH3220) yhteensopivuus SpeechMagic Executive saneluohjelman kanssa Jotta SpeechMike III sarjan sanelumikrofonia voidaan käyttää Executive saneluohjelmassa,
TM ETRS-TM35FIN-ETRS89 WTG
 VE1 SHADOW - Main Result Calculation: 8 x Nordex N131 x HH145m Assumptions for shadow calculations Maximum distance for influence Calculate only when more than 20 % of sun is covered by the blade Please
TM ETRS-TM35FIN-ETRS89 WTG
 SHADOW - Main Result Assumptions for shadow calculations Maximum distance for influence Calculate only when more than 20 % of sun is covered by the blade Please look in WTG table WindPRO version 2.8.579
Ajettavat luokat: SM: S1 (25 aika-ajon nopeinta)
") SUPERMOTO SM 2013 OULU Lisämääräys ja ohje Oulun Moottorikerho ry ja Oulun Formula K-125ry toivottaa SuperMoto kuljettajat osallistumaan SuperMoto SM 2013 Oulu osakilpailuun. Kilpailu ajetaan karting radalla
SUPERMOTO SM 2013 OULU Lisämääräys ja ohje Oulun Moottorikerho ry ja Oulun Formula K-125ry toivottaa SuperMoto kuljettajat osallistumaan SuperMoto SM 2013 Oulu osakilpailuun. Kilpailu ajetaan karting radalla
The Viking Battle - Part Version: Finnish
 The Viking Battle - Part 1 015 Version: Finnish Tehtävä 1 Olkoon kokonaisluku, ja olkoon A n joukko A n = { n k k Z, 0 k < n}. Selvitä suurin kokonaisluku M n, jota ei voi kirjoittaa yhden tai useamman
Owner s Manual GREE Electric Appliances,Inc.of zhuhai
 Ilmalämpöpumppu Split air conditioner wall mounted model Käyttäjän opas Owner s Manual GREE Electric Appliances,Inc.of zhuhai Ultra-thin GWHD09A3NK3DF KFR-25GW/NaA12FA GWHD12B2NK3AD KFR-32GW/NaA12FA Please
Tarua vai totta: sähkön vähittäismarkkina ei toimi? 11.2.2015 Satu Viljainen Professori, sähkömarkkinat
 Tarua vai totta: sähkön vähittäismarkkina ei toimi? 11.2.2015 Satu Viljainen Professori, sähkömarkkinat Esityksen sisältö: 1. EU:n energiapolitiikka on se, joka ei toimi 2. Mihin perustuu väite, etteivät
Tork Paperipyyhe. etu. tuotteen ominaisuudet. kuvaus. Väri: Valkoinen Malli: Vetopyyhe
 etu Monikäyttöpaperi hoitaa useimmat pyyhintätehtävät Sopiva lasipintojen pyyhintään Sopii käsien kuivaamiseen Elintarvikekäyttöön hyväksytty Tork Easy Handling, pakkaus, jota on helppo kantaa mukana,
FinFamily PostgreSQL installation ( ) FinFamily PostgreSQL
 FinFamily PostgreSQL") FinFamily PostgreSQL 1 Sisällys / Contents FinFamily PostgreSQL... 1 1. Asenna PostgreSQL tietokanta / Install PostgreSQL database... 3 1.1. PostgreSQL tietokannasta / About the PostgreSQL database...
FinFamily PostgreSQL 1 Sisällys / Contents FinFamily PostgreSQL... 1 1. Asenna PostgreSQL tietokanta / Install PostgreSQL database... 3 1.1. PostgreSQL tietokannasta / About the PostgreSQL database...
( ,5 1 1,5 2 km
 Tuulivoimala Rakennukset Asuinrakennus Liikerak. tai Julkinen rak. Lomarakennus Teollinen rakennus Kirkollinen rakennus Varjostus "real case" h/a 1 h/a 8 h/a 20 h/a 4 5 3 1 2 6 7 8 9 10 0 0,5 1 1,5 2 km
1.3 Lohkorakenne muodostetaan käyttämällä a) puolipistettä b) aaltosulkeita c) BEGIN ja END lausekkeita d) sisennystä
 puolipistettä b) aaltosulkeita c) BEGIN ja END lausekkeita d) sisennystä") OULUN YLIOPISTO Tietojenkäsittelytieteiden laitos Johdatus ohjelmointiin 811122P (5 op.) 12.12.2005 Ohjelmointikieli on Java. Tentissä saa olla materiaali mukana. Tenttitulokset julkaistaan aikaisintaan
OULUN YLIOPISTO Tietojenkäsittelytieteiden laitos Johdatus ohjelmointiin 811122P (5 op.) 12.12.2005 Ohjelmointikieli on Java. Tentissä saa olla materiaali mukana. Tenttitulokset julkaistaan aikaisintaan
Miksi Suomi on Suomi (Finnish Edition)
") Miksi Suomi on Suomi (Finnish Edition) Tommi Uschanov Click here if your download doesn"t start automatically Miksi Suomi on Suomi (Finnish Edition) Tommi Uschanov Miksi Suomi on Suomi (Finnish Edition)
Miksi Suomi on Suomi (Finnish Edition) Tommi Uschanov Click here if your download doesn"t start automatically Miksi Suomi on Suomi (Finnish Edition) Tommi Uschanov Miksi Suomi on Suomi (Finnish Edition)
Asennusopas. DEVIreg 531. Elektroninen termostaatti.
 Asennusopas DEVIreg 531 Elektroninen termostaatti www.devi.com Sisällysluettelo 1 Johdanto................. 3 1.1 Tekniset tiedot.......... 4 1.2 Turvaohjeet............ 5 2 Asennusohjeet.............
TUOTTEEN TEKNISET TIEDOT 250/ /700 P5
 250/120 277/700 P5 OPTOTRONIC Elektroninen liitäntälaite ledimoduuleille (vakiovirta) SSOVELLUSALUEET Katu- ja kaupunkivalaistus Teollisuus Sopii suojausluokan I valaisimiin TUOTE-EDUT Vahva ylijännitesuojaus:
TM ETRS-TM35FIN-ETRS89 WTG
 SHADOW - Main Result Calculation: N117 x 9 x HH141 Assumptions for shadow calculations Maximum distance for influence Calculate only when more than 20 % of sun is covered by the blade Please look in WTG
TM ETRS-TM35FIN-ETRS89 WTG
 SHADOW - Main Result Assumptions for shadow calculations Maximum distance for influence Calculate only when more than 20 % of sun is covered by the blade Please look in WTG table WindPRO version 2.8.579
S-55.1100 SÄHKÖTEKNIIKKA JA ELEKTRONIIKKA
 S-55.00 SÄHKÖKNKKA A KONKKA. välikoe 2..2008. Saat vastata vain neljään tehtävään!. aske jännite U. = 4 Ω, 2 = Ω, = Ω, = 2, 2 =, = A, 2 = U 2 2 2 2. ännitelähde tuottaa hetkestä t = t < 0 alkaen kaksiportaisen
TM ETRS-TM35FIN-ETRS89 WTG
 SHADOW - Main Result Assumptions for shadow calculations Maximum distance for influence Calculate only when more than 20 % of sun is covered by the blade Please look in WTG table 5.11.2013 16:44 / 1 Minimum
Recirkulering. El-tilslutning. Kontrolpanel. Dansk. Timerfunktion
 1 2 Dansk Recirkulering Luften renses ved hjælp at aktive kulfiltre hvorefter den returneres til rummet. Kulfiltre bestilles separat. El-tilslutning Emhætten skal tilsluttes 230 V i henhold til stærkstrømsreglementet.
Results on the new polydrug use questions in the Finnish TDI data
 Results on the new polydrug use questions in the Finnish TDI data Multi-drug use, polydrug use and problematic polydrug use Martta Forsell, Finnish Focal Point 28/09/2015 Martta Forsell 1 28/09/2015 Esityksen
TM ETRS-TM35FIN-ETRS89 WTG
 SHADOW - Main Result Assumptions for shadow calculations Maximum distance for influence Calculate only when more than 20 % of sun is covered by the blade Please look in WTG table 22.12.2014 11:33 / 1 Minimum
Käyttöohje CRL Ennen tämän tuotteen käyttöä lue tämä käyttöohje huolellisesti ja kokonaan.
 Käyttöohje Kelloradio CRL-330 www.denver-electronics.com Ennen tämän tuotteen käyttöä lue tämä käyttöohje huolellisesti ja kokonaan. Tuotetiedot EN FI Correctly set the stand in specially design for it
LUONNOS RT 80260 EN AGREEMENT ON BUILDING WORKS 1 THE PARTIES. May 1998 1 (10)
") RT 80260 EN May 1998 1 (10) AGREEMENT ON BUILDING WORKS This agreement template is based on the General Terms and Conditions of Building Contracts YSE 1998 RT 16-10660, LVI 03-10277, Ratu 417-7, KH X4-00241.
RT 80260 EN May 1998 1 (10) AGREEMENT ON BUILDING WORKS This agreement template is based on the General Terms and Conditions of Building Contracts YSE 1998 RT 16-10660, LVI 03-10277, Ratu 417-7, KH X4-00241.
TW- WLAN 802.11ac SOVITTIMEN ASENNUSOHJE
 TW- WLAN 802.11ac SOVITTIMEN ASENNUSOHJE Copyright TeleWell Oy Tekniset tiedot: - - - - - - - Yhteensopiva IEEE 802.11b/g/n/ac - standardien kanssa Taajuusalueet 2.4 GHz ja 5 GHz Maksiminopeus: 300 Mbps
Bounds on non-surjective cellular automata
 Bounds on non-surjective cellular automata Jarkko Kari Pascal Vanier Thomas Zeume University of Turku LIF Marseille Universität Hannover 27 august 2009 J. Kari, P. Vanier, T. Zeume (UTU) Bounds on non-surjective
SELL Student Games kansainvälinen opiskelijaurheilutapahtuma
 SELL Student Games kansainvälinen opiskelijaurheilutapahtuma Painonnosto 13.5.2016 (kansallinen, CUP) Below in English Paikka: Nääshalli Näsijärvenkatu 8 33210 Tampere Alustava aikataulu: Punnitus 12:00-13:00
Information on Finnish Courses Autumn Semester 2017 Jenni Laine & Päivi Paukku Centre for Language and Communication Studies
 Information on Finnish Courses Autumn Semester 2017 Jenni Laine & Päivi Paukku 24.8.2017 Centre for Language and Communication Studies Puhutko suomea? -Hei! -Hei hei! -Moi! -Moi moi! -Terve! -Terve terve!
Jokaisella person. käyttökerralla tehtävän rutiinitarkastuksen lisäksi pätevän henkilön tulisi tehdä henkilösuojaimelle
 Inspection Henkilösuojaimen tarkastus Tarkastusohjeet Inspection Inspection Inspection In addition to routine checks for each use, should regularly undergo a detailed inspection by a competent Jokaisella
4x4cup Rastikuvien tulkinta
 4x4cup Rastikuvien tulkinta 4x4cup Control point picture guidelines Päivitetty kauden 2010 sääntöihin Updated for 2010 rules Säännöt rastikuvista Kilpailijoiden tulee kiinnittää erityistä huomiota siihen,
Other approaches to restrict multipliers
 Other approaches to restrict multipliers Heikki Tikanmäki Optimointiopin seminaari 10.10.2007 Contents Short revision (6.2) Another Assurance Region Model (6.3) Cone-Ratio Method (6.4) An Application of
Tietorakenteet ja algoritmit
 Tietorakenteet ja algoritmit Taulukon edut Taulukon haitat Taulukon haittojen välttäminen Dynaamisesti linkattu lista Linkatun listan solmun määrittelytavat Lineaarisen listan toteutus dynaamisesti linkattuna
Data protection template
 Data protection template Aihe: rekisteriseloste ja informointipohja Topic: information about the register and information to users (related to General Data Protection Regulation (GDPR) (EU) 2016/679) Mallina
IEC IP V AC. VIZULO Stork Little Brother LED street luminaire / katuvalaisin. Mounting instruction Asennusohjeet. min 40 C.
 VIZULO Stork Little Brother LED street luminaire / katuvalaisin Mounting instruction Asennusohjeet 05 IEC EN 60598 IP66 min 40 C max + 45 C 198-264 V AC PH2 4 6 29/01/2016 SIA VIZULO Ganibu dambis 7a,
1/6. Resetointi ja vianmääritys lju
 400-64176_ Sähköpöydät 1/6 esetointi ja vianmääritys Pöydän resetointi tehdään aina ennen käyttöönottoa ja tarvittaessa häiriötilanteessa. Määritä pöydän tyyppi käyttökytkimen ja jalustan mukaan ja tee
SAGA 150. Asennusohjeet. Mittaa oven korkeus. Piirrä seinään oven kiinni -päätyyn seinäkannattimen kohdalle vaakaviiva korkeudelle ovi + 75mm + 20 mm.
 SAGA 150 Asennusohjeet 500 1 2 Mittaa oven korkeus. Piirrä seinään oven kiinni -päätyyn seinäkannattimen kohdalle vaakaviiva korkeudelle ovi + 75mm + 20 mm. 3 Piirrä vesivaa an avulla viiva myös kiskon
LX 70. Ominaisuuksien mittaustulokset 1-kerroksinen 2-kerroksinen. Fyysiset ominaisuudet, nimellisarvot. Kalvon ominaisuudet
 LX 70 % Läpäisy 36 32 % Absorptio 30 40 % Heijastus 34 28 % Läpäisy 72 65 % Heijastus ulkopuoli 9 16 % Heijastus sisäpuoli 9 13 Emissiivisyys.77.77 Auringonsuojakerroin.54.58 Auringonsäteilyn lämmönsiirtokerroin.47.50
WAMS 2010,Ylivieska Monitoring service of energy efficiency in housing. 13.10.2010 Jan Nyman, jan.nyman@posintra.fi
 WAMS 2010,Ylivieska Monitoring service of energy efficiency in housing 13.10.2010 Jan Nyman, jan.nyman@posintra.fi Background info STOK: development center for technology related to building automation