Introduction Proper Use...Page 7 Supply Scope...Page 8 Description of Parts...Page 8 Technical Data...Page 9
|
|
|
- Marjatta Aho
- 9 vuotta sitten
- Katselukertoja:
Transkriptio
1 Table of Contents Introduction Proper Use...Page 7 Supply Scope...Page 8 Description of Parts...Page 8 Technical Data...Page 9 Safety Instructions...Page 10 Before you start...page 15 Set the time...page 16 Operation Connecting the electrical appliance to be tested...page 17 Current measurement...page 17 Maximum current...page 18 Measure power consumption...page 19 Maximum power consumption...page 19 Delete maximum values...page 20 Set the overload warning value...page 20 Measure mains voltage...page 21 Measure mains frequency...page 22 Show power factor...page 22 Set electricity rate 1 and 2...Page 23 Set electricity flat-rate...page 25 Total energy consumption...page 27 Time measurement function...page 28 Show energy costs...page 29 Set the Energy consumption / Time measurement function / Total cost display to 0...Page 30 Changing the batteries...page 30 Restore delivery condition...page 31 Cleaning and Care...Page 32 Disposal...Page 32 Warranty and Service Warranty Declaration...Page 34 Service Address...Page 34 Declaration of Conformity...Page 35 Manufacturer...Page 35 GB _Energiekostenmessgeraet_Content_GB-FI-SE-DE.indd :57

2 1 UP DOWN PRICE SET A kwh GB 56861_Energiekostenmessgeraet_Content_GB-FI-SE-DE.indd :57

3 B GB _Energiekostenmessgeraet_Content_GB-FI-SE-DE.indd :57
4 Introduction The following pictograms are used in these operating instructions / on the device: Read instruction manual! Observe caution and safety notes! Caution electric shock! Danger to life! Risk of explosion! Keep children away from electrical devices! For use in dry rooms only. V ~ W Hz A kwh Volt (AC) Watts (Effective power) Hertz (mains frequency) Amp Kilowatt hour Direct current (Type of current and voltage) Proper procedure and handling. Dispose packaging and appliance in an environmentally-friendly way! 6 GB 56861_Energiekostenmessgeraet_Content_GB-FI-SE-DE.indd :57
 Watts (Effective power) Hertz (mains frequency) Amp Kilowatt hour Direct current (Type of current and voltage) Proper")
5 Introduction Energy Monitor Q Introduction Familiarise yourself with the product before using it for the first time. Please read the following operating manual and safety instructions carefully. Always use the instrument only as described and for the stated areas of use. Keep this manual in a safe place. Make sure that all documents accompany the instrument if you pass it on to anyone else. Q Proper Use The appliance is designed to measure the power consumption of electrical appliances and to calculate electricity and operating costs. Any other use or modification of the instrument constitute improper use and carry a serious risk of accident. The manufacturer is not liable for damage caused by improper use. The instrument is not intended for commercial use. GB _Energiekostenmessgeraet_Content_GB-FI-SE-DE.indd :57

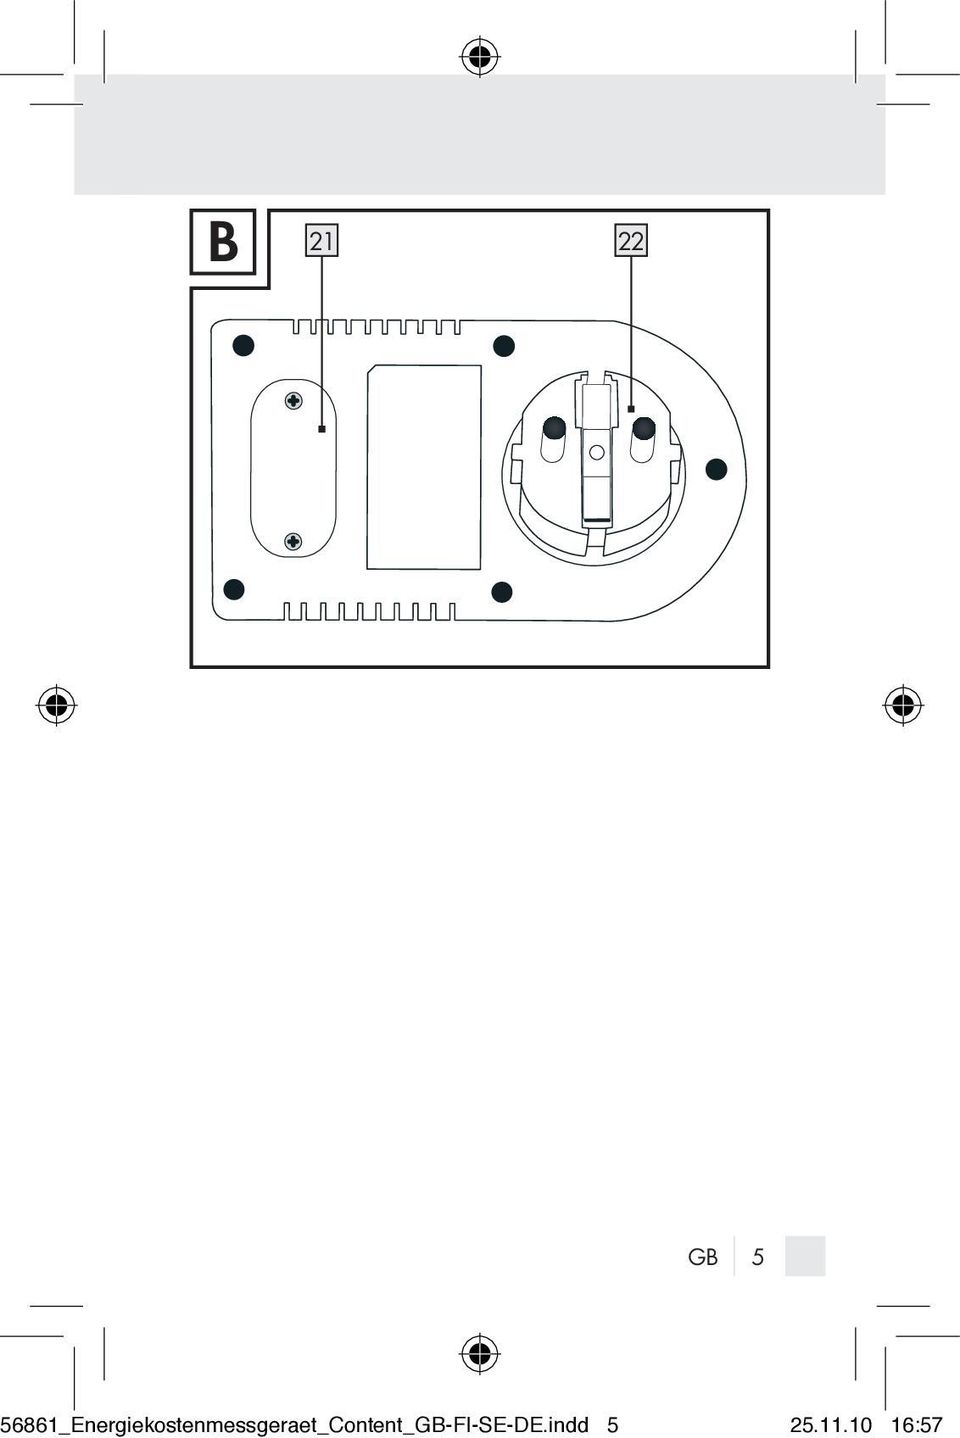
6 Introduction Q Supply Scope 1 x wattmeter 2 x round cell batteries (Alkaline LR44, 1.5 V ) 1 x operating manual 1 x warning labels for the battery compartment cover in other languages Q Description of Parts 1 LC display 2 SET button 3 PRICE button 4 DOWN button 5 UP button 6 Socket 7 OVERLOAD / overload symbol 8 Watt symbol / overload warning value power consumption (W) 9 Ampere symbol / overload warning value current consumption (A) 10 Volt symbol 11 Hz / mains frequency symbol 12 TIME / time symbol 8 GB 56861_Energiekostenmessgeraet_Content_GB-FI-SE-DE.indd :57
 9 Ampere symbol / overload warning value current consumption (A) 10 Volt symbol 11 Hz / mains frequency symbol 12 TIME / time symbol 8 GB")
7 Introduction 13 / cost symbol 14 2nd electricity tariff 15 symbol (setting the time) 16 Total symbol 17 Kilowatt-hours symbol 18 Power factor / power factor symbol 19 PRICE kwh / price per kwh symbol 20 Max symbol 21 Battery compartment cover 22 Plug Q Technical Data Model: EM 240-A DE Input voltage: 230 V ~, 50 Hz Max. permissible load: 16 A ~, 3500 W Type of battery: 2 x LR.44 (Alkaline) 1.5 V Lower limit range for current measurements: A Ampere indicating range: A Volt indicating range: V ~ Watt indicating range: W Kilowatt hour indicating range: kwh GB _Energiekostenmessgeraet_Content_GB-FI-SE-DE.indd :57

8 Introduction / Safety Instructions Mains frequency indicating range: Hz Resolution: 0.5 W Enviromental conditions: Altitude: max m Temperature: + 5 C C Relative humidity: max. 90 % Tolerance range: in volts: ± 3 % in amperes: ± 3 %, ± 0.01 A in watts: ± 3 %, ± 2 W Dimensions of LCD: 3.2 x 3.2 cm (W x H) Safety Instructions Warning! Please read all the safety information and instructions. Failure to observe the safety information and instructions can result in electric shock, fire and / or serious injury. PLEASE RETAIN ALL SAFETY INFORMATION AND INSTRUCTIONS FOR FUTURE REFERENCE. 10 GB 56861_Energiekostenmessgeraet_Content_GB-FI-SE-DE.indd :57

9 Safety Instructions How to avoid fatal injury by electric shock! J Inspect the wattmeter, additional equipment and the electrical appliances you wish to test before every use to ensure that they are intact. Damaged electrical appliances and buckled / kinked mains leads or bare wires increase the risk of an electric shock. J Do not operate the wattmeter if mains leads or mains plugs on the electrical appliances you wish to test are damaged. CAUTION! Damaged mains leads pose a risk of fatal injury by electric shock. J The connector plug 22 of the wattmeter must fit into the outlet. The connector plug 22 must not be modified in any way. Do not use adapter plugs in conjunction with earthed electrical appliances. Using unmodified mains plugs and proper outlets reduces the risk of an electric shock. J Avoid physical contact with earthed surfaces such as those of pipes, heaters, ovens and fridges. There is an increased risk of an electric shock if your body is earthed. J Keep the wattmeter away from rain and moisture. If water enters the wattmeter there is an increased risk of an electric shock. GB _Energiekostenmessgeraet_Content_GB-FI-SE-DE.indd :57

10 Safety Instructions J Only operate the wattmeter in dry clothing and preferably shoes with a rubber sole or standing on an insulating mat. J Only measure voltages of over 25 V ~ in compliance with the relevant safety instructions for the electrical appliance you wish to test. J Never under any circumstances open up the housing of the wattmeter. If the wattmeter does not work properly or is damaged, please have it repaired immediately by a specialist. J Do not operate the wattmeter outdoors. J Always remove the electrical appliances you are testing from the socket 6 directly by the mains plug and never using the mains lead. J Remove the wattmeter from the outlet when you have finished using it. 12 GB How to avoid personal injury and damage to the product! J RISK OF FATAL INJURY AND ACCIDENTS FOR INFANTS AND CHILDREN! Never leave children unattended with the packaging materials or the product. The packaging material carries a risk of suffocation and there is a risk of fatal injury by 56861_Energiekostenmessgeraet_Content_GB-FI-SE-DE.indd :57

11 Safety Instructions electric shock. Children often underestimate dangers. Always keep children away from the product. J CAUTION! DANGER OF EXPLOSION! Never operate the wattmeter where there is any risk of explosion, i.e. close to inflammable liquids or gases. J Never exceed the stated maximum input voltage. J Avoid strong vibrations or shocks. J Never expose the wattmeter to extreme temperatures, extreme sunlight, humidity or moisture. J Never expose the wattmeter to extreme temperature fluctuations. Do not use the wattmeter until it has become adjusted to the ambient temperature. J Never operate the wattmeter close to strong magnetic fields such as motors, transformers or similar. J Do not place the wattmeter face down on workbenches or working surfaces. This helps to prevent damage to the operating elements and the LCD 1. J Remove the batteries from the wattmeter if you do not intend to use if for any length of time. J Do not connect after each other. J Use the power cost meter only in buildings equipped under Installation Category II (CAT II) according to IEC 664. The maximum peak voltage must not exceed 2500 V ~. GB _Energiekostenmessgeraet_Content_GB-FI-SE-DE.indd :57

12 Safety Instructions The main electricity supply for residential buildings usually falls under Installation Category II. 14 GB Safety Instructions for Batteries! J Remove batteries that have not been used for any length of time from the instrument. J CAUTION! DANGER OF EXPLOSION! Never recharge batteries. J Make sure when inserting the batteries that the polarity is correct. This is indicated in the battery compartment. J If necessary, clean the battery and instrument contacts before inserting the batteries. J Remove spent batteries from the instrument immediately on account of the increased risk of leakage. J Batteries must not be disposed of in household waste. J Consumers are under a legal obligation to dispose of batteries properly. J Keep batteries out of the reach of children, do not dispose of them in fire, do not short-circuit them, and do not take them apart. J Failure to observe these instructions may result in the batteries discharging beyond their end voltage, which 56861_Energiekostenmessgeraet_Content_GB-FI-SE-DE.indd :57

13 Safety Instructions / Before you start carries a risk of leakage. If the batteries in your instrument have leaked, remove them immediately to prevent damage to the instrument. J Avoid contact with skin, eyes and mucous membrane. In the event of contact with battery acid, rinse the affected area with plenty of water and / or consult a doctor. J Unplug the appliance before changing the batteries. J The battery compartment cover 21 must be completely inserted before bring into operation. Q Before you start Note: first stick the enclosed label onto the battery compartment cover 21. Note: two round cell batteries (Alkaline LR44, 1.5 V ) are already inserted in the wattmeter on delivery. j Remove the battery compartment cover 21 by unscrewing the two screws with a suitable screwdriver. j Remove the isolating strip from between the two round cell batteries (Alkaline LR44, 1.5 V ) on the back of the battery compartment cover 21. j Close the battery compartment by replacing the battery compartment cover 21. Please make sure that you GB _Energiekostenmessgeraet_Content_GB-FI-SE-DE.indd :57
 are already inserted in the wattmeter on delivery.")
14 Before you start retighten the two screws firmly. Note: Make sure that you replace the battery compartment cover 21 the right way round. The rounded corners of the battery compartment cover 21 must fit into the rounded recesses in the battery compartment. j The wattmeter is now ready for operation. Q Set the time The time is displayed as soon as the isolating strip has been removed. The symbol 15 also appears. j Press the PRICE button 3 until the time appears in the bottom third of the LC display 1. j Press the SET button 2 for approx. 3 seconds. The time display flashes. j Press the UP button 5 to set the hours. j Press the DOWN button 4 to set the minutes. j Press the SET button 2 to switch between 12 and 24-hour format. j Press the PRICE button 3 to confirm your setting. 16 GB 56861_Energiekostenmessgeraet_Content_GB-FI-SE-DE.indd :57

15 Operation Q Operation Q Connecting the electrical appliance to be tested c CAUTION! RISK OF FATAL INJURY BY ELECTRIC SHOCK! Only measure voltages of over 25 V ~ in compliance with the relevant safety instructions for the electrical appliance you wish to test. m CAUTION! RISK OF INJURY! Never exceed the stated maximum input voltage. j Plug the wattmeter into a suitable outlet. j Now plug the mains plug of the electrical appliance you wish to test into the socket 6 of the wattmeter. Q Current measurement j Press the UP button 5 until the Ampere symbol 9 appears in the top third of the LC display 1. Note: the Current measurement function is the standard setting for the wattmeter. As soon as the isolating strip between the two round cell batteries is removed, the wattmeter is automatically in this mode. GB _Energiekostenmessgeraet_Content_GB-FI-SE-DE.indd :57

16 Operation j The LCD 1 now indicates the present current in A (Ampere) required for use of the electrical appliance. Note: you can also call up the current reading when the wattmeter has been removed from the outlet or when the electrical appliance you are testing is no longer connected to the wattmeter. As soon as you take a new measurement, the old current is overwritten. Q Maximum current j Press the UP button 5 until the Max symbol 20 and the Ampere symbol 9 appear in the top third of the LC display 1. j The LCD 1 now indicates the maximum required current in A (Ampere) measured with the wattmeter so far. Note: you can also call up the maximum current reading when the wattmeter has been removed from the outlet or when the electrical appliance you are testing is no longer connected to the wattmeter. Note: the maximum current value is saved until a higher value is measured. The old value is then overwritten by the new measurement. 18 GB 56861_Energiekostenmessgeraet_Content_GB-FI-SE-DE.indd :57

17 Operation Q Measure power consumption j Press the UP button 5 until the Watt symbol 8 appears in the top third of the LC display 1. j The LCD 1 now indicates the present power consumption in W (Watt) required for use of the electrical appliance. Note: the power consumption is calculated according to the following formula: power = voltage x current x power factor. Q Maximum power consumption j Press the UP button 5 until the Max symbol 20 and the Watt symbol 8 appear in the top third of the LC display 1. j The LCD 1 now indicates the maximum power consumption in W (Watt) measured by the wattmeter so far. Note: you can also call up the maximum power consumption reading when the wattmeter has been removed from the outlet or when the electrical appliance you are testing is no longer connected to the wattmeter. Note: the maximum power consumption is saved until a higher value is measured. The old value is then overwritten by the new measurement. GB _Energiekostenmessgeraet_Content_GB-FI-SE-DE.indd :57

18 Operation Q Delete maximum values j Use the UP button 5 to select one of the two maximum values (see Maximum current, Maximum power consumption ). j Keep the SET button 2 pressed for approx. 3 seconds to set the maximum value to 0. Q Set the overload warning value Note: in this mode you have a choice between two overload warning values. You can set an overload warning value for the current (A) and an overload warning value for the power consumption (W). Note: the overload warning value for power consumption (W) 8 is set by default to 0,0 W on delivery. Proceed as follows: 1. Press the UP button 5 until the overload symbol 7 ( OVERLOAD ) appears in the top third of the LC display Now press the SET button 2. The ampere symbol 9 starts to flash. 3. Press the UP 5 or DOWN button 4 to select either 20 GB 56861_Energiekostenmessgeraet_Content_GB-FI-SE-DE.indd :57
 8 is set by default to 0,0 W on delivery. Proceed as follows: 1.")
19 Operation the overload warning value for power consumption (W) 8 or the overload warning value for current (A) Press the SET button 2. The first digit flashes. 5. Press the UP 5 or DOWN button 4 to set the required value. 6. Press the SET button 2 to move to the next digit. 7. Repeat steps 5 and 6 until you have set the required overload warning value. 8. When you have set the value for the last digit, press the PRICE button 3 to confirm your entry. Note: as soon as the entered overload warning values are exceeded by any connected electrical appliance you are testing, the overload symbol 7 flashes and a warning signal sounds. Q Measure mains voltage j Press the DOWN button 4 until the Volt symbol 10 appears in the centre of the LC display 1. Note: the Measure mains voltage function is the standard setting for the wattmeter. As soon as the isolating strip between the two round cell batteries is removed, the wattmeter is automatically in this mode. GB _Energiekostenmessgeraet_Content_GB-FI-SE-DE.indd :57

20 Operation j The LCD 1 now indicates the present mains voltage in V (volts). Q Measure mains frequency j Press the DOWN button 4 until the power frequency symbol 11 (Hz) appears in the centre of the LC display 1. j The LCD 1 now indicates the present mains frequency in Hz (Hertz). Note: the wattmeter indicates mains frequencies in a range of 40 to 70 Hz. In Europe a frequency of 50 Hz is used for the general power supply system. Q Show power factor j Press the DOWN button 4 until the power factor symbol 18 ( Power Factor ) appears in the centre of the LC display 1. j The LC display 1 now indicates the power factor. note: the power factor expresses the ratio of real (active) to theoretical (apparent) power consumed by an electrical device. The power factor can be between 0 and 1. Ideally, the power factor is GB 56861_Energiekostenmessgeraet_Content_GB-FI-SE-DE.indd :57

21 Operation Q Set electricity rate 1 and 2 Note: the price per kwh is set to 0 on delivery. Note: you can set two different electricity rates (e.g. daytime and night-time rate) for the power cost meter. In order to use this function, you must set the starting times for electricity rate 1 and 2. IMPORTANT! Electricity rate 1 is automatically the rate that was programmed first. Tip! You can obtain details of the current price per kwh from your electricity provider. Note: please make sure that the top third of the LC display 1 shows the standard display (see Display current ). Proceed as follows: 1. Press the DOWN button 4 until the price per kwh symbol 19 ( PRICE KWh ) appears in the centre of the LC display Press the UP button 5 so that four digits appear in the bottom third of the LC display 1. The symbol 15 also appears. 3. Now press the SET button 2. The first digit starts to flash. 4. Press the UP 5 or DOWN button 4 to set the units digit before the decimal point of the current price GB _Energiekostenmessgeraet_Content_GB-FI-SE-DE.indd :57
22 Operation per kwh in Euro ( ) for electricity rate 1. Example: Press the SET button 2 to move to the next digit. 6. Press the UP 5 or DOWN button 4 to set the hundreds digit of the current price per kwh in Eurocent ( ) for electricity rate 1. Example: Press the SET button 2 to move to the next digit. 8. Repeat step 6 in order to set the tens and units digit. Example: Press the SET button 2. The time display starts to flash in the bottom third of the LC display Press the UP button 5 to set the starting time for electricity rate 1 in hours. 11. Press the DOWN button 4 to set the starting time for electricity rate 1 in minutes. 12. Press the PRICE button 3 to confirm your entry. The power cost meter begins measuring the cost of energy consumed in electricity rate 1 at the set starting time. 13. Press the PRICE button 3. The price per kwh symbol 19 ( PRICE KWh ) and 2 appear in the centre of the LC display 1. The display for the 2nd electricity tariff 14 appears in the bottom third of the LC display Press the SET button 2. The first digit starts to flash. 15. Press the UP 5 or DOWN button 4 to set the units digit before the decimal point of the current price per kwh in Euro ( ) for electricity rate 2. Example: GB 56861_Energiekostenmessgeraet_Content_GB-FI-SE-DE.indd :57
23 Operation 16. Press the SET button 2 to move to the next digit. 17. Press the UP 5 or DOWN button 4 to set the hundreds digit of the current price per kwh in Eurocent ( ) for electricity rate 2. Example: Press the SET button 2 to move to the next digit. 19. Repeat step 17 to set the tens and units digit. Example: Press the SET button 2. The time display in the bottom third of the LC display 1 starts to flash. 21. Press the UP button 5 to set the starting time for electricity rate 2 in hours. 22. Press the DOWN button 4 to set the starting time for electricity rate 2 in minutes. 23. Press the PRICE button 3 to confirm your entry. The power cost meter begins measuring the cost of energy consumed in electricity rate 2 at the set starting time. Note: These settings affect the Display energy costs function. Q Set electricity flat-rate If your electricity provider does not offer different electricity rates (day / night), you can set a flat rate for electricity. The GB _Energiekostenmessgeraet_Content_GB-FI-SE-DE.indd :57
24 Operation power cost meter then works on the basis of this flat rate round the clock. Note: make sure that the standard display (see Display current ) appears in the top third of the LC display Press the DOWN button 4 until the price per KWh symbol 19 ( PRICE KWh ) appears in the centre of the LC display Press the UP button 5 so that - -:- - appears in the bottom third of the LC display Press the SET button 2. The first digit begins to flash. 4. Press the UP 5 or DOWN button 4 to set the units digit before the decimal point of the current price per kwh in Euro ( ). Example: Press the SET button 2 to move to the next digit. 6. Press the UP 5 or DOWN button 4 to set the hundreds digit of the current price per kwh in Eurocent ( ). Example: Press the SET button 2 to move to the next digit. 8. Repeat step 6 to set the tens and units digit. Example: Press the PRICE button 3 to confirm your entry. Note: the setting made here affects the Display energy costs function. 26 GB 56861_Energiekostenmessgeraet_Content_GB-FI-SE-DE.indd :57
25 Operation Q Total energy consumption Note: this mode displays the accumulated total energy in kwh consumed by connected electrical devices since the start of measurement. Note: Check that standard displays (see Measuring the current and Measuring the mains voltage ) appear in the top and middle thirds of the LC display 1. j Press the PRICE button 3 repeatedly until the kilowatthours symbol 17 and the total symbol 16 appear in the bottom third of the LC display 1. Note: the Total power consumption function is the standard setting for the wattmeter. As soon as the isolating strip between the two round cell batteries is removed, the wattmeter is automatically in this mode. j The LCD 1 now indicates the total amount of energy consumed in kwh (kilowatt hours). Note: the measuring range of the wattmeter is between 0.00 and kwh. GB _Energiekostenmessgeraet_Content_GB-FI-SE-DE.indd :57
26 Operation Q Time measurement function Note: this mode displays the amount of time in hours / minutes / seconds or hours / minutes format during which all connected electrical devices consumed energy. The power cost meter and the devices you wish to monitor must all be switched on for time measurement. Note: Check that standard displays (see Measuring the current and Measuring the mains voltage ) appear in the top and middle thirds of the LC display 1. j Press the PRICE button 3 repeatedly until the time symbol 12 and the total symbol 16 appear in the bottom third of the LC display 1. j The LCD 1 now indicates the amount of time in which connected electrical appliances consumed energy. Note: as soon as the counter reaches 99:59:59, the display switches to hours/minutes format. The maximum time is 9999:59. Note: you can also call up the total time when the wattmeter has been removed from the outlet or when the electrical appliance you are testing is no longer connected to the wattmeter. 28 GB 56861_Energiekostenmessgeraet_Content_GB-FI-SE-DE.indd :57
27 Operation Note: as soon as the wattmeter indicates that the current is too weak (0.00 A in Measure current mode), the time measurement function stops. Note: the time measurement function stops as soon as you unplug the electrical appliance you are testing from the socket 6 of the wattmeter. As soon as you plug another electrical appliance into the wattmeter, the time measurement function resumes. Q Show energy costs Note: the total cost of the consumed energy is shown in (Euro). Note: the total cost of the consumed energy is calculated on the basis of the set price per kwh (See Set electricity rate 1 and 2, Set electricity flat-rate ). Note: Check that standard displays (see Measuring the current and Measuring the mains voltage ) appear in the top and middle thirds of the LC display 1. j Press the PRICE button 3 until the cost symbol 13 ( TOTAL ) appears in the bottom third of the LC display 1. j The LCD 1 now indicates the energy costs incurred for use of the electrical appliance. GB _Energiekostenmessgeraet_Content_GB-FI-SE-DE.indd :57
28 Operation Note: you can also call up the total cost when the wattmeter has been removed from the outlet or when the electrical appliance you are testing is no longer connected to the wattmeter. Note: the energy cost calculator stops as soon as you unplug the electrical appliance you are testing from the socket 6 of the wattmeter. As soon as you plug another electrical appliance into the wattmeter, the energy cost calculator resumes. Q Set the Energy consumption / Time measurement function / Total cost display to 0 j Keep the PRICE button 3 pressed for approx. 5 seconds to set the counter to 0. Q Changing the batteries Note: as soon as you remove the round cell batteries from the wattmeter, all the saved values are automatically deleted. 30 GB 56861_Energiekostenmessgeraet_Content_GB-FI-SE-DE.indd :57
29 Operation Proceed as follows: j Remove the battery compartment cover 21 by unscrewing the two screws with a suitable screwdriver. j Remove the two round cell batteries from the holder on the back of the battery compartment cover 21. j Insert two new batteries (Alkaline LR44, 1.5 V ) in the holder on the back of the battery compartment cover 21. Note: make sure when inserting the batteries that the polarity is correct. This is indicated in the battery compartment. j Close the battery compartment by replacing the battery compartment cover 21. Please make sure that you retighten the two screws firmly. Note: make sure that you replace the battery compartment cover 21 the right way round. The rounded corners of the battery compartment cover 21 must fit into the rounded recesses in the battery compartment. Q Restore delivery condition Malfunctions may occur if the device is exposed to a strong electromagnetic, high-frequency field. If malfunctions occur, e.g. the buttons no longer respond or there are irregularities in the display, please return the device to delivery condition. To do this, remove the batteries for several minutes and then GB _Energiekostenmessgeraet_Content_GB-FI-SE-DE.indd :57
30 Operation / Cleaning and Care / Disposal place them back in the device (see Changing the batteries ). If malfunctions persist, change the position of the device. IMPORTANT! Please note that all data will be deleted. Q Cleaning and Care Warning! RISK OF FATAL INJURY BY ELECTRIC SHOCK! Keep the wattmeter away from rain and moisture. If water enters the wattmeter there is an increased risk of an electric shock. Warning! RISK OF FATAL INJURY BY ELECTRIC SHOCK! Before carrying out any work on the product or on an electrical appliance connected to it, remove the wattmeter from the outlet. j Clean the wattmeter with a dry, non-fluffing cloth. Q Disposal The packaging is made entirely of recyclable materials, which you may dispose of at your local recycling facilities. 32 GB 56861_Energiekostenmessgeraet_Content_GB-FI-SE-DE.indd :57
31 Disposal never dispose of electrical appliances in the household waste! In accordance with European Directive 2002 / 96 / EC on used electrical and electronic appliances and its implementation in national law, used electrical appliances must be collected separately and recycled in an ecologically compatible manner. Details of current options for disposing of electrical appliances after their useful life can be obtained from your local or city council. risk of environmental damage from improper disposal of batteries! Batteries shall not be disposed off in domestic waste. They may contain poisonous heavy metals and must be treated as hazardous waste. The chemical symbols of the heavy metals are as follows: Cd = Cadmium, Hg = Mercury, Pb = Lead. For this reason, take used batteries to a local collection point. GB _Energiekostenmessgeraet_Content_GB-FI-SE-DE.indd :57
32 Warranty and Service Q Warranty and Service Q Warranty Declaration This instrument has a 3-year warranty from the date of purchase; the warranty is only valid for the original purchaser and is not transferable. Please retain your receipt as proof of purchase. The warranty applies to material or manufacturing defects only. It does not cover wear parts or damage caused by improper use. The warranty shall expire in the event of third-party intervention. This warranty shall not affect your statutory rights. Please contact the service centre by telephone in the event of any claims under the warranty. This is the only way to ensure that your instrument can be returned free of charge. Q Service Address BAT, Lindenstraße 35, D Tübingen exp@bat-tuebingen.com Service tel.: +49 (0) (14 cent / min from the German fixed line network, mobile phone max. 42 cent / min.) 34 GB 56861_Energiekostenmessgeraet_Content_GB-FI-SE-DE.indd :57
33 Warranty and Service For further information we recommend that you consult the Customer Service / FAQ sections of our web site at Q Declaration of Conformity The CE symbol was applied in compliance with the following European Directives: 2006 / 95 / EC Low Voltage Directive 2004 / 108 / EC Electromagnetic Compatibility Directive The Declaration of Conformity is held by the manufacturer. Q Manufacturer BAT, Lindenstraße 35, D Tübingen GB _Energiekostenmessgeraet_Content_GB-FI-SE-DE.indd :57
34 _Energiekostenmessgeraet_Content_GB-FI-SE-DE.indd :57
35 Sisällysluettelo Johdanto Määräystenmukainen käyttö...sivu 41 Toimituksen laajuus...sivu 42 Osien kuvaus...sivu 42 Tekniset tiedot...sivu 43 Turvaohjeet...Sivu 44 Ennen käyttöönottoa...sivu 49 Kellonajan asetus...sivu 50 Käyttö Tarkistuslaitteen liittäminen...sivu 50 Sähkövirran voimakkuuden mittaaminen...sivu 51 Maksimaalinen sähkövirran voimakkuus...sivu 52 Energian kulutuksen mittaaminen...sivu 52 Maksimaalinen tehonkulutus...sivu 53 Maksimiarvojen tyhjääminen...sivu 53 Ylikuormituksesta ilmoittavan varoitusarvon säätäminen...sivu 54 Verkkojännitteen mittaaminen...sivu 55 Verkkotaajuuden mittaaminen...sivu 56 Tehokertoimen muistiin palauttaminen...sivu 56 Sähkötariffin 1 ja 2 säätö...sivu 57 Sähkökustannusten kokonaiskustannusten säätö...sivu 60 Kokonaisarvo energiankulutus...sivu 61 Ajanmittaustoiminto...Sivu 62 Energiakulujen näyttäminen...sivu 63 Energiankulutus / ajanmittaustoiminto / kokonaiskustannusnäytön nollaus...sivu 64 Paristojen vaihtaminen...sivu 65 Toimitustilan palauttaminen...sivu 66 Puhdistus ja hoito...sivu 66 Hävittäminen...Sivu 67 Takuu ja palvelu Takuutodistus...Sivu 68 Huolto-osoite...Sivu 69 Standardinmukaisuustodistus...Sivu 69 Valmistaja...Sivu 69 FI _Energiekostenmessgeraet_Content_GB-FI-SE-DE.indd :57
36 1 UP DOWN PRICE SET A kwh FI 56861_Energiekostenmessgeraet_Content_GB-FI-SE-DE.indd :57
37 B FI _Energiekostenmessgeraet_Content_GB-FI-SE-DE.indd :57
38 Johdanto Tässä käyttöohjeessa / laitteessa käytetään seuraavia kuvakkeita: Lue käyttöohje! Huomioi varoitus- ja turvaohjeet! Varo sähköiskua! Hengenvaara! Räjähdysvaara! Pidä sähkölaite pois lasten ulottuvilta! Käyttö sallittu vain kuivissa tiloissa. V ~ W Hz A kwh Voltti (Vaihtojännite) Watti (Vaikutusteho) Hertsi (verkkotaajuus) Ampeeri Kilowattitunti Tasavirta (Virta- ja jännitelaji) Näin käyttäydyt oikein! Hävitä pakkaus ja laite ympäristöystävällisesti! 40 FI 56861_Energiekostenmessgeraet_Content_GB-FI-SE-DE.indd :57
39 Johdanto Energiankulutusmittari Q Johdanto Tutustu laitteeseen ennen ensimmäistä käyttöönottoa. Lue huolellisesti läpi alempana oleva käyttöohje ja turvaohjeet. Käytä laitetta kuvauksen mukaisesti ja vain annetuille käyttöalueille. Säilytä tämä käyttöohje. Anna kaikki asiakirjat mukaan, jos annat laitteen edelleen kolmannelle osapuolelle. Q Määräystenmukainen käyttö Laite on tarkoitettu mittaamaan energiankulutusta ja sähkönja käyttökustannusten laskemista. Muunlainen käyttö tai laitteeseen tehdyt muutokset eivät ole määräysten mukaisia ja sisältävät huomattavia tapaturmavaaroja. Valmistaja ei vastaa vahingoista, jotka johtuvat käytöstä, joka ei ole ollut määräysten mukainen. Laitetta ei ole tarkoitettu kaupallisiin tarkoituksiin. FI _Energiekostenmessgeraet_Content_GB-FI-SE-DE.indd :57
40 Johdanto Q Toimituksen laajuus 1 x Energiankulutusmittari 2 x Nappiparistoa (Alkaline LR44, 1,5 V ) 1 x Käyttöohje 1 x Varoitustarrat paristotilan kanteen muilla kielillä. Q Osien kuvaus 1 LC-näyttö 2 SET-painike ( asetus ) 3 PRICE-painike ( hinta ) 4 DOWN-painike ( alaspäin ) 5 UP-painike ( ylöspäin ) 6 Laitteen pistorasia 7 OVERLOAD / ylikuormitussymboli 8 WATT-symboli / ylikuormitus-varoitusarvo tehon kulutus (W) 9 Ampeeri-symboli/ ylikuormitus-varoitusarvo virran voimakkuus (A) 10 Voltti-symboli 11 Hz / verkkotaajuus-symboli 12 TIME / aikasymboli 13 / kustannussymboli sähkötariffi 42 FI 56861_Energiekostenmessgeraet_Content_GB-FI-SE-DE.indd :57
41 Johdanto 15 -symboli (kellonajan asetus) 16 Total-symboli 17 Kilowattitunti-symboli 18 Power Factor / tehokerroinsymboli 19 PRICE KWh / hinta /kwh-symboli 20 Max-symboli 21 Paristotilan kansi 22 Liitäntäpistoke Q Tekniset tiedot Malli: EM 240-A DE Käyttöjännite: 230 V ~, 50 Hz Max. sallittu kuormitus: 16 A, 3500 W Paristotyyppi: 2 x LR.44 (Alkaline) 1,5 V Alempi raja-aluearvo sähkömittauksille: 0,005 A Näyttöalue Ampeeri: 0,00-16 A Näyttöalue Voltti: V ~ Näyttöalue Watti: W Näyttöalue Kilowattitunti: 0, kwh Näyttöalue Verkkotaajuus: Hz Erotuskyky: 0,5 W FI _Energiekostenmessgeraet_Content_GB-FI-SE-DE.indd :57
42 Johdanto / Turvaohjeet Ympäristöolosuhteet: Korkeus: max m Lämpötila: + 5 C C Suhteellinen ilmankosteus: max. 90 % Toleranssialue: volteissa: ± 3 % ampeereissa: ± 3 %, ± 0,01 A wateissa: ± 3 %, ± 2 W LC-näytön mitat: 3,2 x 3,2 cm (L x K) Turvaohjeet Varoltus! Lue läpi kaikki turvaohjeet ja määräykset. Turvaohjeiden ja määräysten laiminlyönti voi johtaa sähköiskuun, tulipaloon ja / tai vaikeisiin loukkaantumisiin. SÄILYTÄ KAIKKI TURVAOHJEET JA MÄÄRÄYKSET TULEVAISUUTTA VARTEN! 44 FI 56861_Energiekostenmessgeraet_Content_GB-FI-SE-DE.indd :57
43 Turvaohjeet Kuinka vältyt sähköiskun aiheuttamalta hengenvaaralta! J Tarkasta energiankulutusmittarin, lisävarusteiden ja mitattavien sähkölaitteiden kunto ennen jokaista käyttöä. Vioittuneet sähkölaitteet sekä murtuneet verkkojohdot tai paljaat metallilangat lisäävät sähköiskun riskiä. J Älä käytä energiankulutusmittaria, jos mitattavien sähkölaitteiden verkkojohdot tai pistokkeet ovat vioittuneet. VARO! Vioittuneet verkkojohdot merkitsevät sähköiskusta johtuvaa hengenvaaraa. J Energiankulutusmittarin pistokkeen 22 on sovittava pistorasiaan. Pistoketta 22 ei saa muuttaa mitenkään. Älä käytä adapteripistokkeita yhdessä maadoitettujen sähkölaitteiden kanssa. Alkuperäiset pistokkeet ja sopivat pistorasiat vähentävät sähköiskun riskiä. J Vältä kosketusta maadoitettujen pintojen, kuten putkien, lämmitysten, sähköhellojen ja jääkaappien kanssa. Jos kehosi on maadoittunut, on sähköiskun riski suurempi. J Suojaa energiankulutusmittari sateelta ja kosteudelta. Veden tunkeutuminen laitteeseen lisää sähköiskun riskiä. J Käytä energiankulutusmittaria vain ollessasi kuivissa vaatteissa ja mieluummin kumipohjaisissa kengissä tai eristysmaton päällä. FI _Energiekostenmessgeraet_Content_GB-FI-SE-DE.indd :57
44 Turvaohjeet J Mittaa yli 25 V ~ jännitteet vain niiden asiaankuuluvien turvamääräysten mukaisesti, jotka on annettu mitattaville laitteille. J Älä missään tapauksessa avaa energiakulutusmittarin suojusta. Anna mittari heti ja vain ainoastaan ammattimiehen korjattavaksi, jos se ei toimi moitteettomasti tai jos se on rikki. J Älä käytä energiankulutusmittaria ulkona. J Kiinnitä mitattavat sähkölaitteet aina suoraan pistokkeeseen, älä koskaan pistorasian 6 verkkojohtoon. J Vedä energiankulutusmittari pistorasiasta irti, jos et enää käytä sitä. Kuinka välttyä tuotteen aiheuttamilta tapaturmilta ja vahingoilta! J HENGEN- JA TAPATURMAVAARA PIENILLE LAPSILLE JA LAPSILLE! Älä jätä lapsia koskaan vartioimatta pakkausmateriaalin tai laitteen kanssa tukehtumisvaaran ja sähköiskusta johtuvan hengenvaaran takia. Lapset aliarvioivat usein sähkölaitteiden vaarat. Pidä laite pois lasten ulottuvilta. 46 FI 56861_Energiekostenmessgeraet_Content_GB-FI-SE-DE.indd :57
45 Turvaohjeet J VARO! RÄJÄHDYSVAARA! Älä käytä energiankulutusmittaria ympäristössä, joka on räjähdysaltis tai jossa on palavia nesteitä tai kaasuja. J Älä koskaan ylitä annettua maksimaalista käyttöjännitettä. J Vältä voimakkaita tärähdyksiä. J Älä aseta energiankulutusmittaria äärimmäisiin lämpötiloihin, voimakkaaseen auringonpaisteeseen, ilmankosteuteen tai märkyyteen. J Suojaa energiankulutusmittari äärimmäisiltä lämpötilanvaihteluilta. Ota se käyttöön vasta, kun ympäristön lämpötila on sopiva. J Älä käytä mittaria voimakkaiden magneettisten kenttien, kuten esim. moottoreiden, muuntajien jne. läheisyydessä. J Älä aseta energiankulutusmittaria etupuoli alaspäin työpöydille tai työpinnoille. Näin vältät käyttöelementtien ja LC-näytön 1 vahingoittumisen. J Poista paristot mittarista heti, jollet käytä laitetta pitempään aikaan. J Älä pistä laitetta toisen laitteen pistorasiaan. J Käytä energiakustannusmittaria vain rakennuksissa, jotka vastaavat IEC 664 mukaista asennusluokkaa II (CAT II). Suurin jännitehuippu ei saa ylittää V ~. Asuinrakennusten päävirransyöttö kuuluu normaalisti asennusluokkaan II. FI _Energiekostenmessgeraet_Content_GB-FI-SE-DE.indd :57
46 Turvaohjeet Paristoja koskevat turvaohjeet! J Poista paristot laitteesta, jos niitä ei ole käytetty pitkään aikaan. J VARO! RÄJÄHDYSVAARA! Älä koskaan lataa paristoja uudelleen! J Ota oikea napaisuus huomioon asentaessasi paristoja paikoilleen! Tiedot paristojen oikeista navoista löydät paristokotelon sisältä. J Puhdista paristo- ja laitekontaktit ennen paristojen asentamista, jos tarpeen. J Poista käytetyt paristot heti laitteesta, niin että ne eivät pääse vuotamaan! J Paristot eivät kuulu talousjätteisiin! J Jokainen käyttäjä on velvollinen hävittämään paristot oikeaoppisesti! J Pidät paristot poissa lasten ulottuvilta, älä heitä niitä tuleen, vältä oikosulkua äläkä hajota niitä. J Paristot voivat purkautua, jos ohjeita ei noudateta. Paristot voivat tällöin vuotaa. Jos laitteessasi olevat paristot ovat saattaneet vuotaa, ota ne heti pois, jotta laite ei mene rikki. J Vältä kontaktia ihon, silmien ja limakalvojen kanssa. Jos joudut paristosta pääsevän hapon kanssa tekemisiin, 48 FI 56861_Energiekostenmessgeraet_Content_GB-FI-SE-DE.indd :57
47 Turvaohjeet / Ennen käyttöönottoa huuhdo kontaktiin joutunut kohta runsaalla vedellä ja / tai hakeudu lääkäriin! J Katkaise virta laitteesta ennen paristojen vaihtoa. J Tarkista ennen laitteen käyttöönottoa, että paristotilan kansi 21 on kunnolla kiinni. Q Ennen käyttöönottoa Huomautus: Liimaa ensin oheinen tarra paristotilan kanteen 21. Huomautus: Kaksi nappiparistoa (Alkaline LR44, 1,5 V ) on jo laitteen toimituksessa mukana. j Poista paristotilan kansi 21 avaamalla kumpikin ruuvi sopivalla ruuviavaimella. j Poista eristyskaista kummankin nappipariston (alkaline LR44, 1,5 V ) välistä paristotilan kannen 21 takapuolella. j Sulje paristokotelo sulkemalla paristokotelon kansi 21. Tarkista, että kumpikin ruuvi on kiristetty taas kunnolla. Huomautus: Kiinnitä huomiota siihen, että laitat paristokotelon kannen 21 oikein päin. Paristokotelon kannen pyöristettyjen kulmien täytyy sopia paristokotelossa oleviin pyöristettyihin syvennyksiin. j Energiankulutusmittari on nyt käyttövalmis. FI _Energiekostenmessgeraet_Content_GB-FI-SE-DE.indd :57
48 Ennen käyttöönottoa / Käyttö Q Kellonajan asetus Ajannäyttö käynnistyy heti, kun eristyskaista on poistettu. Lisäksi näyttöön tulee -symboli 15. j Paina niin kauan PRICE -painiketta 3, kunnes LCnäytön 1 alempaan kolmannekseen tulee ajannäyttö. j Paina SET -painiketta 2 noin 3 sekuntia. Ajannäyttö vilkkuu. j Paina UP -painiketta 5, kun haluat asettaa tunnit. j Paina DOWN -painiketta 4, kun haluat asettaa minuutit. j Paina SET -painiketta 2, kun haluat valita 12- ja 24-tuntiformaatin välillä. j Vahvista syöttö painamalla PRICE -painiketta 3. Q Käyttö Q Tarkistuslaitteen liittäminen c VARO! SÄHKÖISKUSTA JOHTUVA HENGENVAA- RA! Mittaa yli 25 V ~ jännitteet vain niiden asiaankuuluvien turvamääräysten mukaisesti, jotka on annettu mitattaville laitteille. 50 FI 56861_Energiekostenmessgeraet_Content_GB-FI-SE-DE.indd :57
49 Käyttö m VARO! TAPATURMAVAARA! Älä koskaan ylitä annettua maksimaalista käyttöjännitettä! j Työnnä energiankulutusmittari sopivaan pistorasiaan. j Työnnä nyt mitattavan laitteen pistoke pistorasiaan 6. Q Sähkövirran voimakkuuden mittaaminen j Paina niin kauan UP -painiketta 5, kunnes LC-näytön 1 ylempään kolmannekseen tulee ampeerisymboli 9. Huomautus: Toiminto sähkövirran mittaus on energiankulutusmittarin perussäätö. Niin nopeasti kuin eristysviivat saadaan poistettua nappiparistojen ympäriltä, on laite automaattisesti tässä tilassa. j LC-näytössä 1 näkyy nyt se todellinen sähkövirta ampeereissa (A), joka tätä kuormitusta varten tarvitaan. Huomautus: Voit palauttaa sähkövirta-arvon vielä sitten muistiin, kun energiankulutusmittari ei enää ole kytkettynä pistorasiaan tai tarkastettava laite ei enää ole kytkettynä energiankulutusmittariin. Niin pian kuin uusi koe tehdään, vanha sähkövirta-arvo päivittyy. FI _Energiekostenmessgeraet_Content_GB-FI-SE-DE.indd :57
50 Käyttö Q Maksimaalinen sähkövirran voimakkuus j Paina niin kauan UP -painiketta 5, kunnes LC-näytön 1 ylempään kolmannekseen tulee max-symboli 20 ja ampeerisymboli 9. j LC-näyttö 1 näyttää nyt maksimaalisen tarvittavan sähkövirran ampeereissa (A), joka tähän mennessä mitattiin energiankulutusmittarilla. Huomautus: Voit palauttaa sähkövirran voimakkuuden vielä sitten muistiin, kun energiankulutusmittari ei ole enää pistorasiassa eikä mitattava sähkölaite enää ole kytkettynä energiankulutusmittariin. Huomautus: Maksimaalinen sähkövirran arvo pysyy niin kauan tallennettuna, kunnes korkeampi arvo mitataan. Vasta sitten vanha arvo päivittyy uudella. Q Energian kulutuksen mittaaminen j Paina niin kauan UP -painiketta 5, kunnes LC-näytön 1 ylempään kolmannekseen tulee watt-symboli 8. j LC-näytöstä 1 näet todellisen energiankulutuksen wateissa (W), jonka kuormitus tarvitsee. Huomautus: tehonkulutus voidaan laskea seuraavalla 52 FI 56861_Energiekostenmessgeraet_Content_GB-FI-SE-DE.indd :57
51 Käyttö kaavalla: teho = jännite x sähkövirran voimakkuus x tehokerroin. Q Maksimaalinen tehonkulutus j Paina niin kauan UP -painiketta 5, kunnes LC-näytön 1 ylempään kolmannekseen tulee max-symboli 20 ja ampeerisymboli 8. j LC-näyttö 1 näyttää tehonkulutuksen nyt wateissa (W), joka tähän mennessä mitattiin energiankulutusmittarilla. Huomautus: Voit palauttaa maksimaalisen tehonkulutuksen vielä sitten muistiin, kun energiankulutusmittari ei ole enää pistorasiassa eikä mitattava sähkölaite enää ole kytkettynä energiankulutusmittariin. Huomautus: Maksimaalinen tehonkulutus pysyy niin kauan muistissa, kunnes uusi korkeampi arvo mitataan. Vasta sitten vanhan mittausarvo päälle tallennetaan uusi arvo. Q Maksimiarvojen tyhjääminen j Valitse UP -painikkeella 5 jompikumpi maksimiarvo (katso Sähkövirran maksimivoimakkuus, Maksimi tehonkulutus ). FI _Energiekostenmessgeraet_Content_GB-FI-SE-DE.indd :57
52 Käyttö j Pidä SET -painiketta 2 alhaalla noin 3 sekuntia maksimiarvon nollaamiseksi. Q Ylikuormituksesta ilmoittavan varoitusarvon säätäminen Huomautus: Voit valita tässä tilassa kahden ylikuormitusvaroitusarvon välillä. Voit säätää ylikuormitus-varoitusarvon sähkövirralle (A) tai tehonkulutukselle (W). Huomautus: Tehonkulutuksen ylikuormituksen varoitusarvo (W) 8 on toimitettaessa säädetty standardinmukaisesti 0,0 watiksi. Menettele seuraavasti: 1. Paina niin kauan UP -painiketta 5, kunnes LC-näytön 1 ylempään kolmannekseen tulee ylikuormitussymboli 7 ( OVERLOAD ). 2. Paina nyt SET -painiketta 2. Ampeeri-symboli 9 alkaa vilkkua. 3. Paina UP - 5 tai DOWN -näppäintä 4 valitaksesi joko toiminnon tehonkulutus (W) 8 tai sähkövirran ylikuormituksesta varoittavan arvon (A) Paina SET -näppäintä 2. Ensimmäinen numero vilkkuu. 54 FI 56861_Energiekostenmessgeraet_Content_GB-FI-SE-DE.indd :57
53 Käyttö 5. Paina UP - 5 tai DOWN -näppäintä 4 säätääksesi halutun arvon. 6. Paina SET -näppäintä 2 päästäksesi seuraavaan numeroon. 7. Toista vaiheet 5. ja 6., kunnes saat säädettyä toivotun ylikuormituksesta ilmoittavan varoitusarvon. 8. Paina PRICE -näppäintä 3, sen jälkeen kun olet säätänyt arvon viimeiselle luvulle vahvistaaksesi syötön. Huomautus: Niin pian kuin mitattavassa sähkölaitteessa ylitetään annetut ylikuormituksen varoitusarvot, ylikuormitustunnus vilkkuu 7 ja varoitussignaali soi. Q Verkkojännitteen mittaaminen j Paina niin kauan DOWN -painiketta 4, kunnes LCnäytön 1 keskelle tulee voltti-symboli 10. Huomautus: Verkkojännitteen mittaaminen on energiankulutusmittarin perussäätö. Niin pian kuin nappiparistojen eristysviivat on poistettu, on energiankulutusmittari automaattisesti tässä tilassa. j LC-näytöstä 1 näkyy nyt todellinen verkkojännite voltteina (V). FI _Energiekostenmessgeraet_Content_GB-FI-SE-DE.indd :57
54 Käyttö Q Verkkotaajuuden mittaaminen j Paina niin kauan DOWN -painiketta 4, kunnes LCnäytön 1 keskelle tulee verkkotaajuussymboli 11 (Hz). j LC-näyttö 1 näyttää ajankohtaisen verkkotaajuuden hertseissä (Hz). Huomautus: Energiankulutusmittari näyttää verkkotaajuuden Hz:n alueella. Euroopassa käytetään yleisessä sähköverkossa 50 Hz:n taajuutta. Q Tehokertoimen muistiin palauttaminen j Paina niin kauan DOWN -painiketta 4, kunnes LC-näytön 1 keskelle tulee tehokerroinsymboli 18 ( Power-Factor ). j LC-näytössä 1 on nyt tehokerroin. Huomautus: Tehokerroin ilmoittaa, mikä on sähkölaitteen todellisen (pätötehon) ja teoreettisen (näennäistehon) tehonoton välinen suhde. Tehokerroin voi olla 0 ja 1 välillä. Ihanteellisessa tapauksessa tehokerroin on FI 56861_Energiekostenmessgeraet_Content_GB-FI-SE-DE.indd :57
55 Käyttö Q Sähkötariffin 1 ja 2 säätö Huomautus: Toimitettaesssa hinta / kwh on nollattu. Huomautus: Voit asettaa energiakustannusmittariin kaksi erilaista sähkötariffia (esim. päivä- ja yötariffin). Jotta tätä toimintoa voitaisiin käyttää, sähkötariffille 1 ja 2 on asetettava starttiajat. TÄRKEÄÄ! Sähkötariffi 1 on automaattisesti se sähkötariffi, joka ohjelmoitiin ensimmäisenä. Ohje! Aktuellin hinnan / kwh saat selville energiayritykseltä. Huomautus: Tarkista, että LC-näytön 1 ylemmässä kolmanneksessa on vakionäyttö (katso Sähkövirran voimakkuuden näyttö ). Menettele seuraavasti: 1. Paina niin kauan DOWN -painiketta 4, kunnes LC-näytön 1 keskelle tulee hintasymboli / kwh 19 ( PRICE KWh ) 2. Paina niin kauan UP -painiketta 5, kunnes LC-näytön 1 alempaan kolmannekseen tulee neljä numeroa. Lisäksi näyttöön tulee -symboli Paina nyt SET -painiketta 2. Ensimmäinen numero vilkkuu. 4. Paina UP - 5 tai DOWN -painiketta 4, kun haluat FI _Energiekostenmessgeraet_Content_GB-FI-SE-DE.indd :57
56 Käyttö ykköskohtaan pilkun edelle asettaa aktuellin hinnan / kwh euroina ( ) sähkötariffille 1. Esimerkki: 1, Paina SET -painiketta 2 päästäksesi seuraavaan numeroon. 6. Paina UP - 5 tai DOWN -painiketta 4, kun haluat ykköskohtaan pilkun edelle asettaa aktuellin hinnan / kwh eurosentteinä ( ) sähkötariffille 1. Esimerkki: 1, Paina SET -painiketta 2 päästäksesi seuraavaan numeroon. 8. Toista toiminto 6 voidaksesi asettaa arvon kymmen- ja ykköskohdalle. Esimerkki: 1, Paina SET -painiketta 2. LC-näytön 1 alaosassa vilkkuu ajannäyttö. 10. Paina UP -painiketta 5, kun haluat säätää sähkötariffin 1 käynnistysajan tunteina. 11. Paina DOWN -painiketta 4, kun haluat säätää sähkötariffin 1 käynnistysajan minuutteina. 12. Vahvista syöttö painamalla PRICE -painiketta 3. Energiakustannusmittari aloittaa asetettuna käynnistysaikana käytettyjen energiakustannusten mittauksen sähkötariffissa Paina PRICE -painiketta 3. LC-näytön 1 keskelle tulevat hinta / kwh-symboli 19 ( PRICE KWh ) ja näyttö 2. LC-näytön 1 alemmassa kolmanneksessa on 2. sähkötariffin 14 näyttö. 58 FI 56861_Energiekostenmessgeraet_Content_GB-FI-SE-DE.indd :57
57 Käyttö 14. Paina SET -painiketta 2. Ensimmäinen numero vilkkuu. 15. Paina UP - 5 tai DOWN -painiketta 4, kun haluat ykkösten kohtaan pilkun edelle asettaa aktuellin hinnan / kwh euroina ( ) sähkötariffille 2. Esimerkki: 1, Paina SET -painiketta 2 päästäksesi seuraavaan numeroon. 17. Paina UP - 5 tai DOWN -painiketta 4, kun haluat satojen kohtaan asettaa aktuellin hinnan / kwh eurosentteinä ( ) sähkötariffille 2. Esimerkki: 1, Paina SET -painiketta 2 päästäksesi seuraavaan numeroon. 19. Toista askel 17. voidaksesi asettaa kymmen- ja ykköskohdat. Esimerkki: 1, Paina SET -painiketta 2. LC-näytön 1 alemmassa kolmanneksessa vilkkuu ajannäyttö. 21. Paina UP -painiketta 5, kun haluat säätää sähkötariffin 2 käynnistysajan tunteina. 22. Paina DOWN -painiketta 4, kun haluat säätää sähkötariffin 2 käynnistysajan minuutteina. 23. Vahvista syöttö painamalla PRICE -painiketta 3. Energiakustannusmittari aloittaa asetettuna käynnistysaikana käytettyjen energiakustannusten mittauksen sähkötariffissa 2. Huomautus: Tässä säädetyt arvot vaikuttavat toimintoon Energiakustannusten näyttö. FI _Energiekostenmessgeraet_Content_GB-FI-SE-DE.indd :57
LYTH-CONS CONSISTENCY TRANSMITTER
 LYTH-CONS CONSISTENCY TRANSMITTER LYTH-INSTRUMENT OY has generate new consistency transmitter with blade-system to meet high technical requirements in Pulp&Paper industries. Insurmountable advantages are
Installation instruction PEM
 Installation instruction ASENNUSOHJE PEM1032 2010-02 SURGE ARRESTER SET FOR POLE MOUNT TRANSFORMER YLIJÄNNITESUOJASETTI PYLVÄSMUUNTAJALLE ENGLISH SUOMI 2/8 PEM1032 2010-02 ENGLISH GENERAL INFORMATION -
PAINEILMALETKUKELA-AUTOMAATTI AUTOMATIC AIR HOSE REEL
 MAV4 MAV5 MAV6 PAINEILMALETKUKELA-AUTOMAATTI AUTOMATIC AIR HOSE REEL Käyttöohje Instruction manual HUOMIO! Lue käyttöohjeet huolellisesti ennen laitteen käyttöä ja noudata kaikkia annettuja ohjeita. Säilytä
WINE COOLER TFW METOS TFW 160S, TFW 365-2S, TFW 375S MG ,
 WINE COOLER TFW METOS TFW 160S, TFW 365-2S, TFW 375S MG4116794, 4116798, 4116797 Instruction manual TWF 365-2S TWF 375S TWF 160S 01.09.2015 Table if Contents 1. Important safety instructions...3 2. Unpacking
INSTALLATION INSTRUCTION ASENNUSOHJE PEM SJTK31 SJTK46 ENGLISH SUOMI
 INSTALLATION INSTRUCTION ASENNUSOHJE PEM1256 2010-2 SJTK31 SJTK46 ENGLISH SUOMI GB GENERAL INFORMATION - Check that the kit is suitable for the cable type. - Check the materials listed in the bill of materials
Efficiency change over time
 Efficiency change over time Heikki Tikanmäki Optimointiopin seminaari 14.11.2007 Contents Introduction (11.1) Window analysis (11.2) Example, application, analysis Malmquist index (11.3) Dealing with panel
Rekisteröiminen - FAQ
 Rekisteröiminen - FAQ Miten Akun/laturin rekisteröiminen tehdään Akun/laturin rekisteröiminen tapahtuu samalla tavalla kuin nykyinen takuurekisteröityminen koneille. Nykyistä tietokantaa on muokattu niin,
1. SIT. The handler and dog stop with the dog sitting at heel. When the dog is sitting, the handler cues the dog to heel forward.
 START START SIT 1. SIT. The handler and dog stop with the dog sitting at heel. When the dog is sitting, the handler cues the dog to heel forward. This is a static exercise. SIT STAND 2. SIT STAND. The
Choose Finland-Helsinki Valitse Finland-Helsinki
 Write down the Temporary Application ID. If you do not manage to complete the form you can continue where you stopped with this ID no. Muista Temporary Application ID. Jos et onnistu täyttää lomake loppuun
National Building Code of Finland, Part D1, Building Water Supply and Sewerage Systems, Regulations and guidelines 2007
 National Building Code of Finland, Part D1, Building Water Supply and Sewerage Systems, Regulations and guidelines 2007 Chapter 2.4 Jukka Räisä 1 WATER PIPES PLACEMENT 2.4.1 Regulation Water pipe and its
Capacity Utilization
 Capacity Utilization Tim Schöneberg 28th November Agenda Introduction Fixed and variable input ressources Technical capacity utilization Price based capacity utilization measure Long run and short run
Installation instruction PEM
 Installation instruction ASENNUSOHJE PEM1031 2010-04 CURRENT LIMITING DEVICE FOR POLE MOUNT TRANSFORMER VIRTAA RAJOITTAVA SUOJA PYLVÄSMUUNTAJALLE ENGLISH SUOMI 75 2/8 PEM1031 2010-04 ENGLISH GENERAL INFORMATION
Öljytäytteinen sähköpatteri Electric Oil Radiator
 Öljytäytteinen sähköpatteri Electric Oil Radiator KÄYTTÖOHJE Alkuperäisten ohjeiden käännös INSTRUCTIONS MANUAL Original instructions MALLI/MODEL: Holly 1500: ERC2-1507 Holly 2000: ERC2-2009 DT Istr (ERC
anna minun kertoa let me tell you
 anna minun kertoa let me tell you anna minun kertoa I OSA 1. Anna minun kertoa sinulle mitä oli. Tiedän että osaan. Kykenen siihen. Teen nyt niin. Minulla on oikeus. Sanani voivat olla puutteellisia mutta
On instrument costs in decentralized macroeconomic decision making (Helsingin Kauppakorkeakoulun julkaisuja ; D-31)
") On instrument costs in decentralized macroeconomic decision making (Helsingin Kauppakorkeakoulun julkaisuja ; D-31) Juha Kahkonen Click here if your download doesn"t start automatically On instrument costs
On instrument costs in decentralized macroeconomic decision making (Helsingin Kauppakorkeakoulun julkaisuja ; D-31) Juha Kahkonen Click here if your download doesn"t start automatically On instrument costs
Information on preparing Presentation
 Information on preparing Presentation Seminar on big data management Lecturer: Spring 2017 20.1.2017 1 Agenda Hints and tips on giving a good presentation Watch two videos and discussion 22.1.2017 2 Goals
PSSA-8/PSSA-8UK OWNERS MANUAL
 PSSA-8/PSSA-8UK OWNERS MANUAL LED indicator Test Button Art. 36.3066 / Art. 8.40 GB Power Switch (PSSA-8 / PSSA-8UK) Identifying the parts LED indicator Test Button Getting Started Plug the Power Switch
66149_silv_Energiekosten-Messgerät_Content_GB-FI-SE-DE.indd 3 25.05.11 15:06
 A 1 6 5 2 3 4 3 66149_silv_Energiekosten-Messgerät_Content_GB-FI-SE-DE.indd 3 25.05.11 15:06 B 8 7 4 66149_silv_Energiekosten-Messgerät_Content_GB-FI-SE-DE.indd 4 25.05.11 15:06 Introduction Proper use...page
Solar Water Heater Kit. EcoStyle. 1 User Manual/Operating Instructions. Contents FREE LESSON PLANS AVAILABLE.
 EcoStyle 1 User Manual/Operating Instructions Contents 1 Contents 2 What s in the box? 3 Setting up the 4 Heating water 5 Measuring water temperature with the digital thermometer 6 Maximum/minimum temperature
Network to Get Work. Tehtäviä opiskelijoille Assignments for students. www.laurea.fi
 Network to Get Work Tehtäviä opiskelijoille Assignments for students www.laurea.fi Ohje henkilöstölle Instructions for Staff Seuraavassa on esitetty joukko tehtäviä, joista voit valita opiskelijaryhmällesi
Salasanan vaihto uuteen / How to change password
 Salasanan vaihto uuteen / How to change password Sisällys Salasanakäytäntö / Password policy... 2 Salasanan vaihto verkkosivulla / Change password on website... 3 Salasanan vaihto matkapuhelimella / Change
KONEISTUSKOKOONPANON TEKEMINEN NX10-YMPÄRISTÖSSÄ
 KONEISTUSKOKOONPANON TEKEMINEN NX10-YMPÄRISTÖSSÄ https://community.plm.automation.siemens.com/t5/tech-tips- Knowledge-Base-NX/How-to-simulate-any-G-code-file-in-NX- CAM/ta-p/3340 Koneistusympäristön määrittely
Box 1. Things you have/ Pakkaus sisältää. x 4 x 16 x 4 x 4. 300mm. 1700mm. 300mm 1. Things you should know / Sinun Tulee Tietää
 Phobos 30 Things you should know / Sinun Tulee Tietää Things you prepare / Näitä Tarvitset DURING INSTALLATION ALL PRODUCTS: use protective gloves at all times use eye protection at all times never install
1/4. Resetointi ja vianmääritys. 22.11.2013 ntr
 A400-64176 Sähköpöydät 1/4 Resetointi ja vianmääritys Pöydän resetointi tehdään aina ennen käyttöönottoa ja tarvittaessa häiriötilanteessa. Määritä pöydän tyyppi käyttökytkimen ja jalustan mukaan ja tee
Golfpallon etsijä asennusmanuaali
 Golfpallon etsijä asennusmanuaali Prazza takuu Kaikki Prazza tuotteet on suunniteltu ja valmistettu tiukkojen laatuvaatimusten mukaan, tuotteet ovat helppokäyttöisiä ja helppoja asentaa. Jos sinulla ilmenee
VAROITUKSET. Älä pura laitetta osiin.
 VAROITUKSET Laitteen väärinkäyttö voi johtaa henkilövahinkoihin. Noudata kaikkia tässä ohjekirjassa annettuja ohjeita ja käytä laitetta oikein. Älä koskaan seiso laitteen alapuolella. Älä pura laitetta
16. Allocation Models
 16. Allocation Models Juha Saloheimo 17.1.27 S steemianalsin Optimointiopin seminaari - Sks 27 Content Introduction Overall Efficienc with common prices and costs Cost Efficienc S steemianalsin Revenue
You can check above like this: Start->Control Panel->Programs->find if Microsoft Lync or Microsoft Lync Attendeed is listed
 Online Meeting Guest Online Meeting for Guest Participant Lync Attendee Installation Online kokous vierailevalle osallistujalle Lync Attendee Asennus www.ruukki.com Overview Before you can join to Ruukki
Lab SBS3.FARM_Hyper-V - Navigating a SharePoint site
 Lab SBS3.FARM_Hyper-V - Navigating a SharePoint site Note! Before starting download and install a fresh version of OfficeProfessionalPlus_x64_en-us. The instructions are in the beginning of the exercise.
OFFICE 365 OPISKELIJOILLE
 OFFICE 365 OPISKELIJOILLE Table of Contents Articles... 3 Ohjeet Office 365 käyttöönottoon... 4 One Driveen tallennetun videon palauttaminen oppimisympäristön palautuskansioon... 5 Changing default language
AKKREDITOITU TESTAUSLABORATORIO ACCREDITED TESTING LABORATORY VERKOTAN OY VERKOTAN LTD.
 T287/M03/2017 Liite 1 / Appendix 1 Sivu / Page 1(5) AKKREDITOITU TESTAUSLABORATORIO ACCREDITED TESTING LABORATORY VERKOTAN OY VERKOTAN LTD. Tunnus Code Laboratorio Laboratory Osoite Address www www T287
Owner s Manual GREE Electric Appliances,Inc.of zhuhai
 Ilmalämpöpumppu Split air conditioner wall mounted model Käyttäjän opas Owner s Manual GREE Electric Appliances,Inc.of zhuhai Ultra-thin GWHD09A3NK3DF KFR-25GW/NaA12FA GWHD12B2NK3AD KFR-32GW/NaA12FA Please
The CCR Model and Production Correspondence
 The CCR Model and Production Correspondence Tim Schöneberg The 19th of September Agenda Introduction Definitions Production Possiblity Set CCR Model and the Dual Problem Input excesses and output shortfalls
On instrument costs in decentralized macroeconomic decision making (Helsingin Kauppakorkeakoulun julkaisuja ; D-31)
") On instrument costs in decentralized macroeconomic decision making (Helsingin Kauppakorkeakoulun julkaisuja ; D-31) Juha Kahkonen Click here if your download doesn"t start automatically On instrument costs
On instrument costs in decentralized macroeconomic decision making (Helsingin Kauppakorkeakoulun julkaisuja ; D-31) Juha Kahkonen Click here if your download doesn"t start automatically On instrument costs
Returns to Scale II. S ysteemianalyysin. Laboratorio. Esitelmä 8 Timo Salminen. Teknillinen korkeakoulu
 Returns to Scale II Contents Most Productive Scale Size Further Considerations Relaxation of the Convexity Condition Useful Reminder Theorem 5.5 A DMU found to be efficient with a CCR model will also be
2017/S Contract notice. Supplies
 Supplies 153936 2017 25/04/2017 S80 - - Supplies - Contract notice - Open procedure I. II. III. IV. VI. -: Medical equipments, pharmaceuticals and personal care products 2017/S 080-153936 Contract notice
Forehead & Ear Thermometer
 PERSONAL CARE Forehead & Ear Thermometer Before reading, unfold both pages containing illustrations and familiarise yourself with all functions of the device. Käännä ennen lukemista molemmat kuvalliset
Calisto USB-kaiutinpuhelin. Käyttöopas
 Calisto 7200 USB-kaiutinpuhelin Käyttöopas Sisällysluettelo Yleiskatsaus 3 Connect to PC 4 Päivittäinen käyttö 5 Power 5 Äänenvoimakkuus 5 Mykistys / mykistyksen poisto 5 Puheluun vastaaminen tai puhelun
FinFamily PostgreSQL installation ( ) FinFamily PostgreSQL
 FinFamily PostgreSQL") FinFamily PostgreSQL 1 Sisällys / Contents FinFamily PostgreSQL... 1 1. Asenna PostgreSQL tietokanta / Install PostgreSQL database... 3 1.1. PostgreSQL tietokannasta / About the PostgreSQL database...
FinFamily PostgreSQL 1 Sisällys / Contents FinFamily PostgreSQL... 1 1. Asenna PostgreSQL tietokanta / Install PostgreSQL database... 3 1.1. PostgreSQL tietokannasta / About the PostgreSQL database...
Asennusopas. DEVIreg 531. Elektroninen termostaatti.
 Asennusopas DEVIreg 531 Elektroninen termostaatti www.devi.com Sisällysluettelo 1 Johdanto................. 3 1.1 Tekniset tiedot.......... 4 1.2 Turvaohjeet............ 5 2 Asennusohjeet.............
INSTALLATION INSTRUCTION ASENNUSOHJE PEM ENGLISH SUOMI INSULATION PIERCING CONNECTOR SLIW17.2 ERISTYKSEN LÄPÄISEVÄ LIITIN SLIW17.
 INSTALLATION INSTRUCTION ASENNUSOHJE PEM904 2011-08 ENGLISH SUOMI INSULATION PIERCING CONNECTOR SLIW17.2 ERISTYKSEN LÄPÄISEVÄ LIITIN SLIW17.2 2/8 SLIW17.2 PEM904 2011-08 GENERAL INFORMATION (ENG) - Check
Data protection template
 Data protection template Aihe: rekisteriseloste ja informointipohja Topic: information about the register and information to users (related to General Data Protection Regulation (GDPR) (EU) 2016/679) Mallina
Käyttöohje. USB Charger UCH20
 Käyttöohje USB Charger UCH20 Sisältö Johdanto... 3 USB Charger: Tietoja... 3 USB-laturin käyttäminen... 4 Laitteen akun lataaminen...4 Juridiset tiedot...5 Declaration of Conformity...6 2 Johdanto USB
WindPRO version joulu 2012 Printed/Page :47 / 1. SHADOW - Main Result
 SHADOW - Main Result Assumptions for shadow calculations Maximum distance for influence Calculate only when more than 20 % of sun is covered by the blade Please look in WTG table WindPRO version 2.8.579
INSTALLATION INSTRUCTION ASENNUSOHJE PEM1417 2012-11 ENGLISH SUOMI CURRENT LIMITING DEVICE VIRTAA RAJOITTAVA SUOJA SDI46.812 & SDI46.
 INSTALLATION INSTRUCTION ASENNUSOHJE PEM1417 2012-11 ENGLISH SUOMI CURRENT LIMITING DEVICE VIRTAA RAJOITTAVA SUOJA SDI46.812 & SDI46.824 2/8 SDI46.812 & SDI46.824 PEM1417 2012-11 ENGLISH GENERAL INFORMATION
107401959 G INSTRUCTIONS FOR USE BRUGSANVISNING BETRIEBSANLEITUNG VC300 SERIES USER MANUAL MODE D EMPLOI INSTRUCCIONES DE USO
 0740959 G INSTRUCTIONS FOR USE BRUGSANVISNING BETRIEBSANLEITUNG MODE D EMPLOI INSTRUCCIONES DE USO VC300 SERIES USER MANUAL - Basic operations. - Suction regulation 3 - Cordlock (HEPA) 3. 4 - Wind up the
Sisällysluettelo Table of contents
 Sisällysluettelo Table of contents OTC:n Moodlen käyttöohje suomeksi... 1 Kirjautuminen Moodleen... 2 Ensimmäinen kirjautuminen Moodleen... 2 Salasanan vaihto... 2 Oma käyttäjäprofiili... 3 Työskentely
TM ETRS-TM35FIN-ETRS89 WTG
 SHADOW - Main Result Assumptions for shadow calculations Maximum distance for influence Calculate only when more than 20 % of sun is covered by the blade Please look in WTG table WindPRO version 2.8.579
TM ETRS-TM35FIN-ETRS89 WTG
 SHADOW - Main Result Assumptions for shadow calculations Maximum distance for influence Calculate only when more than 20 % of sun is covered by the blade Please look in WTG table WindPRO version 2.8.579
CONVERSION KITS FOR FRAMES MR8 AND MR9 INSTALLATION INSTRUCTIONS
 CONVERSION KITS FOR FRAMES MR8 AND MR9 INSTALLATION INSTRUCTIONS MR8 AND MR9 CONVERSION KIT - INSTALLATION INSTRUCTION Document ID: DPD01787, Revision: A, Release date: 17.11.2015 1.1 MR8 kit contents
SAGA 150. Asennusohjeet. Mittaa oven korkeus. Piirrä seinään oven kiinni -päätyyn seinäkannattimen kohdalle vaakaviiva korkeudelle ovi + 75mm + 20 mm.
 SAGA 150 Asennusohjeet 500 1 2 Mittaa oven korkeus. Piirrä seinään oven kiinni -päätyyn seinäkannattimen kohdalle vaakaviiva korkeudelle ovi + 75mm + 20 mm. 3 Piirrä vesivaa an avulla viiva myös kiskon
Other approaches to restrict multipliers
 Other approaches to restrict multipliers Heikki Tikanmäki Optimointiopin seminaari 10.10.2007 Contents Short revision (6.2) Another Assurance Region Model (6.3) Cone-Ratio Method (6.4) An Application of
SpeechMike III sarjan sanelumikrofonien (mallit LFH3200 ja LFH3220) yhteensopivuus SpeechMagic Executive saneluohjelman kanssa
 yhteensopivuus SpeechMagic Executive saneluohjelman kanssa") SpeechMike III sarjan sanelumikrofonien (mallit LFH3200 ja LFH3220) yhteensopivuus SpeechMagic Executive saneluohjelman kanssa Jotta SpeechMike III sarjan sanelumikrofonia voidaan käyttää Executive saneluohjelmassa,
SpeechMike III sarjan sanelumikrofonien (mallit LFH3200 ja LFH3220) yhteensopivuus SpeechMagic Executive saneluohjelman kanssa Jotta SpeechMike III sarjan sanelumikrofonia voidaan käyttää Executive saneluohjelmassa,
Metsälamminkankaan tuulivoimapuiston osayleiskaava
 VAALAN KUNTA TUULISAIMAA OY Metsälamminkankaan tuulivoimapuiston osayleiskaava Liite 3. Varjostusmallinnus FCG SUUNNITTELU JA TEKNIIKKA OY 12.5.2015 P25370 SHADOW - Main Result Assumptions for shadow calculations
LUONNOS RT 80260 EN AGREEMENT ON BUILDING WORKS 1 THE PARTIES. May 1998 1 (10)
") RT 80260 EN May 1998 1 (10) AGREEMENT ON BUILDING WORKS This agreement template is based on the General Terms and Conditions of Building Contracts YSE 1998 RT 16-10660, LVI 03-10277, Ratu 417-7, KH X4-00241.
RT 80260 EN May 1998 1 (10) AGREEMENT ON BUILDING WORKS This agreement template is based on the General Terms and Conditions of Building Contracts YSE 1998 RT 16-10660, LVI 03-10277, Ratu 417-7, KH X4-00241.
1. Liikkuvat määreet
 1. Liikkuvat määreet Väitelauseen perussanajärjestys: SPOTPA (subj. + pred. + obj. + tapa + paikka + aika) Suora sanajärjestys = subjekti on ennen predikaattia tekijä tekeminen Alasääntö 1: Liikkuvat määreet
TUOTTEEN TEKNISET TIEDOT 250/ /700 P5
 250/120 277/700 P5 OPTOTRONIC Elektroninen liitäntälaite ledimoduuleille (vakiovirta) SSOVELLUSALUEET Katu- ja kaupunkivalaistus Teollisuus Sopii suojausluokan I valaisimiin TUOTE-EDUT Vahva ylijännitesuojaus:
Tynnyrivaara, OX2 Tuulivoimahanke. ( Layout 9 x N131 x HH145. Rakennukset Asuinrakennus Lomarakennus 9 x N131 x HH145 Varjostus 1 h/a 8 h/a 20 h/a
 , Tuulivoimahanke Layout 9 x N131 x HH145 Rakennukset Asuinrakennus Lomarakennus 9 x N131 x HH145 Varjostus 1 h/a 8 h/a 20 h/a 0 0,5 1 1,5 km 2 SHADOW - Main Result Assumptions for shadow calculations
Miksi Suomi on Suomi (Finnish Edition)
") Miksi Suomi on Suomi (Finnish Edition) Tommi Uschanov Click here if your download doesn"t start automatically Miksi Suomi on Suomi (Finnish Edition) Tommi Uschanov Miksi Suomi on Suomi (Finnish Edition)
Miksi Suomi on Suomi (Finnish Edition) Tommi Uschanov Click here if your download doesn"t start automatically Miksi Suomi on Suomi (Finnish Edition) Tommi Uschanov Miksi Suomi on Suomi (Finnish Edition)
Technische Daten Technical data Tekniset tiedot Hawker perfect plus
 Technische Daten Technical data Tekniset tiedot Hawker perfect plus PzS-Zellen Hawker perfect plus, mit Schraubverbindern, Abmessungen gemäß DIN/EN 60254-2 und IEC 254-2 Serie L PzS-cells Hawker perfect
TM ETRS-TM35FIN-ETRS89 WTG
 SHADOW - Main Result Assumptions for shadow calculations Maximum distance for influence Calculate only when more than 20 % of sun is covered by the blade Please look in WTG table WindPRO version 2.9.269
Recirkulering. El-tilslutning. Kontrolpanel. Dansk. Timerfunktion
 1 2 Dansk Recirkulering Luften renses ved hjælp at aktive kulfiltre hvorefter den returneres til rummet. Kulfiltre bestilles separat. El-tilslutning Emhætten skal tilsluttes 230 V i henhold til stærkstrømsreglementet.
On instrument costs in decentralized macroeconomic decision making (Helsingin Kauppakorkeakoulun julkaisuja ; D-31)
") On instrument costs in decentralized macroeconomic decision making (Helsingin Kauppakorkeakoulun julkaisuja ; D-31) Juha Kahkonen Click here if your download doesn"t start automatically On instrument costs
On instrument costs in decentralized macroeconomic decision making (Helsingin Kauppakorkeakoulun julkaisuja ; D-31) Juha Kahkonen Click here if your download doesn"t start automatically On instrument costs
WindPRO version joulu 2012 Printed/Page :42 / 1. SHADOW - Main Result
 SHADOW - Main Result Assumptions for shadow calculations Maximum distance for influence Calculate only when more than 20 % of sun is covered by the blade Please look in WTG table 13.6.2013 19:42 / 1 Minimum
( ( OX2 Perkkiö. Rakennuskanta. Varjostus. 9 x N131 x HH145
 OX2 9 x N131 x HH145 Rakennuskanta Asuinrakennus Lomarakennus Liike- tai julkinen rakennus Teollinen rakennus Kirkko tai kirkollinen rak. Muu rakennus Allas Varjostus 1 h/a 8 h/a 20 h/a 0 0,5 1 1,5 2 km
IEC IP V AC. VIZULO Stork Little Brother LED street luminaire / katuvalaisin. Mounting instruction Asennusohjeet. min 40 C.
 VIZULO Stork Little Brother LED street luminaire / katuvalaisin Mounting instruction Asennusohjeet 05 IEC EN 60598 IP66 min 40 C max + 45 C 198-264 V AC PH2 4 6 29/01/2016 SIA VIZULO Ganibu dambis 7a,
Uusi Ajatus Löytyy Luonnosta 4 (käsikirja) (Finnish Edition)
 (Finnish Edition)") Uusi Ajatus Löytyy Luonnosta 4 (käsikirja) (Finnish Edition) Esko Jalkanen Click here if your download doesn"t start automatically Uusi Ajatus Löytyy Luonnosta 4 (käsikirja) (Finnish Edition) Esko Jalkanen
Uusi Ajatus Löytyy Luonnosta 4 (käsikirja) (Finnish Edition) Esko Jalkanen Click here if your download doesn"t start automatically Uusi Ajatus Löytyy Luonnosta 4 (käsikirja) (Finnish Edition) Esko Jalkanen
TM ETRS-TM35FIN-ETRS89 WTG
 SHADOW - Main Result Assumptions for shadow calculations Maximum distance for influence Calculate only when more than 20 % of sun is covered by the blade Please look in WTG table 5.11.2013 16:44 / 1 Minimum
Gap-filling methods for CH 4 data
 Gap-filling methods for CH 4 data Sigrid Dengel University of Helsinki Outline - Ecosystems known for CH 4 emissions; - Why is gap-filling of CH 4 data not as easy and straight forward as CO 2 ; - Gap-filling
TW- WLAN 802.11ac SOVITTIMEN ASENNUSOHJE
 TW- WLAN 802.11ac SOVITTIMEN ASENNUSOHJE Copyright TeleWell Oy Tekniset tiedot: - - - - - - - Yhteensopiva IEEE 802.11b/g/n/ac - standardien kanssa Taajuusalueet 2.4 GHz ja 5 GHz Maksiminopeus: 300 Mbps
Tilausvahvistus. Anttolan Urheilijat HENNA-RIIKKA HAIKONEN KUMMANNIEMENTIE 5 B RAHULA. Anttolan Urheilijat
 7.80.4 Asiakasnumero: 3000359 KALLE MANNINEN KOVASTENLUODONTIE 46 51600 HAUKIVUORI Toimitusosoite: KUMMANNIEMENTIE 5 B 51720 RAHULA Viitteenne: Henna-Riikka Haikonen Viitteemme: Pyry Niemi +358400874498
Supplies
 Supplies - 239150-2018 05/06/2018 S105 - - Supplies - Contract notice - Open procedure I. II. III. IV. VI. Finland-Oulu: Medical equipments 2018/S 105-239150 Contract notice Supplies Directive 2014/24/EU
TM ETRS-TM35FIN-ETRS89 WTG
 SHADOW - Main Result Assumptions for shadow calculations Maximum distance for influence Calculate only when more than 20 % of sun is covered by the blade Please look in WTG table WindPRO version 2.8.579
S Sähkön jakelu ja markkinat S Electricity Distribution and Markets
 S-18.3153 Sähkön jakelu ja markkinat S-18.3154 Electricity Distribution and Markets Voltage Sag 1) Kolmivaiheinen vastukseton oikosulku tapahtuu 20 kv lähdöllä etäisyydellä 1 km, 3 km, 5 km, 8 km, 10 km
Secto Design Oy Kauppalantie 12 02700 Kauniainen Finland tel. +358 9 5050598 fax +358 9 5475 2535 info@sectodesign.fi www.sectodesign.
 Secto Design Oy Kauppalantie 12 02700 Kauniainen Finland tel. +358 9 5050598 fax +358 9 5475 2535 info@sectodesign.fi www.sectodesign.fi Secto 4200 pendant natural birch, black or white laminate, walnut
TW-LTE 4G/3G. USB-modeemi (USB 2.0)
") TW-LTE 4G/3G USB-modeemi (USB 2.0) Tiedonsiirtonopeus: 100 Mbps/50 Mbps LTE: 1800/2100/2600 MHz GSM/GPRS/EDGE: 850/900/1800/1900 MHz UMTS: 900/2100 MHz Pikaohje (Finnish) CE Käyttöönotto- ohje SIM- kortin
TW-LTE 4G/3G USB-modeemi (USB 2.0) Tiedonsiirtonopeus: 100 Mbps/50 Mbps LTE: 1800/2100/2600 MHz GSM/GPRS/EDGE: 850/900/1800/1900 MHz UMTS: 900/2100 MHz Pikaohje (Finnish) CE Käyttöönotto- ohje SIM- kortin
TM ETRS-TM35FIN-ETRS89 WTG
 VE1 SHADOW - Main Result Calculation: 8 x Nordex N131 x HH145m Assumptions for shadow calculations Maximum distance for influence Calculate only when more than 20 % of sun is covered by the blade Please
Hankintailmoitus: Pohjois-Savon sairaanhoitopiirin kuntayhtymä/kiinteistöyksikkö : Puijon sairaalan Pääaula-alueen uudistus, Sähköurakka
 Finland Tender Hankintailmoitus: Pohjois-Savon sairaanhoitopiirin kuntayhtymä/kiinteistöyksikkö : Puijon sairaalan Pääaula-alueen uudistus, Sähköurakka Tarjoukset 6.5.2011 klo 15.00 mennessä osoitteeseen:
IFAGG WORLD CUP I, CHALLENGE CUP I and GIRLS 12-14 OPEN INTERNATIONAL COMPETITION 1 st 2 nd April 2011, Vantaa Finland
 IFAGG WORLD CUP I, CHALLENGE CUP I and GIRLS 12-14 OPEN INTERNATIONAL COMPETITION 1 st 2 nd April 2011, Vantaa Finland Vantaa Gymnastics Club and Finnish Gymnastics Federation are very pleased to welcome
( ,5 1 1,5 2 km
 Tuulivoimala Rakennukset Asuinrakennus Liikerak. tai Julkinen rak. Lomarakennus Teollinen rakennus Kirkollinen rakennus Varjostus "real case" h/a 1 h/a 8 h/a 20 h/a 4 5 3 1 2 6 7 8 9 10 0 0,5 1 1,5 2 km
FinFamily Installation and importing data (11.1.2016) FinFamily Asennus / Installation
 FinFamily Asennus / Installation") FinFamily Asennus / Installation 1 Sisällys / Contents FinFamily Asennus / Installation... 1 1. Asennus ja tietojen tuonti / Installation and importing data... 4 1.1. Asenna Java / Install Java... 4 1.2.
FinFamily Asennus / Installation 1 Sisällys / Contents FinFamily Asennus / Installation... 1 1. Asennus ja tietojen tuonti / Installation and importing data... 4 1.1. Asenna Java / Install Java... 4 1.2.
TM ETRS-TM35FIN-ETRS89 WTG
 SHADOW - Main Result Assumptions for shadow calculations Maximum distance for influence Calculate only when more than 20 % of sun is covered by the blade Please look in WTG table WindPRO version 2.8.579
TM ETRS-TM35FIN-ETRS89 WTG
 SHADOW - Main Result Assumptions for shadow calculations Maximum distance for influence Calculate only when more than 20 % of sun is covered by the blade Please look in WTG table WindPRO version 2.8.579
,0 Yes ,0 120, ,8
 SHADOW - Main Result Calculation: Alue 2 ( x 9 x HH120) TuuliSaimaa kaavaluonnos Assumptions for shadow calculations Maximum distance for influence Calculate only when more than 20 % of sun is covered
Curriculum. Gym card
 A new school year Curriculum Fast Track Final Grading Gym card TET A new school year Work Ethic Detention Own work Organisation and independence Wilma TMU Support Services Well-Being CURRICULUM FAST TRACK
TIKIT a) Suorassa tikissä ristiommel jää nahan alle piiloon. b) Ristitikissä ommel jää näkyviin.
 Suorassa tikissä ristiommel jää nahan alle piiloon. b) Ristitikissä ommel jää näkyviin.") CML WHEEL COVER -RUORINAHKAN OMPELUOHJE Liota nahkoja lämpimässä vedessä n. 15 minuuttia ennen ompelua. Pidä nahka kosteana koko ompelun ajan esim. sumutepullolla. Pidä ommellessa kevyt kireys nahkaan,
CML WHEEL COVER -RUORINAHKAN OMPELUOHJE Liota nahkoja lämpimässä vedessä n. 15 minuuttia ennen ompelua. Pidä nahka kosteana koko ompelun ajan esim. sumutepullolla. Pidä ommellessa kevyt kireys nahkaan,
Suomen Aurinkolämpö Oy
 Suomen Aurinkolämpö Oy Verkkoon kytkettävät aurinkopaneelijärjestelmät Marko Harju 0505123254 Suomenaurinkolampo.fi Yritysesittely Kajaanilainen 2012 perustettu perheyritys Kilpailukykyisiä tuotteita,
Elektronisk rörelsevakt med PIR-sensor. Elektroninen liiketunnistin PIRtunnistimella. Electronic Motion Detector with PIR Sensor KÄYTTÖOHJE
 Direkt inkoppling / Suora kytkentä / Direct connection MJ-JZ/JA-140206 13 000 00 Bruksanvisning Elektronisk rörelsevakt med PIR-sensor KÄYTTÖOHJE Elektroninen liiketunnistin PIRtunnistimella Instruction
Tarua vai totta: sähkön vähittäismarkkina ei toimi? 11.2.2015 Satu Viljainen Professori, sähkömarkkinat
 Tarua vai totta: sähkön vähittäismarkkina ei toimi? 11.2.2015 Satu Viljainen Professori, sähkömarkkinat Esityksen sisältö: 1. EU:n energiapolitiikka on se, joka ei toimi 2. Mihin perustuu väite, etteivät
S-55.1100 SÄHKÖTEKNIIKKA JA ELEKTRONIIKKA
 S-55.00 SÄHKÖKNKKA A KONKKA. välikoe 2..2008. Saat vastata vain neljään tehtävään!. aske jännite U. = 4 Ω, 2 = Ω, = Ω, = 2, 2 =, = A, 2 = U 2 2 2 2. ännitelähde tuottaa hetkestä t = t < 0 alkaen kaksiportaisen
Käyttöohje CRL Ennen tämän tuotteen käyttöä lue tämä käyttöohje huolellisesti ja kokonaan.
 Käyttöohje Kelloradio CRL-330 www.denver-electronics.com Ennen tämän tuotteen käyttöä lue tämä käyttöohje huolellisesti ja kokonaan. Tuotetiedot EN FI Correctly set the stand in specially design for it
Tork Paperipyyhe. etu. tuotteen ominaisuudet. kuvaus. Väri: Valkoinen Malli: Vetopyyhe
 etu Monikäyttöpaperi hoitaa useimmat pyyhintätehtävät Sopiva lasipintojen pyyhintään Sopii käsien kuivaamiseen Elintarvikekäyttöön hyväksytty Tork Easy Handling, pakkaus, jota on helppo kantaa mukana,
Wi Fi PISTORASIA SWS-A1
 Wi Fi PISTORASIA SWS-A1 FI Wi Fi PISTORASIA SWS-A1 Toiminta ja turvallisuusmerkinnät GB Wifi Socket SWS-A1 Operation and Safety Notes IAN 103043 FI FI Ennen ohjeen lukemista taivuta kuvasivu auki ja tutustu
Ajettavat luokat: SM: S1 (25 aika-ajon nopeinta)
") SUPERMOTO SM 2013 OULU Lisämääräys ja ohje Oulun Moottorikerho ry ja Oulun Formula K-125ry toivottaa SuperMoto kuljettajat osallistumaan SuperMoto SM 2013 Oulu osakilpailuun. Kilpailu ajetaan karting radalla
SUPERMOTO SM 2013 OULU Lisämääräys ja ohje Oulun Moottorikerho ry ja Oulun Formula K-125ry toivottaa SuperMoto kuljettajat osallistumaan SuperMoto SM 2013 Oulu osakilpailuun. Kilpailu ajetaan karting radalla
Information on Finnish Courses Autumn Semester 2017 Jenni Laine & Päivi Paukku Centre for Language and Communication Studies
 Information on Finnish Courses Autumn Semester 2017 Jenni Laine & Päivi Paukku 24.8.2017 Centre for Language and Communication Studies Puhutko suomea? -Hei! -Hei hei! -Moi! -Moi moi! -Terve! -Terve terve!
Information on Finnish Language Courses Spring Semester 2018 Päivi Paukku & Jenni Laine Centre for Language and Communication Studies
 Information on Finnish Language Courses Spring Semester 2018 Päivi Paukku & Jenni Laine 4.1.2018 Centre for Language and Communication Studies Puhutko suomea? -Hei! -Hei hei! -Moi! -Moi moi! -Terve! -Terve
TM ETRS-TM35FIN-ETRS89 WTG
 SHADOW - Main Result Assumptions for shadow calculations Maximum distance for influence Calculate only when more than 20 % of sun is covered by the blade Please look in WTG table 22.12.2014 11:33 / 1 Minimum
TM ETRS-TM35FIN-ETRS89 WTG
 SHADOW - Main Result Calculation: N117 x 9 x HH141 Assumptions for shadow calculations Maximum distance for influence Calculate only when more than 20 % of sun is covered by the blade Please look in WTG
1.3 Lohkorakenne muodostetaan käyttämällä a) puolipistettä b) aaltosulkeita c) BEGIN ja END lausekkeita d) sisennystä
 puolipistettä b) aaltosulkeita c) BEGIN ja END lausekkeita d) sisennystä") OULUN YLIOPISTO Tietojenkäsittelytieteiden laitos Johdatus ohjelmointiin 811122P (5 op.) 12.12.2005 Ohjelmointikieli on Java. Tentissä saa olla materiaali mukana. Tenttitulokset julkaistaan aikaisintaan
OULUN YLIOPISTO Tietojenkäsittelytieteiden laitos Johdatus ohjelmointiin 811122P (5 op.) 12.12.2005 Ohjelmointikieli on Java. Tentissä saa olla materiaali mukana. Tenttitulokset julkaistaan aikaisintaan
Fitting instructions. Fitting set for joining all types of DEVI self limiting heating cables to heating cables Art. no. 19805779 SSTL nro 04 312 85
 GB/FI Fitting instructions Fitting set for joining all types of DEVI self limiting heating cables to heating cables Art. no. 19805779 SSTL nro 04 312 85 intelligent varme Contents: GB Connection kits 3