FKS 2200 B1. Electric Chainsaw Translation of original operation manual. Sähkökäyttöinen ketjusaha Alkuperäisen käyttöohjeen käännös
|
|
|
- Anna Jokinen
- 9 vuotta sitten
- Katselukertoja:
Transkriptio
1 FKS 2200 B1 Electric Chainsaw Translation of original operation manual Sähkökäyttöinen ketjusaha Alkuperäisen käyttöohjeen käännös Elektrisk kedjesåg Översättning av bruksanvisning i original Elektrisk kædesav Oversættelse af den originale driftsvejledning Elektro-Kettensäge Originalbetriebsanleitung

2 Before reading, unfold the page containing the illustrations and familiarise yourself with all functions of the device. Käännä ennen lukemista kuvallinen sivu esiin ja tutustu seuraavaksi laitteen kaikkiin toimintoihin. Vik ut bildsidan och ha den till hands när du läser igenom anvisningarna och gör dig bekant med apparatens/ maskinens funktioner. Før du læser, vend siden med billeder frem og bliv bekendt med alle apparatets funktioner. Klappen Sie vor dem Lesen die Seite mit den Abbildungen aus und machen Sie sich anschließend mit allen Funktionen des Gerätes vertraut. GB / IE Translation of original operation manual Page FI Alkuperäisen käyttöohjeen käännös Sivu SE Översättning av bruksanvisning i original Sidan DK Oversættelse af den originale driftsvejledning Side DE / AT / CH Originalbetriebsanleitung Seite

3 A B C D 8 3 E F

4 G H I J 25

5 K L M N O P 2 1 Q R S
6 GB IE Content Intended purpose...6 Notes on safety...6 Symbols used in the instructions...7 Symbols used on the saw...7 General notes on safety...8 General safety instructions for power tools...8 Causes and operator prevention of kickback...11 General description...12 Function description...12 Overview...12 Safety functions...12 Operation startup...13 Tensioning the saw chain...13 Chain lubrication...13 Operating the chainsaw...14 Switching on...14 Checking the chain brake...14 Checking the oil automatic system..15 Changing the saw bar...15 Fitting the saw chain...15 Sawing techniques...16 General...16 Bucking...16 Limbing...17 Felling trees...17 Maintenance and cleaning...19 Cleaning...19 Maintenance Interval Table...19 Maintenance intervals...20 Oiling the saw chain...20 Sharpening the saw chain...20 Adjusting the chain tension...21 Trouble shooting...22 Maintaining the chain bar...23 Starting up a new saw chain...23 Waste disposal and environmental protection...23 Guarantee...24 Spare parts...25 Technical Data CE Declaration of Conformity Exploded Drawing Grizzly Service-Center Before first using the machine, please read this instruction manual carefully, for your own safety and for the safety of others. Keep the manual in a safe place and pass it on to any subsequent owner to ensure that the information contained therein is available at all times. Failure to adhere to the safety instructions and directions may result in electric shock, fire, and/or serious injury. Intended purpose The electric chainsaw is constructed for sawing wood only. The saw is not designed for any other types of application (e.g. cutting of brickwork, plastic or food). The chainsaw is designed for employment in the do-it-yourselfer sector. It was not designed for continuous employment in the commercial sector. The device is designed for use by adults. Young people over 16 years old may use the chainsaw under supervision only. The manufacturer is not liable for damages, which were caused through use in applications for which it was not designed, or incorrect operation. Notes on safety This section deals with the basic safety regulations while working with the electric chainsaw. 6

7 GB IE An electric chainsaw is a dangerous device, which can cause serious or even fatal injuries with incorrect or careless use. Thus, for your own safety and the safety of others, you should always take note of the instructions on safety and, in case of difficulties, consult a specialist for advice. Symbols used in the instructions Hazard symbols with information on prevention of personal injury and property damage. Precaution symbol (explanation of precaution instead of exclamation mark) with information on prevention of harm / damage. Notice symbol with information on how to handle the device properly. Symbols used on the saw Make yourself familiar with all control elements before any work. Practice handling the saw and have explained the functions, operating methods and sawing techniques by a practiced user or specialist. 460 mm Wear personal protective equipment. Basically, wear protective goggles or, even better, face protection, ear protection, safety helmet, cut-protection working clothes, cut-protection gloves, and cut-protection safety boots with anti-slip soles. Caution! Spring-back - Be careful of spring-back of the machine during work. Do not expose the unit to rain. The device must not be wet, nor should it be operated in a moist environment. Caution! Remove the plug immediately from the plug socket in case of damage or cutting through of the mains cable Information of the acoustic power level L WA in db. Length of the chain bar Safety class II Machines do not belong with domestic waste. Read and take note of the operating manual belonging to the machine! 7
 with information on prevention of harm / damage. Notice symbol with information on how to handle the device properly.")
8 GB IE General notes on safety Before you do any work with the electric chainsaw, make yourself familiar with all operating parts. Practise using the saw (sawing logs on a sawhorse) and get an experienced user or a specialist to explain to you the function of the saw, the way of working, the techniques of sawing and the personal protection equipment. Read the safety instructions in order to avoid injuries and material damage. General safety instructions for power tools WARNING! Read all safety directions and instructions. Omissions in the compliance with safety directions and instructions can cause electrical shock, fire and/or severe injuries. Retain all safety directions and instructions for future use. The term Power Tools used in the safety instructions refers to mains-operated power tools (with power cord) and to battery-operated power tools (without power cord). Work area safety Keep work area clean and well lit. Cluttered or dark areas invite accidents. Do not operate power tools in explosive atmospheres, such as in the presence of flammable Iiquids, gases or dust. Power tools create sparks which may ignite the dust or fumes. Keep children and bystanders away while operating a power tool. Distractions can cause you to lose control. Electrical safety Power tool plugs must match the outlet. Never modify the plug in any way. Do not use any adapter plugs with earthed (grounded) power tools. Unmodified plugs and matching outlets will reduce risk of electric shock Avoid body contact with earthed or grounded surfaces, such as pipes, radiators, ranges and refrigerators. There is an increased risk of electric shock if your body is earthed or grounded. Do not expose power tools to rain or wet conditions. Water entering a power tool will increase the risk of electric shock. If the power cable for this equipment is damaged, it must be replaced by the manufacturer, a customer service agent of the same or a similarly qualified person in order to prevent hazards. Lay the extension cable in such a way that it will not be caught by branches or similar during sawing. Do not abuse the cord. Never use the cord for carrying, pulling or unplugging the power tool. Keep cord away from heat, oil, sharp edges or moving parts. Damaged or entan- 8

9 GB IE Do not force the power tool. Use the correct power tool for your application. The correct power tool will do the job better and safer at the rate for which it was designed. Do not use the power tool if the switch does not turn it on and off. Any power tool that cannot be controlled with the switch is dangerous and must be repaired. Disconnect the plug from the power source and/or the battery pack from the power tool before making any adjustments, changing accessories, or storing power tools. Such preventive safety measures reduce the risk of starting the power tool accidentaily. Store idle power tools out of the reach of children and do not allow persons unfamiliar with the power tool or these instructions to opergled cords increase the risk of electric shock. When operating a power tool outdoors, use an extension cord suitable for outdoor use. Use of a cord suitable for outdoor use reduces the risk of electric shock. If operating a power tool in a damp location is unavoidable, use a residual current device (RCD) protected supply. Use of an RCD reduces the risk of electric shock. Use a surge protector with a release current of 30 ma or less. Personal safety Stay alert, watch what you are doing and use common sense when operating a power tool. Do not use a power tool while you are tired or under the influence of drugs, alcohol or medication. A moment of inattention white operating power tools may result in serious personal injury. Use personal protective equipment. Always wear eye protection. Protective equipment such as dust mask, non-skid safety shoes, hard hat, or hearing protection used for appropria te conditions will reduce personal injuries. Prevent unintentional starting. Ensure the switch is in the off-position before connecting to power source and/or battery pack, picking up or carrying the tool. Carrying power tools with your finger on the switch or energising power tools that have the switch on invites accidents. Remove any adjusting key or wrench before turning the power tool on. A wrench or a key left at- tached to a rotating part of the power tool may result in personal injury. Do not overreach. Keep proper footing and balance at all times. This enables better control of the power tool in unexpected situations. Dress properly. Do not wear loose clothing or jewellery. Keep your hair, clothing and gloves away from moving parts. Loose clothes, jewellery or long hair can be caught in moving parts. If devices are provided for the connection of dust extraction and collection facilities, ensure these are connected and properly used. Use of dust collection can reduce dustrelated hazards. Power tool use and care 9

10 GB IE ate the power tool. Power tools are dangerous in the hands of untrained users. Maintain power tools. Check for misalignment or binding of moving parts, breakage of parts and any other condition that may affect the power tool s operation. If damaged, have the power tool repaired before use. Many accidents are caused by poorly maintained power tools. Keep cutting tools sharp and clean. Properly maintained cutting tools with sharp cutting edges are less Iikely to bind and are easier to control. Use the power tool, accessories and tool bits etc. in accordance with these instructions, taking into account the working conditions and the work to be performed. Use of the power tool for operations different from those intended could result in a hazardous situation. Service Have your power tool serviced by a qualified repair person using only identical replacement parts. This will ensure that the safety of the power tool is maintained. Chain saw safety warnings: Keep ail parts of the body away from the saw chain wh en the chain saw is operating. Before you start the chain saw, make sure the saw chain is not contacting anything. A moment of inattention white operating chain saws may cause entanglement of your clothing or body with the saw chain. Always hold the chain saw with your right hand on the rear handle and your left hand on the front handle. Holding the chain saw with a reversed hand configuration increases the risk of personal injury and should never be done. Wear safety glasses and hearing protection. Further protective equipment for head, hands, legs and feet is recommended. Adequate protective clothing will reduce personal injury by flying debris or accidentai contact with the saw chain. Do not operate a chain saw in a tree. Operation of a chain saw white up in a tree may result in personal in jury. Always keep proper footing and operate the chain saw only when standing on fixed, secure and level surface. Slippery or unstable surfaces such as ladders may cause a loss of balance or control of the chain saw. When cutting a Iimb that is under tension be alert for spring back. When the tension in the wood fibres is released the spring loaded Iimb may strike the operator and/or throw the chain saw out of control. Use extreme caution when cutting brush and saplings. The slender material may catch the saw chain and be whipped toward you or pull you off balance. Carry the chain saw by the front handle with the chain saw switched off and away from your body. When transporting or storing the chain saw always fit the guide bar cover. Proper handling of the chain saw will reduce the Iikelihood of accidentai contact with the moving saw chain. 10

11 GB IE Follow instructions for lubricating, chain tensioning and changing accessories. Improperly tensioned or lubricated chain may either break or increase the chance for kickback. Keep handles dry, clean, and free from oil and grease. Greasy, oily handles are slippery causing loss of control. Cut wood only. Do not use chain saw for purposes not intended. For example: do not use chain saw for cutting plastic, masonry or nonwood building materials. Use of the chain saw for operations different than intended could result in a hazardous situation Causes and operator prevention of kickback Fig. 1 Beware of kickback! Be careful of kickback of the machine during work. There is danger of injury here. You can avoid kickbacks by exercising caution and using a correct sawing technique. Kickback may occur when the nose or tip of the guide bar touches an object, or when the wood closes in and pinches the saw chain in the cut (cf. image 1/fig. B). Tip contact in some cases may cause a sudden reverse reaction, kicking the guide bar up and back towards the operator (cf. image 1/fig. A). Pinching the saw chain along the top of the guide bar may push the guide bar rapidly back towards the operator. Either of these reactions may cause you to lose control of the saw which could result in serious personal injury. Do not rely exclusively upon the safety devices built into your saw. As a chain saw user, you should take several steps to keep your cutting jobs free from accident or injury. Kickback is the result of tool misuse and/ or incorrect operating procedures or conditions and can be avoided by taking proper precautions as given below: Maintain a firm grip, with thumbs and fingers encircling the chain saw handles, with both hands on the saw and position your body and arm to allow you to resist kickback forces. Kickback forces can be controlled by the operator, if proper precautions are taken. Do not let go of the chain saw. Do not overreach and do not cut above shoulder height. This helps prevent unintended tip contact and enables better control of the chain saw in unexpected situations. Only use replacement bars and chains specified by the manufacturer. Incorrect replacement bars and chains may cause chain breakage and/or kickback. Follow the manufacturer s sharpening and maintenance instructions for the saw chain. Decreasing the depth gauge height can lead to increased kickback. 11

12 GB IE General description Safety functions Function description The chainsaw is driven by an electric motor. The circulating chain is led around a saw bar (guide rail) The tool is fitted with a rapid-action chaintensioning system and a fast-acting chain brake. An automatic oil dosing regulator ensures continuous chain lubrication. The chainsaw is equipped with various protection fittings for the protection of the user. Refer to the following descriptions for the function of control elements. Overview A 12 The diagrams can be found on the front old-out pages. 1 Rear handle 2 Oil filler cap 3 Chain brake handle, front hand guard 4 Chain bar 5 Saw chain 6 Nose sprocket 7 Bumper 8 Front handle 9 Electric motor 10 On/off switch 11 Safety lock 12 Chain catcher 13 Chain adjustment ring 14 Fastening bolt for sprocket chain wheel covering 15 Safety bolt 16 Sprocket chain wheel covering 17 Rear hand guard 18 Cable holder 19 Mains cable 20 Saw bar protection sheath A 1 Rear grip with hand guard (17) Protects the hand against branches and boughs in the case of springing away by the chain. 3 Chain braking lever/hand guard Control system, which stops the saw chain immediately in case of a spring-back; lever can also be activated manually; protects the left hand of the operator if it slides from the front grip. 5 Saw chain with small springback Helps you to catch spring-backs with specially developed control systems. 7 Metal stop claw Reinforces the stability when vertical cuts are carried out and facilitates sawing. 9 Electric motor Double insulated for safety reasons. 10 On-off switch with safety chain brake On releasing the On/Off switch, the device immediately switches off. 11 Switch-on block The switch-on block must be released for switching on the device. 12 Chain catcher Decreases the danger of injuries if the chain breaks or if it comes off.

13 GB IE Operation startup Always wear protective gloves when working with the chainsaw and employ only original parts. Pull out the power plug before doing any work on the chainsaw itself - injury hazard! The tool is completely assembled on delivery.before you start up the electric chainsaw, adjust the chain, fill up with chain oil and check the automatic lubrication and chain brake function. Tensioning the saw chain B 1. Ensure that the chain brake has been released, that is, that the chain brake lever is pulled up against the front grip (8). 2. Unscrew the fastening bolt (14). 3. To tighten the saw, turn the chain adjustment ring (13) clockwise. To loosen the tension, turn the chain adjustment ring anti-clockwise. 4. Tighten up the fastening bolt (14) again. With a new saw chain, you must readjust the chain tension after at least 5 cutting operations. With a correctly tensioned chain you get good cutting performance and a longer life. An incorrectly tensioned chain may break or spring off, leading to danger of injury. Test the electric saw before every start and the chain tension after every hour of sawing. The chain is correctly tensioned if it does not sag at the rail underside and can be rotated completely around with the gloved hand. When the saw chain is tensioned with 9 N (approx. 1 kg), the gap between the saw chain and the guide rail may not be more than 2 mm. Chain lubrication The rail and chain must never be without oil. If you operate the electric chainsaw with too little oil, the cutting performance and the lifetime of the saw chain is reduced, since the chain becomes blunt faster. You can identify a case of too little oil where smoke development or discoloration of the rail occurs. The power saw is equipped with an oil automatic system. As soon as the motor is speeded up, the oil also flows faster to the chain bar. Check the oil fill level and regularly top up with oil ( C 21). The oil tank holds 270 ml oil. Use Parkside bio-oil; this product contains additives that reduce wear and tear and does not damage the pump system. bio-oil is available from our Service-Center (see P. 109 for the address). 13
. 2. Unscrew the fastening bolt (14). 3.")
14 GB IE If you have no Grizzly bio-oil available, use chain lubrication oil with low adhesive additive content. C 1. Unscrew the oil fill cap (2) and fill up with chain oil. 2. Wipe off any spilled oil and close the cap again. Operating the chainsaw Switch on the chainsaw only when chain bar, saw chain and sprocket chain wheel covering are correctly assembled. Ensure the voltage of the mains connection agrees with the label on the device. Make sure you have a secure stance Note: The saw is a high-powered device, where a 13 A fuse generally suffices, provided that further current consumers with high service are not connected. However, if the premises installations are not implemented optimally and quick-acting protection fuses are built-in (e.g. B 16), the protection fuse will be activated due to the current peaks during switch-on. You should install time-delay fuses with the designation L, which can be bought in every hardware store. Fuses with the designation G are provided with even longer time delay, however they are not usually employed in households. Caution! Saw can oil up, see notes on Operation startup. Switching on D 1. Check before the start, whether sufficient chain oil is in the tank and, if necessary, refill with chain oil (see Chapter Operation Start). 2. Form a loop from the end of the extension cable and hang this into the tension relief (18) on the rear grip. 3. Connect the device to the mains voltage. Release the chain brake, where you shift the brake arm (3) back against the front grip (8). 4. Hold the electric chainsaw firmly with both hands, with the right hand on the rear grip and the left hand on the front handle. Thumb and finger must close securely over the handles. 5. For switching on, activate the switch-on block (11) with the right thumb and then press the On/Off switch (10), the electric power saw runs with highest speed. Release the switch-on block again. 6. The power saw switches off when you release the On/Off switch again. Switching for continuous running is not possible. Checking the chain brake The motor cannot be turned on if the chain brake has engaged. Do not employ the chain brake in order to start the chainsaw or to switch it off. 14

15 GB IE E 1. Release the chain brake by shifting the brake arm over against the front grip (8). 2. Place the electric chainsaw onto a solid, flat surface. It must not contact any objects. 3. Connect the device to the mains voltage. 4. Hold the electric chainsaw firmly with both hands, with the right hand on the rear grip and the left hand on the front handle. Thumb and finger must close securely over the handles. 5. Turn on the electric chainsaw. 6. Activate the chain braking lever (3), with running motor, with the left hand. Chain should stop abruptly. 7. Once the chain brake is working properly, release the on/off switch and the chain brake. If the chain brake does not function correctly, you must not use the electric chainsaw. A slack saw chain leads to danger of injury. Return the electric chainsaw to our Service-Center for repair (see P. 109 for our address). If an oil trace can be seen, the chainsaw is working trouble-free. J 4. Clean the oil passages of the chain bar ( J 26), in order to guarantee a trouble-free, automatic oiling of the saw chain during operation. Changing the saw bar F 1. Switch the saw off and unplug it from the mains. 2. Lay the saw on a flat surface. 3. Loosen the safety bolt (15) underneath the tensioning unit. Turn the fastening bolt (14) anticlockwise to remove the sprocket chain wheel covering (16). 4. Remove the saw bar and saw chain. To remove the guide bar (4), raise it to an angle of approx. 45 degrees. This will make it easier to take the saw chain (5) off the sprocket (23). 5. To fit the new bar, place the bar onto the bar bolt with the tensioning plate pointing outwards (23). Fitting the saw chain Checking the oil automatic system Check the oil level and the oil automatic system before commencement of work. Switch on the chainsaw and hold it above a bright background. The saw must not touch the ground. G 1. Switch the saw off and unplug it from the mains. 2. Spread the chain (5) out into a loop with the cutting edges running clockwise. 15

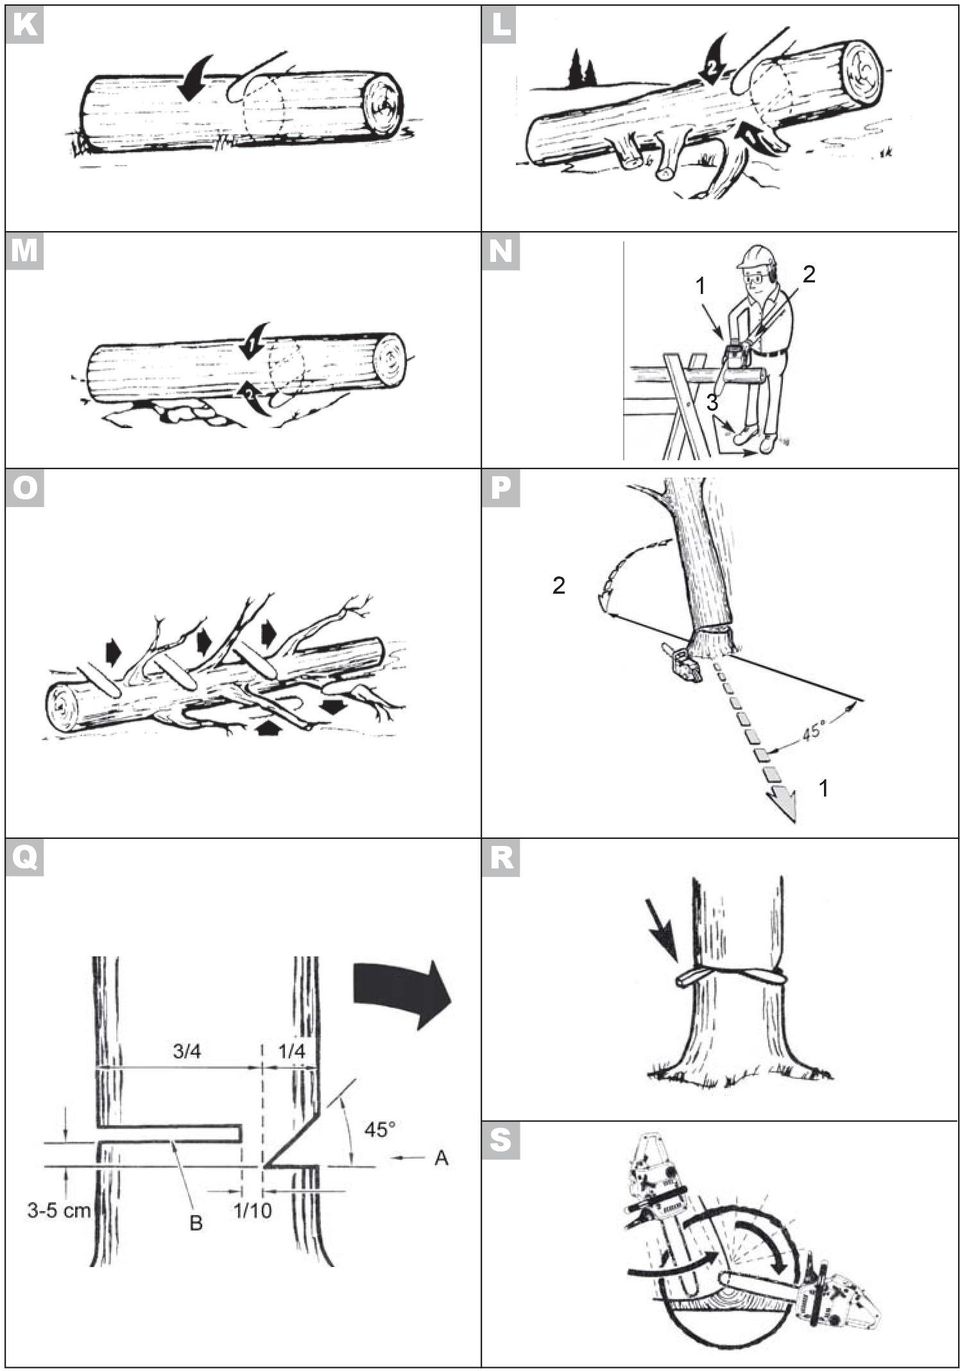
16 GB IE 3. Slide the saw chain (5) into the bar guide groove. To mount the guide bar (4), raise it to an angle of approx. 45 degrees. This will make it easier to replace the saw chain (5) onto the sprocket (23). It is normal that the saw chain (5) is slack. Sagging in the chain is normal. 4. Pre-tighten the chain (5) by turning the tensioning plate (23) clockwise. 5. Position the sprocket chain wheel covering (16). First place the tab (25)on the cover into the corresponding notch on the plate (16). Only lightly tighten the fastening bolt (14), as you will still have to tension the saw. Bucking If the saw chain jams, you do not attempt to pull out the electric chainsaw using power. There is a danger of injury here. Switch off the motor and use a lever or wedge to free the electric chainsaw. This refers to sawing up a felled tree trunk into smaller sections. Ensure that the saw chain does not come in contact with the ground during sawing. Make sure you have a secure stance and, in the case of sloping ground, stand above the log. Refer to the start-up section on how to tension the saw chain. Sawing techniques General You have better control when you saw with the bottom side of the chain bar (with pulling saw chain) and not to with the top side of the chain bar (with pushing saw chain). The saw chain must not contact either the ground or another object during sawing through or after sawing completion. Make sure that the saw chain does not become jammed in the wood. Do not let the tree trunk break or split off. Consider also the precautions against spring-back (see notes on safety). K L 1. Log is lying on the ground: Saw through the log completely from above and ensure at the end of the cut not to contact the ground. If you can turn the tree trunk, saw two-thirds of the way through it. Then turn the trunk around and saw the rest of the way through from above. 2. Log is supported at one end: Start sawing from the bottom and work your way up (with the upper edge of the bar) a third of the way into the diameter of the trunk to prevent splitting. Then saw from the top downwards with the lower edge of the bar towards the first cut to prevent the bar from becoming jammed in the wood. 16
on the cover into the corresponding notch on the plate (16). Only lightly tighten the fastening bolt (14), as you will still have to tension the saw.")
17 GB IE M N O 3. Log is supported at both ends: Start from the top and work down (with the lower edge of the bar) to a third of the diameter of the trunk. Then saw from underneath with the upper edge of the bar until the two cuts meet. 4. Sawing on a sawhorse: Hold the electric chainsaw steady with both hands, keeping the saw in front of you while sawing. Once the saw is through the wood, guide the machine passed you on the right (1). Hold your left arm as straight as you can (2). Watch out for the falling trunk. Position yourself to prevent any danger from the separated trunk. Watch your feet. The trunk may cause injuries when falling. Keep your balance (3). Limbing Limbing is the designation for the sawing off of branches and boughs from a felled tree. Many accidents occur during the removal of branches. Never cut tree limbs when you are standing on the log. Keep the spring-back area in mind if branches are under tension. Do not remove support branches until after the sawing off. Branches under tension must be sawed from below to above, in order to prevent jamming of the chainsaw. When working on thicker branches, use the same technique as when you are sawing up a felled trunk. Work to the left of the log and as near as possible to the electric chainsaw. As far as possible, the weight of the saw should rest on the log. Change position to saw off branches on the other side of the trunk. Branches sticking out are cut off separately. Felling trees A lot of experience is necessary in felling trees. Cut down trees only when you can safely handle the electric chainsaw. In no case should you use the electric chainsaw if you feel unsure about anything. Ensure that no people or animals are in the field of action. The safety distance between the tree to be felled and the nearest-located workplace must be 2 ½ tree lengths. Note the felling direction: The user must be able to move safely near the felled tree, to saw off the tree easily and remove branches.it is to be avoided that the felled tree snags itself on another tree. Note the natural felling direction, which is dependent on the slope and curvature characteristic of the tree, wind direction and the number of branches. In the case of sloping ground, stand above the tree to be felled. Small trees, with a diameter of cm, can usually be sawn off with one cut. In case of trees with a larger diameter, a notched cut and a back cut must be implemented (see below). 17
. Watch out for the falling trunk. Position yourself to prevent any danger from the separated trunk. Watch your feet.")
18 GB IE O P Q Do not fell any trees when a strong or changing wind is blowing, if the danger of property damage exists or if the tree could fall on electric wires. Immediately after termination of the sawing procedure, remove the ear protection so that you can hear hooter and alarm signals. 1. Removal of branches: Remove hanging branches by positioning the cut from above the branch. With removal of branches, never work higher than shoulder level. 2. Escape area: Remove the undergrowth around the tree to ensure an easy escape. The escape area (1) should be around 45 either side behind the planned felling direction (2). 3. Cutting notch (A): Make a felling notch in the direction in which you wish the tree to fall. Start with an upper sawing cut. Now make a sawcut below, which runs horizontally and encounters the upper sawcut exactly. The depth of cut of the notch should be approx. ¼ of the trunk diameter and the cutting angle at least 45. Never step in front of a tree which is notched. Q R S 4. Felling back cut (B): Make the back cut from the other side of the log, where you stand to the left of the log and saw with the chainsaw pulling. The back cut must run horizontally about 3-5 cm above the horizontal notched cut. The back cut should be so deep that the separation distance between the back cut and the notch cutting line is at least 1/10 of the trunk diameter. The part of the log not sawed through is designated as a break dimension. Insert a felling wedge or a crowbar into the back cut, as soon as the depth of cut permits this, in order to prevent a jamming of the chain bar. 5. If the trunk diameter is larger than the length of the chain bar, make two cuts. For safety reasons, we advise inexperienced users not to fell any logs with a rail length which is smaller than the trunk diameter. 6. After carrying out of the back cut, the tree falls by itself or with the aid of the felling wedge or crowbar. As soon as the tree begins to fall, pull out the saw from the section, stop the motor, place the electric chainsaw down and leave the workplace using the withdrawal path. 18
 should be around 45 either side behind the planned felling direction (2). 3.")
19 GB IE Maintenance and cleaning Basically, carry out maintenance and cleaning works with switched-off motor and power plug removed. Danger of injury! Leave any maintenance and servicing work not covered by this manual to our Service-Center (see P. 109 for the address). Use only original spare parts. Allow the machine to cool down before all maintenance and cleaning works. Danger of burn injuries! Cleaning Clean the machine thoroughly after every use. In this way, you extend the life of the machine and avoid accidents. Keep the gripping handles free of gas, oil or grease. Clean the gripping handles, where appropriate, with a moist cloth soaked in soap. Use no solvents or gas for cleaning! Clean the saw chain after every use. Use a paint brush or whisk for that. Do not use any liquids to clean the chain. After cleaning, oil the chain lightly with chain oil. Clean the ventilation slots and the surfaces of the machine with a paint brush, whisk or dry cloth. Do not use any liquids for cleaning. Maintenance Interval Table Machine part Action Before every use Components of the chain brake Check, replace if required After 10 hours of operation Sprocket chain wheel Check, replace if required Saw chain (5) Check oil, regrind or replace if required Check, turn round, clean and oil Guide bar (4) 19

20 GB IE Maintenance intervals Regularly carry out the maintenance operations listed in the following table. The life of the saw is extended by regular maintenance of your chainsaw. Furthermore, you get optimum cutting performance and avoid accidents. Oiling the saw chain Clean and oil the chain regularly. In this way, you keep the chain sharp and get optimum machine performance. In case of damage due to inadequate maintenance of the saw chain, the guarantee claim is invalid. Remove the power plug and use cut-protection gloves when you are handling the chain or the chain bar. Oil the chain after cleaning, after 10 hours of use or at least once weekly, depending on which comes first. Before oiling, the chain bar must be cleaned thoroughly, in particular the teeth of the rail. Use a whisk and a dry cloth for that. Oil the individual chain links with the aid of an oil suction gun with pinpoint tip (available in the specialist trade). Place individual oil drops onto the articulated links and onto the tooth tips of the individual chain links. Sharpening the saw chain An incorrectly sharpened saw chain increases the danger of spring-back! Use cut-protection gloves when you are handling the chain or the chain bar. A sharp chain guarantees an optimal cutting performance. It eats effortlessly through the wood and leaves large, long wooden chips. A saw chain is blunt if you have to press the cutting equipment through the wood and the wooden chips are very small. In the case of a very blunt saw chain, no chip cuttings result at all, only sawdust. The sawing parts of the chain are the cutting elements, which consist of a cutting tooth and a depth limiting projection. The vertical separation distance between these two determines the sharpness depth. The following values must be noted in sharpening the cutting teeth: H - Sharp edge angle (30 ) - Breast angle (85 ) - Sharpness depth (0.65 mm) - Round file diameter (4.0 mm) 20

21 GB IE Deviations from the measurement data of the cutting geometry can lead to an increase of the spring-back slope of the machine. Increased danger of accident! Special tools are necessary for sharpening the chain, which guarantee that the cutting edges are sharpened at the correct angle and to the correct depth. For the inexperienced user of chainsaws, we recommend to have the saw chain sharpened by a specialist or a specialist workshop. If you think yourself capable of sharpening the chain, you can acquire the special tools in the specialist trade. I 1. Switch the saw off and unplug it from the mains. 2. Remove the saw chain (refer to the section on operating the saw). The chain should be well-tensioned to ensure proper sharpening. 3. For the sharpening, a round file with 4.0 mm diameter is necessary. Other diameters damage the chain and can lead to danger during work! 6. The chain is worn and must be replaced by a new saw chain if only approx. 4 mm of the cutting teeth is remaining. 7. After the sharpening, all cutting elements must now be equal in length and width. 8. After every third sharpening, the sharpness depth (depth limitation) must be checked and the height filed with the aid of a flat file. The depth limitation should be set back about 0.65 mm from the cutting tooth. After the setting back of depth limitation, round it off a little at the front. Adjusting the chain tension The adjustment of the chain tension is described in the chapter: Starting operation, tensioning chainsaw. Switch off the saw and pull out the power plug. Check the chain tension regularly and re-adjust this as often as possible, so that the chain fits closely to the rail, however is still slack enough to be pulled with the hand. 4. Sharpen only from the inside to the outside. Guide the file from the inner side of the cutting teeth to the outer side. Lift the file when you are withdrawing it. 5. Sharpen first the teeth on one side. Turn the saw around and sharpen the teeth of the other side. 21
22 GB IE Trouble shooting Problem Possible cause Fault correction Device does not start Chain does not rotate Inferior cutting performance Saw runs with difficulty, chain comes off Mains voltage defective House protection fuse activated Defective On/Off switch (10) Worn carbon brushes Defective motor Chain brake blocks saw chain (5) Incorrectly mounted saw chain (5) Saw chain (5) blunt Chain tension insufficient Chain tension insufficient Check plug socket, cable, line and plug, where appropriate, repair by electrical specialist. Check house protection fuse, see note Repair by customer service Repair by customer service Repair by customer service Check chain brake. Possibly release chain brake Mount saw chain correctly Sharpen cutting teeth or place on new chain Check chain tension Check chain tension Chain becomes hot, smoke development during sawing, discoloration of the rail Too little chain oil Check oil level and, where appropriate, refill with chain oil, check oil automatic system and, where appropriate, clean oil outflow duct or have repaired by customer service 22
23 GB IE Maintaining the chain bar Use cut-protection gloves when handling the chain or the chain bar. The chain bar must be turned round every 10 working hours, in order to guarantee uniform wear. To ensure consistent wear on either side, the bar (4) should be turned over every about 10 hours of operation. Turning over the bar (4) requires you to move the tensioning screw (22) to the other side of the bar. Unscrew the retaining bolt attaching the bar (4) to the tensioning screw (22). Move the tensioning screw (22) over to the other side of the bar and screw the retaining bolt back in. 1. Switch off the saw and pull out the power plug. 2. Remove the sprocket chain wheel covering, the saw chain and the chain bar. 3. Check the chain bar for wear. Remove burrs and straighten the guide surfaces with a flat file. 4. Clean the oil passages of the chain bar ( J 26), in order to guarantee a trouble-free, automatic oiling of the saw chain during operation. 5. Mount chain bar, chainsaw and sprocket chain wheel covering and tighten the chainsaw. Turning over the bar (4) requires you to move the tensioning screw (22) to the other side of the bar. Unscrew the retaining bolt attaching the bar (4) to the tensioning screw (22). Move the tensioning screw (22) over to the other side of the bar and screw the retaining bolt back in. With the oil nozzles in good condition and the oil regulator set correctly, the saw chain will spray a little oil off after starting. Starting up a new saw chain In the case of a new chain, the tensioning force decreases after some time. Therefore you must re-tension the chain after the first 5 cuts and at longer intervals after this. Never attach a new chain to a worn drive pinion or place onto a damaged or worn chain bar. The chain could spring back or break, potentially leading to serious injury. Waste disposal and environmental protection Do not dispose of used oil in the sewage system or drains. Dispose of used oil in an environmentally correct manner - bring it to a waste disposal center. Be environmentally friendly. Return the tool, accessories and packaging to a recycling centre when you have finished with them. Machines do not belong with domestic waste. Empty the oil tank carefully and hand in your electric chainsaw at a disposal center. The plastic and metal parts employed can be separated out and thus recycled use can be implemented. Ask our Service- Center for details (see P. 109 for the address). 23
24 GB IE Guarantee This unit has a guarantee period of 36 months, or 12 months for units used on a commercial basis or for replacement units according to the statutory regulations. Damages, which can be attributed to natural wear, overloading or inappropriate use, are excluded from the guarantee. Certain component parts are subject to a normal wear and are excluded from the guarantee. In particular, these include: Saw chain, chain bar, sprocket chain wheel and carbon brushes, provided that the complaints cannot be attributed to flaws in the materials themselves. Also, all damage to the machine, the saw chain and the chain bar, which can be attributed to inadequate lubrication, are excluded from the guarantee. Furthermore, a condition of the guarantee services is that the maintenance intervals, indicated in the operating instruction, have been adhered to and the instructions on the cleaning, care and maintenance have been followed. Damages, which originate due to material or manufacturer faults, will be repaired free of charge by replacement delivery or repair. This is conditional on the saw being returned to the dealer complete with purchase receipt and proof of guarantee. Unqualified attempts at repairing the unit or dismantling/opening the motor casing result in loss of guarantee. This is conditional upon the device being returned in one piece complete with proof of purchase and guarantee to our service centre (see address on p. 109). Our Service-Center will also carry out any non-guarantee repair work for a charge. We will be happy to give you a quote. We will only work on units that have been sent in with the appropriate packaging, postage paid. You can avoid paying extra for bulk postage or increased shipping costs by dismantling the bar and chain, and packing them together with the motor block in the rear part of the original box. Cut off the thinner front part, making sure that the box keeps its rectangular form, and carefully seal up the box on this side. The sender carries the costs of postage and packing. Caution: Please, in no case, send defective devices with filled oil tank. Completely empty the tank. Possible material damages (oil runs out if device is placed on its side or upside down!) and/or fire damages during transport are borne at the expense of the sender. Devices sent in with freight collect - by bulk freight, express or with other special freight - are not accepted. If you have a justified guarantee claim, please contact our service centre by telephone, which will then advise you on how the claim will be processed. We will dispose of tools free of charge. 24
25 GB IE Spare parts The following spares are available from Grizzly Service-Center (see P. 109 for the address). Please indicate the machine type and the number of the spare part with your order. Saw chain Chain bar Bio chain oil 1 liter Bio chain oil 5 liter If further spare parts should be necessary, please find the part number on the exploded drawings. Technical Data Electrical chainsaw...fks 2200 B1 Rated input voltage...230v~, 50 Hz Input power W Safety class... / II Chain speed...13,6 m/s Weight (without guide rail and chain)...4,7 kg Weight (with guide rail and chain)... 5,9 kg Oiltank ml Chain...91P Oregon 3/8 LoPro Chrome cutting teeth, low-kickback Chain bar. Oregon Typ OE, 160 SDEA041 Chain link separation...10 mm Chain width...1,3 mm Teeth of the sprocket chain wheel...7 Length of the chain bar mm Sawing length mm Acoustic pressure level (LpA)...96 db (A); KpA=3,0 db (A) sound power level (LWA) db (A); KWA=3,0 db (A) Guaranteed sound power level db (A) Vibration (an)...6,97 m/s 2 ; K=1,5 m/s 2 The stated vibration emission value was measured in accordance with a standard testing procedure and may be used to compare one power tool to another. The stated vibration emission value may also be used for a preliminary exposure assessment. Warning: The vibration emission value may differ during actual use of the power tool from the stated value depending on the manner in which the power tool is used. Safety precautions aimed at protecting the user should be based on estimated exposure under actual usage conditions (all parts of the operating cycle are to be considered, including, for example, times during which the power tool is turned off and times when the tool is turned on but is running idle). Noise and vibration values were determined according to the standards and stipulations mentioned in the declaration of conformity. Technical and optical changes can be carried out in the course of further development without notice. All dimensions, references and information of this instruction manual are therefore without guarantee. Legal claims, which are made on the basis of the instruction manual, cannot thus be considered as valid. 25
26 FI Sisältö Käyttötarkoitus Turvallisuusohjeet Ohjeessa käytety symbolit Turvallisuusohjeet/sahassa olevat symbolit...27 Yleisiä turvallisuusohjeita Takaiskua estävät toimenpiteet Yleinen kuvaus Toimintakuvaus Yleiskatsaus Turvatoiminnot Käyttöönotto Teräketjun kiristys Ketjun voitelu Ketjusahan käyttö Käynnistys Ketjujarrun tarkistus Öljyautomatiikan tarkistus Laipan vaihto Aseta ketju paikoilleen Sahaustekniikat Yleistä Katkominen Karsinta Puiden kaato Huolto ja puhdistus Taulukko huoltovälit...38 Puhdistus Huoltovälit...38 Teräketjun rasvaus...38 Teräketjun teroitus...39 Ketjunkireyden säätö...39 Uuden ketjun asettaminen paikalleen...40 Laipan huolto...40 Jätehuolto ja ympäristösuoja...40 Takuu...41 Varaosat...42 Tekniset tiedot...42 Virheiden etsintä...43 CE standardinmukaisuustodistus Räjähdyspiirustus Grizzly Service-Center Lue käyttöohje huolellisesti ennen laitteen ensimmäistä käyttöönottoa. Talleta ohje hyvin ja anna se aina seuraavaksi tulevalle käyttäjälle, jotta tiedot ovat aina käytettävissä. Turvallisuusohjeiden ja sääntöjen noudattamattomuus voi aiheuttaa sähköiskun, palon ja/tai vaikeita tapaturmia. Käyttötarkoitus Sähkökäyttöinen ketjusaha on kehitetty kaikenlaisen puun sahaukseen. Sahaa ei ole tarkoitettu mihinkään muuhun käyttöön (esim. muurin/kiven, muovin tai elintarvikkeiden sahaukseen). Ketjusaha on tarkoitettu kotikäyttöön. Sitä ei ole tarkoitettu jatkuvaan ammattikäyttöön. Laitetta saa käyttää vain aikuiset. Yli 16-vuotiaat nuoret saavat käyttää konetta vain valvonnan alla. Valmistaja ei vastaa vahingoista, jotka aiheutuvat määräysten vastaisesta tai väärästä käytöstä. Turvallisuusohjeet Tämä kappale koskee ketjusahalla työskenneltäessä periaatteellisesti noudatettavia turvallisuusmääräyksiä. Sähkökäyttöinen ketjusaha on vaarallinen laite, joka väärin tai huolimattomasti käytettynä voi aiheuttaa vaarallisia tai jopa kuolemaan johtavia tapaturmia. Harjoittele käyttä- 26
27 FI mään sahaa (katkaise sahapukissa oleva pyöröpuu) ja anna kokeneen käyttäjän tai ammattimiehen antaa neuvoja toiminnasta, vaikutuksesta, sahaustekniikasta ja henkilökohtaisten turvavarusteiden käytöstä. Ohjeessa käytety symbolit Henkilö- ja esinevahinkojen estämiseksi käytetyt varoitusemerkit. Kieltomerkki (huutomerkin sijasta kiellot selitetään) ja vahinkojen estämistiedot. Ohjemerkki, joiden avuin konetta voidaan käyttää paremmin. Turvallisuusohjeet/sahassa olevat symbolit Ota ennen töiden aloittamista selvää kaikista käyttöelementeistä. Harjoittele käyttämään sahaa ja anna kokeneen ammattimiehen selvittää sinulle toiminta, käyttötarkoitus ja sahaustekniikka. Lue ja noudata koneeseen kuuluvaa käyttöohjetta! Käytä henkilökohtaisia turvavarusteita. Käytä periaatteessa suojalaseja tai mieluummin visiiriä, kuulosuojaimia, suojakypärää, turvakäsineitä ja turvajalkineita. Huomio! Takapotku ota huomioon sahalla työskennellessäsi, että se voi aiheuttaa takapotkun. 460 mm Älä käytä sahaa sateella. Laite ei saa olla kostea, eikä sitä saa käyttää kosteassa ympäristössä. Huomio! Vedä pistoke pistorasiasta heti, kun huomaat verkkokaapelin vioittuneen tai katkenneen. Äänitehotasolukema L WA db:nä Sähkölaitteet eivät kuulu talousjätteisiin Suojaluokka II Terän pituus Yleisiä turvallisuusohjeita Ennen kuin teet töitä ketjusahalla, ota ensin selvää sen kaikista osista ja toiminnoista. Harjoittele käyttämään sahaa (sahaa poikki sahapukissa olevaa pyöröpuuta) ja anna kokeneen ammattimiehen selvittää itsellesi sahan toiminta, vaikutus ja sahaustekniikka. Lue seuraavat turvallisuusohjeet henkilö- ja esinevahinkojen välttämiseksi: VAROITUS! Lue kaikki turvallisuusmääräykset ja ohjeet. Turvallisuusmääräysten ja ohjeiden noudattamattomuus voi aiheuttaa sähköiskun, tulipalon ja/tai vakavia loukkaantumisia. Säilytä kaikki turvallisuusmääräykset ja ohjeet tulevaisuuden varalle. 27
28 FI Turvallisuusmääräyksissä esitetty termi Sähkötyökalu tarkoittaa verkkosähköllä toimivia sähkötyökaluja (virtakaapelilla) sekä akkukäyttöisiä sähkötyökaluja (ilman virtakaapelia). Työpaikan turvallisuus: Pidä työpaikka puhtaana ja huolehdi riittävästä valaistuksesta. Epäpuhtaus ja huono valaistus työpaikalla voivat johtaa loukkaantumisiin. Älä työskentele sähkökäyttöisella ketjusahalla räjähdysvaarallisella alueella, jossa on helposti syttyviä nesteitä, kaasuja tai pölyä. Sähköllä käyvät työkalut kehittävät kipinöintiä, joka voi sytyttää pölyn tai höyryt. Älä anna pienten lasten tai asiattomien henkilöiden olla työpaikalla. Häiritseminen voi aiheuttaa sen, että menetät koneen hallinnan. Turvallisuus: Varoitus: Näin vältät sähköiskun aiheuttamat tapaturmat ja loukkaantumiset: Sähköisen ketjusahan pistokkeen täytyy sopia pistorasiaan. Pistoketta ei saa muuttaa millään tavalla. Älä käytä adapteripistokkeita yhdessä maadoitettujen sähkötyökalujen kanssa. Alkuperäiset pistokkeet ja sopivat pistorasiat vähentävät sähköiskuvaaraa. Vältä kosketusta maadoitettuihin pintoihin, kuten putkiin, lämmityksiin, hellaan tai jääkappiin. Sähköiskuvaara on olemassa, kun kehosi on maadoitettu. Äläpidä sähköketjusahaa sateessa tai märässä paikassa. Veden pääsy laitteeseen kohottaa sähköiskuvaaraa. Jos tämän laitteen liitäntäjohto on vioittunut, valmistajan tai sen asiakaspalvelun tai muun pätevän henkilön tulee vaihtaa se vaaratilanteiden välttämiseksi. Pidä liitoskaapelia aina niin, ettei se sahatessa tartu oksiin tai muuhun sahan lähettyvillä oleviin esineisiin. Älä käytä kaapelia mihinkään muuhun tarkoitukseen, älä kanna laitetta kaapelista kiinni pitäen tai ripusta laitetta kaapelista, älä myöskään vedä kaapelia irti pistorasiasta kaapelista vetämällä vaan pidä silloin kiinni pistokkeesta. Varo, ettei kaapeli joudu kuumuuteen, siihen ei pääse öljyä eikä terävät reunat tai liikkuvat osat voi vioittaa sitä. Vioittuneet tai kiertynyt kaapeli voi aiheuttaa sähköiskun. Kun työskentelet sahalla ulkona, käytä vain ulkokäyttöön soveltuvaa jatkokaapelia. Ulkokäyttöön soveltuva jatkokaapeli vähentää sähköiskuvaaraa. Jos sähköketjusahan käyttöä märissä tiloissa ei voida välttää, täytyy silloin olla käytettävissä myös vikavirtakytkin. Vikavirtakytkimen käyttö vähentää sähköiskuvaaraa. Vikavirtakytkimen laukaisuvirta täytyy olla 30 ma tai alhaisempi. Henkilöitä koskeva turvallisuus: Varoitus: Näin vältät tapaturmat ja loukkaantumiset: Ole varovainen ja käytä sähköketjusahaa harkiten. Älä työskentele sähköketjusahalla, jos olet väsynyt tai huumeiden, alkoholin tai lääkkeiden vaikutuksen alainen. Hetkellinen huolimattomuus sähköketjusahan käytössä voi johtaa vaikeisiin tapaturmiin. 28
FKS 2200 B1. Electric Chainsaw Translation of original operation manual. Sähkökäyttöinen ketjusaha Alkuperäisen käyttöohjeen käännös
 FKS 2200 B1 Electric Chainsaw Translation of original operation manual Sähkökäyttöinen ketjusaha Alkuperäisen käyttöohjeen käännös Elektrisk motorsåg Översättning av bruksanvisning i original Elektrisk
1. SIT. The handler and dog stop with the dog sitting at heel. When the dog is sitting, the handler cues the dog to heel forward.
 START START SIT 1. SIT. The handler and dog stop with the dog sitting at heel. When the dog is sitting, the handler cues the dog to heel forward. This is a static exercise. SIT STAND 2. SIT STAND. The
LYTH-CONS CONSISTENCY TRANSMITTER
 LYTH-CONS CONSISTENCY TRANSMITTER LYTH-INSTRUMENT OY has generate new consistency transmitter with blade-system to meet high technical requirements in Pulp&Paper industries. Insurmountable advantages are
PAINEILMALETKUKELA-AUTOMAATTI AUTOMATIC AIR HOSE REEL
 MAV4 MAV5 MAV6 PAINEILMALETKUKELA-AUTOMAATTI AUTOMATIC AIR HOSE REEL Käyttöohje Instruction manual HUOMIO! Lue käyttöohjeet huolellisesti ennen laitteen käyttöä ja noudata kaikkia annettuja ohjeita. Säilytä
VAROITUKSET. Älä pura laitetta osiin.
 VAROITUKSET Laitteen väärinkäyttö voi johtaa henkilövahinkoihin. Noudata kaikkia tässä ohjekirjassa annettuja ohjeita ja käytä laitetta oikein. Älä koskaan seiso laitteen alapuolella. Älä pura laitetta
INSTALLATION INSTRUCTION ASENNUSOHJE PEM SJTK31 SJTK46 ENGLISH SUOMI
 INSTALLATION INSTRUCTION ASENNUSOHJE PEM1256 2010-2 SJTK31 SJTK46 ENGLISH SUOMI GB GENERAL INFORMATION - Check that the kit is suitable for the cable type. - Check the materials listed in the bill of materials
On instrument costs in decentralized macroeconomic decision making (Helsingin Kauppakorkeakoulun julkaisuja ; D-31)
") On instrument costs in decentralized macroeconomic decision making (Helsingin Kauppakorkeakoulun julkaisuja ; D-31) Juha Kahkonen Click here if your download doesn"t start automatically On instrument costs
On instrument costs in decentralized macroeconomic decision making (Helsingin Kauppakorkeakoulun julkaisuja ; D-31) Juha Kahkonen Click here if your download doesn"t start automatically On instrument costs
National Building Code of Finland, Part D1, Building Water Supply and Sewerage Systems, Regulations and guidelines 2007
 National Building Code of Finland, Part D1, Building Water Supply and Sewerage Systems, Regulations and guidelines 2007 Chapter 2.4 Jukka Räisä 1 WATER PIPES PLACEMENT 2.4.1 Regulation Water pipe and its
On instrument costs in decentralized macroeconomic decision making (Helsingin Kauppakorkeakoulun julkaisuja ; D-31)
") On instrument costs in decentralized macroeconomic decision making (Helsingin Kauppakorkeakoulun julkaisuja ; D-31) Juha Kahkonen Click here if your download doesn"t start automatically On instrument costs
On instrument costs in decentralized macroeconomic decision making (Helsingin Kauppakorkeakoulun julkaisuja ; D-31) Juha Kahkonen Click here if your download doesn"t start automatically On instrument costs
Secto Design Oy Kauppalantie 12 02700 Kauniainen Finland tel. +358 9 5050598 fax +358 9 5475 2535 info@sectodesign.fi www.sectodesign.
 Secto Design Oy Kauppalantie 12 02700 Kauniainen Finland tel. +358 9 5050598 fax +358 9 5475 2535 info@sectodesign.fi www.sectodesign.fi Secto 4200 pendant natural birch, black or white laminate, walnut
Information on preparing Presentation
 Information on preparing Presentation Seminar on big data management Lecturer: Spring 2017 20.1.2017 1 Agenda Hints and tips on giving a good presentation Watch two videos and discussion 22.1.2017 2 Goals
Uusi Ajatus Löytyy Luonnosta 4 (käsikirja) (Finnish Edition)
 (Finnish Edition)") Uusi Ajatus Löytyy Luonnosta 4 (käsikirja) (Finnish Edition) Esko Jalkanen Click here if your download doesn"t start automatically Uusi Ajatus Löytyy Luonnosta 4 (käsikirja) (Finnish Edition) Esko Jalkanen
Uusi Ajatus Löytyy Luonnosta 4 (käsikirja) (Finnish Edition) Esko Jalkanen Click here if your download doesn"t start automatically Uusi Ajatus Löytyy Luonnosta 4 (käsikirja) (Finnish Edition) Esko Jalkanen
On instrument costs in decentralized macroeconomic decision making (Helsingin Kauppakorkeakoulun julkaisuja ; D-31)
") On instrument costs in decentralized macroeconomic decision making (Helsingin Kauppakorkeakoulun julkaisuja ; D-31) Juha Kahkonen Click here if your download doesn"t start automatically On instrument costs
On instrument costs in decentralized macroeconomic decision making (Helsingin Kauppakorkeakoulun julkaisuja ; D-31) Juha Kahkonen Click here if your download doesn"t start automatically On instrument costs
INSTALLATION INSTRUCTION ASENNUSOHJE PEM1417 2012-11 ENGLISH SUOMI CURRENT LIMITING DEVICE VIRTAA RAJOITTAVA SUOJA SDI46.812 & SDI46.
 INSTALLATION INSTRUCTION ASENNUSOHJE PEM1417 2012-11 ENGLISH SUOMI CURRENT LIMITING DEVICE VIRTAA RAJOITTAVA SUOJA SDI46.812 & SDI46.824 2/8 SDI46.812 & SDI46.824 PEM1417 2012-11 ENGLISH GENERAL INFORMATION
Box 1. Things you have/ Pakkaus sisältää. x 4 x 16 x 4 x 4. 300mm. 1700mm. 300mm 1. Things you should know / Sinun Tulee Tietää
 Phobos 30 Things you should know / Sinun Tulee Tietää Things you prepare / Näitä Tarvitset DURING INSTALLATION ALL PRODUCTS: use protective gloves at all times use eye protection at all times never install
WINE COOLER TFW METOS TFW 160S, TFW 365-2S, TFW 375S MG ,
 WINE COOLER TFW METOS TFW 160S, TFW 365-2S, TFW 375S MG4116794, 4116798, 4116797 Instruction manual TWF 365-2S TWF 375S TWF 160S 01.09.2015 Table if Contents 1. Important safety instructions...3 2. Unpacking
Capacity Utilization
 Capacity Utilization Tim Schöneberg 28th November Agenda Introduction Fixed and variable input ressources Technical capacity utilization Price based capacity utilization measure Long run and short run
Installation instruction PEM
 Installation instruction ASENNUSOHJE PEM1032 2010-02 SURGE ARRESTER SET FOR POLE MOUNT TRANSFORMER YLIJÄNNITESUOJASETTI PYLVÄSMUUNTAJALLE ENGLISH SUOMI 2/8 PEM1032 2010-02 ENGLISH GENERAL INFORMATION -
MOOTTORIPYÖRÄNOSTIN MOTORCYCLE LIFT
 MEG30 Lue käyttöohjeet huolellisesti ennen laitteen käyttöä ja noudata kaikkia annettuja ohjeita. Säilytä ohjeet myöhempää tarvetta varten. Read the instruction manual carefully before using the tool and
Network to Get Work. Tehtäviä opiskelijoille Assignments for students. www.laurea.fi
 Network to Get Work Tehtäviä opiskelijoille Assignments for students www.laurea.fi Ohje henkilöstölle Instructions for Staff Seuraavassa on esitetty joukko tehtäviä, joista voit valita opiskelijaryhmällesi
Choose Finland-Helsinki Valitse Finland-Helsinki
 Write down the Temporary Application ID. If you do not manage to complete the form you can continue where you stopped with this ID no. Muista Temporary Application ID. Jos et onnistu täyttää lomake loppuun
anna minun kertoa let me tell you
 anna minun kertoa let me tell you anna minun kertoa I OSA 1. Anna minun kertoa sinulle mitä oli. Tiedän että osaan. Kykenen siihen. Teen nyt niin. Minulla on oikeus. Sanani voivat olla puutteellisia mutta
TIKIT a) Suorassa tikissä ristiommel jää nahan alle piiloon. b) Ristitikissä ommel jää näkyviin.
 Suorassa tikissä ristiommel jää nahan alle piiloon. b) Ristitikissä ommel jää näkyviin.") CML WHEEL COVER -RUORINAHKAN OMPELUOHJE Liota nahkoja lämpimässä vedessä n. 15 minuuttia ennen ompelua. Pidä nahka kosteana koko ompelun ajan esim. sumutepullolla. Pidä ommellessa kevyt kireys nahkaan,
CML WHEEL COVER -RUORINAHKAN OMPELUOHJE Liota nahkoja lämpimässä vedessä n. 15 minuuttia ennen ompelua. Pidä nahka kosteana koko ompelun ajan esim. sumutepullolla. Pidä ommellessa kevyt kireys nahkaan,
C B. min 4mm (0,16 ) 2 English 1153988-26 Rev.4 2014-04-15
 2 English 1153988-26 Rev.4 2014-04-15") GB Operator s manual 6-26 SE Bruksanvisning 27-47 DK Brugsanvisning 48-69 FI Käyttöohje 70-91 NO Bruksanvisning 92-112 FR Manuel d utilisation 113-135 NL Gebruiksaanwijzing 136-158 IT Istruzioni per l
GB Operator s manual 6-26 SE Bruksanvisning 27-47 DK Brugsanvisning 48-69 FI Käyttöohje 70-91 NO Bruksanvisning 92-112 FR Manuel d utilisation 113-135 NL Gebruiksaanwijzing 136-158 IT Istruzioni per l
SAGA 150. Asennusohjeet. Mittaa oven korkeus. Piirrä seinään oven kiinni -päätyyn seinäkannattimen kohdalle vaakaviiva korkeudelle ovi + 75mm + 20 mm.
 SAGA 150 Asennusohjeet 500 1 2 Mittaa oven korkeus. Piirrä seinään oven kiinni -päätyyn seinäkannattimen kohdalle vaakaviiva korkeudelle ovi + 75mm + 20 mm. 3 Piirrä vesivaa an avulla viiva myös kiskon
Installation instruction PEM
 Installation instruction ASENNUSOHJE PEM1031 2010-04 CURRENT LIMITING DEVICE FOR POLE MOUNT TRANSFORMER VIRTAA RAJOITTAVA SUOJA PYLVÄSMUUNTAJALLE ENGLISH SUOMI 75 2/8 PEM1031 2010-04 ENGLISH GENERAL INFORMATION
Öljytäytteinen sähköpatteri Electric Oil Radiator
 Öljytäytteinen sähköpatteri Electric Oil Radiator KÄYTTÖOHJE Alkuperäisten ohjeiden käännös INSTRUCTIONS MANUAL Original instructions MALLI/MODEL: Holly 1500: ERC2-1507 Holly 2000: ERC2-2009 DT Istr (ERC
03 PYÖRIEN SIIRTÄMINEN
 78 03 PYÖRIEN SIIRTÄMINEN Wheels and tyres are heavy. Their handling may involve heavy lifting at the workshop. We have developed a logical ergonomic method for transporting wheels. The focus here is our
4x4cup Rastikuvien tulkinta
 4x4cup Rastikuvien tulkinta 4x4cup Control point picture guidelines Päivitetty kauden 2010 sääntöihin Updated for 2010 rules Säännöt rastikuvista Kilpailijoiden tulee kiinnittää erityistä huomiota siihen,
Owner s Manual GREE Electric Appliances,Inc.of zhuhai
 Ilmalämpöpumppu Split air conditioner wall mounted model Käyttäjän opas Owner s Manual GREE Electric Appliances,Inc.of zhuhai Ultra-thin GWHD09A3NK3DF KFR-25GW/NaA12FA GWHD12B2NK3AD KFR-32GW/NaA12FA Please
Fitting instructions. Fitting set for joining all types of DEVI self limiting heating cables to heating cables Art. no. 19805779 SSTL nro 04 312 85
 GB/FI Fitting instructions Fitting set for joining all types of DEVI self limiting heating cables to heating cables Art. no. 19805779 SSTL nro 04 312 85 intelligent varme Contents: GB Connection kits 3
Recirkulering. El-tilslutning. Kontrolpanel. Dansk. Timerfunktion
 1 2 Dansk Recirkulering Luften renses ved hjælp at aktive kulfiltre hvorefter den returneres til rummet. Kulfiltre bestilles separat. El-tilslutning Emhætten skal tilsluttes 230 V i henhold til stærkstrømsreglementet.
Secto 4200 pendant natural birch, black or white laminate, walnut veneer
 Secto Design Oy Kauppalantie 12 02700 Kauniainen Finland tel. +358 9 5050598 fax +358 9 5475 2535 info@sectodesign.fi www.sectodesign.fi Secto 4200 pendant natural birch, black or white laminate, walnut
Jokaisella person. käyttökerralla tehtävän rutiinitarkastuksen lisäksi pätevän henkilön tulisi tehdä henkilösuojaimelle
 Inspection Henkilösuojaimen tarkastus Tarkastusohjeet Inspection Inspection Inspection In addition to routine checks for each use, should regularly undergo a detailed inspection by a competent Jokaisella
Efficiency change over time
 Efficiency change over time Heikki Tikanmäki Optimointiopin seminaari 14.11.2007 Contents Introduction (11.1) Window analysis (11.2) Example, application, analysis Malmquist index (11.3) Dealing with panel
Victo Finishes Shade Cable + ceiling cup Natural birch White White laminated White Black laminated Black Walnut veneer White.
 Victo 4250 Finishes Shade Cable + ceiling cup Natural birch White White laminated White Black laminated Black Walnut veneer White Material Sizes Light source Cable IP Rating Maintenance Form pressed birch
CLEANING JOB ORIENTATION
 CLEANING JOB ORIENTATION CLEANING EQUIPMENT 1. cleaning trolley 2. cleaning bucket 3. garbage sack 4. squegee - You can dry windows, mirrors and floors. 5. floor mop and cloth 6. window washing applicator
SESKO ry LAUSUNTOPYYNTÖ 12/08 LIITE Toimisto (7) HUOM. Komiteoiden ja seurantaryhmien kokoonpanot on esitetty SESKOn komitealuettelossa
 HUOM. Komiteoiden ja seurantaryhmien kokoonpanot on esitetty SESKOn komitealuettelossa") 2008-12-19 1(7) SK 20 ENERGIAKAAPELIT S456-08 1: General requirements Esikuva: pren 50525-1:2008 S457-08 2-11: Cables for general applications. Flexible cables with thermoplastic PVC Esikuva: pren 50525-2-11:2008
2008-12-19 1(7) SK 20 ENERGIAKAAPELIT S456-08 1: General requirements Esikuva: pren 50525-1:2008 S457-08 2-11: Cables for general applications. Flexible cables with thermoplastic PVC Esikuva: pren 50525-2-11:2008
Solar Water Heater Kit. EcoStyle. 1 User Manual/Operating Instructions. Contents FREE LESSON PLANS AVAILABLE.
 EcoStyle 1 User Manual/Operating Instructions Contents 1 Contents 2 What s in the box? 3 Setting up the 4 Heating water 5 Measuring water temperature with the digital thermometer 6 Maximum/minimum temperature
IAN 87797. Sähkökäyttöinen pensasleikkuri Alkuperäisen käyttöohjeen käännös. Elektrisk häcksax Översättning av bruksanvisning i original
 Electric Hedge Trimmer FHT 600 B2 Electric Hedge Trimmer Translation of original operation manual Sähkökäyttöinen pensasleikkuri Alkuperäisen käyttöohjeen käännös Elektrisk häcksax Översättning av bruksanvisning
Exercise 1. (session: )
") EEN-E3001, FUNDAMENTALS IN INDUSTRIAL ENERGY ENGINEERING Exercise 1 (session: 24.1.2017) Problem 3 will be graded. The deadline for the return is on 31.1. at 12:00 am (before the exercise session). You
EEN-E3001, FUNDAMENTALS IN INDUSTRIAL ENERGY ENGINEERING Exercise 1 (session: 24.1.2017) Problem 3 will be graded. The deadline for the return is on 31.1. at 12:00 am (before the exercise session). You
Curriculum. Gym card
 A new school year Curriculum Fast Track Final Grading Gym card TET A new school year Work Ethic Detention Own work Organisation and independence Wilma TMU Support Services Well-Being CURRICULUM FAST TRACK
Särmäystyökalut kuvasto Press brake tools catalogue
 Finnish sheet metal machinery know-how since 1978 Särmäystyökalut kuvasto Press brake tools catalogue www.aliko.fi ALIKO bending chart Required capacity in kn (T) in relation to V-opening. V R A S = plates
The CCR Model and Production Correspondence
 The CCR Model and Production Correspondence Tim Schöneberg The 19th of September Agenda Introduction Definitions Production Possiblity Set CCR Model and the Dual Problem Input excesses and output shortfalls
CONVERSION KITS FOR FRAMES MR8 AND MR9 INSTALLATION INSTRUCTIONS
 CONVERSION KITS FOR FRAMES MR8 AND MR9 INSTALLATION INSTRUCTIONS MR8 AND MR9 CONVERSION KIT - INSTALLATION INSTRUCTION Document ID: DPD01787, Revision: A, Release date: 17.11.2015 1.1 MR8 kit contents
KONEISTUSKOKOONPANON TEKEMINEN NX10-YMPÄRISTÖSSÄ
 KONEISTUSKOKOONPANON TEKEMINEN NX10-YMPÄRISTÖSSÄ https://community.plm.automation.siemens.com/t5/tech-tips- Knowledge-Base-NX/How-to-simulate-any-G-code-file-in-NX- CAM/ta-p/3340 Koneistusympäristön määrittely
1/4. Resetointi ja vianmääritys. 22.11.2013 ntr
 A400-64176 Sähköpöydät 1/4 Resetointi ja vianmääritys Pöydän resetointi tehdään aina ennen käyttöönottoa ja tarvittaessa häiriötilanteessa. Määritä pöydän tyyppi käyttökytkimen ja jalustan mukaan ja tee
Salasanan vaihto uuteen / How to change password
 Salasanan vaihto uuteen / How to change password Sisällys Salasanakäytäntö / Password policy... 2 Salasanan vaihto verkkosivulla / Change password on website... 3 Salasanan vaihto matkapuhelimella / Change
Octo Finishes Shade Cable + ceiling cup Natural birch White White laminated White Black laminated Black Walnut veneer White.
 Octo 4240 Finishes Shade Cable + ceiling cup Natural birch White White laminated White Black laminated Black Walnut veneer White Material Sizes Light source Cable IP Rating Maintenance Form pressed birch
ATV TUKKIKÄRRY ATV LOG TRAILER
 Lue käyttöohjeet huolellisesti ennen laitteen käyttöä ja noudata kaikkia annettuja ohjeita. Säilytä ohjeet myöhempää tarvetta varten. Read the instruction manual carefully before using the appliance and
Gap-filling methods for CH 4 data
 Gap-filling methods for CH 4 data Sigrid Dengel University of Helsinki Outline - Ecosystems known for CH 4 emissions; - Why is gap-filling of CH 4 data not as easy and straight forward as CO 2 ; - Gap-filling
INSTALLATION INSTRUCTION ASENNUSOHJE PEM ENGLISH SUOMI INSULATION PIERCING CONNECTOR SLIW17.2 ERISTYKSEN LÄPÄISEVÄ LIITIN SLIW17.
 INSTALLATION INSTRUCTION ASENNUSOHJE PEM904 2011-08 ENGLISH SUOMI INSULATION PIERCING CONNECTOR SLIW17.2 ERISTYKSEN LÄPÄISEVÄ LIITIN SLIW17.2 2/8 SLIW17.2 PEM904 2011-08 GENERAL INFORMATION (ENG) - Check
Tork Paperipyyhe. etu. tuotteen ominaisuudet. kuvaus. Väri: Valkoinen Malli: Vetopyyhe
 etu Monikäyttöpaperi hoitaa useimmat pyyhintätehtävät Sopiva lasipintojen pyyhintään Sopii käsien kuivaamiseen Elintarvikekäyttöön hyväksytty Tork Easy Handling, pakkaus, jota on helppo kantaa mukana,
1. Liikkuvat määreet
 1. Liikkuvat määreet Väitelauseen perussanajärjestys: SPOTPA (subj. + pred. + obj. + tapa + paikka + aika) Suora sanajärjestys = subjekti on ennen predikaattia tekijä tekeminen Alasääntö 1: Liikkuvat määreet
FI GB. Asennus-, käyttöohjeet. Installation, operation instructions
 FI GB Asennus-, käyttöohjeet Installation, operation instructions Asennus FI Keinuripustuksen asennus Tekstin sulkeissa olevat numerot viittaavat kuvien 1, 2, 3 ja 4 numerointiin. Kiinnitä keinuripustuksen
The Viking Battle - Part Version: Finnish
 The Viking Battle - Part 1 015 Version: Finnish Tehtävä 1 Olkoon kokonaisluku, ja olkoon A n joukko A n = { n k k Z, 0 k < n}. Selvitä suurin kokonaisluku M n, jota ei voi kirjoittaa yhden tai useamman
TIEKE Verkottaja Service Tools for electronic data interchange utilizers. Heikki Laaksamo
 TIEKE Verkottaja Service Tools for electronic data interchange utilizers Heikki Laaksamo TIEKE Finnish Information Society Development Centre (TIEKE Tietoyhteiskunnan kehittämiskeskus ry) TIEKE is a neutral,
IEC IP V AC. VIZULO Stork Little Brother LED street luminaire / katuvalaisin. Mounting instruction Asennusohjeet. min 40 C.
 VIZULO Stork Little Brother LED street luminaire / katuvalaisin Mounting instruction Asennusohjeet 05 IEC EN 60598 IP66 min 40 C max + 45 C 198-264 V AC PH2 4 6 29/01/2016 SIA VIZULO Ganibu dambis 7a,
Nuku hyvin, pieni susi -????????????,?????????????????. Kaksikielinen satukirja (suomi - venäjä) (www.childrens-books-bilingual.com) (Finnish Edition)
 (www.childrens-books-bilingual.com) (Finnish Edition)") Nuku hyvin, pieni susi -????????????,?????????????????. Kaksikielinen satukirja (suomi - venäjä) (www.childrens-books-bilingual.com) (Finnish Edition) Click here if your download doesn"t start automatically
Nuku hyvin, pieni susi -????????????,?????????????????. Kaksikielinen satukirja (suomi - venäjä) (www.childrens-books-bilingual.com) (Finnish Edition) Click here if your download doesn"t start automatically
Sisällysluettelo Table of contents
 Sisällysluettelo Table of contents OTC:n Moodlen käyttöohje suomeksi... 1 Kirjautuminen Moodleen... 2 Ensimmäinen kirjautuminen Moodleen... 2 Salasanan vaihto... 2 Oma käyttäjäprofiili... 3 Työskentely
Secto Design Oy Kauppalantie Kauniainen Finland tel fax
 Secto Design Oy Kauppalantie 12 02700 Kauniainen Finland tel. +358 9 5050598 fax +358 9 5475 2535 info@sectodesign.fi www.sectodesign.fi Secto 4202 Magnum pendant Available in natural birch, black or white
MÖNKIJÄN TUKKIKÄRRY ATV TRAILER
 A T V 1 MÖNKIJÄN TUKKIKÄRRY ATV TRAILER KÄYTTÖOHJE MANUAL HUOMIO! Lue käyttöohjeet huolellisesti ennen laitteen käyttöä ja noudata kaikkia annettuja ohjeita. Säilytä ohjeet myöhempää tarvetta varten. NOTE!
mini Safe by Design and optimized for tilting windows
 mini Safe by Design and optimized for tilting windows MINI CASSETTE Suitable for 17mm or 20mm chain or constant tension spring mechanism. The spring mechanism is suited also for operating from the bottom
Lab SBS3.FARM_Hyper-V - Navigating a SharePoint site
 Lab SBS3.FARM_Hyper-V - Navigating a SharePoint site Note! Before starting download and install a fresh version of OfficeProfessionalPlus_x64_en-us. The instructions are in the beginning of the exercise.
MEETING PEOPLE COMMUNICATIVE QUESTIONS
 Tiistilän koulu English Grades 7-9 Heikki Raevaara MEETING PEOPLE COMMUNICATIVE QUESTIONS Meeting People Hello! Hi! Good morning! Good afternoon! How do you do? Nice to meet you. / Pleased to meet you.
OFFICE 365 OPISKELIJOILLE
 OFFICE 365 OPISKELIJOILLE Table of Contents Articles... 3 Ohjeet Office 365 käyttöönottoon... 4 One Driveen tallennetun videon palauttaminen oppimisympäristön palautuskansioon... 5 Changing default language
107401959 G INSTRUCTIONS FOR USE BRUGSANVISNING BETRIEBSANLEITUNG VC300 SERIES USER MANUAL MODE D EMPLOI INSTRUCCIONES DE USO
 0740959 G INSTRUCTIONS FOR USE BRUGSANVISNING BETRIEBSANLEITUNG MODE D EMPLOI INSTRUCCIONES DE USO VC300 SERIES USER MANUAL - Basic operations. - Suction regulation 3 - Cordlock (HEPA) 3. 4 - Wind up the
AYYE 9/ HOUSING POLICY
 AYYE 9/12 2.10.2012 HOUSING POLICY Mission for AYY Housing? What do we want to achieve by renting apartments? 1) How many apartments do we need? 2) What kind of apartments do we need? 3) To whom do we
KOPIOINTILAITE PUUSORVIIN WOOD LATHE COPYING ATTACHEMENT
 XW016-3 XW017-3 KOPIOINTILAITE PUUSORVIIN WOOD LATHE COPYING ATTACHEMENT Käyttöohje Instruction manual HUOMIO! Lue käyttöohjeet huolellisesti ennen laitteen käyttöä ja noudata kaikkia annettuja ohjeita.
16. Allocation Models
 16. Allocation Models Juha Saloheimo 17.1.27 S steemianalsin Optimointiopin seminaari - Sks 27 Content Introduction Overall Efficienc with common prices and costs Cost Efficienc S steemianalsin Revenue
LUONNOS RT 80260 EN AGREEMENT ON BUILDING WORKS 1 THE PARTIES. May 1998 1 (10)
") RT 80260 EN May 1998 1 (10) AGREEMENT ON BUILDING WORKS This agreement template is based on the General Terms and Conditions of Building Contracts YSE 1998 RT 16-10660, LVI 03-10277, Ratu 417-7, KH X4-00241.
RT 80260 EN May 1998 1 (10) AGREEMENT ON BUILDING WORKS This agreement template is based on the General Terms and Conditions of Building Contracts YSE 1998 RT 16-10660, LVI 03-10277, Ratu 417-7, KH X4-00241.
mini Safe by Design and optimized for tilting windows
 mini Safe by Design and optimized for tilting windows DOMICET MINI Suitable for mm or 20mm chain or constant tension spring mechanism. Optimized for tilting windows and the spring mechanism is suited also
Vakiomallisten kuumakanavajärjestelmien kytkeminen Wiring of standard hotrunner systems
 Teknillinen dokumentaatio Technical documentation E. Vakiomallisten kuumakanavajärjestelmien kytkeminen Wiring of standard hotrunner systems Version.0 ! Tärkeä turvaohje / Important safety instruction
200 cm, textile cable, ceiling plug/connector + ceiling cup + 3 steel wires
 Magnum 4202 Finishes Shade Cable + ceiling cup Natural birch White White laminated White Black laminated Black Walnut veneer White Material Sizes Light source Cable IP Rating Maintenance Form pressed birch
Bounds on non-surjective cellular automata
 Bounds on non-surjective cellular automata Jarkko Kari Pascal Vanier Thomas Zeume University of Turku LIF Marseille Universität Hannover 27 august 2009 J. Kari, P. Vanier, T. Zeume (UTU) Bounds on non-surjective
Akkukäyttöiset ruohoja pensassakset Alkuperäisen käyttöohjeen käännös. Cordless Grass & Shrub Cutter Translation of original operation manual
 FGS 10 A1 Cordless Grass & Shrub Cutter Translation of original operation manual Akkukäyttöiset ruohoja pensassakset Alkuperäisen käyttöohjeen käännös Batteridriven gräs- och busksax Översättning av bruksanvisning
Data protection template
 Data protection template Aihe: rekisteriseloste ja informointipohja Topic: information about the register and information to users (related to General Data Protection Regulation (GDPR) (EU) 2016/679) Mallina
C++11 seminaari, kevät Johannes Koskinen
 C++11 seminaari, kevät 2012 Johannes Koskinen Sisältö Mikä onkaan ongelma? Standardidraftin luku 29: Atomiset tyypit Muistimalli Rinnakkaisuus On multicore systems, when a thread writes a value to memory,
SIRKKELINTERÄN TEROITUSKONE SLIPMASKIN FÖR SÅGKLINGOR SAW BLADE SHARPENING MACHINE
 XWS024 SIRKKELINTERÄN TEROITUSKONE SLIPMASKIN FÖR SÅGKLINGOR SAW BLADE SHARPENING MACHINE Käyttöohje Bruksanvisning Instruction manual Alkuperäisten käyttöohjeiden käännös Översättning av originalbruksanvisning
S Sähkön jakelu ja markkinat S Electricity Distribution and Markets
 S-18.3153 Sähkön jakelu ja markkinat S-18.3154 Electricity Distribution and Markets Voltage Sag 1) Kolmivaiheinen vastukseton oikosulku tapahtuu 20 kv lähdöllä etäisyydellä 1 km, 3 km, 5 km, 8 km, 10 km
Oma sininen meresi (Finnish Edition)
") Oma sininen meresi (Finnish Edition) Hannu Pirilä Click here if your download doesn"t start automatically Oma sininen meresi (Finnish Edition) Hannu Pirilä Oma sininen meresi (Finnish Edition) Hannu Pirilä
Oma sininen meresi (Finnish Edition) Hannu Pirilä Click here if your download doesn"t start automatically Oma sininen meresi (Finnish Edition) Hannu Pirilä Oma sininen meresi (Finnish Edition) Hannu Pirilä
TM ETRS-TM35FIN-ETRS89 WTG
 SHADOW - Main Result Assumptions for shadow calculations Maximum distance for influence Calculate only when more than 20 % of sun is covered by the blade Please look in WTG table WindPRO version 2.8.579
Rekisteröiminen - FAQ
 Rekisteröiminen - FAQ Miten Akun/laturin rekisteröiminen tehdään Akun/laturin rekisteröiminen tapahtuu samalla tavalla kuin nykyinen takuurekisteröityminen koneille. Nykyistä tietokantaa on muokattu niin,
Vannekiristin metallivanteelle. Sealless steel strapping tool
 XK6071 Vannekiristin metallivanteelle Sealless steel strapping tool Käyttöohje Manual HUOMIO! Lue käyttöohjeet huolellisesti ennen laitteen käyttöä ja noudata kaikkia annettuja ohjeita. Säilytä ohjeet
Reliable diagnostic support Ultra-light design
 EN Powerful illumination Intelligent charging management Reliable diagnostic support Ultra-light design VISIOMED Optima UV original scale 1:1 VISIOMED Optima Quality Made Easy and an illumination close
Väite Argument "Yhteiskunnan velvollisuus on tarjota virkistysalueita ja -palveluita." "Recreation sites and service
 Olisiko vastaaja valmis maksamaan... Would the respondent be willing to pay for... Luonto-opastuksesta Nature guide services Autiotuvan käytöstä Use of wilderness huts Tulipaikan käytöstä (polttopuut,
Kitchen Pendant 2/10/19
 Kitchen Pendant Kitchen Pendant Dining Area Dining Area Living Area Dining Area Bathroom 201 Quantity: 2 W A L L C O L L E C T I O N Voto Wall Square DESCRIPTION The Voto light by Tech Lighting is simply
LAATTALEIKKURI TILE CUTTING SAW
 AWD600 LAATTALEIKKURI TILE CUTTING SAW Käyttöohje Instruction manual HUOMIO! Lue käyttöohjeet huolellisesti ennen laitteen käyttöä ja noudata kaikkia annettuja ohjeita. Säilytä ohjeet myöhempää tarvetta
Pyöröteräleikkurit Round knife cutters
 Pyöröteräleikkurit Round knife cutters EH-USM - 240V 260W - terän / blade's Ø 110 mm - 4-kaariterä / 4-bow blade - terän nopeus / blade speed 950 rpm - leikkuunopeus / cutting speed 328 m/min - leikkuukorkeus
Kysymys 5 Compared to the workload, the number of credits awarded was (1 credits equals 27 working hours): (4)
: (4)") Tilasto T1106120-s2012palaute Kyselyn T1106120+T1106120-s2012palaute yhteenveto: vastauksia (4) Kysymys 1 Degree programme: (4) TIK: TIK 1 25% ************** INF: INF 0 0% EST: EST 0 0% TLT: TLT 0 0% BIO:
Tilasto T1106120-s2012palaute Kyselyn T1106120+T1106120-s2012palaute yhteenveto: vastauksia (4) Kysymys 1 Degree programme: (4) TIK: TIK 1 25% ************** INF: INF 0 0% EST: EST 0 0% TLT: TLT 0 0% BIO:
WindPRO version joulu 2012 Printed/Page :42 / 1. SHADOW - Main Result
 SHADOW - Main Result Assumptions for shadow calculations Maximum distance for influence Calculate only when more than 20 % of sun is covered by the blade Please look in WTG table 13.6.2013 19:42 / 1 Minimum
Metsälamminkankaan tuulivoimapuiston osayleiskaava
 VAALAN KUNTA TUULISAIMAA OY Metsälamminkankaan tuulivoimapuiston osayleiskaava Liite 3. Varjostusmallinnus FCG SUUNNITTELU JA TEKNIIKKA OY 12.5.2015 P25370 SHADOW - Main Result Assumptions for shadow calculations
Tilausvahvistus. Anttolan Urheilijat HENNA-RIIKKA HAIKONEN KUMMANNIEMENTIE 5 B RAHULA. Anttolan Urheilijat
 7.80.4 Asiakasnumero: 3000359 KALLE MANNINEN KOVASTENLUODONTIE 46 51600 HAUKIVUORI Toimitusosoite: KUMMANNIEMENTIE 5 B 51720 RAHULA Viitteenne: Henna-Riikka Haikonen Viitteemme: Pyry Niemi +358400874498
Virtually Oy. Laadukas tyynysarja vaativaan käyttöön IMMOBILISAATIO. Arpegia. y-tunnus: puh.
 Arpegia 07/1340 Taille 1 long. 200 cm haut. 18 cm 07/1345 Taille 2 long. 245 cm haut. 18 cm 07/1350 Taille 3 long. 280 cm haut. 18 cm 07/1440 Taille 1 long. 200 cm haut. 10 cm 07/1445 Taille 2 long. 245
TYÖKALUVAUNU JA YLÄKAAPPI
 MEG95 TYÖKALUVAUNU JA YLÄKAAPPI Käyttöohje (Alkuperäisten käyttöohjeiden käännös) FI Onnittelut tämän laadukkaan Meganex-tuotteen valinnasta. Lue käyttöohjeet huolellisesti ennen laitteen käyttöä ja noudata
Other approaches to restrict multipliers
 Other approaches to restrict multipliers Heikki Tikanmäki Optimointiopin seminaari 10.10.2007 Contents Short revision (6.2) Another Assurance Region Model (6.3) Cone-Ratio Method (6.4) An Application of
( ( OX2 Perkkiö. Rakennuskanta. Varjostus. 9 x N131 x HH145
 OX2 9 x N131 x HH145 Rakennuskanta Asuinrakennus Lomarakennus Liike- tai julkinen rakennus Teollinen rakennus Kirkko tai kirkollinen rak. Muu rakennus Allas Varjostus 1 h/a 8 h/a 20 h/a 0 0,5 1 1,5 2 km
PARTS LIST Item Description Q'TY Item Description Q'TY
 PARTS LIST Item Description Q'TY Item Description Q'TY 1 Lower door 1 40 Jockey wheel axel 1 2 Safety switch 1 41 Power cord 1 3 Screw M4 35 4 42 Switch 1 4 Hex bolt M6 8 4 43 Lower shaft bracket 1 5 Washer
Microsoft Lync 2010 Attendee
 VYVI MEETING Lync Attendee 2010 Instruction 1 (15) Microsoft Lync 2010 Attendee Online meeting VYVI MEETING Lync Attendee 2010 Instruction 2 (15) Index 1 Microsoft LYNC 2010 Attendee... 3 2 Acquiring Lync
Miehittämätön meriliikenne
 Rolls-Royce & Unmanned Shipping Ecosystem Miehittämätön meriliikenne Digimurros 2020+ 17.11. 2016 September 2016 2016 Rolls-Royce plc The 2016 information Rolls-Royce in this plc document is the property