Spa Bath Mat SLB 450 A2
|
|
|
- Jarno Kähkönen
- 9 vuotta sitten
- Katselukertoja:
Transkriptio
1 PERSONAL CARE Spa Bath Mat Spa Bath Mat Operating instructions Bubbelbad Bruksanvisning Porekylpymatto Käyttöohje Luft-boblebad Betjeningsvejledning KOMPERNASS GMBH BURGSTRASSE 21 D BOCHUM ID-Nr.: -02/11-V2 IAN 64639

2 w q
3 Index Introduction Information for these operating instructions Copyright Limited liability Intended use Warnings Safety Use Restrictions Risk of electrocution Interaction with batteries Basic Safety Instructions Appliance-Components Setting up and connecting...7 Safety instructions Items supplied and transport inspection Unpacking Disposal of the packaging Requirements on the Installation Location Electrical connections Inserting batteries into the remote control Fixing the air-bubble mat into the bath 9 Using aromatic oils Connecting the air hose Electrical connections Handling and operation...12 Switching On and Off Functions Function selection on the pump...13 Function selection with the remote control Cleaning Safety instructions Cleaning the appliance Troubleshooting Safety instructions Malfunction causes and remedies.16 Storage/Disposal Storage Disposal of the appliance Disposing of the batteries Appendix Notes on the EC Declaration of Conformity Technical data Warranty Service Importer GB IE 1

4 Introduction GB IE Introduction Information for these operating instructions These operating instructions are a component of the Spa Bath Mat (henceforth designated as the appliance) and they provide you with important information about the intended use, safety and connection as well as operation of the appliance. The operating instructions must be constantly kept available close to the appliance. It is to be read and used by anyone assigned to install, service and repair faults in the appliance. Keep these operating instructions and hand them over with the appliance to any future owners. Copyright This documentation is copyright protected. Any copying or reproduction, including as extracts, as well as the repetion of images, also in an altered state, is not permitted without the express written consent of the manufacturer. Limited liability Intended use All technical information, data and information for connection and operation of the appliance contained in these operating instructions correspond to the latest available at the time of printing and, to the best of our knowledge, take into account our previous experience and know-how. No claims can be derived from the details, illustrations and descriptions in these instructions. The manufacturer assumes no responsibility for damage caused by failure to observe the instructions, improper use, inappropriate repairs, making unauthorized changes or for using unapproved replacement parts. This appliance is intended only for use in the production of air bubbles in baths for the purpose of Wellness massages in enclosed spaces and for domestic use. This appliance is not intended for any other use or for uses beyond those mentioned. Claims of any kind due to damage caused by improper use, incompetent repairs, unauthorized modifi cations or the use of non-approved spare parts are excluded. The operator alone bears liability. 2

5 Introduction Warnings In the existing operation instructions the following warnings are used: GB IE DANGER A warning at this danger level indicates a threateningly dangerous situation. If the dangerous situation is not avoided, it could result in death or serious injury. Follow the instructions given in this warning notice to avoid the risks of death or serious injury to people. WARNING A warning at this danger level signifies a potentially dangerous situation. If the dangerous situation is not avoided it can lead to injuries. The directives in this warning are there to avoid personal injuries. IMPORTANT A warning of this danger level signifies possible property damage. If the situation is not avoided it can lead to property damage. The directives in this warning are there to avoid property damage. NOTICE A notice signifi es additional information that assists in the handling of the appliance. 3

6 Safety GB IE Safety In this chapter you receive important safety information regarding handling of the appliance. This appliance complies with the statutory safety regulations. Incorrect usage can, however, lead to personal injury and property damage. Use Restrictions Do not use the appliance: if you have high blood-pressure if you have cardiovascular diseases if you are pregnant NOTICE If you have an illness, check with your doctor on the possible application of it before using the appliance. Children may use the appliance only under adult supervision. Risk of electrocution DANGER Risk of fatal electrocution! Contact with wires or components carrying mains power could be potentially fatal! Observe the following safety notices to avoid electrical hazards: Do not operate the appliance if the power cable or the plug are damaged. Never set the appliance up above the bathtub. Connect the appliance only to an electrical outlet protected by an FC protector switch (RCD) with a rated residual current not exceeding 30 ma. Never touch the pump and the mains plug with wet hands. Never place the pump into water. Place the pump at least 60 cm away from the bath tub. Under no circumstances should you open the housing of the appliance. Should live connections be touched and/or the electrical and mechanical construction changed, there is a risk of receiving an electric shock. 4

7 Safety Interaction with batteries WARNING Danger from improper use! For safe handling of batteries observe the following safety instructions: Do not throw the batteries into a fi re. Never short-circuit batteries. Do not attempt to recharge batteries. Regularly check the condition of the batteries. Leaking battery acid can cause permanent damage to the appliance. Special care should be taken when handling a damaged or leaking battery. Danger from acid burns! Wear protective gloves. Store batteries in a place inaccessible to children. When swallowed seek immediate medical attention. Remove the batteries from the remote control if you do not intend to use the device for extended periods of time. GB IE Basic Safety Instructions For safe handling of the appliance observe the following safety information: Before use check the appliance for visible external damage. Do not put into operation a appliance that is damaged or has been dropped. So as to avoid hazards, should the mains power cable of the appliance become damaged, it must be replaced by the manufacturer, his customer service or by a qualifi ed technician. This appliance is not intended for use by individuals (including children) with restricted physical, physiological or intellectual abilities or defi ciences in experience and/or knowledge unless they are supervised by a person responsible for their safety or receive from this person instruction in how the appliance is to be used. Children should be supervised to ensure that they do not play with the appliance. The appliance must be inaccessible to people in the bathtub. Repairs should only be carried out by authorized specialist companies or by the customer service department. Incompetent repairs can result in signifi cant risks for the user. In addition warranty claims become void. 5

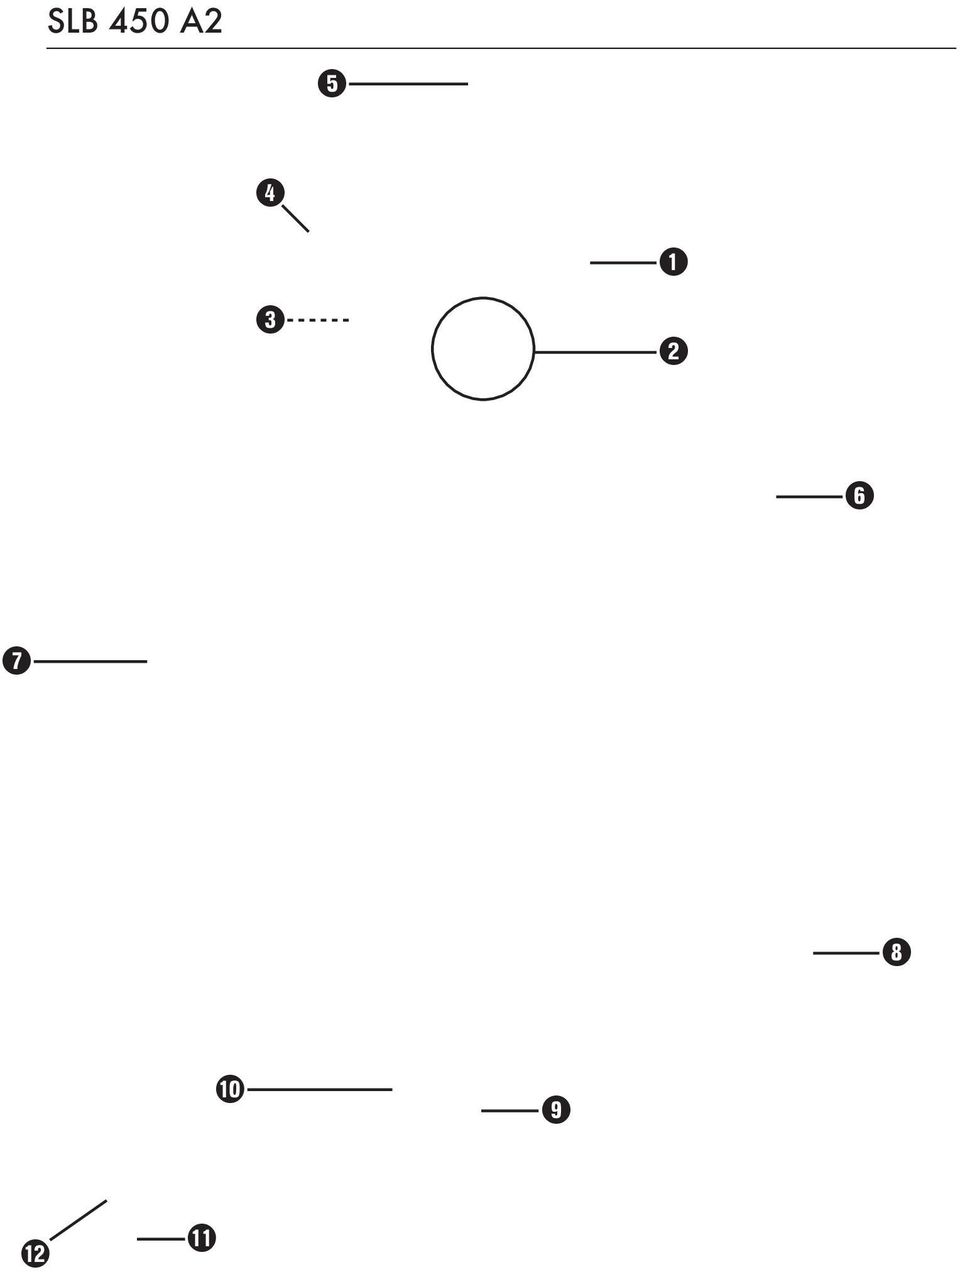
8 Appliance-Components GB IE A repair to the appliance during the warranty period may only be carried out by a customer service department authorized by the manufacturer otherwise no additional warranty claims can be considered for subsequent damages. Defective components may only be replaced with original replacement parts. Only by using original replacement parts can you guarantee that the safety requirements are complied with. Protect the pump and the remote control against moisture and the penetration by liquids. Never submerge the pump or the remote control in water, never place the pump in the close vicinity of water and do not place any objects fi lled with liquids (such as vases) on the appliance. Do not place any objects on the appliance. Do not operate the appliance close to open fl ames (e.g. candles). Avoid direct solar radiation. Always remove the power cable from the mains power socket with the plug, not with the cable. In the cases of a defect occurring or a thunderstorm approaching, remove the plug from the mains power socket. Appliance-Components Electric pump 2 Connection supports for the air hose (pump side) 3 Function button (Pump) 4 Mains power cable 5 LED operation indicator 6 Air-bubble mat 7 Connection supports for the air hose (air-bubble mat side) 8 Air hose 9 Remote control 10 Function button (Remote control) 11 Aromatic oil-pad 12 Cotton fl eece 6
 on the appliance.")
9 Setting up and connecting Setting up and connecting Safety instructions GB IE DANGER Packaging material should not be used as a play thing. There is a risk of suff ocation! WARNING To avoid damage to persons and property, pay heed to the requirements for the installation site and for the electrical connection. Items supplied and transport inspection The appliance is delivered with the following components as standard: Electric pump with mains power cable Remote control including battery (3V, Type CR 2032) Air hose Air-bubble mat 3 Aromatic oil-pads and cotton fl eece Operating Instructions NOTICE Check the items supplied to ensure everything is available and it is free from visible damage. If the contents are not complete or are damaged due to defective packaging or through transportation, contact the service hotline (see chapter Service). Unpacking Remove all parts of the appliance and the operating instructions from the box. Remove all packing material. 7

10 Setting up and connecting GB IE Disposal of the packaging The packaging protects the appliance from transport damage. The packaging materials are selected from the point of view of their environmental friendliness and disposal technology and are therefore recyclable. The recirculation of packaging into the material circuit saves on raw material and reduces generated waste. Dispose of packaging material that is no longer needed according to the regionally established regulations. NOTICE If possible preserve the appliance's original packaging during the warranty period so that in the case of a warranty claim you can package the appliance properly for return. Requirements on the Installation Location DANGER Risk of fatal electrocution! Should the appliance make contact with water whilst connected to the mains power supply there exists a potentially fatal risk! Observe the following safety notices to avoid electrical hazards: All parts containing electrical components, except remote control devices, should be located or secured so that they cannot fall into the bathtub. Parts that are charged with standard mains power, i.e. all parts except those supplied with the extra low safety voltage of up to 12 V, MUST be inaccessible to people in the bath. For a safe and error-free operation of the appliance, installation location must fulfi ll the following conditions: Never place the pump above the bathtub. Place the pump on a fi rm, level and dry surface. Place the pump in such a way that the suction opening under of the pump housing cannot be covered (such as by a bath mat). Do not place the pump in a wet environment or in a spraywater area. Do not place the pump directly next to a radiator or a radiant heater. The mains power socket must be protected by an FC protector switch (RCD) with a rated residual current not exceeding 30 ma.. It must be easily accessible, so that the plug can be quickly removed in an emergency. Secure the air-bubble mat 6 to the fl oor of your bathtub with the rear suction cups. 8

11 Setting up and connecting Electrical connections IMPORTANT Before you connect up, compare the connection data (voltage and frequency) on the plate of the appliance with that of your electrical network. This data must match in order to avoid damage to the appliance. Check to ensure that the power cable 4 of the appliance is undamaged and it will not be laid over hot surfaces and/or sharp edges. Make sure that the power cable 4 is not over taut or folded. Do not let the power cable 4 hang over edges (trip wire eff ect). GB IE Inserting batteries into the remote control NOTICE The supplied battery (3V, type CR 2032) has already been fi tted into the remote control at the factory. Before use, remove the insulation strip from the battery compartment. To insert a new battery, proceed as follows: Open the battery compartment at the rear of the remote control 9 by rotating the circular cover in the direction of the symbol. Use a small coin for turning it. Insert a battery of the type CR 2032 (3V) into the battery compartment. Make sure the polarities are correct; the positive pole faces up. Close the battery compartment by replacing the round cover and turning it in the direction of the symbol until it is fi rmly seated back in the housing. Fixing the air-bubble mat into the bath DANGER Slippery! If the air bubble mat is not fixed into the bathtub properly, there is a great risk of slipping! Observe the following safety information to avoid the risks of slipping: Carefully press the air-bubble mat onto the bottom of the bath tub until all of the suction cups on the air-bubble mat are fi rmly secured to the bath bottom. Check every time before getting into the bath tub whether the air-bubble mat is still properly and fi rmly secured. Do not climb into the bathtub before all the suction cups of the air-bubble mat are properly secured in the bath tub. 9
.")
12 Setting up and connecting GB IE Place the air-bubble mat 6 onto the bottom of your bath tub so that the connection-support for the air hose 7 is pointing upwards. Press the air-bubble mat 6 with the fl at of your hands until it is fi rmly secured onto the bath tub fl oor by its suction cups. NOTICE The suction cups of the air-bubble mat attach themselves to the bottom of the bath tub much easier and more fi rmly if you fi rst moisten them slightly before pressing. Using aromatic oils Optionally, you can use aromatic oils (perfume or massage oils). For this, use the supplied aroma-oil pad Open the aroma-oil pad 11. Place a drop of the aromatic oil onto the cotton-fl eece 12. Close the aroma-oil pad 11. Place the aromatic oil-pad 11 in the connection support 2 of the pump. NOTICE You can also order the aromatic oil-pads over the phone via the Service Hotline (see the chapter Service). Item Number Designation Number of Pieces zu Aroma oil-pads including 3 cotton fl eece 10
. For this, use the supplied aroma-oil pad 11. 12 2 11 Open the aroma-oil pad 11.")
13 Setting up and connecting Connecting the air hose First connect the air hose 8 to the connection-support 2 of the pump. With this, ensure that the plastic cam aligns exactly with the recess in the connection-support 2. Then turn the hose connector of the air hose 8 to the left, in the direction of the symbol, until the hose connector is clamped in the connecting support 2 of the pump. GB IE 2 8 Afterwards, insert the hose fi tting on the other side of the air hose into the connection-support of the air-bubble mat 7. 8 fi rmly

14 Handling and operation GB IE Electrical connections DANGER Risk of fatal electrocution! Contact with wires or components carrying mains power could be potentially fatal! Observe the following safety notices to avoid risks from electrical hazards: Do not operate the appliance if the power cable or the plug are damaged. Connect the appliance only to an electrical outlet protected by an FC protector switch (RCD) with a rated residual current not exceeding 30 ma. Never touch the pump and the mains plug with wet hands. Avoid water contact with the pump. Place the pump at least 60 cm away from the bath tub. Under no circumstances should you open the housing of the appliance. Should live connections be touched and/or the electrical and mechanical construction changed, there is a risk of receiving an electric shock. Insert the plug into a mains power socket. Handling and operation In this chapter you receive important information for the handling and operation of the appliance. Switching On and Off Switch the pump on with one press of the function button 3 on the pump. Switch the pump off with several presses of the function button 3 on the pump. NOTICE In the same way, the pump may be switched on or off using the remote control 9 by pressing the function button

15 Handling and operation Functions The appliance off ers three diff erent operating modes: Continuous with low intensity Continuous with high intensity Massage operation GB IE IMPORTANT Risk of damage to the appliance from excessive continuous operation. Excessive continuous operation may cause an overheating of the pump. The appliance switches off after 20 minutes usage time. Allow the pump to cool down for 10 minutes after the normal period of use before switching it back on. Function selection on the pump Switch the pump on with one press of the function button 3. The LED operation indicator 5 blinks green, and the pump is operating at the lowest level of intensity. By once again pressing the function button 3 the LED operation indicator 5 blinks red and the pump switches to the high intensity level. By pressing the function button 3 once again, the appliance switches into the programme mode. The LED operation indicator 5 blinks orange, and the appliance is now working in the massage mode. With this, the appliance works by alternating between the low and high intensity levels. Press the function button 3 a fourth time to switch the appliance off. The LED operation indicator 5 extinguishes. NOTICE The appliance switches off automatically after 20 minutes usage time. 13

16 Handling and operation GB IE Function selection with the remote control IMPORTANT Risk of damage from water intrusion. Never submerge the appliance or the remote control in water or other fl uids. The appliance or the remote control could be irreparably damaged. Using the suction cups on the back of it, attach the remote control onto the tiles next to your bath tub. NOTICE To ensure faultfree operation of the remote control 9, it must be held during operation so that it points directly to the pump. Switch the pump on with one press of the function button 10. The LED operation indicator 5 on the pump blinks green, and the pump is operating at the lowest level of intensity. By once again pressing the function button 10 the LED operation indicator 5 on the pump blinks red and the pump switches to the high intensity level. By pressing the function button 10 once again, the appliance switches into the programme mode. The LED operation indicator 5 on the pump blinks orange, and the appliance is now working in the massage mode. With this, the appliance works by alternating between the low and high intensity levels. Press the function button 10 a fourth time to switch the appliance off. The LED operation indicator 5 on the pump extinguishes. NOTICE The appliance switches off automatically after 20 minutes usage time. 14

17 Cleaning/Troubleshooting Cleaning Safety instructions GB IE DANGER Risk of fatal electrocution! Remove the plug from the mains power socket before beginning to clean the appliance. IMPORTANT Damage to the appliance! In order to avoid irreparable damage to the appliance, ensure that no moisture can permeate into the pump housing when you are cleaning it. Cleaning the appliance Clean the surfaces of the pump housing only with a soft, dry cloth. Clean the air-bubble mat with water and a soft sponge. Clean the air hose only with water. Then let it dry well. NOTICE To take the air-bubble mat out of the bath tub, gently grasp under the individual suction cups with a fi ngernail to neutralise the vacuum eff ect. Troubleshooting In this chapter you will receive important information for malfunction localisation and remedies. Observe the instructions in order to avoid danger and damage. Safety instructions WARNING Observe the following safety information to avoid danger and property damage: Repairs to electronic devices may only be carried out by specialists who have been trained by the manufacturer. Considerable danger to the consumer and damage to the device can occur as a result of incorrect repairs. 15

18 Troubleshooting GB IE Malfunction causes and remedies The following table will help with localising and eliminating minor malfunctions: Defect Possible cause Solution Appliance does not switch on. Appliance does not let itself be switched off. There are no air bubbles exiting the air-bubble mat. Air-bubble mat does not adhere to the fl oor of the bathtub. Appliance stops automatically. The plug is not inserted. Mains power socket does not supply any power. The remote control 9 was not directed at the appliance. The battery in the remote control is empty. The battery in the remote control is empty. Function button 3 not pressed often enough. Appliance not switched on. Air hose 8 not properly connected. Suction cups of the airbubble mat are not clinging fi rmly to the fl oor of the bath. Soap, shampoo or hair remnants prevent fi rm suction to the bottom of the bath tub. Cooling time after operation too short. Insert the plug into a mains power socket. Check the fuses. On activation, aim the remote control at the pump. Insert a new battery into the remote control. Insert a new battery into the remote control. Press the function button repeatedly until the appliance switches off. Switch the appliance on. Properly connect/lock the air hose to the air-bubble mat 6 and to the pump. Moisten the suction caps on the airbubble mat and then press it fi rmly onto the bottom of the bath tub. Remove the soap, shampoo or hair remnants/rinse the bath tub out before pressing the air-bubble mat down. After use, allow the pump to cool for at least 10 minutes and fi rst then restart it if still needed. NOTICE If you cannot solve the problem with the aforementioned methods, please contact Customer Service. 16

19 Storage/Disposal Storage/Disposal Storage If you do not intend to use the appliance for a long time, unplug it from the mains power socket, remove the air hose and store it in a clean, dry place away from direct sunlight.. Clean the air bubble mat and let it dry well. Remove the battery from the remote control. GB IE Disposal of the appliance Do not dispose of this appliance in your normal domestic waste. This product is subject to the provisions of the European Directive 2002/96/EC-WEEE (Waste Electrical and Electronic Equipment). Dispose of this appliance through an approved waste disposal centre or at your community waste facility. Observe the currently applicable regulations. In case of doubt, please contact your waste disposal centre. Disposing of the batteries Do not dispose of the batteries with household waste. Every consumer is statutorily obliged to dispose of batteries at a collection site of his community/city district or at a retail store. This obligation is intended to ensure that batteries are disposed of in an environmentally safe fashion. Only dispose of batteries when they are fully discharged. 17
.")
20 Appendix GB IE Appendix Notes on the EC Declaration of Conformity This device complies, in regards to conformance with the basic requirements and other relevent regulations, with the EMC Directive 2004/108/EC, as well as the Directive for Low Voltage Devices 2006/95/EC. The complete original declaration of conformity can be obtained from the importer. Technical data Model Operating voltage Power consumption Remote control battery V/ 50 Hz 450 W 3 V, Type CR 2032 (Lithium Battery) Operating temperature C Humidity (no condensation) 5-90 % Measurements (W x B x D) Pump Air-bubble mat Weight Pump Air-bubble mat 25 x 16 x x 36 x 1.2 approx approx. 800 cm cm g g Protection class II / Protection type Automatic switch-off time Cooling time IP45 after 20 minutes min. 10 minutes 18
 Pump Air-bubble mat Weight Pump Air-bubble mat 25 x 16 x 17 120 x 36 x 1.2 approx. 1.500 approx.")
21 Appendix Warranty With this appliance you receive a warranty of 3 years from the date of purchase. This appliance has been manufactured with care and thoroughly tested before delivery. Please retain your receipt as proof of purchase. In the case of a warranty claim, please make contact by telephone with our service department. Only in this way can a post-free despatch for your goods be assured. GB IE NOTICE The warranty covers only claims for material and manufacturing defects, not for transport damages, worn parts or for damage to fragile components, e.g. buttons or batteries.. This product is for private use only and is not intended for commercial use. If this product has been subjected to improper or inappropriate handling, abuse, or modifi cations not carried out by one of our authorised service centres, the warranty will be considered void. This warranty does not aff ect your statutory rights. The warranty period is not extended by repairs eff ected under warranty. This applies also to replaced and repaired parts. Damages or defects discovered after purchase are to be reported directly after unpacking, at the latest two days after the purchase date. Repairs carried out after lapse of the warranty period are subject to charge. Service Importer Service Great Britain Tel.: ( 0.10/Min.) kompernass@lidl.gb IAN Service Ireland Tel.: (0,08 EUR/Min., (peak)) (0,06 EUR/Min., (off peak)) kompernass@lidl.ie IAN KOMPERNASS GMBH BURGSTRASSE BOCHUM, GERMANY 19
22
23 Sisällysluettelo Johdanto Tietoja tästä käyttöohjeesta Tekijänoikeus Vastuun rajoittaminen Määräystenmukainen käyttö Varoitukset Turvallisuus Käyttörajoitukset Sähkövirran aiheuttama vaara...24 Paristojen käsittely Tärkeitä turvallisuusohjeita Laitteen osat Sijoitus ja kytkennät Turvaohjeet Toimituksen laajuus ja kuljetustarkastus Purkaminen pakkauksesta Pakkauksen hävittäminen Pystytyspaikalle asetetut vaatimukset 28 Sähköliitäntä Pariston asettaminen kauko-ohjaimeen Porematon kiinnittäminen kylpyammeeseen Aromaöljyjen käyttö Ilmaletkun liittäminen Sähköliitäntä Ohjaus ja käyttö Virrankytkentä ja -katkaisu Toiminnot Toimintojen valinta pumpulla Toimintojen valinta kauko-ohjaimella 34 Puhdistus Turvaohjeet Laitteen puhdistaminen Vianetsintä Turvaohjeet Virheiden syyt ja korjaaminen Säilytys/Hävittäminen Säilytys Laitteen hävittäminen Paristojen hävittäminen Liite EY-vaatimustenmukaisuusvakuutusta koskeva ohje Tekniset tiedot Takuu Huolto Maahantuoja FI 21
24 Johdanto Johdanto FI Tietoja tästä käyttöohjeesta Tämä käyttöohje on porematon (jatkossa "laite") osa ja siinä annetaan tärkeitä ohjeita laitteen määräystenmukaisesta käytöstä, turvallisuudesta, liitännästä sekä laitteen käytöstä. Käyttöohjeen on aina oltava käytettävissä laitteen lähellä. Jokaisen laitetta käyttävän ja laitteen häiriöitä korjaavan henkilön on luettava käyttöohje ja sovellettava sitä. Säilytä tämä käyttöohje ja luovuta se laitteen mukana seuraavalle omistajalle. Tekijänoikeus Tämä asiakirja on suojattu tekijänoikeudellisesti. Kaikenlainen monistaminen tai kopiointi, myös osittain, sekä kuvien toistaminen, myös muutettuna, on sallittua ainoastaan valmistajan kirjallisella luvalla. Vastuun rajoittaminen Kaikki tämän käyttöohjeen sisältämät tekniset tiedot, liitäntää ja käyttöä koskevat tiedot ja ohjeet, vastaavat viimeisintä tilaa painatusajankohtana ja ne on annettu tähänastisten kokemustemme ja havaintojemme perusteella parhaiden tietojemme mukaisesti. Tämän ohjeen tiedoista, kuvista ja kuvauksista ei voida johtaa minkäänlaisia vaatimuksia. Valmistaja ei vastaa mistään vahingoista, joiden syynä on ohjeiden noudattamatta jättäminen, muu kuin määräystenmukainen käyttö, virheellisesti suoritetut korjaukset, luvattomasti suoritetut muutokset tai muiden kuin sallittujen varaosien käyttö. Määräystenmukainen käyttö Tämä laite on tarkoitettu vain porekylpyjen luomiseen hyvinvointihierontatarkoituksissa suljetuissa tiloissa yksityiskäyttöön. Muu tai tämän ylittävä käyttö katsotaan määräystenvastaiseksi. Emme vastaa mistään määräystenvastaisesta käytöstä, asiattomista korjauksista, luvattomasti suoritetuista muutoksista tai muiden kuin sallittujen varaosien käytöstä johtuvista vahingoista. Vastuu on yksin käyttäjän. 22
25 Johdanto Varoitukset Tässä käyttöohjeessa käytetään seuraavia varoituksia: VAARA Tämän vaara-asteen varoitus on merkkinä uhkaavasta vaarallisesta tilanteesta. Mikäli vaarallista tilannetta ei vältetä, se voi johtaa kuolemaan tai vakaviin vammoihin. Noudata tässä varoituksessa olevia ohjeita välttääksesi kuolemanvaaran tai vakavat henkilövammat. FI VAROITUS Tämän vaara-asteen varoitus on merkkinä mahdollisesti vaarallisesta tilanteesta. Mikäli vaarallista tilannetta ei vältetä, se voi johtaa loukkaantumisiin. Noudata tämän varoituksen ohjeita välttääksesi henkilöiden loukkaantumisen. HUOMIO Tämän vaara-asteen varoitus on merkkinä mahdollisesta aineellisesta vahingosta. Mikäli tilannetta ei vältetä, se voi johtaa aineellisiin vahinkoihin. Noudata tämän varoituksen ohjeita välttääksesi aineellisia vahinkoja. OHJE Ohje on merkkinä lisätiedoista, jotka helpottavat laitteen käyttöä. 23
26 Turvallisuus Turvallisuus FI Tässä luvussa annetaan tärkeitä turvaohjeita laitteen käsittelyyn. Tämä laite on säädettyjen turvallisuusmääräysten mukainen. Asiaton käyttö saattaa johtaa henkilövahinkoihin ja aineellisiin vahinkoihin. Käyttörajoitukset Älä käytä laitetta seuraavissa tapauksissa: Korkea verenpaine Sydän- ja verisuonitaudit Raskauden aikana OHJE Jos olet sairas, neuvottele käyttömahdollisuuksista lääkärisi kanssa ennen laitteen käyttöä. Lapset saavat käyttää laitetta vain aikuisten valvonnassa. Sähkövirran aiheuttama vaara VAARA Sähkövirran aiheuttama hengenvaara! Koskettaessa jännitteen alaisiin johtoihin tai rakenneosiin on olemassa hengenvaara! Noudata seuraavia turvaohjeita välttääksesi sähkövirran aiheuttaman vaaran: Älä käytä laitetta, jos verkkopistoke tai liitäntäjohto on vaurioitunut. Älä koskaan aseta laitetta kylpyammeen yläpuolelle. Liitä laite ainoastaan sellaiseen verkkopistorasiaan, joka on varmistettu vikavirtakytkimellä (RCD), jonka mittausvikavirta ei ole yli 30 ma. Älä koske pumppuun ja verkkopistokkeeseen märillä käsillä. Älä koskaan aseta pumppua veteen. Aseta pumppu vähintään 60 cm:n etäisyydelle kylpyammeesta. Älä missään tapauksessa avaa laitteen koteloa. Jos jännitettä johtaviin liitäntöihin kosketaan ja sähköistä ja mekaanista rakennetta muutetaan, on olemassa sähköiskun vaara. 24
27 Turvallisuus Paristojen käsittely VAROITUS Asiattoman käytön aiheuttama vaara! Noudata seuraavia turvaohjeita paristojen turvallista käsittelyä varten: Älä heitä paristoja tuleen. Älä oikosulje paristoja. Älä yritä ladata paristoja uudelleen. Tarkasta paristo säännöllisesti. Ulos valuva paristohappo voi aiheuttaa laitteessa pysyviä vaurioita. Toimi erityisen varovasti käsitellessäsi vahingoittuneita tai vuotaneita paristoja. Syöpymisvaara! Käytä suojakäsineitä. Säilytä paristot lapsilta ulottumattomissa. Hakeudu nieltyäsi välittömästi lääkäriin. Poista paristo kaukosäätimestä, jos et käytä laitetta pidempään. FI Tärkeitä turvallisuusohjeita Käsittele laitetta turvallisesti noudattamalla seuraavia turvaohjeita: Tarkista laite ennen käyttöä ulkoisten näkyvien vaurioiden varalta. Älä ota viallista tai pudonnutta laitetta käyttöön. Jos laitteen verkkojohto on vahingoittunut / vahingoittuu, johdon saa vahinkojen välttämiseksi vaihtaa vain valmistajalla tai valmistajan valtuuttamassa asiakaspalvelupisteessä tai muussa ammattitaitoisessa huoltoliikkeessä. Tätä laitetta ei ole tarkoitettu sellaisten henkilöiden (mukaan lukien lapset) käyttöön, joiden rajoitetut, fyysiset, aistilliset tai henkiset kyvyt tai kokemuksen ja/tai tiedon puute estävät käytön, lukuun ottamatta tilanteita, joissa heitä valvoo turvallisuudesta vastaava henkilö tai joissa he ovat saaneet tältä ohjeita laitteen käytöstä. Lapsia on valvottava, jotta varmistettaisiin, etteivät he leiki laitteella. Laitteen tulee olla kylpyammeessa olevien henkilöiden ulottumattomissa. Anna laite ainoastaan valtuutetun ammattiyrityksen tai huoltopalvelun korjattavaksi. Asiattomat korjaukset voivat aiheuttaa vaaroja käyttäjälle. Lisäksi takuu raukeaa. 25
28 Laitteen osat FI Laitteen korjauksen takuuaikana saa suorittaa ainoastaan valmistajan valtuuttama huoltoliike, muutoin ei takuu ole enää voimassa seuraavien vaurioiden esiintyessä. Vialliset rakenneosat saa vaihtaa vain alkuperäisiin varaosiin. Vain näillä osilla on taattua, että turvallisuusvaatimukset täyttyvät. Suojaa pumppua ja kauko-ohjainta kosteudelta ja nesteiden sisään tunkeutumiselta. Älä koskaan upota pumppua ja kauko-ohjainta veteen, älä sijoita pumppua veden lähelle äläkä aseta laitteelle mitään nesteellä täytettyjä esineitä (esim. maljakoita). Älä aseta laitteelle mitään esineitä. Älä käytä laitetta avotulen (esim. kynttilöiden) lähellä. Vältä suoraa auringonpaistetta. Vedä tulojohto pistorasiasta aina liitäntäpistokkeesta, älä liitosjohdosta. Irrota verkkopistoke pistorasiasta, jos esiintyy häiriöitä tai ukkosta. Laitteen osat Sähköinen pumppu 2 Ilmaletkun liitäntäistukka (pumpun puolella) 3 Toimintopainike (pumppu) 4 Liitäntäjohto 5 LED-käyttönäyttö 6 Porematto 7 Ilmaletkun liitäntäistukka (porematto) 8 Ilmaletku 9 Kauko-ohjain 10 Toimintopainike (kauko-ohjain) 11 Aromaöljykasetti 12 Puuvillatyyny 26
29 Sijoitus ja kytkennät Sijoitus ja kytkennät Turvaohjeet VAARA Pakkausmateriaalit eivät ole leikkikaluja. Ne voivat aiheuttaa tukehtumisvaaran. FI VAROITUS Noudata pystytyspaikalle asetetuista vaatimuksista sekä laitteen sähköliitännästä annettuja ohjeita henkilövahinkojen ja aineellisten vahinkojen välttämiseksi. Toimituksen laajuus ja kuljetustarkastus Laite toimitetaan vakiona seuraavin komponentein: Sähköinen pumppu ja liitäntäjohto Kaukosäädin ml. paristo (3 V, tyyppi CR 2032) Ilmaletku Porematto 3 aromaöljykasettia ja puuvillatyyny Käyttöohje OHJE Tarkista toimituksen täydellisyys ja tarkista osat näkyvien vaurioiden varalta. Jos toimitus ei ole täydellinen tai havaitset puutteellisesta pakkauksesta tai kuljetuksesta aiheutuneita vaurioita, käänny huollon palvelunumeron puoleen (katso luku Huolto). Purkaminen pakkauksesta Ota kaikki laitteen osat ja käyttöohje pakkauksesta. Poista koko pakkausmateriaali 27
30 Sijoitus ja kytkennät FI Pakkauksen hävittäminen Pakkaus suojaa laitetta kuljetusvahingoilta. Pakkausmateriaalit on valittu ympäristöystävälliset ja jätehuoltotekniset näkökulmat huomioon ottaen ja siksi ne voidaan kierrättää. Pakkauksen palauttaminen materiaalikiertoon säästää raaka-aineita ja vähentää jätettä. Hävitä tarpeettomat pakkausmateriaalit paikallisten voimassa olevien määräysten mukaisesti. OHJE Säilytä alkuperäispakkaus mahdollisuuksien mukaan laitteen takuuaikana. Näin voit pakata laitteen asianmukaisesti mahdollisen takuutapauksen sattuessa. Pystytyspaikalle asetetut vaatimukset VAARA Sähkövirran aiheuttama hengenvaara! Jos jännitteen alainen laite joutuu kosketuksiin veden kanssa, on olemassa hengenvaara! Noudata seuraavia turvaohjeita välttääksesi sähkövirran aiheuttaman vaaran: Sähköisiä rakenneosia sisältävät osat, kauko-ohjauslaitteita lukuun ottamatta, on pystytettävä tai kiinnitettävä niin, etteivät ne voi pudota kylpyammeeseen. Aktiivisia osia sisältävät osat, korkeintaan 12 V:n turvapienjännitteellä syötettäviä osia lukuun ottamatta, on sijaittava kylvyssä olevien henkilöiden ulottumattomissa. Laitteen turvallista ja virheetöntä toimintaa varten on pystytyspaikan täytettävä seuraavat vaatimukset: Älä koskaan aseta pumppua kylpyammeen yläpuolelle. Aseta pumppu kiinteälle, vaakasuoralle ja kuivalle alustalle. Aseta pumppu niin, ettei pumppukotelon alapuolella sijaitsevaa imuaukkoa peitetä (esim. kylpyhuoneen matolla). Älä aseta pumppua märkään ympäristöön tai roiskeveden alueelle. Älä aseta pumppua suoraan lämpöpatterin tai lämmityslaitteen viereen. Pistorasian on oltava varmistettu vikavirtakytkimellä (RCD), jonka mittausvikavirta ei saa olla yli 30 ma. Siihen on päästävä hyvin käsiksi niin, että verkkopistoke voidaan tarvittaessa irrottaa helposti. Kiinnitä porematto 6 kylpyammeesi pohjaan sen taustapuolella olevilla imukupeilla. 28
31 Sijoitus ja kytkennät Sähköliitäntä HUOMIO Vertaa ennen laitteen liittämistä tyyppikilven liitäntätietoja (jännite ja taajuus) sähköverkkosi vastaaviin tietoihin. Näiden tietojen on vastattava toisiaan, jotta laitteessa ei esiinny häiriöitä. Varmista, että laitteen liitäntäjohdossa 4 ei ole vaurioita ja ettei sitä vedetä kuumien pintojen ja/tai terävien reunojen yli. Varmista, ettei liitäntäjohtoa 4 vedetä kireälle tai taiteta. Älä anna liitäntäjohdon 4 roikkua kulmien yli (ansalankavaikutus). FI Pariston asettaminen kauko-ohjaimeen OHJE Mukana toimitettu paristo (3V, tyyppi CR 2032) on asetettu kauko-ohjaimeen jo tehtaalla. Poista ennen käyttöä paristolokerossa oleva eristysliuska. Aseta uusi paristo paikoilleen seuraavasti: Avaa paristolokero kaukosäätimen 9 taustapuolella kiertämällä pyöreää suojusta symbolin suuntaan. Käytä kiertämiseen pientä kolikkoa. Aseta paristokoteloon tyypin CR 2032 (3V) paristo. Varmista tällöin oikea napaisuus: Plusnapa osoittaa ylöspäin. Sulje paristokotelo asettamalla pyöreä suojus paikoilleen ja kiertämällä sitä symbolin suuntaan, kunnes se on jälleen tiiviisti paikoillaan kotelossa. Porematon kiinnittäminen kylpyammeeseen VAARA Liukastumisvaara! Jos poremattoa ei kiinnitetä kylpyammeeseen oikein, on olemassa liukastumisvaara! Noudata seuraavia turvaohjeita liukastumisvaaran välttämiseksi: Paina poremattoa huolellisesti ammeen pohjaan, kunnes kaikki porematon imukupit on kiinnitetty tiiviisti ammeen pohjaan. Tarkista ennen jokaista kylpyammeeseen astumiskertaa, että porematto on kiinnitetty asianmukaisesti. Älä astu kylpyammeeseen, ennen kuin kaikki porematon imukupit on kiinnitetty asianmukaisesti ammeeseen. 29
32 Sijoitus ja kytkennät FI Aseta porematto 6 kylpyammeesi pohjalle niin, että ilmaletkun liitäntäistukka 7 osoittaa ylöspäin. Paina poremattoa 6 tasaisella kädellä, kunnes se imeytyy imukuppeineen ammeen pohjaan. OHJE Porematon imukupit imeytyvät ammeen pohjaan helpommin, jos niitä kostutetaan hieman ennen painamista. Aromaöljyjen käyttö Valinnaisesti voit käyttää aromaattisia öljyjä (tuoksu- tai hierontaöljyjä). Käytä tähän toimitukseen sisältyvää aromaöljykasettia Käännä aromaöljykasetti 11 auki. Lisää tippa aromaöljyä puuvillatyynylle 12. Taita aromaöljykasetti 11 jälleen kokoon. Aseta aromaöljykasetti 11 pumpun liitäntäistukkaan 2. OHJE Voit tilata aromaöljykasetteja lisää myös puhelimitse huollon palvelunumeron kautta (katso luku Huolto). Tuotenro Nimike Osien määrä zu Aromaöljykasetit ml. 3 puuvillatyyny 30
33 Sijoitus ja kytkennät Ilmaletkun liittäminen Liitä ilmaletku 8 ensiksi pumpussa olevaan liitäntäistukkaan 2. Varmista tällöin, että muovinokka on tarkasti samansuuntainen liitäntäistukan 2 loven kanssa. Kierrä sitten ilmaletkun 8 letkumuhvia vasemmalle symbolin suuntaan, kunnes letkumuhvi lukittuu pumpun liitäntäistukkaan 2. FI 2 8 Työnnä sen jälkeen ilmaletkun 8 toisessa päässä oleva letkunysä tiukasti porematon liitäntäistukkaan
34 Ohjaus ja käyttö Sähköliitäntä FI VAARA Sähkövirran aiheuttama hengenvaara! Koskettaessa jännitteen alaisiin johtoihin tai rakenneosiin on olemassa hengenvaara! Noudata seuraavia turvaohjeita välttääksesi sähkövirran aiheuttaman vaaran: Älä käytä laitetta, jos verkkopistoke tai liitäntäjohto on vaurioitunut. Liitä laite ainoastaan sellaiseen verkkopistorasiaan, joka on varmistettu vikavirtakytkimellä (RCD), jonka mittausvikavirta ei ole yli 30 ma. Älä koske pumppuun ja verkkopistokkeeseen märillä käsillä. Vältä koskettamasta pumpulla veteen. Aseta pumppu vähintään 60 cm:n etäisyydelle kylpyammeesta. Älä missään tapauksessa avaa laitteen koteloa. Jos jännitettä johtaviin liitäntöihin kosketaan ja sähköistä ja mekaanista rakennetta muutetaan, on olemassa sähköiskun vaara. Työnnä verkkopistoke pistorasiaan. Ohjaus ja käyttö Tässä luvussa annetaan tärkeitä ohjeita laitteen ohjaukseen ja käyttöön. Virrankytkentä ja -katkaisu Kytke pumppu päälle painamalla kerran pumpussa olevaa toimintopainiketta 3. Kytke pumppu jälleen pois päältä painamalla pumpussa olevaa toimintopainiketta 3 useampaan kertaan. OHJE Pumppu voidaan samalla tavalla kytkeä päälle tai pois päältä kauko-ohjauksen 9 avulla toimintopainiketta 10 painamalla. 32
35 Ohjaus ja käyttö Toiminnot Laite tarjoaa kolme erilaista käyttötapaa: Kestokäyttö alhaisella voimakkuudella Kestokäyttö suurella voimakkuudella Hierontakäyttö FI HUOMIO Liiallisen kestokäytön aiheuttama laitevaurioiden vaara. Yletön kestokäyttö voi johtaa pumpun ylikuumenemiseen. Laite sammuu 20 minuutin käytön jälkeen. Anna pumpun jäähtyä tavanomaisen käytön keston jälkeen 10 minuutin ajan, ennen kuin kytket sen uudelleen päälle. Toimintojen valinta pumpulla Kytke pumppu päälle painamalla kerran toimintopainiketta 3. Käytön LED-merkkivalo 5 vilkkuu vihreänä ja pumppu toimii alhaisimmalla voimakkuustasolla. Kun toimintopainiketta 3 painetaan uudelleen, käytön LED-merkkivalo 5 vilkkuu punaisena ja pumppu vaihtaa suuremmalle voimakkuustasolle. Kun toimintopainiketta 3 painetaan uudelleen, laite vaihtaa ohjelmatilaan. Käytön LED-merkkivalo 5 vilkkuu oranssina ja laite toimii hierontakäytössä. Tällöin laite työskentelee vaihdellen alhaisella ja korkealla voimakkuustasolla. Paina toimintopainiketta 3 neljännen kerran sammuttaaksesi laitteen. Käytön LED-merkkivalo 5 sammuu. OHJE Laite sammuu automaattisesti 20 minuutin käytön jälkeen. 33
36 Toimintojen valinta kauko-ohjaimella Ohjaus ja käyttö FI HUOMIO Sisään tunkeutuvan veden aiheuttama vaurioiden vaara. Älä koskaan upota laitetta tai kauko-ohjainta veteen tai muihin nesteisiin. Laite tai kauko-ohjain voivat vaurioitua korjauskelvottomaksi. Kiinnitä kauko-ohjain sen taustapuolella sijaitsevilla imukupeilla kylpyammeesi vieressä oleviin kaakeleihin. OHJE Kauko-ohjaimen 9 moitteettoman toiminnan takaamiseksi sitä on pidettävä käytettäessä niin, että se osoittaa pumppuun päin. Kytke pumppu päälle painamalla kerran toimintopainiketta 10. Pumpussa oleva käytön LED-merkkivalo 5 vilkkuu vihreänä ja pumppu toimii alhaisimmalla voimakkuustasolla. Kun toimintopainiketta 10 painetaan uudelleen, pumpussa oleva käytön LED-merkkivalo 5 vilkkuu punaisena ja pumppu vaihtaa suuremmalle voimakkuustasolle. Kun toimintopainiketta 10 painetaan uudelleen, laite vaihtaa ohjelmatilaan. Pumpussa oleva käytön LED-merkkivalo 5 vilkkuu oranssina ja laite toimii hierontakäytössä. Tällöin laite työskentelee vaihdellen alhaisella ja korkealla voimakkuustasolla. Paina toimintopainiketta 10 neljännen kerran sammuttaaksesi laitteen. Pumpussa oleva käytön LED-merkkivalo 5 sammuu. OHJE Laite sammuu automaattisesti 20 minuutin käytön jälkeen. 34
37 Puhdistus/Vianetsintä Puhdistus Turvaohjeet VAARA Sähkövirran aiheuttama hengenvaara! Irrota verkkopistoke pistorasiasta ennen puhdistuksen aloittamista. FI HUOMIO Laitevaurio! Varmista, ettei pumppukoteloon tunkeudu puhdistettaessa kosteutta. Näin vältytään laitteen vaurioitumiselta korjauskelvottomaan kuntoon. Laitteen puhdistaminen Puhdista pumppukotelon pinnat vain pehmeällä, kuivalla liinalla. Puhdista porematto vedellä ja pehmeällä sienellä. Puhdista ilmaletku pelkällä vedellä. Anna sen sitten kuivua hyvin. OHJE Ota porematto kylpyammeesta nostamalla varovasti kynnellä yksittäisiä imukuppeja poistaaksesi tyhjiö-imutehon. Vianetsintä Turvaohjeet Tässä luvussa annetaan tärkeitä ohjeita häiriöiden paikallistamisesta ja häiriöiden poistamisesta. Noudata ohjeita vaarojen ja vaurioiden välttämiseksi. VAROITUS Noudata seuraavia turvaohjeita vaarojen ja aineellisten vahinkojen välttämiseksi: Sähkölaitteiden korjaukset saa suorittaa ainoastaan valmistajan kouluttama ammattihenkilöstö. Asiattomat korjaukset voivat aiheuttaa huomattavia vaaroja käyttäjälle ja vahingoittaa laitetta. 35
38 Virheiden syyt ja korjaaminen Vianetsintä Seuraava taulukko auttaa paikallistamaan ja korjaamaan pienemmät häiriöt: FI Vika Mahdollinen syy Korjaus Laitetta ei voida kytkeä päälle. Laitetta ei voida sammuttaa. Porematosta ei tule ilmakuplia. Porematto ei pysy kiinni kylpyammeen pohjassa. Laite pysähtyy itsekseen. Verkkopistoke ei ole seinässä. Pistorasia ei syötä jännitettä. Kauko-ohjainta 9 ei ole suunnattu laitteeseen. Kauko-ohjaimen paristo on tyhjä. Kauko-ohjaimen paristo on tyhjä. Toimintopainiketta 3 ei ole painettu riittävän monta kertaa. Laitetta ei ole kytketty päälle. Ilmaletkua 8 ei ole liitetty oikein. Porematon imukupit eivät ole tarttuneet ammeen pohjaan. Saippua, sampoo tai hiukset ammeen pohjassa estävät kiinnittymisen. Jäähdytysaika käytön jälkeen liian lyhyt. Työnnä verkkopistoke pistorasiaan. Tarkista asunnon sulakkeet. Suuntaa kauko-ohjain painettaessa pumppua kohti. Aseta kaukosäätimeen uusi paristo. Aseta kaukosäätimeen uusi paristo. Paina toimintopainiketta useita kertoja peräkkäin, kunnes laite sammuu. Kytke laite päälle. Liitä/lukitse ilmaletku oikein poremattoon 6 ja pumppuun. Kostuta porematon imukupit ja paina ne sitten tiiviisti kiinni ammeen pohjaan. Poista saippua, sampoo tai hiukset ennen porematon kiinnipainamista / huuhtele amme. Anna pumpun jäähtyä vähintään 10 minuutin ajan käytön jälkeen ja käynnistä vasta sen jälkeen tarvittaessa uudelleen. OHJE Jos et saa ongelmaa ratkaistua edellä mainittujen vaiheiden avulla, käänny valtuutetun huoltoliikkeen puoleen. 36
39 Säilytys/Hävittäminen Säilytys/Hävittäminen Säilytys Jos et käytä laitetta pidempään, irrota se sähköverkosta, irrota ilmaletku ja varastoi se puhtaassa, kuivassa paikassa ilman suoraa auringonpaistetta. Puhdista porematto ja anna sen kuivua hyvin. Ota paristo kauko-ohjauksesta. FI Laitteen hävittäminen Älä hävitä laitetta tavallisen talousjätteen mukana. Tämä tuote on eurooppalaisen direktiivin 2002/96/EC-WEEE (Waste Electrical and Electronic Equipment) alainen. Anna laite hyväksytyn jätehuoltoyrityksen tai kunnallisen jätelaitoksen hävitettäväksi. Noudata ajankohtaisia voimassa olevia määräyksiä. Ota epäselvissä tilanteissa yhteyttä paikalliseen jätehuoltoviranomaiseen. Paristojen hävittäminen Paristoja ei saa hävittää talousjätteiden mukana. Jokaisella kuluttajalla on lakisääteinen velvollisuus toimittaa paristot kuntansa/kaupunginosansa keräyspisteeseen tai liikkeeseen. Tämän tarkoituksena on varmistaa, että paristojen hävittämisestä ei aiheudu vaaraa ympäristölle. Palauta paristot ainoastaan purkautuneina. 37
40 Liite Liite FI EY-vaatimustenmukaisuusvakuutusta koskeva ohje Tämä laite vastaa perustavien vaatimusten ja muiden tärkeiden määräysten vastaavuuden suhteen eurooppalaista sähkömagneettisesta yhteensopivuudesta annettua direktiiviä 2004/108/EC ja pienjännitedirektiiviä 2006/95/EC. Täydellinen alkuperäinen vaatimustenmukaisuusvakuutus on saatavana maahantuojalta. Tekniset tiedot Malli Käyttöjännite Tehonotto Kauko-ohjaimen paristo V/ 50 Hz 450 W 3 V, tyyppi CR 2032 (litiumparisto) Käyttölämpötila C Kosteus (ei tiivistymistä) 5-90 % Mitat (K x L x S): Pumppu Porematto Paino Pumppu Porematto Suojausluokka Kotelointiluokka Automaattinen sammutusaika Jäähtymisaika 25 x 16 x x 36 x 1,2 n n. 800 II/ IP45 20 minuutin kuluttua väh. 10 minuuttia cm cm g g 38
41 Liite Takuu Laitteen takuu on 3 vuotta ostopäivästä. Laite on valmistettu huolellisesti ja tarkistettu tarkasti ennen toimitusta. Säilytä ostokuitti tositteeksi ostosta. Ota takuutapauksessa puhelimitse yhteyttä huoltopisteeseen. Vain näin voidaan taata tuotteesi maksuton lähettäminen huoltoon. OHJE Takuu koskee ainoastaan materiaali- ja valmistusvirheitä, ei kuitenkaan kuljetusvaurioita, kuluvia osia tai herkästi vaurioituvien osien, esim. kytkinten tai akkujen vaurioita. Tuote on tarkoitettu ainoastaan yksityiseen, ei kaupalliseen käyttöön. Takuu raukeaa, jos tuotetta on käytetty tavalla, joka ei vastaa tuotteen käyttötarkoitusta, tai muuten asiattomasti tai liian kovaa voimaa käyttäen. Takuu raukeaa myös, jos jokin muu taho kuin valmistajan valtuuttama huoltoliike on yrittänyt muuttaa tai korjata tuotetta. Tämä takuu ei rajoita kuluttajan lakisääteisiä oikeuksia. Takuukorjaus ei pidennä takuuaikaa. Tämä koskee myös vaihdettuja tai korjattuja osia. Mahdollisesti jo ostettaessa olemassa olevista vaurioista ja puutteista on ilmoitettava välittömästi pakkauksesta purkamisen jälkeen, viimeistään kuitenkin kahden päivän sisällä ostopäiväyksestä. Takuuajan päättymisen jälkeen suoritettavat korjaukset ovat maksullisia. FI Huolto Huolto Suomi Tel.: kompernass@lidl.fi IAN Maahantuoja KOMPERNASS GMBH BURGSTRASSE BOCHUM, GERMANY 39
42
43 Innehållsförteckning Introduktion Information om den här bruksanvisningen Upphovsrätt Ansvarsbegränsning Föreskriven användning Varningar Säkerhet Begränsning av användningssätt..44 Risker med elektricitet Handskas med batterier Grundläggande säkerhetsanvisningar 45 Komponenter Uppställning och anslutning 47 Säkerhetsanvisningar Leveransens innehåll och transportinspektion Uppackning Kassera förpackningen Krav på uppställningsplatsen Elektrisk anslutning Lägga in batteri i fjärrkontrollen...49 Fixera bubbelmattan i badkaret...49 Använda aromaoljor Ansluta luftslang Elektrisk anslutning Användning och drift Sätta på/stänga av Funktioner Välja funktion på pumpen Välja funktion med fjärrkontrollen..54 Rengöring Säkerhetsanvisningar Rengöra apparaten Åtgärda fel Säkerhetsanvisningar Orsaker till fel och åtgärder Förvaring/Kassering Förvaring Kassera apparaten Kassering av batterier Bilaga Information om överensstämmelse med EU-direktiv Tekniska data Garanti Service Importör SE 41
PAINEILMALETKUKELA-AUTOMAATTI AUTOMATIC AIR HOSE REEL
 MAV4 MAV5 MAV6 PAINEILMALETKUKELA-AUTOMAATTI AUTOMATIC AIR HOSE REEL Käyttöohje Instruction manual HUOMIO! Lue käyttöohjeet huolellisesti ennen laitteen käyttöä ja noudata kaikkia annettuja ohjeita. Säilytä
INSTALLATION INSTRUCTION ASENNUSOHJE PEM SJTK31 SJTK46 ENGLISH SUOMI
 INSTALLATION INSTRUCTION ASENNUSOHJE PEM1256 2010-2 SJTK31 SJTK46 ENGLISH SUOMI GB GENERAL INFORMATION - Check that the kit is suitable for the cable type. - Check the materials listed in the bill of materials
Installation instruction PEM
 Installation instruction ASENNUSOHJE PEM1032 2010-02 SURGE ARRESTER SET FOR POLE MOUNT TRANSFORMER YLIJÄNNITESUOJASETTI PYLVÄSMUUNTAJALLE ENGLISH SUOMI 2/8 PEM1032 2010-02 ENGLISH GENERAL INFORMATION -
Öljytäytteinen sähköpatteri Electric Oil Radiator
 Öljytäytteinen sähköpatteri Electric Oil Radiator KÄYTTÖOHJE Alkuperäisten ohjeiden käännös INSTRUCTIONS MANUAL Original instructions MALLI/MODEL: Holly 1500: ERC2-1507 Holly 2000: ERC2-2009 DT Istr (ERC
Presenter SNP6000. Register your product and get support at Käyttöopas
 Register your product and get support at www.philips.com/welcome Presenter SNP6000 FI Käyttöopas 1 a b c d e 2 3 4 Federal Communication Commission Interference Statement This equipment has been tested
Golfpallon etsijä asennusmanuaali
 Golfpallon etsijä asennusmanuaali Prazza takuu Kaikki Prazza tuotteet on suunniteltu ja valmistettu tiukkojen laatuvaatimusten mukaan, tuotteet ovat helppokäyttöisiä ja helppoja asentaa. Jos sinulla ilmenee
Box 1. Things you have/ Pakkaus sisältää. x 4 x 16 x 4 x 4. 300mm. 1700mm. 300mm 1. Things you should know / Sinun Tulee Tietää
 Phobos 30 Things you should know / Sinun Tulee Tietää Things you prepare / Näitä Tarvitset DURING INSTALLATION ALL PRODUCTS: use protective gloves at all times use eye protection at all times never install
Curriculum. Gym card
 A new school year Curriculum Fast Track Final Grading Gym card TET A new school year Work Ethic Detention Own work Organisation and independence Wilma TMU Support Services Well-Being CURRICULUM FAST TRACK
Installation instruction PEM
 Installation instruction ASENNUSOHJE PEM1031 2010-04 CURRENT LIMITING DEVICE FOR POLE MOUNT TRANSFORMER VIRTAA RAJOITTAVA SUOJA PYLVÄSMUUNTAJALLE ENGLISH SUOMI 75 2/8 PEM1031 2010-04 ENGLISH GENERAL INFORMATION
VAROITUKSET. Älä pura laitetta osiin.
 VAROITUKSET Laitteen väärinkäyttö voi johtaa henkilövahinkoihin. Noudata kaikkia tässä ohjekirjassa annettuja ohjeita ja käytä laitetta oikein. Älä koskaan seiso laitteen alapuolella. Älä pura laitetta
107401959 G INSTRUCTIONS FOR USE BRUGSANVISNING BETRIEBSANLEITUNG VC300 SERIES USER MANUAL MODE D EMPLOI INSTRUCCIONES DE USO
 0740959 G INSTRUCTIONS FOR USE BRUGSANVISNING BETRIEBSANLEITUNG MODE D EMPLOI INSTRUCCIONES DE USO VC300 SERIES USER MANUAL - Basic operations. - Suction regulation 3 - Cordlock (HEPA) 3. 4 - Wind up the
Choose Finland-Helsinki Valitse Finland-Helsinki
 Write down the Temporary Application ID. If you do not manage to complete the form you can continue where you stopped with this ID no. Muista Temporary Application ID. Jos et onnistu täyttää lomake loppuun
Straightener HP4661. Register your product and get support at Käyttöopas
 Register your product and get support at www.philips.com/welcome Straightener HP4661 FI Käyttöopas Suomi Olet tehnyt erinomaisen valinnan ostaessasi Philipsin laitteen! Käytä hyväksesi Philipsin tuki ja
D Automassagematte KH 4061 Bedienungsanleitung Ψάθα αυτοκινήτου για µασάζ KH 4061 Οδηγίες χρήσης Hierontamatto autoon KH 4061 Käyttöohje S Elektrisk
 D Automassagematte Bedienungsanleitung Ψάθα αυτοκινήτου για µασάζ Οδηγίες χρήσης Hierontamatto autoon Käyttöohje S Elektrisk massagedyna Bruksanvisning N Bilmassasjematte Bruksanvisning Automassagemåtte
National Building Code of Finland, Part D1, Building Water Supply and Sewerage Systems, Regulations and guidelines 2007
 National Building Code of Finland, Part D1, Building Water Supply and Sewerage Systems, Regulations and guidelines 2007 Chapter 2.4 Jukka Räisä 1 WATER PIPES PLACEMENT 2.4.1 Regulation Water pipe and its
INSTALLATION INSTRUCTION ASENNUSOHJE PEM1417 2012-11 ENGLISH SUOMI CURRENT LIMITING DEVICE VIRTAA RAJOITTAVA SUOJA SDI46.812 & SDI46.
 INSTALLATION INSTRUCTION ASENNUSOHJE PEM1417 2012-11 ENGLISH SUOMI CURRENT LIMITING DEVICE VIRTAA RAJOITTAVA SUOJA SDI46.812 & SDI46.824 2/8 SDI46.812 & SDI46.824 PEM1417 2012-11 ENGLISH GENERAL INFORMATION
IEC IP V AC. VIZULO Stork Little Brother LED street luminaire / katuvalaisin. Mounting instruction Asennusohjeet. min 40 C.
 VIZULO Stork Little Brother LED street luminaire / katuvalaisin Mounting instruction Asennusohjeet 05 IEC EN 60598 IP66 min 40 C max + 45 C 198-264 V AC PH2 4 6 29/01/2016 SIA VIZULO Ganibu dambis 7a,
Salasanan vaihto uuteen / How to change password
 Salasanan vaihto uuteen / How to change password Sisällys Salasanakäytäntö / Password policy... 2 Salasanan vaihto verkkosivulla / Change password on website... 3 Salasanan vaihto matkapuhelimella / Change
Käyttöoppaasi. NILFISK GD 911 BATTERY http://fi.yourpdfguides.com/dref/4251388
 Voit lukea suosituksia käyttäjän oppaista, teknisistä ohjeista tai asennusohjeista tuotteelle NILFISK GD 911 BATTERY. Löydät kysymyksiisi vastaukset NILFISK GD 911 BATTERY käyttöoppaasta ( tiedot, ohjearvot,
CONVERSION KITS FOR FRAMES MR8 AND MR9 INSTALLATION INSTRUCTIONS
 CONVERSION KITS FOR FRAMES MR8 AND MR9 INSTALLATION INSTRUCTIONS MR8 AND MR9 CONVERSION KIT - INSTALLATION INSTRUCTION Document ID: DPD01787, Revision: A, Release date: 17.11.2015 1.1 MR8 kit contents
Straightener HP8331. Register your product and get support at Käyttöopas
 Register your product and get support at www.philips.com/welcome Straightener HP8331 FI Käyttöopas Suomi Olet tehnyt erinomaisen valinnan ostaessasi Philipsin laitteen! Käytä hyväksesi Philipsin tuki ja
WINE COOLER TFW METOS TFW 160S, TFW 365-2S, TFW 375S MG ,
 WINE COOLER TFW METOS TFW 160S, TFW 365-2S, TFW 375S MG4116794, 4116798, 4116797 Instruction manual TWF 365-2S TWF 375S TWF 160S 01.09.2015 Table if Contents 1. Important safety instructions...3 2. Unpacking
Owner s Manual GREE Electric Appliances,Inc.of zhuhai
 Ilmalämpöpumppu Split air conditioner wall mounted model Käyttäjän opas Owner s Manual GREE Electric Appliances,Inc.of zhuhai Ultra-thin GWHD09A3NK3DF KFR-25GW/NaA12FA GWHD12B2NK3AD KFR-32GW/NaA12FA Please
On instrument costs in decentralized macroeconomic decision making (Helsingin Kauppakorkeakoulun julkaisuja ; D-31)
") On instrument costs in decentralized macroeconomic decision making (Helsingin Kauppakorkeakoulun julkaisuja ; D-31) Juha Kahkonen Click here if your download doesn"t start automatically On instrument costs
On instrument costs in decentralized macroeconomic decision making (Helsingin Kauppakorkeakoulun julkaisuja ; D-31) Juha Kahkonen Click here if your download doesn"t start automatically On instrument costs
1/4. Resetointi ja vianmääritys. 22.11.2013 ntr
 A400-64176 Sähköpöydät 1/4 Resetointi ja vianmääritys Pöydän resetointi tehdään aina ennen käyttöönottoa ja tarvittaessa häiriötilanteessa. Määritä pöydän tyyppi käyttökytkimen ja jalustan mukaan ja tee
WK-6 WATER KETTLE BRUKSANVISNING BRUKSANVISNING BRUGSANVISNING KÄYTTÖOHJE INSTRUCTION MANUAL
 WK-6 WATER KETTLE NO SE DK FI GB BRUKSANVISNING BRUKSANVISNING BRUGSANVISNING KÄYTTÖOHJE INSTRUCTION MANUAL WWW.WILFA.COM VEDENKEITIN FIN KÄYTTÖOHJE Lue tämä käyttöohje huolella ennen vedenkeittimen käyttöönottoa
Kok 1,3. Water kettle. Bruksanvisning Bruksanvisning Brugsanvisning Käyttöohje Instruction manual WK13W
 Kok 1,3 Water kettle Bruksanvisning Bruksanvisning Brugsanvisning Käyttöohje Instruction manual Ugit officia porem et ent, inctorem resent volorumqui bearum corestota et ut am quo magnihitae. WK13W S.
Recirkulering. El-tilslutning. Kontrolpanel. Dansk. Timerfunktion
 1 2 Dansk Recirkulering Luften renses ved hjælp at aktive kulfiltre hvorefter den returneres til rummet. Kulfiltre bestilles separat. El-tilslutning Emhætten skal tilsluttes 230 V i henhold til stærkstrømsreglementet.
LYTH-CONS CONSISTENCY TRANSMITTER
 LYTH-CONS CONSISTENCY TRANSMITTER LYTH-INSTRUMENT OY has generate new consistency transmitter with blade-system to meet high technical requirements in Pulp&Paper industries. Insurmountable advantages are
Tork Paperipyyhe. etu. tuotteen ominaisuudet. kuvaus. Väri: Valkoinen Malli: Vetopyyhe
 etu Monikäyttöpaperi hoitaa useimmat pyyhintätehtävät Sopiva lasipintojen pyyhintään Sopii käsien kuivaamiseen Elintarvikekäyttöön hyväksytty Tork Easy Handling, pakkaus, jota on helppo kantaa mukana,
Hairdryer. Register your product and get support at HP8296/00. Käyttöopas
 Register your product and get support at www.philips.com/welcome Hairdryer HP8296/00 FI Käyttöopas c d b e g a f Suomi Olet tehnyt erinomaisen valinnan ostaessasi Philipsin laitteen! Käytä hyväksesi Philipsin
SEFFI - kuivaimen käyttöohjekirja
 SEFFI - kuivaimen käyttöohjekirja (SEFFI Pro Compact, Combi, Team SEFFI Soft Compact, Combi, Team) Käsiin ja jalkoihin tuleville varusteille 1 SEFFI - kuivain Käyttö ohjekirja malleille: SEFFI Pro Compact,
PSSA-8/PSSA-8UK OWNERS MANUAL
 PSSA-8/PSSA-8UK OWNERS MANUAL LED indicator Test Button Art. 36.3066 / Art. 8.40 GB Power Switch (PSSA-8 / PSSA-8UK) Identifying the parts LED indicator Test Button Getting Started Plug the Power Switch
Elektra V ... 13 ... 7... 9 GB... 11 NO ... 21 ... 15 ... 17 DE... 19 PL ... 23 ... 27 ... 25
 SE... 7... 9 GB... 11 NO FR... 13 RU... 15... 17 DE... 19 PL FI... 21 NL... 23 ES... 25 IT... 27 ELV3333, ELV3344, ELV5333, ELV6344 375 300 340 min 300 mm c-c 277 24 9 16 min 300 mm min 500 mm Fig. 1 10
4x4cup Rastikuvien tulkinta
 4x4cup Rastikuvien tulkinta 4x4cup Control point picture guidelines Päivitetty kauden 2010 sääntöihin Updated for 2010 rules Säännöt rastikuvista Kilpailijoiden tulee kiinnittää erityistä huomiota siihen,
Vakiomallisten kuumakanavajärjestelmien kytkeminen Wiring of standard hotrunner systems
 Teknillinen dokumentaatio Technical documentation E. Vakiomallisten kuumakanavajärjestelmien kytkeminen Wiring of standard hotrunner systems Version.0 ! Tärkeä turvaohje / Important safety instruction
Käyttöohje. USB Charger UCH20
 Käyttöohje USB Charger UCH20 Sisältö Johdanto... 3 USB Charger: Tietoja... 3 USB-laturin käyttäminen... 4 Laitteen akun lataaminen...4 Juridiset tiedot...5 Declaration of Conformity...6 2 Johdanto USB
Hairdryer HP4963 HP4962 HP4961 HP4960. Register your product and get support at Käyttöopas
 Register your product and get support at www.philips.com/welcome Hairdryer HP4963 HP4962 HP4961 HP4960 FI Käyttöopas Suomi Olet tehnyt erinomaisen valinnan ostaessasi Philipsin laitteen! Käytä hyväksesi
Network to Get Work. Tehtäviä opiskelijoille Assignments for students. www.laurea.fi
 Network to Get Work Tehtäviä opiskelijoille Assignments for students www.laurea.fi Ohje henkilöstölle Instructions for Staff Seuraavassa on esitetty joukko tehtäviä, joista voit valita opiskelijaryhmällesi
Rekisteröiminen - FAQ
 Rekisteröiminen - FAQ Miten Akun/laturin rekisteröiminen tehdään Akun/laturin rekisteröiminen tapahtuu samalla tavalla kuin nykyinen takuurekisteröityminen koneille. Nykyistä tietokantaa on muokattu niin,
Solar Water Heater Kit. EcoStyle. 1 User Manual/Operating Instructions. Contents FREE LESSON PLANS AVAILABLE.
 EcoStyle 1 User Manual/Operating Instructions Contents 1 Contents 2 What s in the box? 3 Setting up the 4 Heating water 5 Measuring water temperature with the digital thermometer 6 Maximum/minimum temperature
Uusi Ajatus Löytyy Luonnosta 4 (käsikirja) (Finnish Edition)
 (Finnish Edition)") Uusi Ajatus Löytyy Luonnosta 4 (käsikirja) (Finnish Edition) Esko Jalkanen Click here if your download doesn"t start automatically Uusi Ajatus Löytyy Luonnosta 4 (käsikirja) (Finnish Edition) Esko Jalkanen
Uusi Ajatus Löytyy Luonnosta 4 (käsikirja) (Finnish Edition) Esko Jalkanen Click here if your download doesn"t start automatically Uusi Ajatus Löytyy Luonnosta 4 (käsikirja) (Finnish Edition) Esko Jalkanen
Olet vastuussa osaamisestasi
 Olet vastuussa osaamisestasi Ohjelmistoammattilaisuuden uudet haasteet Timo Vehmaro 02-12-2015 1 Nokia 2015 Mitä osaamista tulevaisuudessa tarvitaan? Vahva perusosaaminen on kaiken perusta Implementaatio
STIHL AK 10, 20, 30. Turvallisuusohjeet
 { STIHL AK 10, 20, 30 Turvallisuusohjeet suomi Sisällysluettelo Alkuperäisen käyttöohjeen käännös Painettu kloorittomalle paperille. Painovärit sisältävät kasviöljyjä, paperi on kierrätyskelpoista. 1
Hairdryer. Register your product and get support at HP4962/22 HP4961/22. Käyttöopas
 Register your product and get support at www.philips.com/welcome Hairdryer HP4962/22 HP4961/22 FI Käyttöopas Suomi Olet tehnyt erinomaisen valinnan ostaessasi Philipsin laitteen! Käytä hyväksesi Philipsin
Data protection template
 Data protection template Aihe: rekisteriseloste ja informointipohja Topic: information about the register and information to users (related to General Data Protection Regulation (GDPR) (EU) 2016/679) Mallina
ASENNUS-, HUOLTO- JA KÄYTTÖOHJEET ARCTIC BUFFET LINE DROP IN KEITTOLÄMMITIN
 ASENNUS-, HUOLTO- JA KÄYTTÖOHJEET ARCTIC BUFFET LINE DROP IN KEITTOLÄMMITIN MALLIT: BLDISH SISÄLLYSLUETTELO Vastaanotto 3 Asennus ja käyttöönotto 3 Käyttö 4 Puhdistus 4 Huolto 4 Jos laite ei toimi 4 Takuuehdot
Security server v6 installation requirements
 CSC Security server v6 installation requirements Security server version 6.4-0-201505291153 Pekka Muhonen 8/12/2015 Date Version Description 18.12.2014 0.1 Initial version 10.02.2015 0.2 Major changes
Security server v6 installation requirements
 CSC Security server v6 installation requirements Security server version 6.x. Version 0.2 Pekka Muhonen 2/10/2015 Date Version Description 18.12.2014 0.1 Initial version 10.02.2015 0.2 Major changes Contents
FinFamily PostgreSQL installation ( ) FinFamily PostgreSQL
 FinFamily PostgreSQL") FinFamily PostgreSQL 1 Sisällys / Contents FinFamily PostgreSQL... 1 1. Asenna PostgreSQL tietokanta / Install PostgreSQL database... 3 1.1. PostgreSQL tietokannasta / About the PostgreSQL database...
FinFamily PostgreSQL 1 Sisällys / Contents FinFamily PostgreSQL... 1 1. Asenna PostgreSQL tietokanta / Install PostgreSQL database... 3 1.1. PostgreSQL tietokannasta / About the PostgreSQL database...
Register your product and get support at. HP8117. Käyttöopas
 Register your product and get support at www.philips.com/welcome HP8117 Käyttöopas a b Suomi Olet tehnyt erinomaisen valinnan ostaessasi Philipsin laitteen! Käytä hyväksesi Philipsin tuki ja rekisteröi
Hairdryer HP4997/00. Register your product and get support at Käyttöopas
 Register your product and get support at www.philips.com/welcome Hairdryer HP4997/00 FI Käyttöopas h i a b g c f d e Suomi Olet tehnyt erinomaisen valinnan ostaessasi Philipsin laitteen! Käytä hyväksesi
INSTALLATION INSTRUCTION ASENNUSOHJE PEM ENGLISH SUOMI INSULATION PIERCING CONNECTOR SLIW17.2 ERISTYKSEN LÄPÄISEVÄ LIITIN SLIW17.
 INSTALLATION INSTRUCTION ASENNUSOHJE PEM904 2011-08 ENGLISH SUOMI INSULATION PIERCING CONNECTOR SLIW17.2 ERISTYKSEN LÄPÄISEVÄ LIITIN SLIW17.2 2/8 SLIW17.2 PEM904 2011-08 GENERAL INFORMATION (ENG) - Check
Information on preparing Presentation
 Information on preparing Presentation Seminar on big data management Lecturer: Spring 2017 20.1.2017 1 Agenda Hints and tips on giving a good presentation Watch two videos and discussion 22.1.2017 2 Goals
HAIR DRYER TRAVEL. Move HD 2509
 HAIR DRYER TRAVEL Move HD 2509 DA HU FI CS NO SV IT PT NL SL LT EL BG RU E F B D C A 3 DANSK 05-08 SUOMI 09-12 NORSK 13-16 SVENSKA 17-20 ITALIANO 21-24 PORTUGUÊS 25-28 NEDERLANDS 29-32 MAGYAR 33-36 ČESKY
On instrument costs in decentralized macroeconomic decision making (Helsingin Kauppakorkeakoulun julkaisuja ; D-31)
") On instrument costs in decentralized macroeconomic decision making (Helsingin Kauppakorkeakoulun julkaisuja ; D-31) Juha Kahkonen Click here if your download doesn"t start automatically On instrument costs
On instrument costs in decentralized macroeconomic decision making (Helsingin Kauppakorkeakoulun julkaisuja ; D-31) Juha Kahkonen Click here if your download doesn"t start automatically On instrument costs
1. SIT. The handler and dog stop with the dog sitting at heel. When the dog is sitting, the handler cues the dog to heel forward.
 START START SIT 1. SIT. The handler and dog stop with the dog sitting at heel. When the dog is sitting, the handler cues the dog to heel forward. This is a static exercise. SIT STAND 2. SIT STAND. The
Hairdryer. Register your product and get support at HP4996/22. Käyttöopas
 Register your product and get support at www.philips.com/welcome Hairdryer HP4996/22 FI Käyttöopas d c b e f g h a i Suomi Olet tehnyt erinomaisen valinnan ostaessasi Philipsin laitteen! Käytä hyväksesi
SUOMI Johdanto Yleiskuvaus (Kuva 1) Tärkeää Vaara Varoitus Varoitus Sähkömagneettiset kentät Yleistä
 Tärkeää Vaara Varoitus Varoitus Sähkömagneettiset kentät Yleistä") SUOMI 49 Johdanto Onnittelut ostoksestasi ja tervetuloa Philips-tuotteiden käyttäjäksi! Hyödynnä Philipsin tuki ja rekisteröi tuotteesi osoitteessa www.philips.com/welcome. Yleiskuvaus (Kuva 1) 1 Terä
SUOMI 49 Johdanto Onnittelut ostoksestasi ja tervetuloa Philips-tuotteiden käyttäjäksi! Hyödynnä Philipsin tuki ja rekisteröi tuotteesi osoitteessa www.philips.com/welcome. Yleiskuvaus (Kuva 1) 1 Terä
STIHL AP 100, 200, 300. Turvallisuusohjeet
 { STIHL AP 100, 200, 300 Turvallisuusohjeet suomi Sisällysluettelo Alkuperäisen käyttöohjeen käännös Painettu kloorittomalle paperille. Painovärit sisältävät kasviöljyjä, paperi on kierrätyskelpoista.
Asennusopas. DEVIreg 531. Elektroninen termostaatti.
 Asennusopas DEVIreg 531 Elektroninen termostaatti www.devi.com Sisällysluettelo 1 Johdanto................. 3 1.1 Tekniset tiedot.......... 4 1.2 Turvaohjeet............ 5 2 Asennusohjeet.............
Käyttöohje Savukehitin Micro Rocket
 Käyttöohje Savukehitin Micro Rocket Markkinointi Pietiko Oy www.pietiko.fi Tekniset tiedot Savun määr: Tehon kulutus Säiliön koko Akut Kulutus Paino 2.7 kg Mitat 227X66X81 mm Savun kehityksen kesto: 10-12
LAV90 Etna 3000 HÖYRYPUHDISTIN. Käyttöohje Alkuperäisten ohjeiden käännös. VAROITUS! Lue käyttöohjeet huolellisesti ennen laitteen käyttöä.
 LAV90 Etna 3000 HÖYRYPUHDISTIN Käyttöohje Alkuperäisten ohjeiden käännös VAROITUS! Lue käyttöohjeet huolellisesti ennen laitteen käyttöä. Maahantuoja: ISOJOEN KONEHALLI OY Keskustie 26, 61850 Kauhajoki
KÄYTTÖOHJE AURINKOVARJON JALKAAN KIINNITETTÄVÄ LÄMMITIN P1500
 KÄYTTÖOHJE AURINKOVARJON JALKAAN KIINNITETTÄVÄ LÄMMITIN P1500 Lue käyttöohje ennen lämmittimen käyttöönottoa Käytä lämmitintä ainoastaan käyttöohjeiden mukaisesti. Muu käyttö voi aiheuttaa tulipalon, sähköiskun
Capacity Utilization
 Capacity Utilization Tim Schöneberg 28th November Agenda Introduction Fixed and variable input ressources Technical capacity utilization Price based capacity utilization measure Long run and short run
FH-1, FH-2, CH-15, CH-20 Varmevifte
 FH-1, FH-2, CH-15, CH-20 Varmevifte NO SE DK FI GB BRUKSANVISNING BRUKSANVISNING BRUGSANVISNING KÄYTTÖOHJE INSTRUCTION MANUAL WWW.WILFA.COM Lämpöpuhallin TÄRKEÄÄ - Lue käyttöohje huolella läpi ennen lämpöpuhaltimen
Secto Design Oy Kauppalantie 12 02700 Kauniainen Finland tel. +358 9 5050598 fax +358 9 5475 2535 info@sectodesign.fi www.sectodesign.
 Secto Design Oy Kauppalantie 12 02700 Kauniainen Finland tel. +358 9 5050598 fax +358 9 5475 2535 info@sectodesign.fi www.sectodesign.fi Secto 4200 pendant natural birch, black or white laminate, walnut
Hairdryer. Register your product and get support at HP8203 HP8202 HP8201 HP8200. Käyttöopas
 Register your product and get support at www.philips.com/welcome Hairdryer HP8203 HP8202 HP8201 HP8200 FI Käyttöopas Suomi Olet tehnyt erinomaisen valinnan ostaessasi Philipsin laitteen! Käytä hyväksesi
I-VALO VEGA FIXING MODULE B300
 Nämä ohjeet eivät välttämättä sisällä kaikkien valaisinten tai tarvikkeiden yksityiskohtaisia ohjeita, eivätkä ohjeista kaikissa asennukseen ja käyttöön tai huoltoon liittyvissä tilanteissa. / These instructions
On instrument costs in decentralized macroeconomic decision making (Helsingin Kauppakorkeakoulun julkaisuja ; D-31)
") On instrument costs in decentralized macroeconomic decision making (Helsingin Kauppakorkeakoulun julkaisuja ; D-31) Juha Kahkonen Click here if your download doesn"t start automatically On instrument costs
On instrument costs in decentralized macroeconomic decision making (Helsingin Kauppakorkeakoulun julkaisuja ; D-31) Juha Kahkonen Click here if your download doesn"t start automatically On instrument costs
anna minun kertoa let me tell you
 anna minun kertoa let me tell you anna minun kertoa I OSA 1. Anna minun kertoa sinulle mitä oli. Tiedän että osaan. Kykenen siihen. Teen nyt niin. Minulla on oikeus. Sanani voivat olla puutteellisia mutta
HQ-CHARGER51 1-2 TUNNIN KOMPAKTI LATURI AAA/AA -PARISTOILLE
 SUOMI KÄYTTÖOPAS HQ-CHARGER51 1-2 TUNNIN KOMPAKTI LATURI AAA/AA -PARISTOILLE LUE OHJEET ENNEN LATURIN KÄYTTÖÄ Omistajan käyttöopas Lue tämä käyttöopas huolellisesti. Se sisältää tärkeitä käyttöohjeita.
Hairdryer. Register your product and get support at HP8183 HP8182 HP8181 HP8180. Käyttöopas
 Register your product and get support at www.philips.com/welcome Hairdryer HP8183 HP8182 HP8181 HP8180 FI Käyttöopas Suomi Olet tehnyt erinomaisen valinnan ostaessasi Philipsin laitteen! Käytä hyväksesi
 TÄRKEITÄ HUOMIOITA Kiitos, että valitsit Casa Bugatin UMA keittövaa'an. Kuten kaikkia elektronisia laitteita, myös tätä vaakaa tulee käyttää huolellisesti ja ohjeiden mukaan vammojen ja laitteen vaurioitumisen
 v INSTA-CERT Name and address of certificate holder Uponor Infra Oy Kouvolantie 365, PO Box 21 15561 Nastola Finland CERTIFICATE Date of valid edition No. 23-05-2017 2003 Date of first issue 16-06-2005
The CCR Model and Production Correspondence
 The CCR Model and Production Correspondence Tim Schöneberg The 19th of September Agenda Introduction Definitions Production Possiblity Set CCR Model and the Dual Problem Input excesses and output shortfalls
Hairdryer HP4993 HP4992 HP4991 HP4990. Register your product and get support at Käyttöopas
 Register your product and get support at www.philips.com/welcome Hairdryer HP4993 HP4992 HP4991 HP4990 Käyttöopas e f g d h b a c i j k Suomi Olet tehnyt erinomaisen valinnan ostaessasi Philipsin laitteen!
Hair Styler. Register your product and get support at www.philips.com/welcome HP4696/22. Käyttöopas
 Register your product and get support at www.philips.com/welcome Hair Styler HP4696/22 FI Käyttöopas e g f h i b d c a l m n o p q k j s r Suomi Olet tehnyt erinomaisen valinnan ostaessasi Philipsin laitteen!
TIEKE Verkottaja Service Tools for electronic data interchange utilizers. Heikki Laaksamo
 TIEKE Verkottaja Service Tools for electronic data interchange utilizers Heikki Laaksamo TIEKE Finnish Information Society Development Centre (TIEKE Tietoyhteiskunnan kehittämiskeskus ry) TIEKE is a neutral,
Changes in the drawing are allowed only by the permission of the authorities who have granted the certificate Muutokset sallittu vain sertifikaatin my
 Changes in the drawing are allowed only by the permission of the authorities who have granted the certificate Muutokset sallittu vain sertifikaatin myöntäjän luvalla The drawing is a valid document only
Straightener. Register your product and get support at HP4666/22. Käyttöopas
 Register your product and get support at www.philips.com/welcome Straightener HP4666/22 FI Käyttöopas Suomi Olet tehnyt erinomaisen valinnan ostaessasi Philipsin laitteen! Käytä hyväksesi Philipsin tuki
TÄYTTÖAUTOMAATIT TÄYTTÖAUTOMAATIT COMPUTER INFLATORS
 31 S AHCON computer inflators are designed with a view to high quality, precision and long service life. The inflation computers are designed in Denmark and manufactured and tested in our own workshop.
Sisällysluettelo Table of contents
 Sisällysluettelo Table of contents OTC:n Moodlen käyttöohje suomeksi... 1 Kirjautuminen Moodleen... 2 Ensimmäinen kirjautuminen Moodleen... 2 Salasanan vaihto... 2 Oma käyttäjäprofiili... 3 Työskentely
NL UK F D E I S DK N SF GR. Gebruiksaanwijzing... 4. Instructions for use... 5. Mode d emploi... 7. Anleitung... 8. Instrucciones de Uso...
 Gebruiksaanwijzing Instructions for use Mode d emploi Anleitung Instrucciones de Uso Istruzioni d uso Bruksanvisning Brugsanvisning Bruksanvisning Käyttöohje TYPE 525008 (BLACK) / 525009 (WHITE) CRYSTAL
Siemens Pure kuulokojeiden käyttöohje. www.kuulotekniikka.com
 Siemens Pure kuulokojeiden käyttöohje www.kuulotekniikka.com Sisällysluettelo Kuvaus Pure kuulokojeista sivu 3 Pure kuulokojeen pariston vaihto sivu 4 Tilanneohjelmat ja kuulokojeen virtakytkin sivu 5
Automaattinen maidonvaahdottaja. Käyttöohjeet
 Automaattinen maidonvaahdottaja Käyttöohjeet Sisällysluettelo Maidonvaahdottajasi TÄRKEITÄ TURVALLISUUTTA KOSKEVIA OHJEITA... 3 Oikea käyttö... 3 Säätimet... 4 1 Laitteen asennus ja liitännät... 6 2 Käyttö...
Date Päiväys J.Mikkonen Signature Allekirjoitus. V.Tepponen
 Changes in the drawing are allowed only by the permission of the authorities who have granted the certificate Muutokset sallittu vain sertifikaatin myöntäjän luvalla The drawing is a valid document only
Fitting instructions. Fitting set for joining all types of DEVI self limiting heating cables to heating cables Art. no. 19805779 SSTL nro 04 312 85
 GB/FI Fitting instructions Fitting set for joining all types of DEVI self limiting heating cables to heating cables Art. no. 19805779 SSTL nro 04 312 85 intelligent varme Contents: GB Connection kits 3
n egroidulla tuuletuspainikkeella
 negroidulla tuuletuspainikkeella F j Takuu Guarantee 2 Käyttötarkoitus Intended use 3 Yleispiirteet Performance features 3 Osaluettelo Survey of parts. 4-5 Kokoonpanoesimerkki Design examples 6-7 Asennus
LOUDSPEAKER SYSTEM. Operating instructions. Käyttöohje. Bruksanvisning. Betjeningsvejledning
 3 LOUDSPEAKER SYSTEM Operating instructions Käyttöohje Bruksanvisning Betjeningsvejledning GB FI SE DK Loudspeaker System Langaton kaiutinjärjestelmä Radiohögtalarsystem Radiostyret højtalersystem KH 2525
Keraaminen Lämpöpuhallin VV 21 CA Käyttöohje
 Keraaminen Lämpöpuhallin VV 21 CA Käyttöohje Tuotteen ominaisuudet 2 tehotasoa 800W/1200W PTC-lämpöelementti Alhainen melutaso Kaksinkertainen ylikuumenemissuoja Kaatumissuoja Irroitettava ilmansuodatin
Changes in the drawing are allowed only by the permission of the authorities who have granted the certificate Muutokset sallittu vain sertifikaatin my
 Changes in the drawing are allowed only by the permission of the authorities who have granted the certificate Muutokset sallittu vain sertifikaatin myöntäjän luvalla The drawing is a valid document only
IAN 74073 IAN 74073 NAIL STUDIO SET SNS 45 A2. NAIL STUDIO SET Operating instructions. KYNSISTUDIO Käyttöohje. NAGELSTUDIOSET Bruksanvisning
 Before reading, unfold the page containing the illustrations and familiarise yourself with all functions of the device. Käännä ennen lukemista kuvallinen sivu esiin ja tutustu seuraavaksi laitteen kaikkiin
Bluetooth-kaiuttim en sisä- ja ulkokäyttöön
 BTS-50 Bluetooth-kaiuttim en sisä- ja ulkokäyttöön LUE ENNEN TÄMÄN LAITTEEN KÄYTTÖÄ. www.facebook.com/denverelectronics KÄYTTÖOHJE Varoituksia Tämä tuote on suunniteltu ja valmistettu täyttämään tiukat
Changes in the drawing are allowed only by the permission of the authorities who have granted the certificate Muutokset sallittu vain sertifikaatin my
 Changes in the drawing are allowed only by the permission of the authorities who have granted the certificate Muutokset sallittu vain sertifikaatin myöntäjän luvalla The drawing is a valid document only
GD 910 Operating Instructions
 GD 910 Operating Instructions 107402565 A 2 English... 8 Deutsch... 10 Français... 12 Nederlands... 14 Italiano... 16 Norsk... 18 Svenska... 20 Dansk... 22 Suomi... 24 Español... 26 Português... 28 Eλληνικά...
Efficiency change over time
 Efficiency change over time Heikki Tikanmäki Optimointiopin seminaari 14.11.2007 Contents Introduction (11.1) Window analysis (11.2) Example, application, analysis Malmquist index (11.3) Dealing with panel
BYAS START-UP -PAKETIT JA ASPT?BYAS?
 BYAS START-UP -PAKETIT JA ASPT?BYAS? EN WEST FI CASH PARTNEREILLE VOIMASSA 16.06.2017 ALKAEN SUP-PAKETTI FACE SILVER SUP-PAKETTI FACE SILVER SUP-PAKETTI FACE SILVER PLUS* SIS. ASP, 6 KUUKAUTTA Normaalihinta
SALAMANTERI OS200. Asennus- ja käyttöohjeet
 SALAMANTERI OS200 Asennus- ja käyttöohjeet SISÄLLYSLUETTELO 1. Yleistä... 3 2. Turvaohjeet... 3 3. Asennus... 3 4. Laitteen kuljetus ja siirto... 3 5. Käyttöpaneeli... 4 6. Käyttö... 4 7. Puhdistus ja
BL-2 BLENDER BRUKSANVISNING BRUKSANVISNING BRUGSANVISNING KÄYTTÖOHJE INSTRUCTION MANUAL
 BL-2 BLENDER NO SE DK FI GB BRUKSANVISNING BRUKSANVISNING BRUGSANVISNING KÄYTTÖOHJE INSTRUCTION MANUAL WWW.WILFA.COM Käyttöohje Tehosekoitin Malli Blender BL-2 FI TÄRKEITÄ TURVALLISUUSOHJEITA Sähkölaitteita