Edition Printed in Sweden by AB Åmålstryck
|
|
|
- Leo Lehtonen
- 9 vuotta sitten
- Katselukertoja:
Transkriptio
1 deutsch Betriebsanleitung svenska Bruksanvisning...2, english Operating Instructions...2, italiano Instrucciones de uso...2, dansk Brugsanvisning...2, Edition Printed in Sweden by AB Åmålstryck

2 2

3 Contents 1. Important safety precautions Technical data Vacuum unit Centix 20 assembly instructions Fitting the mounting bracket Locating the vacuum cleaner on the mounting bracket Connecting the machine Operating instructions Centix Starting the machine Servicing Filter and dust bags - Centix Replacing the dust bag Replacing / Cleaning the filter Vacuum unit Centix 40 / Centix 50 Premium assembly instructions Fitting the mounting bracket Locating the vacuum cleaner on the mounting bracket Connecting the machine Operating instructions Centix 40 / Centix 50 Premium Starting the machine Servicing Centix 50 Premium Display Filter and dust bags - Centix 40 / Centix 50 Premium Replacing the bag filter Fitting the bag filter Replacing the dust bag Fitting the dust bag Electrical connection Accessories Troubleshooting ,1 Service/maintenance guide - Centix Service/maintenance guide - Centix 40 / Centix 50 Premium Dimensional drawings...41 Congratulations on your choice of central vacuum cleaner! If you use your vacuum cleaner in accordance with these operating instructions, your machine will be a pleasure to use and an essential worktool in your home for many years to come. Our products are under constant development and we, therefore, reserve the right to make any necessary alterations to the design of the machine. We also make reservations concerning any misprints that may arise. Legislation governing consumer compensation claims apply to this product under current terms of sale - on the assumption that the product has been used correctly (for household use) and maintained in accordance with the instructions contained in this user guide. Dust bags are consumables. This product comes under the various countries statutory requirements concerning the collection and safe treatment of electrical products and, when the time comes for its disposal, it should be handed over to a dealer or waste disposal site for recycling purposes. Complaints caused by faulty or incorrect assembly should be made to the installation firm responsible. Entitlement to compensation may not apply through failure to use the machine correctly or gross negligence concerning the maintenance of the product. 29

4 1 Important safety precautions To reduce the risk of fire, electric shock or injury, read all safety precautions and warning text carefully before using the machine. This central vacuum cleaner is solely intended for dry vacuuming indoors. Never vacuum without a filter installed. Do not vacuum up liquids. Do not use the machine in wet surroundings. Do not vacuum up embers or burning objects such as cigarettes, matchsticks, hot ash or flammable liquid or gas. Do not vacuum in areas where flammable liquids or gases may be present. Unplug the machine before changing the filter or bag and before doing any maintenance work. Always unplug the machine by pulling on the plug, not the power cord. The wall socket and plug must be positioned so that they are clearly visible. Do not vacuum up sharp objects such as broken glass or needles that could puncture the bag. Be particularly careful not to pick up objects that could block the hose/pipe system, such as pencils, toy bricks and small plastic bags. Follow the operating instructions carefully. Servicing and repairs should only be carried out by an authorised workshop. Use only original parts and accessories as recommended by the supplier. Never attempt to modify the machine yourself. Do not use the central vacuum cleaner if the power cord is damaged. The central vacuum cleaner is fitted with a special type of power cord that must be replaced with a cord of the same type if it is damaged. A power cord of this type can be obtained from a service contact. To avoid any risk, this power cord should be replaced by a qualifed expert. The central vacuum cleaner must not be used as a toy. The central vacuum cleaner must never be used to vacuum up contaminated dust or cement dust. 1.1 Technical data CENTIX 20 CENTIX 40 CENTIX 50 Height 427 mm 800 mm 800 mm Width with handles 360 mm 440 mm 440 mm Length with bracket 400 mm 400 mm 400 mm Motor 1500 W 1700 W 1700 W Fuse 10A 10 A 10 A Weight 5.5 kg 6.5 kg 6.7 kg Sound output 69 db 70.5 db 70.5 db Capacity of dust container - 25 l 25 l Capacity when using dust 10 l 14 l 14 l bag Max. suction power 435 W 480 W 480 W Max. air flow 52 l/s 55 l/s 55 l/s Max. vacuum 24 kpa 25 kpa 25 kpa These appliances conform with EU directives 89/336/EEC, 73/23/EEC, 93/68/EEC 30

5 2 Vacuum unit Centix 20 assembly instructions Fig Fitting the mounting bracket Position the holder so that there is plenty of space above and below the place where the vacuum unit is to be located. Make sure there is a minimum of 500 mm free space above the Centix 20 container. Mark the positions for the four screw holes with a pen or similar. Then select appropriate screws and, if necessary, wall plugs for the type of wall surface to which the bracket is to be attached. Drill the four holes for the mounting bracket. The diameter of the screw holes in the holder is 5 mm. Fit the mounting bracket with the large opening pointing upwards, see Fig. 1. Tighten the screws so that the holder is held firmly in place (screws provided). Fig Locating the vacuum cleaner on the mounting bracket Position the vacuum unit so that the mounting bracket is directly above the wall bracket, see Fig. 2. Lower the machine down on to the mounting bracket. Make sure the corresponding bracket on the machine is held firmly in place by the wall bracket. Fig. 3 Fig. 4 Fig Connecting the machine The machine is connected with the suction pipe in the uppermost position and the exhaust pipe in the lower position. This connection should not be glued but can be taped when the unit is serviced at a later date. The suction pipe socket can be fitted to two different points depending on the direction in which you would like to install the pipe system. To relocate the suction pipe socket, you need to do the following: 1. Release the suction pipe socket by unscrewing the four combination Torx screws with a Torx T20 or an ordinary screwdriver, Fig Pull the socket out of the machine, see Fig Loosen the plug blanking off the outlet to which you intend moving the suction pipe socket. Unscrew the four combination Torx screws. Remove the blanking plug from the machine. 4. Adapt (move) the suction pipe socket to the new outlet. NB! The socket is marked Up. Make sure the socket is fitted with ÏUpÓ uppermost. Fasten the socket by fitting and tightening the four screws, Fig Fit the blanking plug to the outlet previously occupied by the suction pipe socket. Use the four screws to hold it in place. The exhaust pipe must be firmly attached to the wall to ensure its connection with the socket does not loosen. Remember that you will need to be able to turn the bent pipe in different directions to ensure a suitable pipe layout. Then connect up the exhaust pipe and muffler, Fig 6. Fit the central vacuum cleaner so that the exhaust pipe is as short as possible, max. 10 metres. Take the surroundings into consideration when positioning the exhaust. For this reason, you should always fit a muffler. For additional information concerning the assembly and installation of the pipe system and low-current lead, please refer to the separate assembly instructions supplied with the pipe package. 31 Fig. 6 Inlet Exhaust

6 3 Operating instructions Centix Fig. 7 Fig. 9 Filter 3.1 Starting the machine The control current outlet (low voltage) should be connected to a control current lead running the length of the pipes. Both ends of the low-voltage lead should be connected to the connection panel on the vacuum cleaner. One lead to each outlet. The central vacuum cleaner s power cable must be connected to a 230 volt mains socket. The appliance is double-insulated and does not need to be earthed. The vacuum cleaner starts and stops automatically. When the vacuum hose is connected to a vacuum socket, a metal ring on the end of the hose closes the control circuit and the vacuum cleaner starts up. 7. When the hose is removed from the vacuum socket, the vacuum cleaner stops. You should allow the hose to empty of dust and dirt before switching the vacuum cleaner off. 3.2 Servicing Always unplug the power cord before doing any service work! If suction is poor, it indicates that the flow of air through the machine is restricted. This may be due to the following: The dust bag is full and should be replaced. The filter is clogged and should be cleaned. The vacuum cleaner has a thermal cut-out that trips if the vacuum cleaner becomes overheated. If this happens - unplug the main power cord to reset the vacuum cleaner. Wait 5-10 minutes to allow the machine to cool down. While you are waiting, check the hose, dust bag and filter to be sure that nothing is blocking the flow of air through the machine. The vacuum cleaner should now start again. If the cut-out trips again, you need to get a service firm to remedy the fault. The Centix 20 should only be operated with a dust bag and filter installed. Fig. 8 If you use a hose with an on-off switch, you can start and stop the vacuum cleaner using the switch on the handle, Fig

7 4 Filter and dust bags - Centix 20 Fig Replacing the dust bag The central vacuum cleaner is fitted with a paper dust bag as standard; never vacuum without a dust bag installed. Grasp the edge of the lid and pull upwards to open it, Fig. 10. Replacing the dust bag: Remove the old dust bag by turning the cardboard stiffener to the right or left so that the raised part of the inlet is in line with the opening in the card. Now slide the bag off the bag nozzle. Fit the new dust bag as follows: Push the opening in the cardboard over the elevation on the inlet and pull on the new bag. Turn the cardboard to lock the bag in place. NB! Turn the edges of the dust bag down into the container. This is to avoid damaging the bag with the lid. Fig Replacing / Cleaning the filter Open the lid and take out the dust bag as described earlier. The filter sits at the bottom of the container around the motor housing. Never use the central vacuum cleaner without a filter installed. Pull the filter out of the container, Fig. 12. The filter can be cleaned by shaking it or washing it in water. If you wash the filter, you must let it dry completely before refitting it. Take the cleaned filter and place it in the bottom of the container. Press the outer edge of the filter down against the sides of the container so that the filter bulges up slightly. Then push the filter down into place. Make sure the filter is packed in tightly against the motor housing, Fig. 13. Reinstall the dust bag and replace the lid. Check that the lid is firmly secured. Fig. 11 Fig. 13 Motor housing The cardboard stiffener locks the bag in place when you twist it as shown in Fig. 11 above. The opening in the card must line up and slide over the elevation on the inlet before you twist the cardboard stiffener to lock it. Filter Filter 33

8 5 Vacuum unit Centix 40 / Centix 50 Premium assembly instructions 5.1 Fitting the mounting bracket Plan the positioning of the mounting bracket so that there is plenty of space above and below the area where the vacuum unit is to be located. Make sure there is a minimum of 400 mm free space below the dust container. Mark the positions for all four screw holes with a pen or similar. The diameter of the holes in the holder is 5 mm. Select screws and, if necessary, wall plugs suitable for the type of wall concerned. Drill the four screw holes. Fit the mounting bracket with the large opening pointing downwards, see Fig. 14. Then screw the holder firmly into place. Fig Locating the vacuum cleaner on the mounting bracket To facilitate the procedure, first remove the dust container. Free the container by pulling both handles outwards. Then remove the container from the machine. Turn the vacuum unit until the mounting bracket is immediately below the bracket on the machine. Lower the machine down on to the mounting bracket, Fig. 15. Make sure the corresponding bracket on the machine is held firmly in place by the wall bracket. 5.3 Connecting the machine The machine is connected with the flexible suction hose in the lower position and the exhaust pipe uppermost, Fig 16. Fig. 15 Fig. 16 The flexible suction hose acts as an adapter connecting the vacuum unit with the pipe system. The accompanying rubber sleeve is used for tightening/loosening purposes between the pipe system and the flexible vacuum hose. Feed half the length of the sleeve into the vacuum hose and fold the other half over. Then feed 5-10 mm of the vacuum hose into the pipe system and fold the sleeve back so that it envelopes the tail pipe, holds the vacuum hose in place and tightens the adapter. NB! This connection must not be glued in case the unit is serviced. Exhaust Position the central vacuum cleaner so that the exhaust pipe can be kept as short as possible, max. 10 metres. Take the surroundings into consideration when positioning the exhaust. For this reason, you should always fit a muffler. For additional information concerning the assembly and installation of the pipe system and low-current lead, please refer to the separate assembly instructions supplied with the pipe package. Inlet 34

9 6 Operating instructions Centix 40 / Centix 50 Premium 6.1 Starting the machine The control current outlet (low voltage) is connected to a control current lead running the length of the pipes. Both ends of the low-voltage lead should be connected to the connection panel on the vacuum unit. One lead to each outlet. The central vacuum cleaner s power cable must be connected to a 230 volt mains socket. The appliance is double-insulated and does not need to be earthed. Fig The vacuum cleaner starts and stops automatically. When the vacuum hose is connected to a vacuum socket, (Fig. 17) a metal ring on the end of the hose closes the control circuit and the vacuum cleaner starts up. When the hose is removed from the vacuum socket, the vacuum cleaner stops. You should allow the hose to empty of dust and dirt before switching the vacuum cleaner off Centix 50 Premium Display The Centix 50 Premium model has a display giving information about the machine, Fig. 19. The display is illuminated and lights up on start-up. The display remains illuminated for 15 minutes after the machine has been switched off. This allows you to check the current status of the machine after it has been in operation. The following information is shown on the display: Run: 301h 01m 11s * Run: Shows the machine s total operating hours, ie, the period of time the motor has been in operation. The time is shown in hours, minutes and seconds. When the machine has been in operation for approximately 700 hours, it will stop. You must then make immediate contact with an authorised service workshop for a replacement motor to be installed. You can reset the machine temporarily and run the motor for an additional 100 hours (approximately) by unplugging the power cable and then reconnecting it to the mains socket. Once you reach the end of the 100 hours of operating time, the machine will stop again. It will now be necessary for an authorised service workshop to replace the motor and reset the clock. Filter / Bag: 80% Fig. 18 If you use a hose with remote control, you can start and stop the vacuum cleaner using the switch on the handle, Fig Servicing Always unplug the power cable before doing any service work! If suction is poor, it indicates that the flow of air through the machine is restricted. This may be due to the following: The dust bag is full and should be replaced. The filter is clogged and should be cleaned of dust. The vacuum cleaner has a thermal cut-out that trips if the vacuum cleaner becomes overheated. If this happens - unplug the main power cored to reset the vacuum cleaner. Wait 5-10 minutes to allow the machine to cool down. While you are waiting, check the hose, dust bag and filter to be sure that nothing is blocking the flow of air through the machine. The vacuum cleaner should now start again. If the cut-out trips again, you need to get a service firm to remedy the fault. The Centix 40/Centix 50 Premium can be run with or without the installation of a dust bag - the choice is yours. These products must always be operated with a bag filter fitted. * Filter/Bag: Shows the remaining capacity of the dust bag and bag filter. The indication is shown as a percentage. 0% is displayed when the bag/bag filter is empty. Indication is then given in increments of 10% at a time. When 90% capacity has been reached, the display will warn you with the following flashing message: Check filter. You should then replace the dust bag and bag filter as soon as possible; see section on filter and dust bag. Once the dust bag has been replaced, reset the machine by starting it up again. The indication should then display 0% again. The panel on the Centix 50 Premium displays relevant information about the machine. Fig. 19 Run: 301h 01m 11s Filter / Bag: 80% 35

10 7 Filter and dust bags - Centix 40 / Centix 50 Premium Fig. 20 Fig. 21 Fig Replacing the bag filter A bag filter must always be installed in the dust container. Clean the filter in the following way: 1. Start by pulling the pipe socket out of the dust container. 2. Release the two handles clamping the dust container. Free them by pulling the handles outwards away from the container, Fig Do not remove the filter from the container. Instead, give the filter a light shaking inside the container to loosen dust from the filter allowing it to fall into the container, Fig Lift out the bag filter. If a dust bag is being used - remove the dust bag. Then empty the container of any remaining dust in a suitable place. 7.2 Fitting the bag filter Replace the bag filter in the machine as follows: 1. Replace the cleaned/shaken bag filter in the container, Fig. 22. Make sure the filter support fits into the inner edge of the dust container properly. Check that the filter is fitted the right way up - the cloth handle on the filter should be visible. 2. Then replace the dust container with the bag filter in the cleaner s vacuum unit. 3. Close the container on the vacuum unit by applying inward pressure to the two handles to ensure the vacuum unit and dust container are fitted together properly. 4. Fit the inlet socket to the machine. Fig Replacing the dust bag The machine is supplied with a paper dust bag. Replace the dust bag in the following way: 1. Pull the inlet socket out of the machine. 2. Release the two handles clamped on to the dust container. Free them by pulling the handles outwards away from the container. 3. Lift off the container. 4. Shake the dust from the bag filter. It may be advantageous for the filter to be installed in the container in such a way that dust in the filter can be shaken down into the dust container. 5. Lift out the bag filter. 6. Remove the dust bag by taking hold of the cardboard stiffener and carefully pulling out the card and bag from the container, Fig Empty the container of dust. 36 Fig Fitting the dust bag Replace the dust bag as follows: 1. Fit the dust bag s card with a hole into the bag holder, Fig Replace the cleaned/shaken bag filter in the container. Make sure the filter support fits into the inner edge of the dust container properly. Check that the filter is fitted the right way up - the cloth handle on the filter should be visible, Fig Replace the dust container on the vacuum unit. Close the container on the vacuum unit by applying inward pressure to the two handles to ensure the vacuum unit and dust container are fitted together properly. 4. Replace the inlet socket in the machine.

11 8 Electrical connection On/Off The control current outlet (low voltage) is connected to a control current lead running the length of the pipes. Both ends of the low-voltage lead are connected to the connection panel on the vacuum unit. One lead to each outlet. The low-voltage lead should be connected as illustrated below. Outlet for the low-voltage leads: Centix 20 Centix 40 Centix 50 Premium The connection panel is located in the top of the Centix 40 and Centix 50 Premium vacuum unit. The central vacuum cleaner s 230 volt power cord must be connected to a 230 volt mains socket. The appliance is double-insulated and does not need to be earthed. The low-voltage lead is connected to this outlet. Centix 20 The connection panel is located in the bottom of the Centix 20 vacuum unit. 37

12 8 Accessories Telescopic tube Adjust the length of the telescopic tube by pressing the button and sliding it in or out. 25. (Maximum length 1000 mm and minimum length 600 mm). For cleaning stairs, we recommend reducing the length of the tube to the minimum. Radiator/crevice nozzle This nozzle is useful for hard-to-reach, restricted areas such as corners, crevices and radiators. Fig. 28 Fig. 25 Fig. 29 Standard floor nozzle This is a universal, lightweight floor nozzle that can be used on most floor surfaces. You can switch from cleaning carpets to parquet or other flooring, Fig. 26/27. Dusting brush The dusting brush can be used on lamps, pictures, curtains and other textiles, Fig. 30. Fig. 30 Fig. 26 Furniture nozzle Small, practical nozzle for vacuuming furniture, cushions and textiles, Fig. 31. Fig. 31 Fig. 27 Remember! Never vacuum up liquids, broken glass or hot ash. Fig

13 10 Troubleshooting All work involving the 240 volt mains electricity supply must be carried out by a qualified electrical contractor with full knowledge of the relevant safety regulations. The vacuum cleaner will not start The vacuum cleaner is fitted with a thermal cut-out that may have tripped. If this happens - unplug the main power cord from the wall socket. Wait five minutes to allow the machine to cool down. While you are waiting, check the filter and dust bag to be sure that nothing is blocking the flow of air through the machine. After five minutes, plug the power cord back into the wall socket. The vacuum cleaner should now start again. If the cut-out trips again, you need to get a service firm to remedy the fault. Are you using the correct hose? Only the original hoses fit correctly. Does the vacuum cleaner start when you try a different vacuum socket? If so, there is a fault in the electrical connection to the first socket. Unscrew the socket and check the connection at the back. Is the power supply connected to the vacuum unit? Is there power at the socket? Is the low-voltage lead connected to the vacuum unit? The vacuum cleaner will not stop Has a metal object become lodged in one of the vacuum sockets causing the pins to become fused? Poor suction power Are all the vacuum sockets closed properly? Has something become jammed in one of the vacuum sockets? Is the container lid closed properly? Is the gasket between the container and the lid in place? Is it damaged? Is the pipe system blocked? Is the dust bag full or clogged? Model Centix 50 Premium issues a warning with a message on the panel. Is filter clogged? Model Centix 50 Premium issues a warning with a message on the panel. Centix 50 Premium display The Centix 50 Premium model has a display that shows relevant status. The display shows the machine s total operating hours (Run) It also shows the remaining capacity of the filter and dust bag (Filter / Bag). * Run: Shows the machine s total operating hours, ie, the period of time the motor has been in operation. When the machine has been in operation for approximately 700 hours, it stops. You must then make immediate contact with an authorised service workshop for a replacement motor to be fitted. You can reset the machine temporarily and run the motor for an additional 100 hours (approximately) by unplugging the power cable and then reconnecting it to the mains socket. Once you reach the end of the 100 hours of operating time, the machine will stop again. It will now be necessary for an authorised service workshop to replace the motor and reset the clock. * Filter/Bag: Shows the remaining capacity of the dust bag and bag filter. The indication is shown as a percentage. 0% is displayed when the bag/bag filter is empty. Indication is then given in increments of 10% at a time. When 90% capacity has been reached, the display will warn you with the following flashing message: Check filter. You should then check the filter and replace the dust bag and bag filter as soon as possible; see section on filter and dust bag. Once the dust bag has been replaced, reset the machine by starting it up again. The indication should then display 0% again. Service and spare parts If you need a service or spare parts, contact your local dealer. In such circumstances, it is always useful if you can give the technical data shown on the rating plate of the vacuum unit. The rating plate is adjacent to the lead intake. It s a good idea to copy this data here so that it is readily to hand. Model:... Product no.:... Serial no.:... Date of purchase:... (please keep your receipt) 39

14 10.1 Service/maintenance guide - Centix 20 NB! Never vacuum without a filter and dust bag installed. Product How often? Why? How? Dust bag Should be replaced before it becomes completely full, depending on use but normally 2-4 times a year. Poor suction and danger of creating a blockage in the pipe system. Grasp the edge of the lid and open it by pulling upwards. Remove the old dust bag by turning the cardboard stiffener to the right or left so that the elevation on the nozzle penetrates the opening in the cardboard. Now slide the bag off the inlet. Push the opening in the cardboard over the elevation on the inlet and pull on the new bag. Twist the cardboard to lock the bag in place. NB! The opening in the card must be adjusted and pushed past the elevation on the inlet before the cardboard can be locked into place with a twisting action. NB! Never vacuum without a dust bag installed. Filter in bottom Should be checked when changing the bag. Poor suction can result. Dust can find its way into the motor. Remove the dust bag as described above. Remove the filter from the bottom. The filter can be cleaned by shaking it or washing it in water. NB! The filter must be completely dry before being reinstalled. Replace the cleaned filter in the machine. Press the outer edge of the filter down against the sides of the container so that the filter bulges up slightly. Refit the dust bag and replace the lid. Check that the lid is sitting firmly in place. NB! Never vacuum without a filter installed Service/maintenance guide - Centix 40 / Centix 50 Premium NB! Never vacuum without a filter installed. Product How often? Why? How? Dust container Should be emptied before the container is 3/4 full, depending on use but normally 2-4 times a year. Danger of blockage in the pipe system. Remove the hose from the machine. Then loosen the handles on the container (pull out from the machine) to free the container from the machine. Lift out the filter and dust bag - see additional information below. Empty the dust into a plastic bag and put in dustbin. Any remaining dust or fluff can be removed manually. Dust bag Should be replaced before it becomes completely full, depending on use but normally 2-4 times a year. Poor suction and danger of creating a blockage in the pipe system. Remove the hose from the machine. Then loosen the handles on the container (pull out from the machine) to free the container from the machine. Lift off the container. Lift out the filter. Then remove the dust bag by pulling the bag s cardboard stiffener off the nozzle. Replace in reverse order. Filter Should be shaken when the container is emptied. NB: Only use dry cleaning methods To maintain good suction power. Start by pulling the hose out of the dust container. Loosen the handles on the container by pulling the handles in an outward direction from the machine. Remove the container from the machine. Do not remove the filter from the container. Instead, give the filter a light shaking inside the container to loosen dust from the filter and allow it to fall into the container. Lift out the bag filter. If a dust bag is being used - remove it. Then empty the dust from the container in a suitable place. 40

15 11 Dimensional drawings Centix 20 / Centix 40 / Centix 50 Premium Dimensional drawings in mm. Centix 20 Centix 40 / Centix 50 Premium Attach to wall 41

16

17 CENTIX 60 PREMIUM english Operating Instructions... 1 deutsch Betriebsanleitung français Notice d utilisation nederlands Gebruiksaanwijzing norsk Driftsinstruks svensk Bruksanvisning dansk Driftsvejledning Käyttöohje

18
19 Sisällys CENTIX 60 CENTIX 60 PREMIUM 1 Tärkeitä turvallisuusohjeita 2 Kuvaus 3 Ennen pölynimurin käynnistystä 4 Käyttö Hallintalaitteet Pölynimurin kokoaminen Seinätelineen asentaminen Imuletkun ja ilmanpoistoletkun asentaminen Liitännät Sähköliitäntä Keskuspölynimurin liitäntäkaavio Keskuspölynimurilaitteiston käyttö Liikkuva käyttö Imuletkun varustelu liikkuvaan käyttöön Laitteen käynnistys Käyttökohteet ja tekniikat 6 Työn lopettamisen jälkeen 7 Huolto 8 Toimintahäiriöiden korjaaminen 9 Lisätietoja 5.1 Käyttötekniikat Kuivien aineiden imurointi Imuletkun ja tarvikkeiden säilytys Liikkuvan käytön jälkeen Huoltokaavio Huoltotyöt Säiliön tyhjennys Pölypussin vaihto Suodatinelementin vaihto Lisätietoja Pölynimurin kierrätystiedot Takuu Testaukset ja hyväksynnät Tekniset tiedot Tarvikkeet EY-vaatimustenmukaisuusvakuutus

20 CENTIX 60 PREMIUM 1 Tärkeitä turvallisuusohjeita Käyttöohjeessa symbolit käytettävät Lue käyttöohjeet ennen pölynimurin käyttöä ja säilytä ne myhempää tarvetta varten. Tällä symbolilla merkittyjä turvallisuusohjeita on noudatettava henkilövahinkojen vaaran välttämiseksi. Tätä symbolia käytetään merkitsemään turvallisuusohjeita, joita on noudatettava pölynimurin vaurioitumisen estämiseksi ja oikean toiminnan takaamiseksi. Tämä symboli ilmaisee vihjeitä ja ohjeita, jotka helpottavat työtä ja parantavat turvallisuutta. Oman turvallisuutesi takia Pölynimuria saavat käyttää vain henkilöt, jotka ovat saaneet siihen koulutuksen ja asianmukaisen luvan. Helppokäyttöisyydestään huolimatta laite ei sovellu lasten käyttöön. Pölynimuria on käytettävä kansallisten määräysten mukaisesti. Käyttöohjeiden ja käyttömaassa voimassa olevien tapaturmantorjuntamääräysten lisäksi on noudatettava myös muita soveltuvia turvallisuus- ja käyttömääräyksiä. Käytä vain turvalliseksi tiedettyjä työmenetelmiä. Tarkoitettu käyttö Tässä käyttöohjeessa kuvatut laitteet soveltuvat kuivien aineiden imurointiin eikä niitä saa käyttää tai säilyttää ulkoilmassa kosteissa olosuhteissa. Seuraavia aineksia ei saa imuroida: terveydelle vaaralliset pölyt kuumat materiaalit (palavat savukkeet, kuuma tuhka jne.) palavat, räjähtävät pölyt (esim. magnesium- tai alumiinipöly) nesteet Varotoimenpiteet ja käyttöä koskevat turvallisuusmääräykset Ennen laitteen käyttöönottoa Tarkista onko verkkojohtoon ilmaantunut vikoja kuten esim. repeämiä tai vanhentumisvaurioita. Jos sähköjohto on viallinen, Alto-huoltopalvelun tai sähköalan ammattilaisen tulee turvallisuussyistä vaihtaa se ennen seuraavaa käyttöönottoa. 86

21 CENTIX 60 PREMIUM Vaihda viallisen sähköjohdon tilalle vain käyttöohjeessa mainitun tyyppinen johto. Varo vahingoittamasta virtajohtoa (esim. vetämällä imuria sen yli/ jättämällä johtoa puristuksiin tai kiskomalla johtoa). Kun vedät virtajohtoa, pidä kiinni pistotulpasta (ei koskaan johdosta). Tarkasta ennen pölynimurin käynnistämistä että se on moitteettomassa kunnossa. Virtajohtojen pistokkeiden ja liittimien roiskesuojauksen tulee olla kunnossa. Älä koskaan käytä pölynimuria suodatinelementin ollessa viallinen. Suosittelemme pölynimurin liittämistä sähköverkkoon vikavirtasuojakytkimen kautta. Se katkaisee virran, jos vuotovirta maahan ylittää 30 ma 30 ms ajan tai siinä on maadoituksen testauspiiri. Sijoita sähköiset osat (pistorasiat, pistotulpat, liittimet) ja jatkojohto niin, että suojausluokka säilyy. Älä koskaan ruiskuta vettä pölynimurin yläosan päälle: henkilövahinkojen ja oikosulun vaara. Noudata uusimpia IECmääräyksiä. Sähköliitännät Tarkasta pölynimurin käyttöjännite ennen sen kytkemistä verkkovirtaan. Varmista, että laitteen arvokilvessä mainittu jännite vastaa paikallisen sähköverkon jännitettä. Jos käytät jatkojohtoa, käytä vain valmistajan vaatimukset täyttävää tai parempilaatuista johtoa katso luku 9.4 Tekniset tiedot. Huolto, puhdistus ja korjaus Suorita vain huoltotyöt, jotka on kuvattu käyttöohjeissa. Vedä pistotulppa pistorasiasta aina ennen pölynimurin puhdistus- ja huoltotöitä. Lisävarusteet ja varaosat Käytä vain laitteen mukana toimitettuja tai käyttöohjeessa mainittuja harjoja. Muiden harjojen käyttö voi olla vaarallista. Käytä ainoastaan Alto-alkuperäisvarusteita ja varaosia (katso 9.5). Muiden osien käyttö voi olla vaarallista. 87
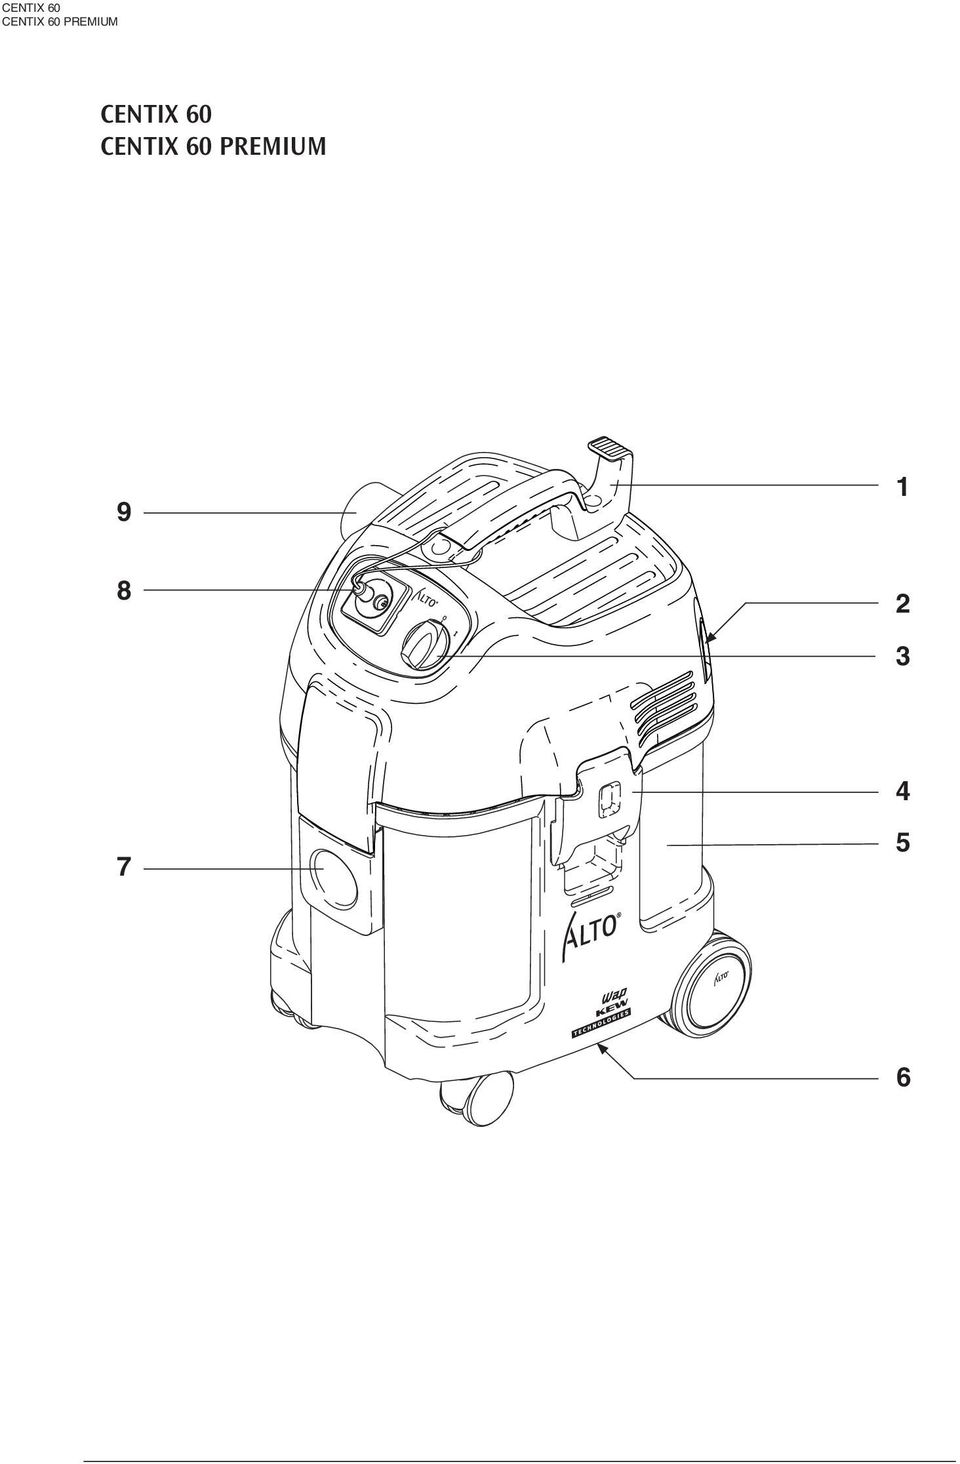
22 CENTIX 60 PREMIUM 2 Kuvaus 2.1 Hallintalaitteet Katso etukannen taitteessa oleva kuva. 1 Kahva ja kaapelikoukku 2 Lisälaitekiinnike 3 Virtakytkin 4 Kiinnityshaka 5 Roskasäiliö 6 Säiliön tyhjennyskahva 7 Imuletkun liitäntä 8 Liikkuvan käytön pistotulppa 9 Ilmanpoistoliitäntä 3 Ennen pölynimurin käynnistystä 3.1 Pölynimurin kokoaminen 3. Ota lisävarusteet roskasäiliöstä ja pakkauksesta. 4. Aseta suodatinpussi ohjeiden mukaisesti säiliöön (katso ohjeet pussin kyljessä). TÄRKEÄÄ! Paina suodatinpussin suu tiiviisti imuletkun liitäntään. 1. Pistotulppa ei saa olla vielä pistorasiassa. 2. Avaa kiinnityslukitus (1) ja irrota imurin yläosa. 5. Aseta imurin yläosa paikalleen (varo vioittamasta suodatinpussia) ja sulje lukitus. HUOMAA! Varmista että salvat lukkiutuvat kunnolla. 3.2 Seinätelineen asentaminen Asennuspaikalla: 1. Ruuvaa kiinnityssanka imuyksikön takasivulla. 2. Kiinnitä seinäteline seinään. 3. Ripusta imuri seinätelineeseen. 88
23 CENTIX 60 PREMIUM 3.3 Imuletkun ja ilmanpoistoletkun asentaminen Imuletku 1m: ruuvaa 90 muhvi (1) imuletkun päähän (kierre vasemmalle) 2. Ilmanpoistoletku 1m: ruuvaa kierrettävä muhvi ø50mm (2) imuletkun päähän. 3. Yhdistä letkut kuvan osoittamalla tavalla imuriin ja asennukseen. 4 Käyttö 4.1 Liitännät Sähköliitäntä Keskuspölynimurin liitäntäkaavio Arvokilvessä mainitun käyttöjännitteen on vastattava sähköverkon jännitettä. 1. Varmista, että imurin virta on katkaistu virtakytkimestä. 2. Kytke virtajohto asianmukaisesti maadoitettuun ja sulakkeella suojattuun pistorasiaan /
24 CENTIX 60 PREMIUM 4.2 Keskuspölynimurilaittei ston käyttö Kytke lisälaitepistorasiaan vain Alton hyväksymiä pistotulppia. 1. Varmista, että laite on kytketty pois päältä imurasioita ei ole aktivoitu 2. Liitä keskusimurointilaitteiston (1) pistotulppa ohjaustauluun. 3. Käännä virtakytkin asentoon I. 4. Työnnä imuletku imurasiaan. CENTIX 60: imumoottori käynnistyy. 5. CENTIX 60 PREMIUM: Kytke imumoottori putken kädensijassa olevalla katkaisijalla (2) päälle ja pois päältä. 4.3 Liikkuva käyttö Imuletkun varustelu liikkuvaan käyttöön CENTIX 60: 1. Kierrä imuletkun muhvi ø32 mm irti imuletkusta (kierre vasemmalle) 2. Kierrä muhvi ø32/50mm (1) imuletkuun (kierre vasemmalle) 1 CENTIX 60 PREMIUM: 1. Käytä liikuteltavaan käyttöön tarkoitettua toimitukseen sisältyvää imuletkua Laitteen käynnistys Käytä vain Alton hyväksymiä pistotulppia lisälaitepistorasiassa Varmista, että laite on kytketty pois päältä. 2. Kytke liikkuvan käytön pistotulppa (1) laitepistorasiaan Liitä imuletku letkunliitäntäkohtaan (1). 4. Käännä virtakytkin asentoon I. Imumoottori käynnistyy. 90
25 5 Käyttökohteet ja tekniikat CENTIX 60 CENTIX 60 PREMIUM 5.1 Käyttötekniikat Oikein käytettyinä lisävarusteet, suulakkeet ja imuletkut parantavat puhdistustehoa ja helpottavat työtä. Hyvä siivoustulos saavutetaan noudattamalla muutamia hyödyllisiä ohjeita ja soveltamalla niitä omiin kokemuksiin erikoistilanteissa. Hyödyllisiä ohjeita Kuivien aineiden imurointi HUOMIO! Seuraavia materiaaleja ei saa imuroida tällä laitteella: terveydelle vaaralliset pölyt kuumat materiaalit (palavat savukkeet, kuuma tuhka jne.) palavat, räjähtävät pölyt (esim. magnesium- ja alumiinipöly jne) nesteet Ennen kuivien aineiden imurointia tulee varmistaa, että pölypussi on paikallaan säiliössä (tilaus-nro katso kohta 9.5 Tarvikkeet ). Imuroidun materiaalin hävittäminen on tällöin helpompaa ja hygieenisempää. 6 Työn lopettamisen jälkeen 6.1 Imuletkun ja tarvikkeiden säilytys VAROITUS! Kompastumisvaara. Onnettomuuksien estämiseksi : 1. Kelaa imuletku ja ripusta toimitukseen sisältyvään seinätelineeseen. 2. Säilytä imuputki/suulake sekä muut tarvikket asianmukaisessa paikassa. 6.2 Liikkuvan käytön jälkeen 1. Kytke imuri pois päältä ja vedä pistotulppa pistorasiasta. 2. Tyhjennä säiliö, puhdista imuri. 3. Kelaa imuletku ja säilytä imuputki/suutin sekä muut tarvikkeet sopivassa paikassa. 4. Kelaa sähköjohto ja ripusta kädensijaan tai 5. Liitä imuri jälleen keskusimurointijärjestelmään. 91
26 CENTIX 60 PREMIUM 7 Huolto 7.1 Huoltokaavio tarpeen mukaan Suodatinpussin vaihto Säiliön tyhjennys Suodatinelementin vaihto Tarkista imuletkun ja varusteiden mahdolliset tukkeumat, puhdista 7.2 Huoltotyöt Säiliön tyhjennys Tyhjennä roskasäiliö jos imuria on käytetty ilman pölypussia: 1. Irrota imurin yläosa säiliöstä. 2. Pidä yhdellä kädellä kiinni säiliön alla olevasta kahvasta ja kaada lika ulos. 3. Hävitä säiliön sisältö paikallisten jätehuoltomääräysten mukaisesti. 4. Puhdista säiliön reuna. 5. Aseta imurin yläosa takaisin paikalleen. 6. Puhdista imuletkun liitäntäkohta ja letkun kaulus. 7. Kiinnitä imuletku paikalleen Pölypussin vaihto 1. Irrota imurin yläosa säiliöstä. 2. Irrota pölypussi varovaisesti imuletkun liitännästä 3. Sulje pölypussin suu liukukannella. 4. Hävitä pölypussi paikallisten jätehuoltomääräysten mukaisesti. 5. Aseta uusi pölypussi puhtaaseen säiliöön ohjeiden mukaisesti (painettu pussin kylkeen). TÄRKEÄÄ! Paina pölypussin suu tiukasti imuletkun liitäntään. 92
27 CENTIX 60 PREMIUM Suodatinelementin vaihto Irrota imurin yläosa roskasäiliöstä ja aseta sivuun suodatinosa ylöspäin. Varo asettamasta imurin yläosaa suojukselle (1). 2. Kierrä suodattimen pidintä vastapäivään (2) ja irrota (3). 3. Irrota suodatinelementti varoen Puhdista suodattimen tiiviste (4), tarkasta mahdolliset vauriot, vaihda tarvittaessa. 5. Aseta uusi suodatinelementti paikalleen. 6. Aseta suodattimen pidin paikalleen ja kiinnitä kiertämällä myötäpäivään. 7. Hävitä käytetty suodatinelementti paikallisten jätehuoltomääräysten mukaisesti. HUOMIO! Älä koskaan käytä imuria ilman suodatinta! 8 Toimintahäiriöiden korjaaminen Häiriö Syy Korjaus Moottori ei käynnisty > Pistorasian sulake palanut. Palauta sulake toimintaan > Keskusimuroinnin/liikkuvan käytön pistotulppaa ei ole työnnetty pistorasiaan > Ylikuormitussuoja on lauennut. Moottori käy koko ajan > Liikkuvan käytön ja keskusimurointijärjestelmän pistotulpat työnnetty pistorasiaan samanaikaisesti. Työnnä pistoke lisälaitepistorasiaan, katso kohta ja Katkaise virta pölynimurista ja anna jäähtyä noin 5 minuutin ajan. Jos imuri ei edelleenkään käynnisty, ota yhteys Alton huolto-osastoon. Työnnä vain toinen pistotulpista laitteen pistorasiaan. Heikentynyt imuteho > Imuletku/suulake tukossa Puhdista imuletku/suulake > Tiiviste/säiliön reuna imurin Puhdista/vaihda tiiviste yläosan ja roskasäiliön välillä likainen /epäkunnossa > Pölypussi täynnä Katso kohta Suodatinpussin vaihto > Suodatinelementti likainen Katso kohta Suodatinelementin vaihto jatkuu --> 93
28 CENTIX 60 PREMIUM Häiriö Syy Korjaus Jännitevaihteluja > Jännitehuollon impedanssi Käytä sopivaa jatkojohtoa liian korkea (katso Turvallisuusohjeet kohta 1 ja luku 9.4 Tekniset tiedot ) Kytke imuri toiseen pistorasiaan lähemmäs sulaketaulua. Yli 7 %:n jännitteenvaihteluita ei pitäisi esiintyä, jos impedanssi siirtopisteessä on 0.15 Ω. 9 Lisätietoja 9.1 Pölynimurin kierrätystiedot Tee hävitettävästä imurista välittömästi käyttökelvoton. 1. Vedä pistotulppa pistorasiasta ja katkaise virtajohto. Laite sisältää arvokkaita materiaaleja, jotka tulisi kierrättää. Toimita imuri sähkölaitteiden vastaanottopisteeseen. Lisätietoja saat jätehuoltoviranomaisilta tai pölynimurin myyjäliikkeestä. 9.2 Takuu Takuun osalta noudatamme yleisiä myynti- ja toimitusehtojamme. Oikeus muutoksiin teknisen kehitystyön takia pidätetään. 9.3 Testaukset ja hyväksynnät Testaukset on suoritettava turvallisuusmääräysten (VBG4) sekä standardin DIN VDE 0701 osan 1 ja osan 3 edellyttämällä tavalla. Pölynimuri on hyväksytty IEC/ EN :n mukaisesti. 94
29 CENTIX 60 PREMIUM 9.4 Tekniset tiedot CENTIX 60 / CENTIX 60 PREMIUM EU Jännite Volttia 230 Taajuus Hz 50/60 Ottoteho Wattia 1200 Kokonaisteho/sulake A 16 Tilavuusvirta (ilma) max. l/min 3600 Alipaine max. Pa Äänenpainetaso db(a) 62 Työpaikan melutaso db(a) 59 Virtajohdon pituus m 7,5 Virtajohdon tyyppi H05VV-F 2 x 0,75 Suojausluokka II Häiriösuojausluokka EN Säiliön tilavuus l 27 Leveys mm 380 Syvyys mm 390 Korkeus mm 570 Paino kg Tarvikkeet Nimike Tilaus-nro Pölypussit (5 kpl) Suodatinelementti Teleskooppiputki Lattiasuulake Imusuti 5146 Rakosuulake ø35x200mm Yleissuulake Seinäteline Letkunpidike Puhallusluukku Imuletku ø32x1800 mm Imuletku ø32x9000 auto S/S Poistoilmayhde ø50 mm Imuletku ø50x1000 mm Kulmamuhvi ø50 mm Muhvi ø50 mm kierrettävä Muhvi ø32/50 mm kierrettävä
30 CENTIX 60 PREMIUM 9.6 EYvaatimustenmukaisuusvakuutus EY-vaatimustenmukaisuusvakuutus ALTO Deutschland GmbH Guido-Oberdorfer-Strasse 2-8 D Bellenberg Tuote: Tyyppi: Kuvaus: Tämän laitteen rakenne vastaa seuraavia määräyksiä: Imuri kuivaimurointiin CENTIX 60 CENTIX 60 PREMIUM 230 V, 50 Hz, 1200 W EY-konedirektiivi EY-pienjännitedirektiivi EY-direktiivi EMC 98/37/EC 73/23/EC 89/336/EC Käytetyt harmonisoidut normit: Käytetyt kansalliset normit ja tekniset spesifikaatiot: EN 292-1, EN EN EN EN , EN , EN DIN EN DIN EN Dipl.-Ing. Wolfgang Nieuwkamp Testaukset ja hyväksynnät Bellenberg,
31
32 Sisällys Tärkeitä turvallisuusohjeita 1 Asennupaketin sisältö 2 Asennuksen suunnittelu 3 Asennus 4 Huolto 5 Toimintahäiriöiden korjaaminen 6 Tarvikkeet CENTIX keskusyksikön sijaintipaikka Imurasioiden sijaintipaikat Putkiston asennus Yleiseet ohjeet putkiston asennusta varten Imuputkien asennus Ohjausjohdon asentaminen Imurasioiden asennus Keskusyksikön asennus Seinätelineen asennus ja paikoitus Imuletkun asennus Poistoilman ohjauksen asennus Toiminta/käyttöönotto Letkunpitimen asennus ja paikoitus Keskusyksikön huolto Putkijärjestelmän huolto Valinnaiset lisävarusteet Varaosat
33 Tärkeitä turvallisuusohjeita Keskusyksikkö Lue käyttöohjeet ennen CENTIX imuyksikön käyttöönottoa ja säilytä ne myöhempää tarvetta varten. Älä peitä keskusyksikön moottorin ilmantuloaukkoa (suojuksen takasivulla), muussa tapauksessa moottori voi ylikuumentua ja kytkeytyä pois päältä. Imulaitteiston asennus Palosuojelu Älä asenna imuyksikköä tiloihin joissa avoimen tulen käsittely on sallittu. Putkistoa asennettaessa tulee ottaa huomioon rakennuksia koskevat maakohtaiset paloturvallisuusmääräykset ja asentaa tarvittaessa asianmukaiset palosuojeluelementit. Laajennussaumat Kun putkistoa asennetaan laajennussaumojen läpi, varmista putkien liukumiskyky suojaeristyksellä laajennussauman kummallakin puolella. Asenna ohjausjohto kaapelinsuojaputkeen. Putkien liimaus Noudata liiman turvallista käyttöä ja käsittelyä koskevia ohjeita (painettu putken kylkeen). Imuyksikön asennus imurasioiden yläpuolelle Jos imuyksikkö on sijoitettu imurasioiden yläpuolelle, on mahdollista, että raskas imuroitu materiaali ei imuroidu ylös asti. Tarkista imurasioiden sisätilat säännöllisesti. Putkijärjestelmän käyttö Seuraavia materiaaleja ei saa imuroida tällä laitteistolla, sillä ne voivat vaarantaa henkilöiden turvallisuutta ja vioittaa laitetta: nesteet ja kostea lika terveydelle vaaralliset pölyt palavat, räjähtävät pölyt (esim. magnesium-, alumiinipöly jne.) kuumat materiaalit (palavat savukkeet, kuuma tuhka jne.) Seuraavia esineitä ei saa imuroida, sillä ne voivat tukkia putkiston: pitkät kappaleet pesurievut, pyyhkeet yms. 121
34
35 2 Asennuksen suunnittelu Vastaa seuraaviin kysymyksiin ennen asennusta: 1. Mikä on rakennuksen tämänhetkinen kunto? suunnitteilla rakennusrunko valmis valmis 2. Miten imuputkisto on määrä asentaa? pinta-asennus uppoasennus onko käytettävissä johto- tai putkikanaaleja? Vinkkejä: Mikäli mahdollista, käytä rakennuksen pohjapiirustusta suunnittelun perustana. 3. Mistä materiaalista seinät on valmistettu? 4. Mihin imuyksikkö halutaan asentaa? 5. Mihin halutaan asentaa imurasiat? 2.1 CENTIX keskusyksikön sijaintipaikka Sijaintipaikka Sijoita imuyksikkö paikkaan missä moottorin ääni häiritsee mahdollisimman vähän joka sijaitsee mahdollisimman keskeisesti niin että putkisto jää mahdollisimman lyhyeksi jossa roskasäiliö voidaan tyhjentää mahdollisimman helposti. Älä sijoita imuyksikköä tiloihin joissa avoimentulen käsittely on sallittu pesukeittiöön ja varastotiloihin Suositeltavia sijaintipaikkoja: kellari autotalli verstas Imuyksikköä varten tarvitaan pistorasia 230 V/50 Hz jännitteellä. Sijoita laite huoneeseen jonka ainakin yksi seinä on ulkoseinä niin että turbiinin ilmanpoisto voidaan ohjata ulkoilmaan (katso konta Poistoilman ohjauksen asennus) 123
36 2.2 Imurasioiden sijaintipaikat Sijoita imurasiat helposti lähestyttäviin kohtiin valokatkaisijoiden tai ovenraamien läheisyyteen ei ovien taakse noin cm:n korkeudelle cm:n korkeudelle - pienten lasten ulottumattomiin - yhdenmukaisuus pistorasioiden ja valokatkaisijoiden kanssa lattiaimurasia; huomaa, että imurasian tulee sijaita lähellä seinää, niin että kompastumisvaara on mahdollisimman pieni. Varo vioittamasta sähköjohtoja kun poraat seiniin tarvittavia reikiä. Mikäli toimitukseen sisältyvät imurasiat eivät riitä, saat niitä lisää lähimmältä ALTO-myyjältä. Ulottuvuusalueen määrittely Imuletkun ja teleskooppiputken pituus yhteensä on noin 10 m. Varaa varmuuden vuoksi työskentelymatkan pituudeksi noin 9 m. 1. Piirrä harpilla rakennuksen pohjapiirrokseen ulkonurkista mittasuhteessa oikeansuuruiset ympyrät joiden säde on 9 m. Ympyrän kaarien rajoittaman alueen sisällä voidaan valita paikka seinään tai lattiaan asennettavalle imurasialle. 2. Jos pinta-ala on suurempi, jaa pohjapiirros useampaan osaan ja menettele samalla tavalla. Huomaa kuitenkin imurasian paikkaa valittaessa, että huonekalut tai kiinteät rakenteet voivat pidentää vaadittavaa letkun pituutta huomattavasti! Vinkkejä: Etäällä sijaitsevaan huoneeseen on mahdollisesti edullisempaa olla asentamatta imurasiaa. Sen sijaan kannattaa ostaa imuletkun jatke (katso ALTO lisävarusteohjelma), jonka avulla voit pidentää imurointietäisyyttä. Voit tarkistaa letkun pituuden asettamalla mittasuhteessa oikeanpituisen langan piirroksen päälle. Harkitse tarkkaan, riittääkö letkun pituus huonekalujen ollessa paikallaan. Valmiissa rakennuksissa imurasioiden paikan määrittely ja matkan mittaus käy parhaiten oikeanmittaisella narulla jota käytät imuletkun tavoin. max.9 m max.9 m 124
37 3 Asennus Sulkeissa mainitut luvut viittaavat jakson 1 taulukkoon Asennuspaketin sisältö. 3.1 Putkiston asennus Yleiseet ohjeet putkiston asennusta varten Sääntö 1 Putket (1) voidaan asentaa pystysuoraan tai vaakasuoraan. Huomaa että vaakasuorassa asennuskessa putkien tulee sijaita kaltevassa asennossa keskusyksikköön nähden. Sääntö 2 Asenna imurasian (10) ja kehyksen (11) perään aina 90 lyhyt kulma (12). Näin estät pitkien osasten imuroitumisen letkun sisään. Huomaa: Työnnä pitkä haara putkijärjestelmään, lyhyt haara kehykseen. Sääntö 3 Työnnä putket yhteen ensin ilman liimaa (13) ja tarkasta etäisyydet ja virtaussuunnat. Mikäli mahdollista, asenna putkisto ensin kokonaan, liitä osat toisiinsa ja tarkasta. Kun kaikki on oikein paikallaan, aloita imurasioiden liimauksella. Sääntö 4 Kohdassa 3 kuvattua tarkastusta suoritettaessa: merkitse putkien liitoskohdat jokaisen putken päässä putkien kulmissa jotka ovat erisuuruisissa kulmissa toisiinsa nähden. Jos niiden tulee olla tarkalleen 45 tai 90 kulmassa, voit käyttää kulmakappaleisiin painettuja merkintöjä. Sääntö 5 Leikkaa putket aina suoraan kulmaan. Käytä putkisaksia tai muuta asianmukaista työkalua. Sääntö 6 Poista purse sahaus- ja leikkauspinnoista. Käytä purseenpoistotyökalua tai terävää taskuveistä. 125
38 Sääntö 7: Levitä liima aina putkelle, ei koskaan muhviin. Sääntö 8: Varmista kaltevuus imurasian ja keskusyksikön välillä. Sääntö 9: Asenna ensimmäiseksi imurasia, joka sijaitsee etäimpänä keskusyksiköstä. Sääntö 10: Liitä putkihaarat aina ilmanvirtauksen suunnassa. Näin vältät raskaiden pölypartikkeleiden putoamisen takaisinpäin ilmanpyörteitä jotka heikentävät imuvoimaa Sääntö 11: Työnnä putkenosat aina tiiviisti kiinni toisiinsa. Sääntö 12: Jos putket valetaan uuden rakennuksen kattoon, huomaa että putket on valamisen aikana varmistettu paikaltaan siirtymistä vastaan imurasioiden liitäntäkappaleet tulevat ulos täsmälleen siinä kohdassa, missä seinän tulee myöhemmin sijaita Imuputkien asennus Kun imurasioiden paikat on valittu, voidaan putkisto asentaa rakennukseen. Putkien eri asennusmahdollisuudet: 1) uudessa rakennuksess 2) valmiissa rakennuksessa a) seinärakenteen sisään (uppoasennus) b) seinärakenteen päälle (pinta-asennus) c) tyhjiin johto- tai putkikanaaleihin tai käyttämättömään hormiin 126
PAINEILMALETKUKELA-AUTOMAATTI AUTOMATIC AIR HOSE REEL
 MAV4 MAV5 MAV6 PAINEILMALETKUKELA-AUTOMAATTI AUTOMATIC AIR HOSE REEL Käyttöohje Instruction manual HUOMIO! Lue käyttöohjeet huolellisesti ennen laitteen käyttöä ja noudata kaikkia annettuja ohjeita. Säilytä
107401959 G INSTRUCTIONS FOR USE BRUGSANVISNING BETRIEBSANLEITUNG VC300 SERIES USER MANUAL MODE D EMPLOI INSTRUCCIONES DE USO
 0740959 G INSTRUCTIONS FOR USE BRUGSANVISNING BETRIEBSANLEITUNG MODE D EMPLOI INSTRUCCIONES DE USO VC300 SERIES USER MANUAL - Basic operations. - Suction regulation 3 - Cordlock (HEPA) 3. 4 - Wind up the
National Building Code of Finland, Part D1, Building Water Supply and Sewerage Systems, Regulations and guidelines 2007
 National Building Code of Finland, Part D1, Building Water Supply and Sewerage Systems, Regulations and guidelines 2007 Chapter 2.4 Jukka Räisä 1 WATER PIPES PLACEMENT 2.4.1 Regulation Water pipe and its
T 7/1. Kätevän kokoinen, käyttömukavuudeltaan erinomainen pölynimuri ammattimaiseen käyttöön. Virtakytkintä käytetään jalalla. Ergonomista ja kätevää.
 T 7/1 Kätevän kokoinen, käyttömukavuudeltaan erinomainen pölynimuri ammattimaiseen käyttöön. 1 2 1 Virtakytkintä käytetään jalalla. Ergonomista ja kätevää. 2 Virtakytkimen käyttö jalalla. Ei tarvetta kumarteluun.
SAGA 150. Asennusohjeet. Mittaa oven korkeus. Piirrä seinään oven kiinni -päätyyn seinäkannattimen kohdalle vaakaviiva korkeudelle ovi + 75mm + 20 mm.
 SAGA 150 Asennusohjeet 500 1 2 Mittaa oven korkeus. Piirrä seinään oven kiinni -päätyyn seinäkannattimen kohdalle vaakaviiva korkeudelle ovi + 75mm + 20 mm. 3 Piirrä vesivaa an avulla viiva myös kiskon
Recirkulering. El-tilslutning. Kontrolpanel. Dansk. Timerfunktion
 1 2 Dansk Recirkulering Luften renses ved hjælp at aktive kulfiltre hvorefter den returneres til rummet. Kulfiltre bestilles separat. El-tilslutning Emhætten skal tilsluttes 230 V i henhold til stærkstrømsreglementet.
T 7/1. Kätevän kokoinen, käyttömukavuudeltaan erinomainen pölynimuri ammattimaiseen käyttöön. Virtakytkintä käytetään jalalla. Ergonomista ja kätevää.
 T 7/1 Kätevän kokoinen, käyttömukavuudeltaan erinomainen pölynimuri ammattimaiseen käyttöön. 1 2 1 Virtakytkintä käytetään jalalla. Ergonomista ja kätevää. 2 Virtakytkimen käyttö jalalla. Ei tarvetta kumarteluun.
Operating instructions SALTIX 10
 Operating instructions SALTIX 10 107402849 C 02 English... 6 Deutsch... 8 Français... 10 Nederlands... 12 Italiano... 14 Norsk... 16 Svenska... 18 Dansk... 20 Suomi... 22 Español... 24 Português... 26
Taloihin < 500 m2. Nilfisk Supreme LCD. Min. määrä. Pölypussit ja suodattimet BAG FILTER
 - mallin keskusyksikössä on informatiivinen näyttö, joka ilmaisee kuvakkein jos jokin on vialla tai on tehtävä jokin toimenpide: pölypussin tyhjennys/suodattimen puhdistus, tukkeutunut ilmavirta, ylikuumeneminen,
LYTH-CONS CONSISTENCY TRANSMITTER
 LYTH-CONS CONSISTENCY TRANSMITTER LYTH-INSTRUMENT OY has generate new consistency transmitter with blade-system to meet high technical requirements in Pulp&Paper industries. Insurmountable advantages are
1. SIT. The handler and dog stop with the dog sitting at heel. When the dog is sitting, the handler cues the dog to heel forward.
 START START SIT 1. SIT. The handler and dog stop with the dog sitting at heel. When the dog is sitting, the handler cues the dog to heel forward. This is a static exercise. SIT STAND 2. SIT STAND. The
1/4. Resetointi ja vianmääritys. 22.11.2013 ntr
 A400-64176 Sähköpöydät 1/4 Resetointi ja vianmääritys Pöydän resetointi tehdään aina ennen käyttöönottoa ja tarvittaessa häiriötilanteessa. Määritä pöydän tyyppi käyttökytkimen ja jalustan mukaan ja tee
INSTALLATION INSTRUCTION ASENNUSOHJE PEM SJTK31 SJTK46 ENGLISH SUOMI
 INSTALLATION INSTRUCTION ASENNUSOHJE PEM1256 2010-2 SJTK31 SJTK46 ENGLISH SUOMI GB GENERAL INFORMATION - Check that the kit is suitable for the cable type. - Check the materials listed in the bill of materials
GD 910 Operating Instructions
 GD 910 Operating Instructions 107402565 A 2 English... 8 Deutsch... 10 Français... 12 Nederlands... 14 Italiano... 16 Norsk... 18 Svenska... 20 Dansk... 22 Suomi... 24 Español... 26 Português... 28 Eλληνικά...
WINE COOLER TFW METOS TFW 160S, TFW 365-2S, TFW 375S MG ,
 WINE COOLER TFW METOS TFW 160S, TFW 365-2S, TFW 375S MG4116794, 4116798, 4116797 Instruction manual TWF 365-2S TWF 375S TWF 160S 01.09.2015 Table if Contents 1. Important safety instructions...3 2. Unpacking
Secto Design Oy Kauppalantie 12 02700 Kauniainen Finland tel. +358 9 5050598 fax +358 9 5475 2535 info@sectodesign.fi www.sectodesign.
 Secto Design Oy Kauppalantie 12 02700 Kauniainen Finland tel. +358 9 5050598 fax +358 9 5475 2535 info@sectodesign.fi www.sectodesign.fi Secto 4200 pendant natural birch, black or white laminate, walnut
Keskuspölynimurit - Puhdas ilma, alhainen äänitaso, huippuimuteho
 150/250/LCD Jotta keskuspölynimurin asennus olisi mahdollisimman helppoa, All-in-1 paketit on suunniteltu vastaamaan normaalin asennuksen tarpeita. Toki voit myös ostaa kaikki osat erikseen. Nilfisk Supreme
Koti-imurit Performer All-in-1 150/250
 Keskuspölynimurit - kaikki yhdessä paketissa Tuotetiedot Kuvittele imuri, jota on helppo käyttää, joka on tehokas ja lähes äänetön. Sellainen, jota ei tarvitse kantaa yläkertaan, ei törmäile huonekaluihin
Installation instruction PEM
 Installation instruction ASENNUSOHJE PEM1032 2010-02 SURGE ARRESTER SET FOR POLE MOUNT TRANSFORMER YLIJÄNNITESUOJASETTI PYLVÄSMUUNTAJALLE ENGLISH SUOMI 2/8 PEM1032 2010-02 ENGLISH GENERAL INFORMATION -
On instrument costs in decentralized macroeconomic decision making (Helsingin Kauppakorkeakoulun julkaisuja ; D-31)
") On instrument costs in decentralized macroeconomic decision making (Helsingin Kauppakorkeakoulun julkaisuja ; D-31) Juha Kahkonen Click here if your download doesn"t start automatically On instrument costs
On instrument costs in decentralized macroeconomic decision making (Helsingin Kauppakorkeakoulun julkaisuja ; D-31) Juha Kahkonen Click here if your download doesn"t start automatically On instrument costs
CONVERSION KITS FOR FRAMES MR8 AND MR9 INSTALLATION INSTRUCTIONS
 CONVERSION KITS FOR FRAMES MR8 AND MR9 INSTALLATION INSTRUCTIONS MR8 AND MR9 CONVERSION KIT - INSTALLATION INSTRUCTION Document ID: DPD01787, Revision: A, Release date: 17.11.2015 1.1 MR8 kit contents
Käyttöoppaasi. NILFISK GD 911 BATTERY http://fi.yourpdfguides.com/dref/4251388
 Voit lukea suosituksia käyttäjän oppaista, teknisistä ohjeista tai asennusohjeista tuotteelle NILFISK GD 911 BATTERY. Löydät kysymyksiisi vastaukset NILFISK GD 911 BATTERY käyttöoppaasta ( tiedot, ohjearvot,
anna minun kertoa let me tell you
 anna minun kertoa let me tell you anna minun kertoa I OSA 1. Anna minun kertoa sinulle mitä oli. Tiedän että osaan. Kykenen siihen. Teen nyt niin. Minulla on oikeus. Sanani voivat olla puutteellisia mutta
INSTALLATION INSTRUCTION ASENNUSOHJE PEM1417 2012-11 ENGLISH SUOMI CURRENT LIMITING DEVICE VIRTAA RAJOITTAVA SUOJA SDI46.812 & SDI46.
 INSTALLATION INSTRUCTION ASENNUSOHJE PEM1417 2012-11 ENGLISH SUOMI CURRENT LIMITING DEVICE VIRTAA RAJOITTAVA SUOJA SDI46.812 & SDI46.824 2/8 SDI46.812 & SDI46.824 PEM1417 2012-11 ENGLISH GENERAL INFORMATION
FI GB. Asennus-, käyttöohjeet. Installation, operation instructions
 FI GB Asennus-, käyttöohjeet Installation, operation instructions Asennus FI Keinuripustuksen asennus Tekstin sulkeissa olevat numerot viittaavat kuvien 1, 2, 3 ja 4 numerointiin. Kiinnitä keinuripustuksen
T 15/1 HEPA. Tehokas ja hyvinvarusteltu pölynimuri laitossiivouskäyttöön. HEPA-suodatin (EN 1882:1998) Highflex-virtajohto
 Highflex-virtajohto") T 15/1 HEPA Tehokas ja hyvinvarusteltu pölynimuri laitossiivouskäyttöön. 1 HEPA-suodatin (EN 1882:1998) Imrissa on HEPA -suodatin (EN 1822:1998) mikä takaa puhtaan poistoilman ja on ihanteellinen käytettäväksi
T 15/1 HEPA Tehokas ja hyvinvarusteltu pölynimuri laitossiivouskäyttöön. 1 HEPA-suodatin (EN 1882:1998) Imrissa on HEPA -suodatin (EN 1822:1998) mikä takaa puhtaan poistoilman ja on ihanteellinen käytettäväksi
On instrument costs in decentralized macroeconomic decision making (Helsingin Kauppakorkeakoulun julkaisuja ; D-31)
") On instrument costs in decentralized macroeconomic decision making (Helsingin Kauppakorkeakoulun julkaisuja ; D-31) Juha Kahkonen Click here if your download doesn"t start automatically On instrument costs
On instrument costs in decentralized macroeconomic decision making (Helsingin Kauppakorkeakoulun julkaisuja ; D-31) Juha Kahkonen Click here if your download doesn"t start automatically On instrument costs
Box 1. Things you have/ Pakkaus sisältää. x 4 x 16 x 4 x 4. 300mm. 1700mm. 300mm 1. Things you should know / Sinun Tulee Tietää
 Phobos 30 Things you should know / Sinun Tulee Tietää Things you prepare / Näitä Tarvitset DURING INSTALLATION ALL PRODUCTS: use protective gloves at all times use eye protection at all times never install
Installation instruction PEM
 Installation instruction ASENNUSOHJE PEM1031 2010-04 CURRENT LIMITING DEVICE FOR POLE MOUNT TRANSFORMER VIRTAA RAJOITTAVA SUOJA PYLVÄSMUUNTAJALLE ENGLISH SUOMI 75 2/8 PEM1031 2010-04 ENGLISH GENERAL INFORMATION
Fitting instructions. Fitting set for joining all types of DEVI self limiting heating cables to heating cables Art. no. 19805779 SSTL nro 04 312 85
 GB/FI Fitting instructions Fitting set for joining all types of DEVI self limiting heating cables to heating cables Art. no. 19805779 SSTL nro 04 312 85 intelligent varme Contents: GB Connection kits 3
Malli ZB06-25A LUE KAIKKI KÄYTTÖOHJEET ENNEN PÖLYNIMURIN KÄYTTÖÄ. KÄYTÄ VAIN OHJEIDEN MUKAISESTI.
 Malli ZB06-25A T Ä R K E Ä Ä T U R V A L L I S U U S T I E T O A LUE KAIKKI KÄYTTÖOHJEET ENNEN PÖLYNIMURIN KÄYTTÖÄ. KÄYTÄ VAIN OHJEIDEN MUKAISESTI. KÄYTTÖOHJE SISÄLTÖ TÄRKEITÄ TURVATOIMIA... 1-3 MUISTIINPANOJA:
Kuluttajaimurit Performer All-in-1 150/250
 Jotta keskuspölynimurin asennus olisi mahdollisimman helppoa, All-in-1 paketit on suunniteltu vastaamaan normaalin asennuksen tarpeita. Toki voit ostaa kaikki osat myös erikseen. Nilfisk Performer All-in-1
Capacity Utilization
 Capacity Utilization Tim Schöneberg 28th November Agenda Introduction Fixed and variable input ressources Technical capacity utilization Price based capacity utilization measure Long run and short run
Salasanan vaihto uuteen / How to change password
 Salasanan vaihto uuteen / How to change password Sisällys Salasanakäytäntö / Password policy... 2 Salasanan vaihto verkkosivulla / Change password on website... 3 Salasanan vaihto matkapuhelimella / Change
VAROITUKSET. Älä pura laitetta osiin.
 VAROITUKSET Laitteen väärinkäyttö voi johtaa henkilövahinkoihin. Noudata kaikkia tässä ohjekirjassa annettuja ohjeita ja käytä laitetta oikein. Älä koskaan seiso laitteen alapuolella. Älä pura laitetta
IVB 7-M B1 302002028 B. Printed in Hungary. auto auto
 auto auto IVB 7-M B 8 B Printed in Hungary auto auto 4 5 6 7 6 8 7 9 Sisältö Tärkeitä turvallisuusohjeita Kuvaus Ennen pölynimurin käynnistystä 4 Käyttö 5 Käyttökohteet ja tekniikat 6 Työn lopettamisen
Keskittämisrenkaat. Meiltä löytyy ratkaisu jokaiseen putkikokoon, 25 mm ja siitä ylöspäin.
 Keskittämisrenkaat Keskittämisrenkaita käytetään kun virtausputki menee suojaputken sisällä, kuten esim. tiealituksissa. Meidän keskittämisrenkaat ovat valmistettu polyeteenistä jonka edut ovat: - helppo
On instrument costs in decentralized macroeconomic decision making (Helsingin Kauppakorkeakoulun julkaisuja ; D-31)
") On instrument costs in decentralized macroeconomic decision making (Helsingin Kauppakorkeakoulun julkaisuja ; D-31) Juha Kahkonen Click here if your download doesn"t start automatically On instrument costs
On instrument costs in decentralized macroeconomic decision making (Helsingin Kauppakorkeakoulun julkaisuja ; D-31) Juha Kahkonen Click here if your download doesn"t start automatically On instrument costs
Pölynimuri Cleanfix S10 Plus ja S10 Plus Hepa
 Pölynimuri Cleanfix S10 Plus ja S10 Plus Hepa VAROITUKSIA Lue käyttö- ja turvallisuusohjeet ennen käyttöä! Tämä imuri ei sovellu nesteiden tai terveydelle haitallisen tai räjähdysalttiin pölyn imuroimiseen.
Information on preparing Presentation
 Information on preparing Presentation Seminar on big data management Lecturer: Spring 2017 20.1.2017 1 Agenda Hints and tips on giving a good presentation Watch two videos and discussion 22.1.2017 2 Goals
T 10/1 Adv. Kompaktin kokoinen, varmatoiminen ja tehokas ammatti-imuri, joka soveltuu ihanteellisesti siivousliikkeille päivittäissiivoukseen.
 T 10/1 Adv Kompaktin kokoinen, varmatoiminen ja tehokas ammatti-imuri, joka soveltuu ihanteellisesti siivousliikkeille päivittäissiivoukseen. 1 2 1 2 Suurikokoinen, pyöreä kestosuodatin pestävää fleeceä
O-renkaan vaihto-ohje Instructions for replacement of o-ring
 Vexve-teräsventtiilin DN10-50 Venttiileille jotka valmistettu vuonna 2006 tai sen jälkeen ja kahva (2) irroita pidätinrengas (3) irroita rajoitin (4) karan tiivisteholkki (5) vaihda vioittunut o-rengas
FinFamily PostgreSQL installation ( ) FinFamily PostgreSQL
 FinFamily PostgreSQL") FinFamily PostgreSQL 1 Sisällys / Contents FinFamily PostgreSQL... 1 1. Asenna PostgreSQL tietokanta / Install PostgreSQL database... 3 1.1. PostgreSQL tietokannasta / About the PostgreSQL database...
FinFamily PostgreSQL 1 Sisällys / Contents FinFamily PostgreSQL... 1 1. Asenna PostgreSQL tietokanta / Install PostgreSQL database... 3 1.1. PostgreSQL tietokannasta / About the PostgreSQL database...
NT 611 ECO K. 1 Integrated wastewater pump. Large quantities of liquid can be disposed of via the disposal pump to allow continuous use.
 NT 611 ECO K Tyhjennyspumpulla varustettu veden- ja pölynimuri suurehkojen vesimäärien imurointiin. Vesi voidaan siirtää säiliöstä pumppaamalla, mikä mahdollistaa jatkuvan nesteen imuroinnin. 1 Integrated
You can check above like this: Start->Control Panel->Programs->find if Microsoft Lync or Microsoft Lync Attendeed is listed
 Online Meeting Guest Online Meeting for Guest Participant Lync Attendee Installation Online kokous vierailevalle osallistujalle Lync Attendee Asennus www.ruukki.com Overview Before you can join to Ruukki
Solar Water Heater Kit. EcoStyle. 1 User Manual/Operating Instructions. Contents FREE LESSON PLANS AVAILABLE.
 EcoStyle 1 User Manual/Operating Instructions Contents 1 Contents 2 What s in the box? 3 Setting up the 4 Heating water 5 Measuring water temperature with the digital thermometer 6 Maximum/minimum temperature
KONEISTUSKOKOONPANON TEKEMINEN NX10-YMPÄRISTÖSSÄ
 KONEISTUSKOKOONPANON TEKEMINEN NX10-YMPÄRISTÖSSÄ https://community.plm.automation.siemens.com/t5/tech-tips- Knowledge-Base-NX/How-to-simulate-any-G-code-file-in-NX- CAM/ta-p/3340 Koneistusympäristön määrittely
Secto 4200 pendant natural birch, black or white laminate, walnut veneer
 Secto Design Oy Kauppalantie 12 02700 Kauniainen Finland tel. +358 9 5050598 fax +358 9 5475 2535 info@sectodesign.fi www.sectodesign.fi Secto 4200 pendant natural birch, black or white laminate, walnut
FinFamily Installation and importing data (11.1.2016) FinFamily Asennus / Installation
 FinFamily Asennus / Installation") FinFamily Asennus / Installation 1 Sisällys / Contents FinFamily Asennus / Installation... 1 1. Asennus ja tietojen tuonti / Installation and importing data... 4 1.1. Asenna Java / Install Java... 4 1.2.
FinFamily Asennus / Installation 1 Sisällys / Contents FinFamily Asennus / Installation... 1 1. Asennus ja tietojen tuonti / Installation and importing data... 4 1.1. Asenna Java / Install Java... 4 1.2.
Ensimmäinen digitaalinen ja täysin modulaarinen 3 kw:n teollisuusimuri
 Imuri voi olla erilainen kuin kuvassa mallista riippuen. S3 on varustettu ohjauspaneelilla, joka toimittaa reaaliaikaista tietoa imutehokkuudesta. Sitä on saatavana 50 tai 100 litran säiliöllä, joka on
Owner s Manual GREE Electric Appliances,Inc.of zhuhai
 Ilmalämpöpumppu Split air conditioner wall mounted model Käyttäjän opas Owner s Manual GREE Electric Appliances,Inc.of zhuhai Ultra-thin GWHD09A3NK3DF KFR-25GW/NaA12FA GWHD12B2NK3AD KFR-32GW/NaA12FA Please
Uusi Ajatus Löytyy Luonnosta 4 (käsikirja) (Finnish Edition)
 (Finnish Edition)") Uusi Ajatus Löytyy Luonnosta 4 (käsikirja) (Finnish Edition) Esko Jalkanen Click here if your download doesn"t start automatically Uusi Ajatus Löytyy Luonnosta 4 (käsikirja) (Finnish Edition) Esko Jalkanen
Uusi Ajatus Löytyy Luonnosta 4 (käsikirja) (Finnish Edition) Esko Jalkanen Click here if your download doesn"t start automatically Uusi Ajatus Löytyy Luonnosta 4 (käsikirja) (Finnish Edition) Esko Jalkanen
Nilfisk Supreme 100/150/250/LCD
 Keskuspölynimurit - puhdas ilma Tuotetiedot Kuvittele imuri, jota on helppo käyttää, joka on tehokas ja lähes äänetön. Sellainen, jota ei tarvitse kantaa yläkertaan, ei törmäile huonekaluihin tai seiniin,
Movair AF 170. Käyttöohje. Korvent Oy Vanha Nurmijärventie 116 01730 VANTAA FINLAND
 Movair AF 170 Käyttöohje Korvent Oy Vanha Nurmijärventie 116 01730 VANTAA FINLAND Sisällysluettelo Yleistä... 3 Varoitus!... 3 Laitteen käyttö ja suodattimien vaihto... 4 Alipaineistajan käyttö... 4 Suodattimien
Yhtiön nimi: - Luotu: - Puhelin: - Fax: - Päiväys: -
 Positio Laske Kuvaus 1 MAGNA 32-1 N Tuote No.: 98117 Huom.! Tuotteen kuva voi poiketa todellisesta tuotteesta The pump is of the canned rotor type, i.e. pump and motor form an integral unit without shaft
Veden- ja pölynimurit NT 70/2
 Veden- ja pölynimurit NT 70/2 Tehokas, kaksimoottorinen märkä-kuivaimuri 70 litran säiliöllä. Vakiovarusteet: Imuletku 4 m Imutangot metallia, 2x 0,5 m Lattiasuutin markä-ja kuivaimurointiin 400 mm Rakosuutin
Teollisuusimurit. Tuotenro 4010100045 4010100046 4010100047. Manuaalinen suodattimen ravistin. Hyväksytty ATEX 22 luokan haitallisille aineille
 15 ATEX on pienikokoinen teollisuusimuri, joka on yksivaiheinen ja sopii käytettäväksi räjähdysherkkää pölyä sisältävissä tiloissa (Zone 22 ATEX). Laite on pieni ja laadukkailla ominaisuuksilla varustettu
The Viking Battle - Part Version: Finnish
 The Viking Battle - Part 1 015 Version: Finnish Tehtävä 1 Olkoon kokonaisluku, ja olkoon A n joukko A n = { n k k Z, 0 k < n}. Selvitä suurin kokonaisluku M n, jota ei voi kirjoittaa yhden tai useamman
Rekisteröiminen - FAQ
 Rekisteröiminen - FAQ Miten Akun/laturin rekisteröiminen tehdään Akun/laturin rekisteröiminen tapahtuu samalla tavalla kuin nykyinen takuurekisteröityminen koneille. Nykyistä tietokantaa on muokattu niin,
Hyvä asiakas Kiitos, kun ostit Cleanfix-reppuimurin. Tuote on sveitsiläinen laatutuote.
 KnapSack reppuimuri Turvallisuusohjeet Hyvä asiakas Kiitos, kun ostit Cleanfix-reppuimurin. Tuote on sveitsiläinen laatutuote. Toivottavasti koneesta on sinulle paljon iloa. Jos sinulla on kommentteja
Elektra V ... 13 ... 7... 9 GB... 11 NO ... 21 ... 15 ... 17 DE... 19 PL ... 23 ... 27 ... 25
 SE... 7... 9 GB... 11 NO FR... 13 RU... 15... 17 DE... 19 PL FI... 21 NL... 23 ES... 25 IT... 27 ELV3333, ELV3344, ELV5333, ELV6344 375 300 340 min 300 mm c-c 277 24 9 16 min 300 mm min 500 mm Fig. 1 10
Asennusopas. DEVIreg 531. Elektroninen termostaatti.
 Asennusopas DEVIreg 531 Elektroninen termostaatti www.devi.com Sisällysluettelo 1 Johdanto................. 3 1.1 Tekniset tiedot.......... 4 1.2 Turvaohjeet............ 5 2 Asennusohjeet.............
SEFFI - kuivaimen käyttöohjekirja
 SEFFI - kuivaimen käyttöohjekirja (SEFFI Pro Compact, Combi, Team SEFFI Soft Compact, Combi, Team) Käsiin ja jalkoihin tuleville varusteille 1 SEFFI - kuivain Käyttö ohjekirja malleille: SEFFI Pro Compact,
TIKIT a) Suorassa tikissä ristiommel jää nahan alle piiloon. b) Ristitikissä ommel jää näkyviin.
 Suorassa tikissä ristiommel jää nahan alle piiloon. b) Ristitikissä ommel jää näkyviin.") CML WHEEL COVER -RUORINAHKAN OMPELUOHJE Liota nahkoja lämpimässä vedessä n. 15 minuuttia ennen ompelua. Pidä nahka kosteana koko ompelun ajan esim. sumutepullolla. Pidä ommellessa kevyt kireys nahkaan,
CML WHEEL COVER -RUORINAHKAN OMPELUOHJE Liota nahkoja lämpimässä vedessä n. 15 minuuttia ennen ompelua. Pidä nahka kosteana koko ompelun ajan esim. sumutepullolla. Pidä ommellessa kevyt kireys nahkaan,
Choose Finland-Helsinki Valitse Finland-Helsinki
 Write down the Temporary Application ID. If you do not manage to complete the form you can continue where you stopped with this ID no. Muista Temporary Application ID. Jos et onnistu täyttää lomake loppuun
Öljytäytteinen sähköpatteri Electric Oil Radiator
 Öljytäytteinen sähköpatteri Electric Oil Radiator KÄYTTÖOHJE Alkuperäisten ohjeiden käännös INSTRUCTIONS MANUAL Original instructions MALLI/MODEL: Holly 1500: ERC2-1507 Holly 2000: ERC2-2009 DT Istr (ERC
Golfpallon etsijä asennusmanuaali
 Golfpallon etsijä asennusmanuaali Prazza takuu Kaikki Prazza tuotteet on suunniteltu ja valmistettu tiukkojen laatuvaatimusten mukaan, tuotteet ovat helppokäyttöisiä ja helppoja asentaa. Jos sinulla ilmenee
UZ 878 Operating Instructions
 UZ 878 Operating Instructions 107402582 A 02 English... 4 Deutsch... 9 Français... 14 Nederlands... 19 Italiano... 24 Norsk... 29 Svenska... 34 Dansk... 39 Suomi... 44 Español... 49 Português... 54 Eλληνικά...
4x4cup Rastikuvien tulkinta
 4x4cup Rastikuvien tulkinta 4x4cup Control point picture guidelines Päivitetty kauden 2010 sääntöihin Updated for 2010 rules Säännöt rastikuvista Kilpailijoiden tulee kiinnittää erityistä huomiota siihen,
KÄYTTÖOHJEKIRJA I 3000
 KÄYTTÖOHJEKIRJA I 3000 JOHDANTO Hyvä asiakas Kiitos siitä, että valitsit toimittajaksi Pullman-Ermatorin. Toivomme, että uusi teollisuusimurinne I 3000 toimii tyydyttävästi ja täyttää kaikki siihen asetetut
1. Liikkuvat määreet
 1. Liikkuvat määreet Väitelauseen perussanajärjestys: SPOTPA (subj. + pred. + obj. + tapa + paikka + aika) Suora sanajärjestys = subjekti on ennen predikaattia tekijä tekeminen Alasääntö 1: Liikkuvat määreet
TEOLLISUUSIMURI Kuiva-/märkäimuri
 KÄYTTÖOHJE TEOLLISUUSIMURI Kuiva-/märkäimuri UAA65 Lue ja perehdy tähän ohjeeseen ennen koneen käyttöönottoa! Läs och sätt dig in i denna bruksanvisning innan du börjar använda maskinen! Read these instructions
Industridammsugare. Teollisuuspölynimuri
 Modell / Malli / Model: EC808SNP-1250 99 940 30 SE BRUKSANVISNING Industridammsugare FI KÄYTTÖOHJEET Teollisuuspölynimuri EN INSTRUCTION MANUAL Industrial Vacuum Cleaner SE Säkerhetsanvisningar VARNING!
I-VALO VEGA FIXING MODULE B300
 Nämä ohjeet eivät välttämättä sisällä kaikkien valaisinten tai tarvikkeiden yksityiskohtaisia ohjeita, eivätkä ohjeista kaikissa asennukseen ja käyttöön tai huoltoon liittyvissä tilanteissa. / These instructions
Lab SBS3.FARM_Hyper-V - Navigating a SharePoint site
 Lab SBS3.FARM_Hyper-V - Navigating a SharePoint site Note! Before starting download and install a fresh version of OfficeProfessionalPlus_x64_en-us. The instructions are in the beginning of the exercise.
Victo Finishes Shade Cable + ceiling cup Natural birch White White laminated White Black laminated Black Walnut veneer White.
 Victo 4250 Finishes Shade Cable + ceiling cup Natural birch White White laminated White Black laminated Black Walnut veneer White Material Sizes Light source Cable IP Rating Maintenance Form pressed birch
BV 5/1. Patentoitu kantolaite, jossa Air Stream Comfort ilmastointikanavat. Helposti liikuteltava
 BV 5/1 Reppuimuri helpottaa hankalasti saavutettavien kohteiden tehokasta imurointia. Tyypillisiä käyttökohteita ovat erilaiset liikennevälineet kuten lentokoneet ja bussit sekä esim. elokuvateatterit.
SW20 Combi SW21 Aqua SW21
 SW20 Combi SW21 Aqua SW21 Lue käyttöohjeet ennen imurin käyttöä Nämä käyttöohjeet on tarkoitettu imurin käyttäjälle Tutustu laitteen osiin, turvallisuusohjeisiin ja käyttöön sekä kunnossapitotoimiin ja
BV 5/1. Patentoitu kantolaite, jossa Air Stream Comfort ilmastointikanavat. Helposti liikuteltava
 BV 5/1 Reppuimuri helpottaa hankalasti saavutettavien kohteiden tehokasta imurointia. Tyypillisiä käyttökohteita ovat erilaiset liikennevälineet kuten lentokoneet ja bussit sekä esim. elokuvateatterit.
Ammatti-imurit GD 930
 Kovaa käyttöä kestävä laatuimuri. Nerokkaan muotoilunsa ansiosta imuri hyödyntää läpikulkevan ilmavirran pienimmällä mahdollisella tehohäviöllä. Tästä syystä imurilla on erinomainen imukyky ja äänen laatu
KÄYTTÖOHJE AURINKOVARJON JALKAAN KIINNITETTÄVÄ LÄMMITIN P1500
 KÄYTTÖOHJE AURINKOVARJON JALKAAN KIINNITETTÄVÄ LÄMMITIN P1500 Lue käyttöohje ennen lämmittimen käyttöönottoa Käytä lämmitintä ainoastaan käyttöohjeiden mukaisesti. Muu käyttö voi aiheuttaa tulipalon, sähköiskun
Imuyksikkö - moottoriteho 750 W - max. ilmamäärä 2210 m 3 /h - max. alipaine 920 Pa - jännite 230 V - virta 5.2 A - imyksikön paino n.
 KÄYTTÖ- JA HUOLTO-OHJEET Perehdy tähän ohjekirjaan huolellisesti ennen kuin asennat, käytät tai huollat EXTOR 2300 imuria. Tämän ohjekirjan ohjeita tulee noudattaa. TEKNINEN ERITTELY EXTOR 2300 imuri:
ASENNUSOHJE KAMMIOEROTIN JEKA MOOTTORIOHJAIMELLE N 0037.03
 ASENNUSOHJE KAMMIOEROTIN JEKA MOOTTORIOHJAIMELLE N 0037.03 OUTDOOR DISCONNECTOR ISO 9001:2009 ISO 14001:2005 OHSAS 18001:2008 TYPE CUB a) PACKING 9713680 Erotin täydellisenä, sisältää erotinpaketin ja
INSTALLATION INSTRUCTION ASENNUSOHJE PEM ENGLISH SUOMI INSULATION PIERCING CONNECTOR SLIW17.2 ERISTYKSEN LÄPÄISEVÄ LIITIN SLIW17.
 INSTALLATION INSTRUCTION ASENNUSOHJE PEM904 2011-08 ENGLISH SUOMI INSULATION PIERCING CONNECTOR SLIW17.2 ERISTYKSEN LÄPÄISEVÄ LIITIN SLIW17.2 2/8 SLIW17.2 PEM904 2011-08 GENERAL INFORMATION (ENG) - Check
Käyttöoppaasi. NILFISK ATTIX 30 PC http://fi.yourpdfguides.com/dref/3470600
 Voit lukea suosituksia käyttäjän oppaista, teknisistä ohjeista tai asennusohjeista tuotteelle. Löydät kysymyksiisi vastaukset käyttöoppaasta ( tiedot, ohjearvot, turvallisuusohjeet, koko, lisävarusteet
Microsoft Lync 2010 Attendee
 VYVI MEETING Lync Attendee 2010 Instruction 1 (15) Microsoft Lync 2010 Attendee Online meeting VYVI MEETING Lync Attendee 2010 Instruction 2 (15) Index 1 Microsoft LYNC 2010 Attendee... 3 2 Acquiring Lync
GD 911 Battery Operating Instructions
 GD 911 Battery Operating Instructions 107402566 A 02 English... 8 Deutsch... 12 Français... 16 Nederlands... 20 Italiano... 24 Norsk... 28 Svenska... 32 Dansk... 36 Suomi... 40 Español... 44 Português...
Käyttöohje Savukehitin Micro Rocket
 Käyttöohje Savukehitin Micro Rocket Markkinointi Pietiko Oy www.pietiko.fi Tekniset tiedot Savun määr: Tehon kulutus Säiliön koko Akut Kulutus Paino 2.7 kg Mitat 227X66X81 mm Savun kehityksen kesto: 10-12
LINC 17. sanka.fi 130624A
 LINC 17 130624A SANKA takaa tuotteen toimivuuden kun asennus tapahtuu ohjeiden mukaisesti. SANKA garanterar produktens funktion då monteringsanvisningen följs. sanka.fi Tarvittaessa. Vid behov. 6mm 3mm
Octo Finishes Shade Cable + ceiling cup Natural birch White White laminated White Black laminated Black Walnut veneer White.
 Octo 4240 Finishes Shade Cable + ceiling cup Natural birch White White laminated White Black laminated Black Walnut veneer White Material Sizes Light source Cable IP Rating Maintenance Form pressed birch
YLEISKUVA TEKNISET TIEDOT
 LANGATON PASSIIVINEN LIIKEILMAISIN Tämä tuote on standardin GB10408.1-2000 mukainen. Langaton passiivinen infrapuna ilmaisin perustuu ihmiskehon infrapuna- eli lämpösäteilyn havaitsemiseen. Ilmaisin vastaanottaa
Erittäin tehokas ja hiljainen pölynimuri
 Erittäin tehokas ja hiljainen pölynimuri : Niille, jotka haluavat erinomaisen siivoustuloksen. Haluatko imurin, jossa on tehokas 2000 W -moottori, HEPA-suodatin helpottamaan allergioita, erittäin matala
OFFICE 365 OPISKELIJOILLE
 OFFICE 365 OPISKELIJOILLE Table of Contents Articles... 3 Ohjeet Office 365 käyttöönottoon... 4 One Driveen tallennetun videon palauttaminen oppimisympäristön palautuskansioon... 5 Changing default language
CLEANING JOB ORIENTATION
 CLEANING JOB ORIENTATION CLEANING EQUIPMENT 1. cleaning trolley 2. cleaning bucket 3. garbage sack 4. squegee - You can dry windows, mirrors and floors. 5. floor mop and cloth 6. window washing applicator
Asennus- ja käyttöohjeet
 TARJOILUPATA ESK Asennus- ja käyttöohjeet 4239100, 4239101 YLEISTÄ Tutustu huolellisesti tämän ohjeen sisältöön, koska siinä on tärkeää tietoa laitteen oikeasta ja turvallisesta asentamisesta, käytöstä
ATTIX 30 / PC / XC ATTIX 40 / PC / XC ATTIX 50 / PC / XC ATTIX PC EC. Quick Start Guide F
 ATTIX 30 / PC / XC ATTIX 40 / PC / XC ATTIX 50 / PC / XC ATTIX 50-21 PC EC Quick Start Guide 302003204 F A 2. * 4.* 5.* 6.* 2 A 2. 4. 5. 6. 6. 3 B 2. ATTIX 30- / 40- / 50-01 ATTIX 30- / 40- / 50-11 ATTIX
Secto Design Oy Kauppalantie Kauniainen Finland tel fax
 Secto Design Oy Kauppalantie 12 02700 Kauniainen Finland tel. +358 9 5050598 fax +358 9 5475 2535 info@sectodesign.fi www.sectodesign.fi Secto 4202 Magnum pendant Available in natural birch, black or white
1. Yleiset turvallisuusohjeet 3 2. Määräysten mukainen käyttö 3
 307286 01 FI LED-valo liiketunnistimella theleda S10 WH 1020921 theleda S10 BK 1020922 theleda S20 WH 1020923 theleda S20 BK 1020924 theleda S10 W WH 1020931 theleda S10 W BK 1020932 theleda S20 W WH 1020933
Curriculum. Gym card
 A new school year Curriculum Fast Track Final Grading Gym card TET A new school year Work Ethic Detention Own work Organisation and independence Wilma TMU Support Services Well-Being CURRICULUM FAST TRACK
ASENNUS-, HUOLTO- JA KÄYTTÖOHJEET ARCTIC BUFFET LINE DROP IN KEITTOLÄMMITIN
 ASENNUS-, HUOLTO- JA KÄYTTÖOHJEET ARCTIC BUFFET LINE DROP IN KEITTOLÄMMITIN MALLIT: BLDISH SISÄLLYSLUETTELO Vastaanotto 3 Asennus ja käyttöönotto 3 Käyttö 4 Puhdistus 4 Huolto 4 Jos laite ei toimi 4 Takuuehdot