Petrol Grass Trimmer FBS 43 A1
|
|
|
- Ida Rantanen
- 7 vuotta sitten
- Katselukertoja:
Transkriptio

1 K O Before reading, unfold the page containing the illustrations and familiarise yourself with all functions of the device. I Käännä ennen lukemista kuvallinen sivu esiin ja tutustu seuraavaksi laitteen kaikkiin toimintoihin. U Vik ut bildsidan och ha den till hands när du läser igenom anvisningarna och gör dig bekant med apparatens / maskinens funktioner. F A C Klappen Sie vor dem Lesen die Seite mit den Abbildungen aus und machen Sie sich anschließend mit allen Funktionen des Gerätes vertraut. Petrol Grass Trimmer FBS 43 A1 K O Petrol Grass Trimmer Operation and Safety Notes Original operating instructions I Bensiinikäyttöinen ruohotrimmeri Käyttö- ja turvaohjeet Alkuperäiskäyttöohje IAN: FBS 43 A1 Einhell Germany AG Wiesenweg 22 D Landau/Isar U Bensindriven röjsåg Bruksanvisning och säkerhetsanvisningar Original-bruksanvisning F A C Benzin-Sense Bedienungs- und Sicherheitshinweise Originalbetriebsanleitung GB/IE Operation and Safety Notes Page 8 FI Käyttö- ja turvaohjeet Sivu 23 Last Information Update Tietojen tila Informationsstatus Stand der Informationen: 03/2012 Ident.-No.: SE Bruksanvisning och säkerhetsanvisningar Sidan 39 DE/AT/CH Bedienungs- und Sicherheitshinweise Seite 54 IAN IAN K O I U Cover_FBS_43_A1.indd :39


2 1 3a 3b 3c a 4b 4c A A B 33 5a 5b 15 6a 18a 18b a 18b b 6c 6d Cover_FBS_43_A1.indd :39


3 6e 6f 25 6g a 7b 7c 22 F 15 G H 29 8a 8b 8c 8d 8e 8f Anleitung_ _LB3.indb :35


4 9a 9b 9c 9d 9e 9f 10a 8 10b 31 10c a 11b 12a Anleitung_ _LB3.indb :35


5 12b 12c K 12d 12e K 12f 13a 13b F D C E Anleitung_ _LB3.indb :35
6 Table of contents GB/IE 1. Introduction Safety regulations Layout and items supplied Intended use Technical data Before starting the equipment Operation Maintenance and ordering of spare parts Storage and transport Cleaning Disposal and recycling Troubleshooting Declaration of conformity Warranty certifi cate...22 The reprinting or reproduction by any other means, in whole or in part, of documentation and papers accompanying products is permitted only with the express consent of the isc GmbH. Subject to technical changes Anleitung_ _LB3.indb :36
7 GB/IE 1. Introduction Congratulations on your new purchase. You have decided in favor of a high-quality product. The operating instructions are a part of this product. They contain information of importance for your safety, for the use of the product and for its disposal. Before you use the product, acquaint yourself with all the information concerning its operation and safety. Use the product only as described and only for the listed areas of application. If you hand on the product to other people, give them all the documentation as well. 2. Safety regulations Caution! Read all safety regulations and instructions. Any errors made in following the safety regulations and instructions may result in an electric shock, fi re and/or serious injury. Keep all safety regulations and instructions in a safe place for future use. Safety devices When working with the equipment, the appropriate plastic guard hood for cutting blade mode or cutting line mode must be fi tted to prevent objects being thrown out by the equipment. The integrated blade in the cutting line guard hood automatically cuts the line to the optimum length. Explanation of the information signs on the equipment (Fig. 14): 1. Warning! 2. Read the instructions before using for the fi rst time! 3. Wear protective headgear, goggles and ear muffs! 4. Wear sturdy, non-slip footwear! 5. Wear safety gloves! 6. Protect the equipment from rain and damp! 7. Be careful of objects being catapulted away! 8. Always switch off the equipment and pull out the spark boot plug before carrying out any maintenance work! 9. The distance between the equipment and persons in the vicinity must be at least 15 m! 10. The cutting tool (blade/cutting line) continues to rotate after the machine is switched off! 11. Caution: Hot equipment parts. Keep your distance! 12. Add a little grease (gear grease) after every 20 hours in operation! Safety information Read the operating instructions carefully. Familiarize yourself with the settings and with the proper use of the equipment. Never allow other persons who are not familiar with the operating instructions to use the equipment. Contact your local governmental agency for information regarding minimum age requirements for the user. Never mow in the direct vicinity of persons - especially children - or animals. Warning! Maintain a safety distance of 15m. If approached, switch off the equipment immediately. Always keep in mind that the user of the equipment is responsible for accidents involving other persons or their property. Important: Danger of poisoning. Emissions, fuels and lubricants are toxic. Do not inhale emissions. Before using Always wear sturdy, non-slip footwear and long trousers when mowing. Never mow barefoot or in sandals. Check the ground on which the equipment will be used and remove all objects that could be caught up and catapulted away. Warning! Petrol is highly flammable! Therefore: - Only store petrol in containers designed to hold petroleum-based liquids. - Only refuel out in the open and do not smoke during the refuelling process. - Always refuel before starting the engine. Do not open the fuel tank cap and do not refuel while the engine is running or when the equipment is hot Anleitung_ _LB3.indb :36
8 GB/IE - If petrol has overflowed, do not under any circumstances attempt to start the engine. Instead, remove the equipment from the affected area. Avoid starting the engine until the petrol fumes have completely evaporated. - For safety reasons, the petrol tank and the tank cap must be replaced if they are damaged. Replace defective silencers. Before using the scythe, visually inspect it to ensure that the blade, mounting bolts and the entire cutting apparatus are in good working order (i.e. not worn out or damaged). To prevent any imbalance, replace worn out or damaged blades and mounting bolts as a set only (if applicable). Handling (operation, storage, monitoring) Wear close-fitting work clothing which is in good condition and which offers protection, such as long trousers, sturdy work shoes, hard-wearing gloves, a helmet, a face mask or goggles to protect your eyes, and good quality cotton wool in your ears or some other ear protectors to reduce the noise. Store the equipment in a safe place. Open the petrol tank cap slowly to release any pressure that may have formed in the petrol tank. To prevent the risk of fire, move at least 3 meters from the refueling area before you start the equipment. Switch off the equipment before you put it down. Always hold the equipment firmly in both hands. Your fingers and thumbs should be wrapped around the handles. Ensure that all screws and connecting elements are secure. Never use the equipment if it has not been properly adjusted or has not been fully or safely assembled. Make sure that the handles are clean and dry and that there is no petrol mixture on them. Set the line spool to the required height. Avoid touching small objects such as stones with the line spool. When carrying out mowing work on a slope always stand at a lower level than the cutting tool. Never cut or trim on a smooth, slippery hill or slope. Keep all parts of your body and items of clothing away from the line spool when you start the engine and when the engine is running. Before you start the engine ensure that the line spool will not strike an obstacle. Always switch off the engine before working on the cutting tool. Store the equipment and accessories in a safe place protected from naked flames and heat/ spark sources such as gas geyser heaters, tumble driers, oil stoves or portable radiators, etc. Keep the guard hood, line spool and engine clear of mowing debris at all times. Only adequately trained people and adults may use, adjust and maintain the equipment. If you are not familiar with the equipment, practice handling it with the engine off. Always check the site you want to mow before you begin your work. Solid objects such as pieces of metal, bottles, stones, etc. can be catapulted away and cause serious injuries and permanent damage to the equipment. If you touch a solid object with the equipment by mistake, switch off the engine immediately and check the equipment for signs of damage. Never use the equipment if it is damaged or defective. Always operate the equipment in its high speed range for trimming and cutting. Do not let the engine run at low speed at the start of mowing or during trimming work. Only use the equipment for the purpose for which it is intended, such as trimming and mowing weeds. Never hold the line spool above knee height when the equipment is in operation. Do not use the equipment if other people or animals are in the immediate vicinity. Keep a minimum distance of 15 m between yourself and other people or animals when mowing. Keep a distance of 30 m if you are mowing down to the ground Anleitung_ _LB3.indb :36
9 GB/IE Additional instructions Do not use any fuel other than that recommended in the operating instructions. Always follow the instructions in the section Fuel and oil. Do not use petrol that has not been mixed correctly with 2-stroke oil. Otherwise there is a risk of causing permanent damage to the engine and of voiding the manufacturer s guarantee. Do not smoke while refueling or using the equipment. Never use the equipment without the exhaust pipe. Do not touch the exhaust pipe with your hands or body. Hold the equipment so that your fingers and thumbs are wrapped around the handled Do not use the equipment in an uncomfortable posture, off balance, with extended arms or with only one hand. Always use both hands on the equipment and wrap your fingers and thumbs around the handles. Always keep the line spool on the ground whilst the equipment is in operation. Use the equipment only for the purpose for which it is intended, such as trimming and mowing weeds. Do not use the equipment over a lengthy period of time - take regular breaks. Do not use the equipment when under the influence of alcohol or drugs. Use the equipment only when the guard hood is fitted and in good working order. Any modifications to the product may place your personal safety at risk and cause the manufacturer s warranty to be voided. Never use the equipment near inflammable liquids or gases, neither in enclosed rooms nor outdoors. This may cause explosions and/ or fire. Do not use any other cutting tools. For your own safety you must use only the accessories and attachments which are listed in the operating instructions or which are recommended or specified by the manufacturer. The use of cutting tools or accessories other than those recommended in the operating instructions or catalog may place your personal safety at risk. Safety precautions for handling the blade Take not of all warnings and instructions relating to operating and fitting the blade. The blade can recoil suddenly from objects if it cannot cut or mow through them. This can cause injuries to the arms or legs. Keep bystanders and animals at least 15 m away from where you are working. If the equipment strikes a foreign body, stop the engine immediately and wait for the blade to come to a standstill. Check the blade for signs of damage. Always replace the blade if it is bent or cracked. The blade is liable to catapult away objects with high force. This can cause blindness or injuries. Wear protection on your eyes, face and legs. Always remove objects from your working area before you use the blade. Carefully check the equipment and its fittings for signs of damage every time before use. Do not use the equipment unless all the blade fittings are installed correctly. When you release the throttle lever, the blade will continue to rotate and will only gradually come to a standstill. A blade which is in the process of rotating to a standstill can cause you or bystanders injuries through cutting. Before you start any work on the blade, switch off the engine and ensure that the blade has come to a standstill. The danger zone has a radius of 15 meters. Bystanders may suffer blindness or injuries. Keep a distance of 15 meters between yourself and other people or animals Anleitung_ _LB3.indb :36
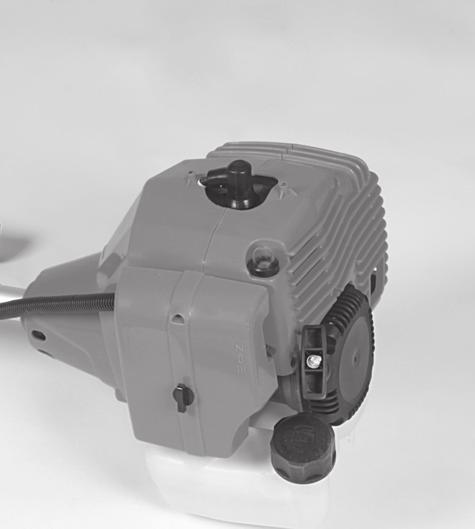
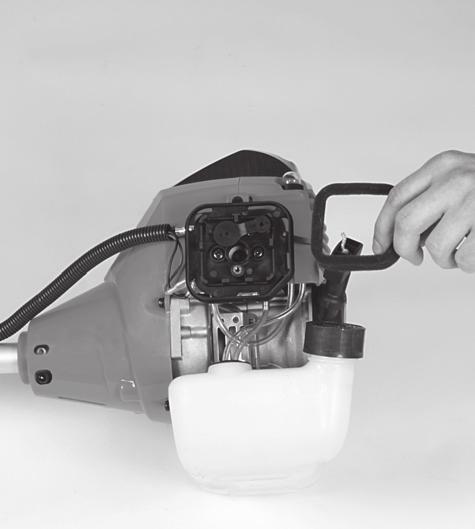
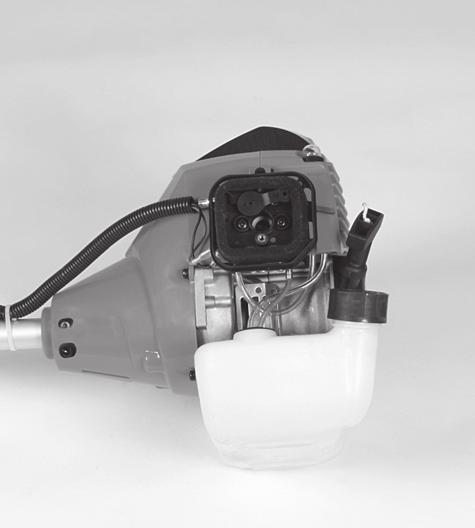
10 GB/IE 3. Layout and items supplied 3.1 Layout (Fig. 1-13) 1. Connecting piece for long handle 2. Long handle 3. Steady grip 4. Starter line / starter cable 5. Choke lever 6. Petrol tank 7. Fuel pump primer 8. Air fi lter housing cover 9. On/Off switch 10. Throttle lever lock 11. Throttle lever 12. Throttle lock 13. Line spool with cutting line 14. Cutting line guard hood 15. Cutting blade guard hood 16. Screw M5 (4x) 17. Carrying strap 18a. Cutting blade (4 teeth) 18b. Cutting blade (3 teeth) 19. Holder for steady grip 20. Handle screw M8 21. Washer Ø 8mm 22. Carrier plate 23. Pressure plate 24. Pressure plate cover 25. Nut M10 (left-hand thread) 26. Oil/petrol mixing bottle 27. Spark plug wrench 28. Open-ended wrench 8/10 mm 29. Hex wrench 4 mm 30. Hex wrench 5 mm 31. Protective cap for spark boot plug 32. Handle screw M6 33. Nut M6 34. Washer Ø 6mm 35. Air fi lter 36. Spark boot plug The cutting blade (18a/18b) and the line spool (13) are jontly referred to in the text as the cutting tool (generic term). 3.2 Items supplied Open the packaging and take out the equipment with care. Remove the packaging material and any packaging and/or transportation braces (if available). Check to see if all items are supplied. Inspect the equipment and accessories for transport damage. If possible, please keep the packaging until the end of the guarantee period. Important! The equipment and packaging material are not toys. Do not let children play with plastic bags, foils or small parts. There is a danger of swallowing or suffocating! 4. Intended use The equipment (cutting blade mode) is designed for cutting high grass and sparse scrub with the 4-tooth blade and for cutting dense scrub and slender wood growth with the 3-tooth blade. The equipment (line spool mode) is designed for cutting lawns and small weeds. The operating instructions as supplied by the manufacturer must be obeyed to ensure that the equipment is used properly. Any use which is not expressly permitted in these instructions may result in damage to the equipment and place the user in serious danger. Be sure to observe the restrictions in the safety information. Please note that our equipment has not been designed for use in commercial, trade or industrial applications. Our warranty will be voided if the equipment is used in commercial, trade or industrial businesses or for equivalent purposes. Caution! Due to the high risk of physical injury to the user, the equipment must not be used to carry out the following work: to clean dirt and debris off walkways, or to chop up tree or hedge clippings. Similarly, the equipment must not be used to level out high areas such as molehills. For safety rea Anleitung_ _LB3.indb :36
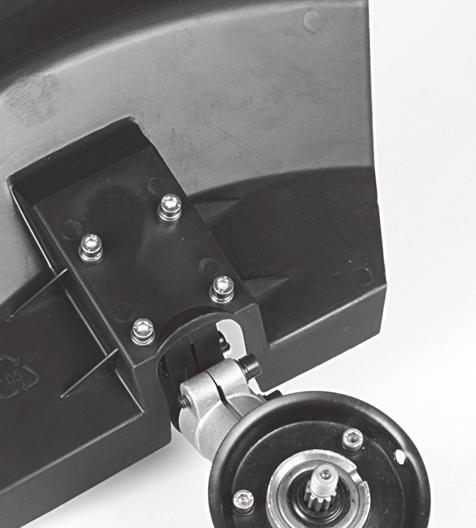
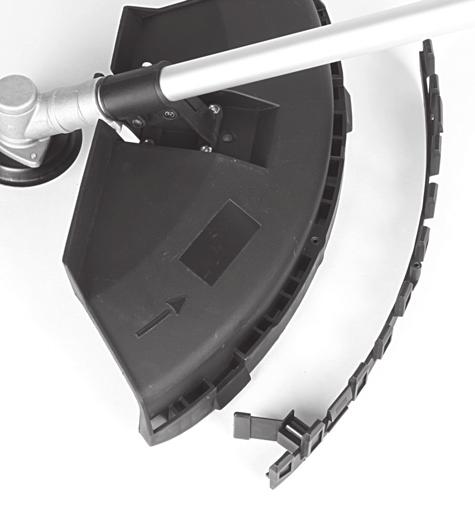
11 GB/IE sons, the equipment is not allowed to be used as a drive unit for other tools of any kind. The equipment is allowed to be used only for its intended purpose. Any other use is deemed to be a case of misuse. The user/operator and not the manufacturer will be liable for any damage or injuries of any kind resulting from such misuse. 5. Technical data Engine type stroke engine, air-cooled, chrome cylinder Engine power (max.) kw/ 1.8 hp Displacement ccm Idle engine speed min -1 Max. engine speed with blade: min -1 with line spool: min -1 Max. cutting speed with blade: min -1 with line spool: min -1 Ignition... Electronic Drive... Centrifugal clutch Weight (with empty tank) kg Cutting circle diameter of line cm Cutting circle diameter of blade...23 cm Cutting line length m Cutting line diameter mm Tank capacity l Spark plug...champion RCJ6Y Fuel consumption at max. engine power kg/h Specifi c fuel consumption at max. engine power g/kwh Sound and vibration L pa sound pressure level...98 db(a) K pa uncertainty db L WA sound power level db(a) K WA uncertainty db Wear ear-muffs. The impact of noise can cause damage to hearing. Operation Vibration emission value a h = 4.1 m/s 2 K uncertainty = 1.5 m/s 2 Keep the noise emissions and vibrations to a minimum. Only use appliances which are in perfect working order. Service and clean the appliance regularly. Adapt your working style to suit the appliance. Do not overload the appliance. Have the appliance serviced whenever necessary. Switch the appliance off when it is not in use. Wear protective gloves. 6. Before starting the equipment 6.1 Assembly Fitting the steady grip (Fig. 3a-3c) Fit the steady grip (3) as shown in Figures 3a-3c. Do not tighten the screw (20) until you have set the optimum working position with the carrying strap (17) (see also section 6.2). The steady grip should be aligned as shown in Figure 1. To dismantle, proceed in reverse order Fitting the long handle (Fig. 4a-4c) Pass the handle screw (32) through the washer (34) and into the connecting piece of the long handle (1). Secure the handle screw loosely with the nut (33). Now press the locking lever (A) and push the long handle (Fig. 4a/Item 2) carefully into the connecting piece for the long handle. While doing so, ensure that the drive shafts on the inside of the long handle slide into each other (turn the line spool (13) / cutting blade (18a/18b) gently if required). The lug of the locking lever (A) must latch into the hole (B). Now Anleitung_ _LB3.indb :36
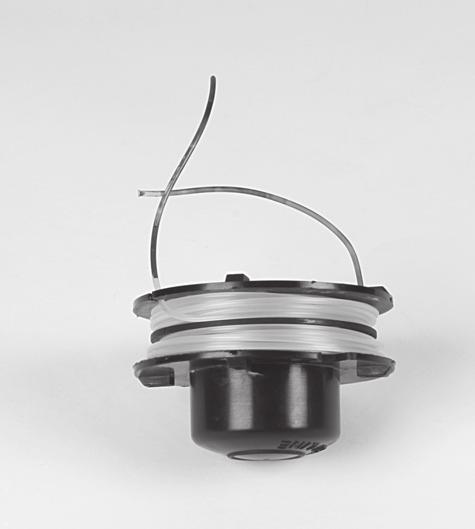
12 GB/IE tighten the handle screw as shown in Figure 4c. To dismantle, simply slacken the handle screw and actuate the locking lever Fitting the blade guard hood Important: The cutting blade guard hood (15) must be fi tted when you want to work with the cutting blade. The guard hood for the cutting blade must be installed as shown in Figures 5a 5b Fitting/Replacing the cutting blade The procedure for fi tting the cutting blade (18a/18b) is shown in Figures 6a-6g. To dismantle, proceed in reverse order. Fit the carrier plate (22) onto the spline shaft as shown in Figure 6b. Secure the cutting blade (18a/18b)) on the carrier plate (Fig. 6c). Place the pressure plate (23) over the thread of the spline shaft (Fig. 6d). Plug on the cover of the pressure plate (24) (Fig. 6e). Look for the hole in the carrier plate, line up with the notch underneath, lock with the supplied hex wrench (29), and then tighten the nut (25) with the spark plug wrench (27) (Fig. 6f/6g). Important: Left-hand thread The cutting blades (18a/18b) are delivered with plastic protective caps fitted to them. Remove these caps before use and refit them after use Fitting the cutting line guard hood on the cutting blade guard hood Important: The cutting line guard hood (14) must be fi tted in addition when you want to work with the cutting line. The guard hood for the cutting line must be installed as shown in Figures 7a 7b. Make sure that the cutting line guard hood engages correctly. A blade (Fig. 7a/ Item F) on the underside of the guard hood automatically cuts the cutting line to the optimum length. It is covered by a guard (Fig. 7a/Item G). Remove the guard before you start working and replace it when you have fi nished working Fitting/Replacing the line spool The procedure for fi tting the line spool (13) is shown in Figure 7c. To dismantle, proceed in reverse order. The line spool is already fi tted when the equipment is delivered. Look for the hole in the carrier plate (22), line up with the notch beneath it, lock with the supplied hex wrench (29), and screw the line spool onto the thread. Important: Left-hand thread 6.2 Setting the cutting height Fit the carrying strap (17) as shown in Figures 8a-8c. Hook the equipment to the carrying belt (Fig. 8d). Adjust to the perfect working and cutting position using the various strap adjusters on the carrying strap (Fig. 8e). To confirm the optimum length of the carrying strap, make a few swinging movements with the engine off (Fig. 9a). The carrying strap is fi tted with a quick-release mechanism. Pull the red strap section (Fig. 8f) if you need to remove the strap quickly. Important: Always use the strap when working with the equipment. Attach the strap as soon as you have started the engine and it is running in idle mode. Switch off the engine before you take off the carrying strap. 6.3 Fuel and oil Recommended fuels Use only a mixture of unleaded petrol and special 2-stroke engine oil. Mix the fuel mixture as indicated in the fuel mixing table. Important: Do not use a fuel mixture which has been stored for longer than 90 days. Important: Never use 2-stroke oil with a recommended mixing ratio of 100:1. The manufacturer s warranty will be voided in case of engine damage due to inadequate lubrication. Important: Only use containers designed and approved for the purpose to transport and store Anleitung_ _LB3.indb :36
13 GB/IE fuel. Pour the correct quantities of petrol and 2-stroke oil into the mixing bottle (see scale printed on the bottle). Then shake the bottle well. 6.4 Fuel mixing table Mixing procedure: 40 parts petrol to 1 part oil Petrol 2-stroke oil 1 liter 25 ml 5 liters 125 ml 7. Operation Please note that the statutory regulations governing noise abatement may differ from one location to another. Each time before use, check the following : That there are no leaks in the fuel system. That the equipment is in perfect condition and that the safety devices and cutting devices are complete. That all screws are securely fastened. That all moving parts move smoothly. 7.1 Starting the engine when cold Fill the tank with the oil/petrol mix. See also Fuel and oil. 1. Set the equipment down on a hard, level surface. 2. Press the fuel pump (primer) (Fig. 1/Item 7) 10 times. 3. Move the On/Off switch (Fig. 1/Item 9) to I. 4. Secure the throttle lever (Fig. 1 / Item 11). To do this, press the throttle lever lock (Fig. 1/Item 12) and then press the throttle lever (Fig. 1/Item 11) and lock the throttle lever by pressing the lock (Fig. 1/Item 10) at the same time. 5. Set the choke lever (Fig. 1/Item 5) to. 6. Hold the equipment fi rmly and pull out the starter cable (Fig. 1/Item 4) until you feel it begin to resist. Then tug sharply on the starter cable 4 times. The equipment should start. Important: Never allow the starter line to snap back. This may result in damage. Important: Since the throttle lever is secured, the cutting tool starts to operate when the engine is started. Then release the throttle lever by actuating it once. Actuating the throttle lever will also release the choke lever. (The engine returns to its idle state). 7. If the engine does not start up, repeat steps 4-6 above. Please note: If the engine does not start up even after several attempts, read the section Troubleshooting. Please note: Always pull out the starter cable in a straight line. If it is pulled out at an angle, friction will occur on the eyelet. As a result of this friction, the starter line will become frayed and will wear away faster. Always hold the starter cable when the starter line retracts. Never allow the starter line to snap back when it has been pulled out. 7.2 Starting the engine when warm (The equipment has been idle for less than min.) 1. Set the equipment down on a hard, level surface. 2. Switch the On/Off switch to I (Fig. 1 / Item 9). 3. Secure the throttle lever (Fig. 1 / Item 11) (in the same way as described in Starting the engine when cold ). 4. Hold the equipment fi rmly and pull out the starter cable until you feel it start to resist. Then tug sharply on the starter cable. The equipment should start after 1-2 tugs. If the equipment does not start after 6 tugs, repeat steps 1 7 of the procedure for starting the engine from cold Anleitung_ _LB3.indb :36
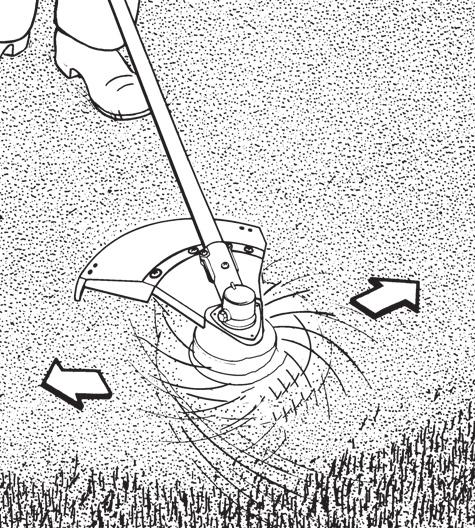
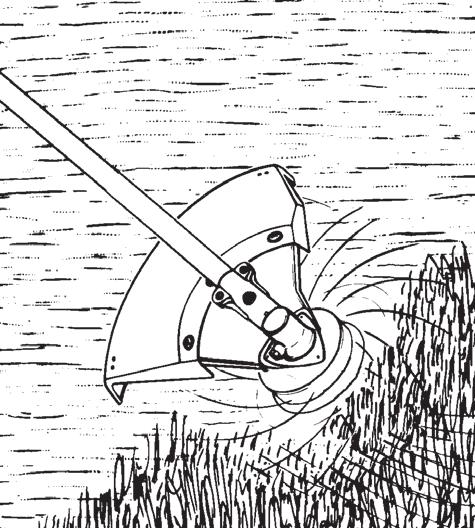
14 GB/IE 7.3 Switching off the engine Emergency Stop procedure: If it becomes necessary to stop the equipment immediately, set the On/Off switch (9) to Stop or 0. Normal procedure: Let go of the throttle lever (11) and wait until the engine has changed to idling speed. Then set the On/Off switch (9) to Stop or Practical tips Practice all the work steps with the engine switched off before you start to use the equipment. Warning! Take extreme care during mowing work. When doing such work keep a distance of 30 meters between yourself and other people or animals. Extending the cutting line Warning! Do not use any kind of metal wire or metal wire encased in plastic in the line spool. This may cause serious injuries to the user. To extend the cutting line (13), run the engine at full speed and tap the line spool on the ground. This will automatically extend the line. The blade on the guard hood will cut the line to the permissible length (Fig. 9b). Important: Remove all grass and weed remnants at regular intervals to prevent the equipment from overheating. Grass and weed remnants become trapped under the guard hood (Fig. 9c) and prevent the equipment from cooling suffi ciently. Remove the remnants carefully using a screwdriver or the like. Different cutting methods When the equipment is correctly assembled it will cut weeds and long grass in places which are diffi cult to access, e.g. along fences, walls and foundations and also around trees. It can also be used for mowing down vegetation so that a garden can be better prepared or a certain area cleared down to the soil. Please note: Even if it is used carefully, cutting around foundations, stone or concrete walls, etc. will result in the line suffering more than the normal level of wear. Trimming/mowing (with line spool/cutting blade) Swing the equipment from side to side in a scything motion. Always keep the cutting tool parallel to the ground. Check the site and decide which cutting height you require. Guide and hold the cutting tool at the required height to ensure that you cut evenly (Fig. 9d). Low trimming (with line spool) Hold the equipment right in front of you at a slight angle so that the underside of the line spool is above the ground and the line strikes the correct target. Always cut away from yourself. Never draw the equipment towards yourself. Cutting along fences/foundations (with line spool) Approach wire mesh fences, lath fences, natural stone walls and foundations slowly so that you can cut close to them without striking the obstacle with the line. If, for example, the line strikes stones, stone walls or foundations, it will wear or fray. If the line strikes wire fencing, it will break. Trimming around trees (with line spool) When trimming around tree trunks, approach slowly so that the line does not strike the bark. Walk around the tree and take care not to damage the tree. Approach grass or weeds with the tip of the line and tilt the line spool forwards slightly. Mowing down to the ground (with line spool) When mowing down to the ground you will cut all the vegetation. To do this, set the line spool at an angle of 30 to the right. Place the handle in the required position (Fig. 9e). Caution! Increased risk of injury to the user, bystanders and animals, and increased risk of damaging property due to objects (e.g. stones) being catapulted away Anleitung_ _LB3.indb :36
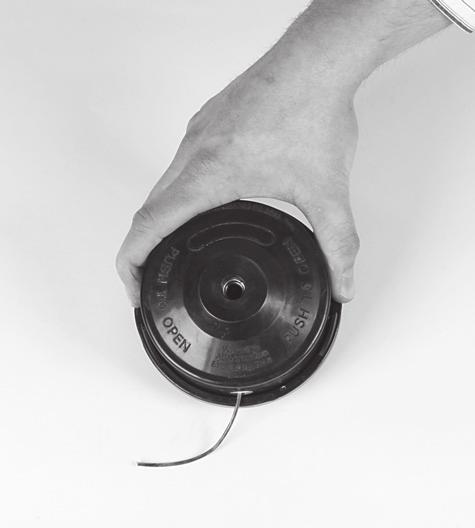
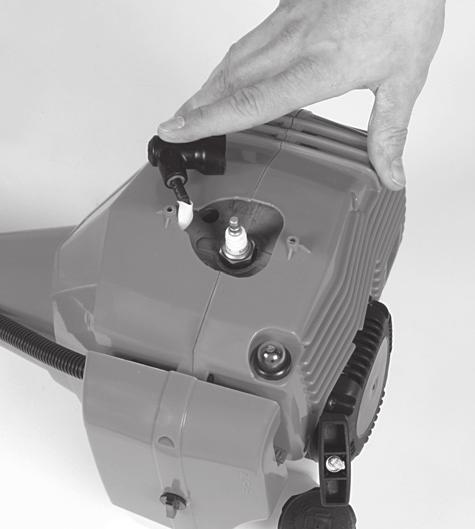
15 GB/IE Caution! Do not use the equipment to remove objects from footpaths, etc. The petrol scythe is a powerful tool and can catapult small stones and other objects a distance of 15 meters or more, causing injuries and damage to cars, houses and windows. Sawing The equipment is not suitable for sawing. Jamming If the cutting tool jams as a result of attempting to cut vegetation that is too dense, switch off the engine immediately. Remove the grass and scrub from the equipment before you restart it. Preventing recoil When you work with the blade, there is a risk of recoil if it strikes solid objects (tree trunks, branches, tree stumps, stones or the like). This will throw the equipment backwards in the direction opposite to the rotation of the cutting tool. This can cause you to lose control of the equipment. Do not use the blade near fences, metal posts, boundary stones or foundations. For cutting slender wood growth, position the equipment as shown in Fig. 9f in order to prevent recoil. 8. Maintenance and ordering of spare parts Always switch off the equipment and pull out the spark boot plug (36) before carrying out any maintenance work. tension. The spool splitter will separate the two halves of the line. (Fig. 12e) 6. Hook the last 15 cm of the two ends of the line onto the opposite lying line holders of the spool plate. (Fig. 12f) 7. Thread the two ends of the line through the metal eyelets in the line spool housing (Fig. 12c). 8. Press the spool plate into the line spool housing (Fig. 12b). 9. Pull the two line ends sharply to release them from the line holders. 10. Join the housing parts together again. 11. Cut the excess line to a length of around 13 cm. This will reduce the load on the engine when starting and warming up. 12. Refi t the line spool (see section 6.1.6). If you are replacing the complete line spool, skip points Maintenance of the air filter Soiled air fi lters reduce the engine output by supplying too little air to the carburetor. Regular checks are therefore essential. The air fi lter (35) should be checked after every 25 hours of use and cleaned if necessary. If the air contains a lot of dust, the air fi lter should be checked more frequently. 1. Remove the cover from the air fi lter housing (Fig. 10a / Item 8) 2. Remove the air fi lter (Fig. 10b/10c) 3. Clean the air fi lter by tapping it or blowing it out (with compressed air). 4. Assemble in reverse order. Important: Never clean the air fi lter with petrol or infl ammable solvents. 8.1 Replacing the line spool/cutting line 1. Dismantle the line spool (13) as described in section Press the spool together (Fig. 12a) and remove one half of the housing (Fig. 12b). 2. Take the spool plate (K) out of the line spool housing (Fig. 12c). 3. Remove any remaining cutting line. 4. Place the new cutting line in the center and hang the loop which has formed into the recess in the spool splitter. (Fig. 12d) 5. Wind up the line counter-clockwise and under Anleitung_ _LB3.indb :36
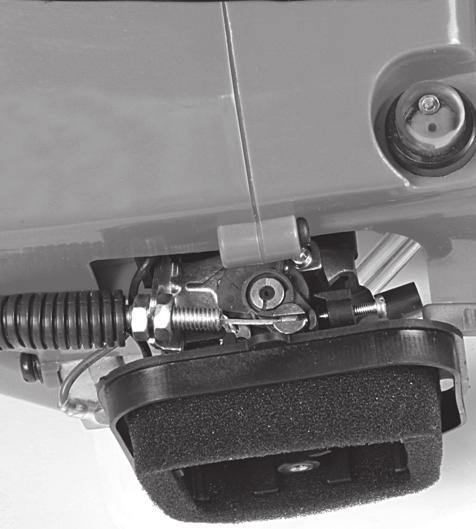
16 GB/IE 8.3 Maintenance of the spark plug Electrode gap = 0.6 mm (distance between the electrodes between which the ignition spark is created). Tighten the spark plug with 12 to 15 Nm using a torque wrench (available from your dealer). Check the spark plug for dirt and grime after 10 hours of operation and if necessary clean it with a copper wire brush. Thereafter service the spark plug after every 50 hours of operation. 1. Dismantle the protective cap (Fig. 10c/Item 31) using a screwdriver. 2. Pull off the spark boot plug (Fig. 11a/Item 36). 3. Remove the spark plug (Fig. 11b) with the supplied spark plug wrench (27). 4. Assemble in reverse order. 8.4 Sharpening the guard hood blade The guard hood blade (Fig. 7a/Item F) can become blunt over time. If you notice this, undo the two screws holding the guard hood blade to the guard hood. Clamp the blade in a vise. Sharpen the blade with a fl at fi le and make sure that the angle of the cutting edge is not altered in the process. File in one direction only. 8.5 Carburetor settings Important: Settings on the carburetor are allowed to be made by authorized customer service personnel. The air fi lter housing cover must be removed before any work on the carburetor, as shown in Figures 10a and 10b. Setting the throttle cable: If the maximum speed of the equipment drops over time and you have ruled out all the other possible causes listed in the section Troubleshooting, it may be necessary to adjust the throttle cable. First of all check whether the carburetor opens fully when the throttle lever is pressed right through. This is the case if the carburetor slide (Fig. 13a/ Item F) is completely opened when the throttle is fully activated. Figure 13a shows the correct setting. If the carburetor slide is not completely open, it must be adjusted. The following steps are required to adjust the throttle cable: Undo the lock nut (Fig. 13b/Item C) a few turns. Undo the adjusting screw (Fig. 13b/Item D) until the carburetor slide is completely open when the throttle is fully activated, as shown in Figure 13a. Retighten the lock nut. Setting the idling speed: Caution! Set the idling speed when the equipment is warm. If the engine stalls when the throttle is not pressed and you have ruled out all the other possible causes listed in the section Troubleshooting, the idling speed must be adjusted. To do this turn the idling speed screw (Fig. 13b/Item E) clockwise until the equipment runs smoothly at idling speed. If the idling speed is so fast that the cutting tool turns as well, it has to be reduced by turning the idling speed screw for as long as is required for the cutting tool to stop turning as well. 8.6 Applying grease to the gear unit Add a little gear grease (approx. 10 g) after every 20 hours in operation. To do so, open the screw H (Fig. 7c). 8.7 Environmental protection Dispose of soiled maintenance material and operating materials at the appropriate collection point. Recycle packaging material, metal and plastics. 8.8 Ordering replacement parts Please provide the following information on all orders for spare parts: Type of unit Article number of the unit ID number of the unit For current prices and information please visit Anleitung_ _LB3.indb :36
17 GB/IE 9. Storage and transport 9.1 Storage Important: Never put the equipment into storage for longer than 30 days without carrying out the following steps. Storing the equipment If you intend to store the equipment for longer than 30 days, it must be prepared accordingly. Otherwise the fuel still remaining in the carburetor will evaporate and leave a rubbery sediment. This can cause problems when starting up the equipment and may require expensive repairs. 1. Slowly remove the fuel tank cap to release any pressure that may have formed in the tank. Carefully empty the tank (6). 2. To remove the fuel from the carburetor, start the engine and let it run until the equipment stops. 3. Leave the engine to cool (approx. 5 minutes). 4. Remove the spark plug (see 8.3). 5. Add one teaspoon of 2-stroke engine oil into the combustion chamber. Slowly pull the starter cord several times to apply a layer of oil to all internal components. Fit the spark plug again. Note: Store the equipment in a dry place and far away from possible ignition sources such as an oven, a gas-fi red hot water boiler, a gas-fi red dryer, etc. Putting the equipment back into operation 1. Remove the spark plug (see 8.3). 2. Quickly tug on the starter line to remove excess oil from the combustion chamber. 3. Clean the spark plug and check that the electrode gap is correct, or insert a new spark plug with the correct electrode gap. 4. Prepare the equipment for operation. 5. Fill the tank with the relevant mixture of fuel and oil. See the section Fuel and oil. 9.2 Transport To transport the equipment, empty the petrol tank as described in the section Storage. Clean coarse dirt off the equipment with a brush or hand brush. Dismantle the steady grip and the long hande as described in section and Cleaning Always switch off the equipment and pull out the spark boot plug before carrying out any cleaning work. The equipment should be cleaned thoroughly every time after it has been used. This applies particularly to the cutting tool and the guard hoods. Keep the air vents and the motor housing free of dirt and dust as far as possible. Wipe the equipment with a clean cloth or blow it down with compressed air at low pressure. It is easiest to remove dirt and grass immediately after mowing. Clean the equipment regularly with a damp cloth and some soft soap. Do not use cleaning agents or solvents; these may be aggressive to the plastic parts in the equipment. Ensure that no water can get into the interior of the equipment. 11. Disposal and recycling The equipment is supplied in packaging to prevent it from being damaged in transit. The raw materials in this packaging can be reused or recycled. The equipment and its accessories are made of various types of material, such as metal and plastic. Defective components must be disposed of as special waste. Fuel and oil must be disposed of only at special refuse collection centers. Ask your dealer or your local council Anleitung_ _LB3.indb :36
18 GB/IE 12. Troubleshooting Fault Possible cause Troubleshooting The equipment does not start The equipment starts but does not develop its full power The engine does not run smoothly Engine smokes excessively - Correct starting procedure not followed - Sooted or damp spark plug - Incorrect carburetor setting - Incorrect choke lever (5) setting - Soiled air fi lter (35) - Incorrect carburetor setting - Incorrect electrode gap on the spark plug - Incorrect carburetor setting - Incorrect fuel mix - Incorrect carburetor setting - Follow the instructions for starting - Clean the spark plug or replace it with a new one - Contact an authorized customer service outlet or send the equipment to ISC-GmbH - Set the choke lever to - Clean the air fi lter - Contact an authorized customer service outlet or send the equipment to ISC-GmbH - Clean the spark plug and adjust the electrode gap or fi t a new spark plug - Contact an authorized customer service outlet or send the equipment to ISC-GmbH - Use the correct fuel mix (see fuel mixing table) - Contact an authorized customer service outlet or send the equipment to ISC-GmbH Anleitung_ _LB3.indb :36
19 GB/IE 13. Declaration of conformity Einhell Germany AG Wiesenweg 22 D Landau/Isar Konformitätserklärung D erklärt folgende Konformität gemäß EU-Richtlinie und Normen für Artikel GB explains the following conformity according to EU directives and norms for the following product F déclare la conformité suivante selon la directive CE et les normes concernant l article I dichiara la seguente conformità secondo la direttiva UE e le norme per l articolo NL verklaart de volgende overeenstemming conform EU richtlijn en normen voor het product E declara la siguiente conformidad a tenor de la directiva y normas de la UE para el artículo P declara a seguinte conformidade, de acordo com a directiva CE e normas para o artigo DK attesterer følgende overensstemmelse i medfør af EU-direktiv samt standarder for artikel S förklarar följande överensstämmelse enl. EU-direktiv och standarder för artikeln FIN vakuuttaa, että tuote täyttää EU-direktiivin ja standardien vaatimukset EE tõendab toote vastavust EL direktiivile ja standarditele CZ vydává následující prohlášení o shodě podle směrnice EU a norem pro výrobek SLO potrjuje sledečo skladnost s smernico EU in standardi za izdelek SK vydáva nasledujúce prehlásenie o zhode podľa smernice EÚ a noriem pre výrobok H a cikkekhez az EU-irányvonal és Normák szerint a következő konformitást jelenti ki Benzin-Sense FBS 43 A1 (Florabest) PL deklaruje zgodność wymienionego poniżej artykułu z następującymi normami na podstawie dyrektywy WE. BG декларира съответното съответствие съгласно Директива на ЕС и норми за артикул LV paskaidro šādu atbilstību ES direktīvai un standartiem LT apibūdina šį atitikimą EU reikalavimams ir prekės normoms RO declară următoarea conformitate conform directivei UE şi normelor pentru articolul GR δηλώνει την ακόλουθη συμμόρφωση σύμφωνα με την Οδηγία ΕΚ και τα πρότυπα για το προϊόν HR potvrđuje sljedeću usklađenost prema smjernicama EU i normama za artikl Izjava o sukladnosti za ovaj proizvod dostupna je na internet stranici BIH potvrđuje sljedeću usklađenost prema smjernicama EU i normama za artikl RS potvrđuje sledeću usklađenost prema smernicama EZ i normama za artikal RUS следующим удостоверяется, что следующие продукты соответствуют директивам и нормам ЕС UKR проголошує про зазначену нижче відповідність виробу директивам та стандартам ЄС на виріб MK ја изјавува следната сообрзност согласно ЕУ-директивата и нормите за артикли TR Ürünü ile ilgili AB direktifl eri ve normları gereğince aşağıda açıklanan uygunluğu belirtir N erklærer følgende samsvar i henhold til EU-direktivet og standarder for artikkel IS Lýsir uppfyllingu EU-reglna og annarra staðla vöru 87/404/EC_2009/105/EC 2005/32/EC_2009/125/EC 2006/95/EC 2006/28/EC X 2004/108/EC 2004/22/EC 1999/5/EC 97/23/EC 90/396/EC_2009/142/EC 89/686/EC_96/58/EC 2011/65/EC X 2006/42/EC Annex IV Notifi ed Body: Notifi ed Body No.: Reg. No.: X 2000/14/EC_2005/88/EC X Annex V Annex VI Noise measured: L WA = 104,7 db (A); guaranteed L WA = 110 db (A) P = 1,35 KW; L/Ø = cm Notifi ed Body: X 2006/28/EC Emission No.: e11*97/68sa*2004/26*1181*00 Standard references: EN ISO 11806; EN ISO Landau/Isar, den Weichselgartner/General-Manager Frank/Product-Management First CE: 10 Archive-File/Record: NAPR Art.-No.: I.-No.: Documents registrar: Robert Mayn Subject to change without notice Wiesenweg 22, D Landau/Isar Anleitung_ _LB3.indb :36
20 GB/IE 14. Warranty certificate Dear Customer, All of our products undergo strict quality checks to ensure that they reach you in perfect condition. In the unlikely event that your device develops a fault, please contact our service department at the address shown on this guarantee card. Of course, if you would prefer to call us then we are also happy to offer our assistance under the service number printed below. Please note the following terms under which guarantee claims can be made: 1. These guarantee terms cover additional guarantee rights and do not affect your statutory warranty rights. We do not charge you for this guarantee. 2. Our guarantee only covers problems caused by material or manufacturing defects, and it is restricted to the rectifi cation of these defects or replacement of the device. Please note that our devices have not been designed for use in commercial, trade or industrial applications. Consequently, the guarantee is invalidated if the equipment is used in commercial, trade or industrial applications or for other equivalent activities. The following are also excluded from our guarantee: compensation for transport damage, damage caused by failure to comply with the installation/assembly instructions or damage caused by unprofessional installation, failure to comply with the operating instructions (e.g. connection to the wrong mains voltage or current type), misuse or inappropriate use (such as overloading of the device or use of non-approved tools or accessories), failure to comply with the maintenance and safety regulations, ingress of foreign bodies into the device (e.g. sand, stones or dust), effects of force or external infl uences (e.g. damage caused by the device being dropped) and normal wear resulting from proper operation of the device. This applies in particular to rechargeable batteries for which we nevertheless issue a guarantee period of 12 months. The guarantee is rendered null and void if any attempt is made to tamper with the device. 3. The guarantee is valid for a period of 3 years starting from the purchase date of the device. Guarantee claims should be submitted before the end of the guarantee period within two weeks of the defect being noticed. No guarantee claims will be accepted after the end of the guarantee period. The original guarantee period remains applicable to the device even if repairs are carried out or parts are replaced. In such cases, the work performed or parts fi tted will not result in an extension of the guarantee period, and no new guarantee will become active for the work performed or parts fi tted. This also applies when an on-site service is used. 4. In order to assert your guarantee claim, please send your defective device postage-free to the address shown below. Please enclose either the original or a copy of your sales receipt or another dated proof of purchase. Please keep your sales receipt in a safe place, as it is your proof of purchase. It would help us if you could describe the nature of the problem in as much detail as possible. If the defect is covered by our guarantee then your device will either be repaired immediately and returned to you, or we will send you a new device. Of course, we are also happy offer a chargeable repair service for any defects which are not covered by the scope of this guarantee or for units which are no longer covered. To take advantage of this service, please send the device to our service address. Einhell UK Ltd Morpeth Wharf Twelve Quays Birkenhead, Wirral CH41 1LF Tel , Fax IAN Anleitung_ _LB3.indb :36
21 Sisällysluettelo FI 1. Johdanto Turvallisuusmääräykset Laitteen kuvaus ja toimituksen laajuus Määräysten mukainen käyttö Tekniset tiedot Ennen käyttöönottoa Käyttö Huolto ja varaosatilaus Varastointi ja kuljetus Puhdistus Käytöstäpoisto ja uusiokäyttö Häiriönpoisto Standardinmukaisuustodistus Takuutodistus...38 Tuotedokumentaation ja tuotteen mukana toimitettujen papereiden osittainenkin kopiointi tai muu monistaminen on sallittu ainoastaan isc GmbH:n nimenomaisella luvalla. Oikeus teknisiin muutoksiin pidätetään Anleitung_ _LB3.indb :36
22 FI 1. Johdanto Onnittelemme sydämellisesti uuden laitteen ostajaa. Olet valinnut itsellesi korkealuokkaisen tuotteen. Käyttöohje on tämän tuotteen olennainen osa. Siinä on tärkeitä ohjeita, jotka koskevat turvallisuutta, käyttöä ja hävittämistä. Perehdy ennen tuotteen käyttöä kaikkiin käyttöohjeisiin ja turvallisuusmääräyksiin. Käytä tuotetta vain ohjeitten mukaisesti ja ainoastaan määrättyyn käyttötarkoitukseen. Jos luovutat laitteen muille henkilöille, anna myös kaikki asiakirjat tuotteen mukana. 2. Turvallisuusmääräykset Varoitus! Lue kaikki turvallisuusmääräykset ja ohjeet. Jos turvallisuusmääräyksiä tai muita ohjeita ei noudateta, saattaa tästä aiheutua sähköiskuja, tulipaloja ja/tai vaikeita vammoja. Säilytä kaikki turvallisuusmääräykset ja ohjeet myöhempää tarvetta varten. Turvallisuusvarusteet Laitetta käytettäessä tulee terien tai lankakoneiston vastaavan muovisuojakuvun olla asennettuna, jotta estetään esineiden sinkoaminen pois. Leikkauslangan suojakupuun asennettu leikkuuterä katkaisee langan automaattisesti oikean mittaiseksi. Laitteessa olevien ohjekilpien selitys (kuva 14): 1. Varoitus! 2. Lue käyttöohje ennen käyttöönottoa! 3. Käytä silmä-/ pää- ja kuulosuojuksia! 4. Käytä tukevia jalkineita! 5. Käytä suojakäsineitä! 6. Suojaa laitetta sateelta tai kosteudelta! 7. Varo poissinkoutuvia osia! 8. Ennen huoltotöihin ryhtymistä sammuta laite ja irrota sytytystulpan pistoke! 9. Laitteen ja lähellä olevien henkilöiden välimatkan tulee olla vähintään 15 m! 10. Leikkaustyökalu (leikkuuterä/leikkauslanka) pyörii sammuttamisen jälkeenkin! 11. Huomio, kuumia osia. Säilytä välimatka! 12. Lisää aina 20 käyttötunnin jälkeen hieman rasvaa (juoksevaa vaihteistorasvaa)! Turvallisuusmääräykset Lue käyttöohje huolellisesti. Perehdy laitteen säätöihin ja sen oikeaan käyttöön. Älä koskaan anna sellaisten henkilöiden käyttää laitetta, jotka eivät ole perehtyneet tähän käyttöohjeeseen. Paikalliset määräykset saattavat määrätä käyttäjän vähimmäisiän. Älä koskaan käytä laitetta, jos lähistöllä on muita ihmisiä ja varsinkin lapsia tai eläimiä. Varoitus: Säilytä aina 15 m turvallisuusvälimatkaa. Jos ihmisiä lähestyy, sammuta laite heti. Muista aina, että konetta käyttävä henkilö on vastuussa muille henkilöille sattuneista tapaturmista tai heidän omaisuutensa vaurioitumisesta. Huomio: Myrkytysvaara, pakokaasut, polttoaineet ja voiteluaineet ovar myrkyllisiä, pakokaasuja ei saa hengittää. Ennen käyttöä Niittämisen aikana tulee aina käyttää tukevia jalkineita ja pitkiä housuja. Älä leikkaa ruohoa paljain jaloin tai ohuissa sandaaleissa. Tarkasta se alue, jolla haluat käyttää laitetta, ja poista kaikki sellaiset vieraat esineet, jotka saattaisivat joutua laitteeseen ja sinkoutua pois. Varoitus: Bensiini on erittäin tulenarkaa: - säilytä bensiiniä vain tähän tarkoitukseen varatuissa astiossa. - täytä polttoainesäiliö vain ulkosalla äläkä tupakoi täyttämisen aikana. - bensiini tulee täyttää säiliöön ennen moottorin käynnistämistä. Moottorin käydessä, tai jos laite on kuuma, polttoainesäiliön tulppaa ei saa avata tai bensiiniä lisätä. - Jos bensiiniä on valunut säiliön yli, ei moottoria saa käynnistää. Sen sijaan laite tulee viedä pois bensiinin saastuttamalta pinnalta. Kaikki käynnistysyritykset tulee jättää, kunnes bensiinihöyryt ovat haihtuneet. - Turvallisuussyistä bensiinisäiliö ja säiliön tulpat täytyy vaihtaa uusiin, jos ne vahingoittuvat Anleitung_ _LB3.indb :36
23 FI Vaihda viallisten äänenvaimentimien tilalle uudet. Ennen käyttöä tulee aina tarkastaa silmämääräisesti, ovatko leikkurin osat, kiinnityspultit ja koko leikkausyksikkö kuluneet tai vahingoittuneet. Epätasapainoisen käynnin välttämiseksi kuluneet tai vahingoittuneet osat ja kiinnityspultit saa vaihtaa uusiin aina vain koko sarja kerrallaan. Käsittely (käyttö, säilytys, tarkastus) Käytä vartaloa myötäileviä työvaatteita, jotka suojaavat, kuten pitkiä housuja, tukevia työjalkineita, kestäviä työkäsineitä, suojakypärää, kasvojen suojanaamaria tai silmiä suojaavia suojalaseja sekä hyvää korvavanua tai muunlaisia kuulosuojuksia melulta suojaamiseksi. Säilytä laite turvallisessa paikassa. Avaa bensiinisäiliön tulppa hitaasti mahdollisen paineen poispäästämiseksi, jos sitä on syntynyt säiliön kanteen. Tulipalon vaaran välttämiseksi poistu vähintään 3 m päähän täyttöpaikalta ennen kuin käynnistät laitteen. Sammuta laite ennen kuin lasket sen kädestäsi. Pitele laitetta aina molemmin käsin. Peukalon ja sormien tulee ympäröidä kahvoja. Huolehdi siitä, että ruuvit ja liittimet on kiristetty tiukkaan. Älä koskaan käytä laitetta, jos sitä ei ole säädetty oikein tai asennettu kokonaan ja turvallisesti. Huolehdi siitä, että kahvat ovat kuivat ja puhtaat eikä niissä ole bensiiniseosta. Liikuta lankapuolaa halutulla korkeudella. Vältä koskettamasta pieniin esineisiin (esim. kiviin) lankapuolalla. Rinteessä tehtävissä leikkuutöissä asetu aina seisomaan leikkurityökalun alapuolelle. Älä koskaan niitä tai leikkaa reunoja sileällä, liukkaalla kukkulalla tai rinteellä. Pidä kaikki ruumiinosat ja vaatekappaleet poissa lankapuolan läheltä, kun käynnistät moottorin tai annat sen käydä. Ennen moottorin käynnistämistä varmista, ettei lankapuola kosketa mihinkään esteisiin. Sammuta moottori aina ennen leikkuriosiin tehtäviä toimia. Säilytä laite ja sen varusteet turvallisesti ja suojattuna avotulelta ja kuumuudelta / kipinänlähteiltä, näitä ovat kaasuläpivirtauskuumennin, pyykinkuivatin, öljyuuni, sähkölämmitin tms. Huolehdi siitä, että leikkuujätteet on poistettu suojakuvusta, lankapuolasta ja moottorista ennen laitteen varastointia. Vain riittävästi koulutetut aikuiset henkilöt saavat käyttää, säätää ja huoltaa laitetta. Jos et ole perehtynyt laitteen käyttöön, harjoittele sitä moottori sammutettuna. Ennen työn aloittamista tarkasta leikattava ruohoalue, sillä kiinteät esineet kuten metallinkappaleet, pullot, kivet tms. saattavat sinkoilla ja aiheuttaa käyttäjälle vakavia vammoja sekä vahingoittaa laitetta pysyvästi. Jos epähuomiossa kosketat laitteella kiinteisiin esineisiin, sammuta moottori heti ja tarkasta, onko laitteeseen mahdollisesti tullut vaurioita. Älä koskaan käytä laitetta, jos se on vahingoittunut tai siinä on vikoja. Leikkaa ja tasaa aina ylemmällä kierroslukualueella. Älä anna moottorin käydä alhaisella kierrosluvulla leikkaamisen alussa tai tasoittamisen aikana. Käytä laitetta vain sille määrättyyn tarkoitukseen, kuten reunojen tasoittamiseen ja rikkaruohojen niittämiseen. Älä koskaan pidä lankapuolaa polvea korkeammalla laitteen käydessä. Älä käytä laitetta, jos välittömässä läheisyydessä on katsojia tai eläimiä. Säilytä työskennellessäsi aina vähintään 15 m välimatka käyttäjän ja muiden henkilöiden tai eläinten välillä. Kun niittotyö tehdään maaperään asti, on vähimmäisvälimatkan oltava 30 m. Lisäohjeita Älä käytä muuta polttoainetta kuin käyttöohjeessa suositeltua. Noudata aina käyttöohjeen luvussa Polttoaine ja öljy annettuja ohjeita. Älä käytä bensiiniä, johon ei ole sekoitettu oikeaa määrää 2-tahti-moottoriöljyä. Muussa tapauksessa tästä aiheutuu pysyvien vaurioiden vaara moottoriin ja valmistajan antama takuu raukeaa. Älä tupakoi täyttäessäsi tai käyttäessäsi lai Anleitung_ _LB3.indb :36
PAINEILMALETKUKELA-AUTOMAATTI AUTOMATIC AIR HOSE REEL
 MAV4 MAV5 MAV6 PAINEILMALETKUKELA-AUTOMAATTI AUTOMATIC AIR HOSE REEL Käyttöohje Instruction manual HUOMIO! Lue käyttöohjeet huolellisesti ennen laitteen käyttöä ja noudata kaikkia annettuja ohjeita. Säilytä
1. SIT. The handler and dog stop with the dog sitting at heel. When the dog is sitting, the handler cues the dog to heel forward.
 START START SIT 1. SIT. The handler and dog stop with the dog sitting at heel. When the dog is sitting, the handler cues the dog to heel forward. This is a static exercise. SIT STAND 2. SIT STAND. The
LYTH-CONS CONSISTENCY TRANSMITTER
 LYTH-CONS CONSISTENCY TRANSMITTER LYTH-INSTRUMENT OY has generate new consistency transmitter with blade-system to meet high technical requirements in Pulp&Paper industries. Insurmountable advantages are
INSTALLATION INSTRUCTION ASENNUSOHJE PEM SJTK31 SJTK46 ENGLISH SUOMI
 INSTALLATION INSTRUCTION ASENNUSOHJE PEM1256 2010-2 SJTK31 SJTK46 ENGLISH SUOMI GB GENERAL INFORMATION - Check that the kit is suitable for the cable type. - Check the materials listed in the bill of materials
Box 1. Things you have/ Pakkaus sisältää. x 4 x 16 x 4 x 4. 300mm. 1700mm. 300mm 1. Things you should know / Sinun Tulee Tietää
 Phobos 30 Things you should know / Sinun Tulee Tietää Things you prepare / Näitä Tarvitset DURING INSTALLATION ALL PRODUCTS: use protective gloves at all times use eye protection at all times never install
Choose Finland-Helsinki Valitse Finland-Helsinki
 Write down the Temporary Application ID. If you do not manage to complete the form you can continue where you stopped with this ID no. Muista Temporary Application ID. Jos et onnistu täyttää lomake loppuun
Capacity Utilization
 Capacity Utilization Tim Schöneberg 28th November Agenda Introduction Fixed and variable input ressources Technical capacity utilization Price based capacity utilization measure Long run and short run
VAROITUKSET. Älä pura laitetta osiin.
 VAROITUKSET Laitteen väärinkäyttö voi johtaa henkilövahinkoihin. Noudata kaikkia tässä ohjekirjassa annettuja ohjeita ja käytä laitetta oikein. Älä koskaan seiso laitteen alapuolella. Älä pura laitetta
National Building Code of Finland, Part D1, Building Water Supply and Sewerage Systems, Regulations and guidelines 2007
 National Building Code of Finland, Part D1, Building Water Supply and Sewerage Systems, Regulations and guidelines 2007 Chapter 2.4 Jukka Räisä 1 WATER PIPES PLACEMENT 2.4.1 Regulation Water pipe and its
Uusi Ajatus Löytyy Luonnosta 4 (käsikirja) (Finnish Edition)
 (Finnish Edition)") Uusi Ajatus Löytyy Luonnosta 4 (käsikirja) (Finnish Edition) Esko Jalkanen Click here if your download doesn"t start automatically Uusi Ajatus Löytyy Luonnosta 4 (käsikirja) (Finnish Edition) Esko Jalkanen
Uusi Ajatus Löytyy Luonnosta 4 (käsikirja) (Finnish Edition) Esko Jalkanen Click here if your download doesn"t start automatically Uusi Ajatus Löytyy Luonnosta 4 (käsikirja) (Finnish Edition) Esko Jalkanen
CONVERSION KITS FOR FRAMES MR8 AND MR9 INSTALLATION INSTRUCTIONS
 CONVERSION KITS FOR FRAMES MR8 AND MR9 INSTALLATION INSTRUCTIONS MR8 AND MR9 CONVERSION KIT - INSTALLATION INSTRUCTION Document ID: DPD01787, Revision: A, Release date: 17.11.2015 1.1 MR8 kit contents
On instrument costs in decentralized macroeconomic decision making (Helsingin Kauppakorkeakoulun julkaisuja ; D-31)
") On instrument costs in decentralized macroeconomic decision making (Helsingin Kauppakorkeakoulun julkaisuja ; D-31) Juha Kahkonen Click here if your download doesn"t start automatically On instrument costs
On instrument costs in decentralized macroeconomic decision making (Helsingin Kauppakorkeakoulun julkaisuja ; D-31) Juha Kahkonen Click here if your download doesn"t start automatically On instrument costs
Installation instruction PEM
 Installation instruction ASENNUSOHJE PEM1032 2010-02 SURGE ARRESTER SET FOR POLE MOUNT TRANSFORMER YLIJÄNNITESUOJASETTI PYLVÄSMUUNTAJALLE ENGLISH SUOMI 2/8 PEM1032 2010-02 ENGLISH GENERAL INFORMATION -
INSTALLATION INSTRUCTION ASENNUSOHJE PEM1417 2012-11 ENGLISH SUOMI CURRENT LIMITING DEVICE VIRTAA RAJOITTAVA SUOJA SDI46.812 & SDI46.
 INSTALLATION INSTRUCTION ASENNUSOHJE PEM1417 2012-11 ENGLISH SUOMI CURRENT LIMITING DEVICE VIRTAA RAJOITTAVA SUOJA SDI46.812 & SDI46.824 2/8 SDI46.812 & SDI46.824 PEM1417 2012-11 ENGLISH GENERAL INFORMATION
Information on preparing Presentation
 Information on preparing Presentation Seminar on big data management Lecturer: Spring 2017 20.1.2017 1 Agenda Hints and tips on giving a good presentation Watch two videos and discussion 22.1.2017 2 Goals
Recirkulering. El-tilslutning. Kontrolpanel. Dansk. Timerfunktion
 1 2 Dansk Recirkulering Luften renses ved hjælp at aktive kulfiltre hvorefter den returneres til rummet. Kulfiltre bestilles separat. El-tilslutning Emhætten skal tilsluttes 230 V i henhold til stærkstrømsreglementet.
On instrument costs in decentralized macroeconomic decision making (Helsingin Kauppakorkeakoulun julkaisuja ; D-31)
") On instrument costs in decentralized macroeconomic decision making (Helsingin Kauppakorkeakoulun julkaisuja ; D-31) Juha Kahkonen Click here if your download doesn"t start automatically On instrument costs
On instrument costs in decentralized macroeconomic decision making (Helsingin Kauppakorkeakoulun julkaisuja ; D-31) Juha Kahkonen Click here if your download doesn"t start automatically On instrument costs
Fitting instructions. Fitting set for joining all types of DEVI self limiting heating cables to heating cables Art. no. 19805779 SSTL nro 04 312 85
 GB/FI Fitting instructions Fitting set for joining all types of DEVI self limiting heating cables to heating cables Art. no. 19805779 SSTL nro 04 312 85 intelligent varme Contents: GB Connection kits 3
Installation instruction PEM
 Installation instruction ASENNUSOHJE PEM1031 2010-04 CURRENT LIMITING DEVICE FOR POLE MOUNT TRANSFORMER VIRTAA RAJOITTAVA SUOJA PYLVÄSMUUNTAJALLE ENGLISH SUOMI 75 2/8 PEM1031 2010-04 ENGLISH GENERAL INFORMATION
4x4cup Rastikuvien tulkinta
 4x4cup Rastikuvien tulkinta 4x4cup Control point picture guidelines Päivitetty kauden 2010 sääntöihin Updated for 2010 rules Säännöt rastikuvista Kilpailijoiden tulee kiinnittää erityistä huomiota siihen,
anna minun kertoa let me tell you
 anna minun kertoa let me tell you anna minun kertoa I OSA 1. Anna minun kertoa sinulle mitä oli. Tiedän että osaan. Kykenen siihen. Teen nyt niin. Minulla on oikeus. Sanani voivat olla puutteellisia mutta
TIKIT a) Suorassa tikissä ristiommel jää nahan alle piiloon. b) Ristitikissä ommel jää näkyviin.
 Suorassa tikissä ristiommel jää nahan alle piiloon. b) Ristitikissä ommel jää näkyviin.") CML WHEEL COVER -RUORINAHKAN OMPELUOHJE Liota nahkoja lämpimässä vedessä n. 15 minuuttia ennen ompelua. Pidä nahka kosteana koko ompelun ajan esim. sumutepullolla. Pidä ommellessa kevyt kireys nahkaan,
CML WHEEL COVER -RUORINAHKAN OMPELUOHJE Liota nahkoja lämpimässä vedessä n. 15 minuuttia ennen ompelua. Pidä nahka kosteana koko ompelun ajan esim. sumutepullolla. Pidä ommellessa kevyt kireys nahkaan,
KONEISTUSKOKOONPANON TEKEMINEN NX10-YMPÄRISTÖSSÄ
 KONEISTUSKOKOONPANON TEKEMINEN NX10-YMPÄRISTÖSSÄ https://community.plm.automation.siemens.com/t5/tech-tips- Knowledge-Base-NX/How-to-simulate-any-G-code-file-in-NX- CAM/ta-p/3340 Koneistusympäristön määrittely
SAGA 150. Asennusohjeet. Mittaa oven korkeus. Piirrä seinään oven kiinni -päätyyn seinäkannattimen kohdalle vaakaviiva korkeudelle ovi + 75mm + 20 mm.
 SAGA 150 Asennusohjeet 500 1 2 Mittaa oven korkeus. Piirrä seinään oven kiinni -päätyyn seinäkannattimen kohdalle vaakaviiva korkeudelle ovi + 75mm + 20 mm. 3 Piirrä vesivaa an avulla viiva myös kiskon
On instrument costs in decentralized macroeconomic decision making (Helsingin Kauppakorkeakoulun julkaisuja ; D-31)
") On instrument costs in decentralized macroeconomic decision making (Helsingin Kauppakorkeakoulun julkaisuja ; D-31) Juha Kahkonen Click here if your download doesn"t start automatically On instrument costs
On instrument costs in decentralized macroeconomic decision making (Helsingin Kauppakorkeakoulun julkaisuja ; D-31) Juha Kahkonen Click here if your download doesn"t start automatically On instrument costs
Solar Water Heater Kit. EcoStyle. 1 User Manual/Operating Instructions. Contents FREE LESSON PLANS AVAILABLE.
 EcoStyle 1 User Manual/Operating Instructions Contents 1 Contents 2 What s in the box? 3 Setting up the 4 Heating water 5 Measuring water temperature with the digital thermometer 6 Maximum/minimum temperature
Network to Get Work. Tehtäviä opiskelijoille Assignments for students. www.laurea.fi
 Network to Get Work Tehtäviä opiskelijoille Assignments for students www.laurea.fi Ohje henkilöstölle Instructions for Staff Seuraavassa on esitetty joukko tehtäviä, joista voit valita opiskelijaryhmällesi
Owner s Manual GREE Electric Appliances,Inc.of zhuhai
 Ilmalämpöpumppu Split air conditioner wall mounted model Käyttäjän opas Owner s Manual GREE Electric Appliances,Inc.of zhuhai Ultra-thin GWHD09A3NK3DF KFR-25GW/NaA12FA GWHD12B2NK3AD KFR-32GW/NaA12FA Please
MOOTTORIPYÖRÄNOSTIN MOTORCYCLE LIFT
 MEG30 Lue käyttöohjeet huolellisesti ennen laitteen käyttöä ja noudata kaikkia annettuja ohjeita. Säilytä ohjeet myöhempää tarvetta varten. Read the instruction manual carefully before using the tool and
AYYE 9/ HOUSING POLICY
 AYYE 9/12 2.10.2012 HOUSING POLICY Mission for AYY Housing? What do we want to achieve by renting apartments? 1) How many apartments do we need? 2) What kind of apartments do we need? 3) To whom do we
Tork Paperipyyhe. etu. tuotteen ominaisuudet. kuvaus. Väri: Valkoinen Malli: Vetopyyhe
 etu Monikäyttöpaperi hoitaa useimmat pyyhintätehtävät Sopiva lasipintojen pyyhintään Sopii käsien kuivaamiseen Elintarvikekäyttöön hyväksytty Tork Easy Handling, pakkaus, jota on helppo kantaa mukana,
1/4. Resetointi ja vianmääritys. 22.11.2013 ntr
 A400-64176 Sähköpöydät 1/4 Resetointi ja vianmääritys Pöydän resetointi tehdään aina ennen käyttöönottoa ja tarvittaessa häiriötilanteessa. Määritä pöydän tyyppi käyttökytkimen ja jalustan mukaan ja tee
Curriculum. Gym card
 A new school year Curriculum Fast Track Final Grading Gym card TET A new school year Work Ethic Detention Own work Organisation and independence Wilma TMU Support Services Well-Being CURRICULUM FAST TRACK
Salasanan vaihto uuteen / How to change password
 Salasanan vaihto uuteen / How to change password Sisällys Salasanakäytäntö / Password policy... 2 Salasanan vaihto verkkosivulla / Change password on website... 3 Salasanan vaihto matkapuhelimella / Change
IEC IP V AC. VIZULO Stork Little Brother LED street luminaire / katuvalaisin. Mounting instruction Asennusohjeet. min 40 C.
 VIZULO Stork Little Brother LED street luminaire / katuvalaisin Mounting instruction Asennusohjeet 05 IEC EN 60598 IP66 min 40 C max + 45 C 198-264 V AC PH2 4 6 29/01/2016 SIA VIZULO Ganibu dambis 7a,
The Viking Battle - Part Version: Finnish
 The Viking Battle - Part 1 015 Version: Finnish Tehtävä 1 Olkoon kokonaisluku, ja olkoon A n joukko A n = { n k k Z, 0 k < n}. Selvitä suurin kokonaisluku M n, jota ei voi kirjoittaa yhden tai useamman
WindPRO version joulu 2012 Printed/Page :42 / 1. SHADOW - Main Result
 SHADOW - Main Result Assumptions for shadow calculations Maximum distance for influence Calculate only when more than 20 % of sun is covered by the blade Please look in WTG table 13.6.2013 19:42 / 1 Minimum
WindPRO version joulu 2012 Printed/Page :47 / 1. SHADOW - Main Result
 SHADOW - Main Result Assumptions for shadow calculations Maximum distance for influence Calculate only when more than 20 % of sun is covered by the blade Please look in WTG table WindPRO version 2.8.579
Särmäystyökalut kuvasto Press brake tools catalogue
 Finnish sheet metal machinery know-how since 1978 Särmäystyökalut kuvasto Press brake tools catalogue www.aliko.fi ALIKO bending chart Required capacity in kn (T) in relation to V-opening. V R A S = plates
WINE COOLER TFW METOS TFW 160S, TFW 365-2S, TFW 375S MG ,
 WINE COOLER TFW METOS TFW 160S, TFW 365-2S, TFW 375S MG4116794, 4116798, 4116797 Instruction manual TWF 365-2S TWF 375S TWF 160S 01.09.2015 Table if Contents 1. Important safety instructions...3 2. Unpacking
INSTALLATION INSTRUCTION ASENNUSOHJE PEM ENGLISH SUOMI INSULATION PIERCING CONNECTOR SLIW17.2 ERISTYKSEN LÄPÄISEVÄ LIITIN SLIW17.
 INSTALLATION INSTRUCTION ASENNUSOHJE PEM904 2011-08 ENGLISH SUOMI INSULATION PIERCING CONNECTOR SLIW17.2 ERISTYKSEN LÄPÄISEVÄ LIITIN SLIW17.2 2/8 SLIW17.2 PEM904 2011-08 GENERAL INFORMATION (ENG) - Check
Tilausvahvistus. Anttolan Urheilijat HENNA-RIIKKA HAIKONEN KUMMANNIEMENTIE 5 B RAHULA. Anttolan Urheilijat
 7.80.4 Asiakasnumero: 3000359 KALLE MANNINEN KOVASTENLUODONTIE 46 51600 HAUKIVUORI Toimitusosoite: KUMMANNIEMENTIE 5 B 51720 RAHULA Viitteenne: Henna-Riikka Haikonen Viitteemme: Pyry Niemi +358400874498
,0 Yes ,0 120, ,8
 SHADOW - Main Result Calculation: Alue 2 ( x 9 x HH120) TuuliSaimaa kaavaluonnos Assumptions for shadow calculations Maximum distance for influence Calculate only when more than 20 % of sun is covered
Metsälamminkankaan tuulivoimapuiston osayleiskaava
 VAALAN KUNTA TUULISAIMAA OY Metsälamminkankaan tuulivoimapuiston osayleiskaava Liite 3. Varjostusmallinnus FCG SUUNNITTELU JA TEKNIIKKA OY 12.5.2015 P25370 SHADOW - Main Result Assumptions for shadow calculations
Artikel-Nr.:
 L 446 S (LB3) Petrol Lawn Mower Artikel-Nr.: 3401087 Ident-Nr.: 01019 Komponenten / Ersatzteile Position Artikel-Nr. Beschreibung Position Artikel-Nr. Beschreibung 3 340108501003 front axis cpl. 4 340108501004
CLEANING JOB ORIENTATION
 CLEANING JOB ORIENTATION CLEANING EQUIPMENT 1. cleaning trolley 2. cleaning bucket 3. garbage sack 4. squegee - You can dry windows, mirrors and floors. 5. floor mop and cloth 6. window washing applicator
Gap-filling methods for CH 4 data
 Gap-filling methods for CH 4 data Sigrid Dengel University of Helsinki Outline - Ecosystems known for CH 4 emissions; - Why is gap-filling of CH 4 data not as easy and straight forward as CO 2 ; - Gap-filling
FinFamily PostgreSQL installation ( ) FinFamily PostgreSQL
 FinFamily PostgreSQL") FinFamily PostgreSQL 1 Sisällys / Contents FinFamily PostgreSQL... 1 1. Asenna PostgreSQL tietokanta / Install PostgreSQL database... 3 1.1. PostgreSQL tietokannasta / About the PostgreSQL database...
FinFamily PostgreSQL 1 Sisällys / Contents FinFamily PostgreSQL... 1 1. Asenna PostgreSQL tietokanta / Install PostgreSQL database... 3 1.1. PostgreSQL tietokannasta / About the PostgreSQL database...
Secto Design Oy Kauppalantie 12 02700 Kauniainen Finland tel. +358 9 5050598 fax +358 9 5475 2535 info@sectodesign.fi www.sectodesign.
 Secto Design Oy Kauppalantie 12 02700 Kauniainen Finland tel. +358 9 5050598 fax +358 9 5475 2535 info@sectodesign.fi www.sectodesign.fi Secto 4200 pendant natural birch, black or white laminate, walnut
( ,5 1 1,5 2 km
 Tuulivoimala Rakennukset Asuinrakennus Liikerak. tai Julkinen rak. Lomarakennus Teollinen rakennus Kirkollinen rakennus Varjostus "real case" h/a 1 h/a 8 h/a 20 h/a 4 5 3 1 2 6 7 8 9 10 0 0,5 1 1,5 2 km
Sisällysluettelo Table of contents
 Sisällysluettelo Table of contents OTC:n Moodlen käyttöohje suomeksi... 1 Kirjautuminen Moodleen... 2 Ensimmäinen kirjautuminen Moodleen... 2 Salasanan vaihto... 2 Oma käyttäjäprofiili... 3 Työskentely
TM ETRS-TM35FIN-ETRS89 WTG
 SHADOW - Main Result Assumptions for shadow calculations Maximum distance for influence Calculate only when more than 20 % of sun is covered by the blade Please look in WTG table WindPRO version 2.8.579
Efficiency change over time
 Efficiency change over time Heikki Tikanmäki Optimointiopin seminaari 14.11.2007 Contents Introduction (11.1) Window analysis (11.2) Example, application, analysis Malmquist index (11.3) Dealing with panel
You can check above like this: Start->Control Panel->Programs->find if Microsoft Lync or Microsoft Lync Attendeed is listed
 Online Meeting Guest Online Meeting for Guest Participant Lync Attendee Installation Online kokous vierailevalle osallistujalle Lync Attendee Asennus www.ruukki.com Overview Before you can join to Ruukki
Tynnyrivaara, OX2 Tuulivoimahanke. ( Layout 9 x N131 x HH145. Rakennukset Asuinrakennus Lomarakennus 9 x N131 x HH145 Varjostus 1 h/a 8 h/a 20 h/a
 , Tuulivoimahanke Layout 9 x N131 x HH145 Rakennukset Asuinrakennus Lomarakennus 9 x N131 x HH145 Varjostus 1 h/a 8 h/a 20 h/a 0 0,5 1 1,5 km 2 SHADOW - Main Result Assumptions for shadow calculations
The CCR Model and Production Correspondence
 The CCR Model and Production Correspondence Tim Schöneberg The 19th of September Agenda Introduction Definitions Production Possiblity Set CCR Model and the Dual Problem Input excesses and output shortfalls
TM ETRS-TM35FIN-ETRS89 WTG
 SHADOW - Main Result Calculation: N117 x 9 x HH141 Assumptions for shadow calculations Maximum distance for influence Calculate only when more than 20 % of sun is covered by the blade Please look in WTG
Data protection template
 Data protection template Aihe: rekisteriseloste ja informointipohja Topic: information about the register and information to users (related to General Data Protection Regulation (GDPR) (EU) 2016/679) Mallina
Olet vastuussa osaamisestasi
 Olet vastuussa osaamisestasi Ohjelmistoammattilaisuuden uudet haasteet Timo Vehmaro 02-12-2015 1 Nokia 2015 Mitä osaamista tulevaisuudessa tarvitaan? Vahva perusosaaminen on kaiken perusta Implementaatio
MÖNKIJÄN TUKKIKÄRRY ATV TRAILER
 A T V 1 MÖNKIJÄN TUKKIKÄRRY ATV TRAILER KÄYTTÖOHJE MANUAL HUOMIO! Lue käyttöohjeet huolellisesti ennen laitteen käyttöä ja noudata kaikkia annettuja ohjeita. Säilytä ohjeet myöhempää tarvetta varten. NOTE!
Technische Daten Technical data Tekniset tiedot Hawker perfect plus
 Technische Daten Technical data Tekniset tiedot Hawker perfect plus PzS-Zellen Hawker perfect plus, mit Schraubverbindern, Abmessungen gemäß DIN/EN 60254-2 und IEC 254-2 Serie L PzS-cells Hawker perfect
LUONNOS RT 80260 EN AGREEMENT ON BUILDING WORKS 1 THE PARTIES. May 1998 1 (10)
") RT 80260 EN May 1998 1 (10) AGREEMENT ON BUILDING WORKS This agreement template is based on the General Terms and Conditions of Building Contracts YSE 1998 RT 16-10660, LVI 03-10277, Ratu 417-7, KH X4-00241.
RT 80260 EN May 1998 1 (10) AGREEMENT ON BUILDING WORKS This agreement template is based on the General Terms and Conditions of Building Contracts YSE 1998 RT 16-10660, LVI 03-10277, Ratu 417-7, KH X4-00241.
( ( OX2 Perkkiö. Rakennuskanta. Varjostus. 9 x N131 x HH145
 OX2 9 x N131 x HH145 Rakennuskanta Asuinrakennus Lomarakennus Liike- tai julkinen rakennus Teollinen rakennus Kirkko tai kirkollinen rak. Muu rakennus Allas Varjostus 1 h/a 8 h/a 20 h/a 0 0,5 1 1,5 2 km
Travel Getting Around
 - Location Olen eksyksissä. Not knowing where you are Voisitko näyttää kartalta missä sen on? Asking for a specific location on a map Mistä täällä on? Asking for a specific...wc?...pankki / rahanvaihtopiste?...hotelli?...huoltoasema?...sairaala?...apteekki?...tavaratalo?...ruokakauppa?...bussipysäkki?
PARTS LIST Item Description Q'TY Item Description Q'TY
 PARTS LIST Item Description Q'TY Item Description Q'TY 1 Lower door 1 40 Jockey wheel axel 1 2 Safety switch 1 41 Power cord 1 3 Screw M4 35 4 42 Switch 1 4 Hex bolt M6 8 4 43 Lower shaft bracket 1 5 Washer
Lab SBS3.FARM_Hyper-V - Navigating a SharePoint site
 Lab SBS3.FARM_Hyper-V - Navigating a SharePoint site Note! Before starting download and install a fresh version of OfficeProfessionalPlus_x64_en-us. The instructions are in the beginning of the exercise.
Jokaisella person. käyttökerralla tehtävän rutiinitarkastuksen lisäksi pätevän henkilön tulisi tehdä henkilösuojaimelle
 Inspection Henkilösuojaimen tarkastus Tarkastusohjeet Inspection Inspection Inspection In addition to routine checks for each use, should regularly undergo a detailed inspection by a competent Jokaisella
TM ETRS-TM35FIN-ETRS89 WTG
 SHADOW - Main Result Assumptions for shadow calculations Maximum distance for influence Calculate only when more than 20 % of sun is covered by the blade Please look in WTG table 22.12.2014 11:33 / 1 Minimum
TM ETRS-TM35FIN-ETRS89 WTG
 SHADOW - Main Result Assumptions for shadow calculations Maximum distance for influence Calculate only when more than 20 % of sun is covered by the blade Please look in WTG table WindPRO version 2.8.579
FinFamily Installation and importing data (11.1.2016) FinFamily Asennus / Installation
 FinFamily Asennus / Installation") FinFamily Asennus / Installation 1 Sisällys / Contents FinFamily Asennus / Installation... 1 1. Asennus ja tietojen tuonti / Installation and importing data... 4 1.1. Asenna Java / Install Java... 4 1.2.
FinFamily Asennus / Installation 1 Sisällys / Contents FinFamily Asennus / Installation... 1 1. Asennus ja tietojen tuonti / Installation and importing data... 4 1.1. Asenna Java / Install Java... 4 1.2.
KMTK lentoestetyöpaja - Osa 2
 KMTK lentoestetyöpaja - Osa 2 Veijo Pätynen 18.10.2016 Pasila YHTEISTYÖSSÄ: Ilmailun paikkatiedon hallintamalli Ilmailun paikkatiedon hallintamalli (v0.9 4.3.2016) 4.4 Maanmittauslaitoksen rooli ja vastuut...
TM ETRS-TM35FIN-ETRS89 WTG
 SHADOW - Main Result Assumptions for shadow calculations Maximum distance for influence Calculate only when more than 20 % of sun is covered by the blade Please look in WTG table 5.11.2013 16:44 / 1 Minimum
ATV TUKKIKÄRRY ATV LOG TRAILER
 Lue käyttöohjeet huolellisesti ennen laitteen käyttöä ja noudata kaikkia annettuja ohjeita. Säilytä ohjeet myöhempää tarvetta varten. Read the instruction manual carefully before using the appliance and
Ajettavat luokat: SM: S1 (25 aika-ajon nopeinta)
") SUPERMOTO SM 2013 OULU Lisämääräys ja ohje Oulun Moottorikerho ry ja Oulun Formula K-125ry toivottaa SuperMoto kuljettajat osallistumaan SuperMoto SM 2013 Oulu osakilpailuun. Kilpailu ajetaan karting radalla
SUPERMOTO SM 2013 OULU Lisämääräys ja ohje Oulun Moottorikerho ry ja Oulun Formula K-125ry toivottaa SuperMoto kuljettajat osallistumaan SuperMoto SM 2013 Oulu osakilpailuun. Kilpailu ajetaan karting radalla
B40 P ELITE B40 B ELITE
 S1154653-38,B40 B,P ELITE_1.fm Page 1 Wednesday, March 14, 2012 7:51 AM GB Operator s manual 2-27 SE Bruksanvisning 28-52 DK Brugsanvisning 53-78 FI Käyttöohje 79-104 NO Bruksanvisning 105-129 FR Manuel
TM ETRS-TM35FIN-ETRS89 WTG
 SHADOW - Main Result Assumptions for shadow calculations Maximum distance for influence Calculate only when more than 20 % of sun is covered by the blade Please look in WTG table WindPRO version 2.8.579
TM ETRS-TM35FIN-ETRS89 WTG
 SHADOW - Main Result Assumptions for shadow calculations Maximum distance for influence Calculate only when more than 20 % of sun is covered by the blade Please look in WTG table WindPRO version 2.8.579
TM ETRS-TM35FIN-ETRS89 WTG
 SHADOW - Main Result Assumptions for shadow calculations Maximum distance for influence Calculate only when more than 20 % of sun is covered by the blade Please look in WTG table WindPRO version 2.8.579
TM ETRS-TM35FIN-ETRS89 WTG
 SHADOW - Main Result Assumptions for shadow calculations Maximum distance for influence Calculate only when more than 20 % of sun is covered by the blade Please look in WTG table WindPRO version 2.9.269
16. Allocation Models
 16. Allocation Models Juha Saloheimo 17.1.27 S steemianalsin Optimointiopin seminaari - Sks 27 Content Introduction Overall Efficienc with common prices and costs Cost Efficienc S steemianalsin Revenue
TM ETRS-TM35FIN-ETRS89 WTG
 VE1 SHADOW - Main Result Calculation: 8 x Nordex N131 x HH145m Assumptions for shadow calculations Maximum distance for influence Calculate only when more than 20 % of sun is covered by the blade Please
LINC 17. sanka.fi 130624A
 LINC 17 130624A SANKA takaa tuotteen toimivuuden kun asennus tapahtuu ohjeiden mukaisesti. SANKA garanterar produktens funktion då monteringsanvisningen följs. sanka.fi Tarvittaessa. Vid behov. 6mm 3mm
Tork Xpress Soft Multifold käsipyyhe. etu
 etu Erinomainen imukyky: kuivaa kädet nopeasti Pehmeä: hellävarainen käsille Tork Carry Pack -pakkaus helpottaa käsittelyä ja hävittämistä Lehti kohokuviointi: suunniteltu tekemään kauniin vaikutelman
FBM 135 A1. Petrol Lawnmower Translation of original operation manual. Bensiinikäyttöinen ruohonleikkuri Alkuperäisen käyttöohjeen käännös
 FBM 135 A1 Petrol Lawnmower Translation of original operation manual Bensiinikäyttöinen ruohonleikkuri Alkuperäisen käyttöohjeen käännös Bensindriven gräsklippare Översättning av bruksanvisning i original
Reliable diagnostic support Ultra-light design
 EN Powerful illumination Intelligent charging management Reliable diagnostic support Ultra-light design VISIOMED Optima UV original scale 1:1 VISIOMED Optima Quality Made Easy and an illumination close
ReFuel 70 % Emission Reduction Using Renewable High Cetane Number Paraffinic Diesel Fuel. Kalle Lehto, Aalto-yliopisto 5.5.
 ReFuel 70 % Emission Reduction Using Renewable High Cetane Number Paraffinic Diesel Fuel Kalle Lehto, Aalto-yliopisto 5.5.2011 Otaniemi ReFuel a three year research project (2009-2011) goal utilize the
107401959 G INSTRUCTIONS FOR USE BRUGSANVISNING BETRIEBSANLEITUNG VC300 SERIES USER MANUAL MODE D EMPLOI INSTRUCCIONES DE USO
 0740959 G INSTRUCTIONS FOR USE BRUGSANVISNING BETRIEBSANLEITUNG MODE D EMPLOI INSTRUCCIONES DE USO VC300 SERIES USER MANUAL - Basic operations. - Suction regulation 3 - Cordlock (HEPA) 3. 4 - Wind up the
FI GB. Asennus-, käyttöohjeet. Installation, operation instructions
 FI GB Asennus-, käyttöohjeet Installation, operation instructions Asennus FI Keinuripustuksen asennus Tekstin sulkeissa olevat numerot viittaavat kuvien 1, 2, 3 ja 4 numerointiin. Kiinnitä keinuripustuksen
2017/S Contract notice. Supplies
 Supplies 153936 2017 25/04/2017 S80 - - Supplies - Contract notice - Open procedure I. II. III. IV. VI. -: Medical equipments, pharmaceuticals and personal care products 2017/S 080-153936 Contract notice
Rekisteröiminen - FAQ
 Rekisteröiminen - FAQ Miten Akun/laturin rekisteröiminen tehdään Akun/laturin rekisteröiminen tapahtuu samalla tavalla kuin nykyinen takuurekisteröityminen koneille. Nykyistä tietokantaa on muokattu niin,
TM ETRS-TM35FIN-ETRS89 WTG
 SHADOW - Main Result Assumptions for shadow calculations Maximum distance for influence Calculate only when more than 20 % of sun is covered by the blade Please look in WTG table WindPRO version 2.8.579
4x4cup Rastikuvien tulkinta. 4x4cup Control point picture guidelines
 4x4cup Rastikuvien tulkinta 4x4cup Control point picture guidelines Säännöt rastikuvista Kilpailijoiden tulee kiinnittää erityistä huomiota siihen, että rastikuvissa näkyy selvästi että kilpailija koskee
RULLARADAT RULLADAT ROLLER TABLES
 ROLLER TABLES Roller tables are an important element in an assembly line, where ergonomics and good workflow must be ensured. The roller tables guarantee that the wheels can be fed forward effortlessly
7.4 Variability management
 7.4 Variability management time... space software product-line should support variability in space (different products) support variability in time (maintenance, evolution) 1 Product variation Product
TÄYTTÖAUTOMAATIT TÄYTTÖAUTOMAATIT COMPUTER INFLATORS
 31 S AHCON computer inflators are designed with a view to high quality, precision and long service life. The inflation computers are designed in Denmark and manufactured and tested in our own workshop.
Öljytäytteinen sähköpatteri Electric Oil Radiator
 Öljytäytteinen sähköpatteri Electric Oil Radiator KÄYTTÖOHJE Alkuperäisten ohjeiden käännös INSTRUCTIONS MANUAL Original instructions MALLI/MODEL: Holly 1500: ERC2-1507 Holly 2000: ERC2-2009 DT Istr (ERC
TM ETRS-TM35FIN-ETRS89 WTG
 SHADOW - Main Result Assumptions for shadow calculations Maximum distance for influence Calculate only when more than 20 % of sun is covered by the blade Please look in WTG table WindPRO version 2.8.579
AquaTrio FC7070. EN User manual 5. DA Brugervejledning 29. FI Käyttöopas 53. NO Brukerhåndbok 76. SV Användarhandbok 100
 Register your product and get support at AquaTrio FC7070 EN User manual 5 DA Brugervejledning 29 FI Käyttöopas 53 NO Brukerhåndbok 76 SV Användarhandbok 100 2.3 2.4 2.2 Table of contents 1 Important 5
PROFYT cc, 4 Stroke
 PROFYT9021-12 26.5cc, 4 Stroke Instruction manual (Original instructions) GB pg 7-16 Käyttöohje (Alkuperäisten ohjeiden käännös) FI pg 17-26 Bruksanvisning (Översättning av originalinstruktionerna) SE
Rakennukset Varjostus "real case" h/a 0,5 1,5
 Tuulivoimala Rakennukset Asuinrakennus Liikerak. tai Julkinen rak. Lomarakennus Teollinen rakennus Kirkollinen rakennus Varjostus "real case" h/a 1 h/a 8 h/a 20 h/a 1 2 3 5 8 4 6 7 9 10 0 0,5 1 1,5 2 km