PROFYT cc, 4 Stroke
|
|
|
- Aleksi Uotila
- 6 vuotta sitten
- Katselukertoja:
Transkriptio
1 PROFYT cc, 4 Stroke Instruction manual (Original instructions) GB pg 7-16 Käyttöohje (Alkuperäisten ohjeiden käännös) FI pg Bruksanvisning (Översättning av originalinstruktionerna) SE pg 27-36


2 (1)
 (5)")
 (9) 3")


3 (2) (3) (4) (5) (6) (7) (8) (9) 3

 (13)")

4 (10) (11) (12) (13) (14) (15) 4
 2 3")
 (21)")


5 (16) 1 (17) 2 3 (18) (19) (20) (21) (22) 5
6 IMPORTANT! TÄRKEÄÄ! Read all safety warnings, instructions, illustrations and specifications provided with this power tool. Lue tarkkaavaisesti kaikki tämän työkalun kanssa toimitetut varoitukset, ohjeet ja spesifikaatiot, ja katso lisäksi kuvat. VIKTIGT! Läs uppmärksamt alla varningar, instruktioner och specifikationer som bifogas med detta verktyg och studera bilderna. VIKTIG! Les nøye gjennom alle advarslene, instruksene og spesifikasjonene som følger med verktøyet, og se på tegningene. ВАЖНО! Пpoчтитe вce yкaзaния, инcтpyкции, иллюcтpaции и cпeцификaции, поставляемые c электроинструментом. TÄHTIS! Lugege läbi kõik elektrilise tööriista kohta esitatud ohuhoiatused ning tutvuge tööriista jooniste ja tehniliste andmetega. SVARĪGI! Izlasiet visus drošības brīdinājumus, instrukcijas, specifikācijas un apskatiet attēlus šī elektroinstrumenta dokumentācijā. SVARBU! Perskaitykite visus saugos įspėjimus, visas instrukcijas, paveikslėlius ir techninius reikalavimus, pateikiamus su šiuo elektriniu įrankiu. 6
7 INTRODUCTION Thankyou for purchasing this product which has passed through our extensive quality assurance process. Every care has been taken to ensure that it reaches you in perfect condition. SAFETY FIRST Before attempting to operate this power tool the following basic safety precautions should always be taken to reduce the risk of fire, electric shock and personal injury. It is important to read the instruction manual to understand the application, limitations and potential hazards associated with this tool. CERTIFICATE OF GUARANTEE This product is guaranteed for a period of 2 Years, with effect from the date of purchase and applies only to the original purchaser. This guarantee only applies to defects arising from, defective materials and or faulty workmanship that become evident during the guarantee period only and does not include consumable items. The manufacturer will repair or replace the product at their discretion subject to the following. That the product has been used in accordance with the guide lines as detailed in the product manual and that it has not been subjected to misuse, abuse or used for a purpose for which it was not intended. That it has not been taken apart or tampered with in any way whatsoever or has been serviced by unauthorised persons or has been used for hire purposes. Transit damage is excluded from this guarantee, for such damage the transport company is responsible. Claims made under this guarantee must be made in the first instance, directly to the retailer within the guarantee period. Only under exceptional circumstances should the product be returned to the manufacturer. In these case it shall be the consumer s responsibility to return the product at their cost ensuring that the product is adequately packed to prevent transit damage and must be accompanied with a brief description of the fault and a copy of the receipt or other proof of purchase. The manufacturer shall not be liable for any special, exemplary, direct, indirect, incidental, or consequential loss or damage under this guarantee. This guarantee is in addition to and does not affect any rights, which the consumer may have by virtue of the Sale of Goods Act 1973 as amended 1975 and STATUTORY RIGHTS This guarantee is in addition to and in no way affects your statutory rights. PRODUCT DISPOSAL When this product reaches the end of it s life or is disposed of for any other reason, it must not be disposed of in household waste. In order to preserve natural resources, and to minimise adverse environmental impact, please recycle or dispose of this product in an environmentally friendly way. It should be taken to your local waste recycling centre or other authorised collection and disposal facility. If in doubt consult your local waste authority for information regarding available recycling and / or disposal options. SPECIFIC SAFETY INSTRUCTIONS Read the instructions with due care. Familiarize yourself with the settings and proper operation of the machine. Never allow children or other persons who are not familiar with the operating instructions to use the machine. Never use in the direct vicinity of persons - especially children - or animals. Warning! Maintain a safety distance of 15m. If approached, switch off the appliance immediately. Always keep in mind that the machine operator or user is responsible for accidents involving other persons and/or their property. Always wear sturdy, non-slip footwear and long trousers when operating the machine. Never operate the machine barefoot or in sandals. Check the grounds on which the machine will be used and remove all objects that could be caught up and violently flung out. Warning! Petrol is highly flammable! Only store petrol in containers designed to hold petroleum-based liquids. Only refuel out in the open and do not smoke during the refueling process. Always refuel before starting the engine. Do not open fuel tank cap and do not refuel when the engine is running or when the brush cutter is hot. If petrol has overflowed, do not under any circumstances attempt to start the engine. Instead, remove the machine from the affected area. Avoid starting the engine until the petrol fumes have completely evaporated. For safety reasons, the petrol tank and other tank closures must be replaced if they are damaged. Replace defective exhausts. Before using the petrol brush cutter, visually inspect it to ensure that the mounting bolts and the entire cutting apparatus are in good working order (i.e. not worn out or damaged). To prevent any imbalance, replace worn out blades or damaged mounting bolts as a set only (if applicable). HANDLING Wear close fitting, tough work clothing that will provide protection, such as long slacks or trousers, protective footware, heavy duty work gloves, hard hat, a safety face shield, or safety glasses for eye protection and a good grade of ear defenders or other sound barriers for hearing protection. 7
8 Store in a safe place. Open fuel cap slowly to release any pressure which may have formed in fuel tank. To prevent a fire hazard, move at least 10 feet (3 meters) from fueling area before starting. Turn unit off before setting it down. Always hold unit firmly with both hands, the thumb and fingers encircling the handles. Keep all screws and fasteners tight. Never operate your equipment when it is improperly adjusted or not completely and securely assembled. Keep handles dry, clean and free of fuel mixture. Keep the cutting head as close to ground as practical. Avoid hitting small objects with the line spool. When cutting on a slope, stand below stringhead. NEVER cut or trim on a hill or slope, etc. if there is the slightest chance of slipping, sliding or losing firm footing. Check the area you will be trimming for debris that may be struck or thrown during operation. Keep all parts of your body and clothing away from the cutting head when starting or running engine. Before starting the engine, make sure the cutting head will not come in contact with any obstructions. Stop the engine before examining cutting line. Store equipment away from possible flammable materials, such as gas-powered water heaters, clothes dryers, or oil-fired furnaces, portable heaters, etc. Always keep the safety guard, the cutting head, and engine free of debris build-up. Operation of equipment should always be restricted to mature and properly instructed individuals. If unfamiliar with trimming techniques, practice the procedures with engine in OFF position. Always clear work area of debris such as cans, bottles, rocks, etc. Striking objects can cause serious injury to the operator or bystanders and also damage equipment. If an object is hit accidentally, turn the engine off immediately and examine the equipment. Never operate unit with damaged or defective equipment. Always trim or cut at high engine speeds. Do not run engine slowly at start or during trimming operations. Do not use equipment for purposes other than trimming or mowing weeds. Never raise the cutting head above knee height during operation. Do not operate unit with other people or animals in the immediate vicinity. Allow a minimum of 50 feet (15 meters) between operator and other people and animals when trimming or mowing. Allow a distance of 100 feet (30 meters) between operator and other people and animals when operating the petrol grass trimmer. 8 If operating on a slope, stand below the cutting attachment. Do not operate on a slope or hilly incline if there is the slightest chance of slipping or losing your footing. ADDITIONAL INSTRUCTIONS DO NOT USE ANY OTHER FUEL other than that recommended in your manual. Always follow instructions in the Fuel and Oil section of this manual. Never use petrol unless it is properly mixed with 2- stroke engine oil. Permanent damage to engine will result, voiding manufacturer s warranty. DO NOT SMOKE while refueling or operating equipment. DO NOT OPERATE UNIT WITHOUT AN EXHAUST and properly installed exhaust shield. DO NOT TOUCH or let your hands or body come in contact with the exhaust. Hold unit with thumbs and fingers encircling the handles. DO NOT OPERATE UNIT IN AWKWARD POSITIONS, off balance, outstretched arms, or one-handed. Always use two hands when operating unit with thumbs and fingers encircling the handles. DO NOT RAISE THE LINE SPOOL above ground level while unit is operating. Injury to operator could result. DO NOT USE UNIT FOR ANY PURPOSES OTHER than trimming lawn or garden areas. DO NOT OPERATE UNIT FOR PROLONGED PERIODS. Rest periodically. DO NOT OPERATE UNIT WHILE UNDER THE INFLUENCE OF ALCOHOL OR DRUGS. DO NOT OPERATE UNIT UNLESS SAFETY GUARD IS INSTALLED AND IN GOOD CONDITION. DO NOT ADD, REMOVE OR ALTER ANY COMPONENTS OF THIS PRODUCT. Doing so could cause personal injury and/or damage the unit voiding the warranty. DO NOT operate your unit near or around flammable liquids or gases whether in or out of doors. An explosion and/or fire may result. DO NOT USE ANY OTHER CUTTING TOOLS. For your own safety only use the accessories and additional equipment specified in the operating manual. The use of tools or accessories other than those recommended in this operating manual may place you in danger of personal injury. GENERAL SAFETY RULES WARNING! Read all instructions Failure to follow all instructions listed below may result in electric shock, fire and/or serious injury. The term "power tool" in all of the warnings listed below refers to your mains operated (corded) power tool or battery operated (cordless) power tool.
9 SAVE THESE INSTRUCTIONS 1) WORK AREA a) Keep work area clean and well lit. Cluttered and dark areas invite accidents. b) Do not operate power tools in explosive atmospheres, such as in the presence of flammable liquids, gases or dust. Power tools create sparks which may ignite the dust or fumes. c) Keep children and bystanders away while operating a power tool. Distractions can cause you to lose control. 2) PERSONAL SAFETY a) Stay alert, watch what you are doing and use common sense when operating a power tool. Do not use a power tool while you are tired or under the influence of drugs, alcohol or medication. A moment of inattention while operating power tools may result in serious personal injury. b) Use safety equipment. Always wear eye protection. Safety equipment such as dust mask, non-skid safety shoes, hard hat, or hearing protection used for appropriate conditions will reduce personal injuries. c) Avoid accidental starting. Ensure the switch is in the off position before plugging in. Carrying power tools with your finger on the switch or plugging in power tools that have the switch on invites accidents. d) Remove any adjusting key or wrench before turning the power tool on. A wrench or a key left attached to a rotating part of the power tool may result in personal injury. e) Do not overreach. Keep proper footing and balance at all times. This enables better control of the power tool in unexpected situations. f) Dress properly. Do not wear loose clothing or jewellery. Keep your hair, clothing and gloves away from moving parts. Loose clothes, jewellery or long hair can be caught in moving parts. g) If devices are provided for the connection of dust extraction and collection facilities, ensure these are connected and properly used. Use of these devices can reduce dust related hazards. 3) POWER TOOL USE AND CARE a) Do not force the power tool. Use the correct power tool for your application. The correct power tool will do the job better and safer at the rate for which it was designed. b) Do not use the power tool if the switch does not turn it on and off. Any power tool that cannot be controlled with the switch is dangerous and must be repaired. c) Disconnect the plug from the power source before making any adjustments, changing accessories, or storing power tools. Such preventive safety measures reduce the risk of starting the power tool accidentally. d) Store idle power tools out of the reach of children and do not allow persons unfamiliar with the power tool or these instructions to operate the power tool. Power tools are dangerous in the hands of untrained users. e) Maintain power tools. Check for misalignment or binding of moving parts, breakage of parts and any other condition that may affect the power tools operation. If damaged, have the power tool repaired before use. Many accidents are caused by poorly maintained power tools. f) Keep cutting tools sharp and clean. Properly maintained cutting tools with sharp cutting edges are less likely to bind and are easier to control. g) Use the power tool, accessories and tool bits etc., in accordance with these instructions and in the manner intended for the particular type of power tool, taking into account the working conditions and the work to be performed. Use of the power tool for operations different from intended could result in a hazardous situation. 4) SERVICE a) Have your power tool serviced by a qualified repair person using only identical replacement parts. This will ensure that the safety of the power tool is maintained. 9
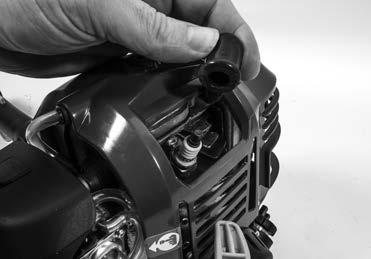
10 COMPONENTS & CONTROLS (FIG.1) 1. Ignition switch 2. Safety lever 3. Air filter cover 4. Starter handle 5. Fuel tank cap 6. Fuel tank 7. Throttle trigger 8. Shoulder strap 9. Debris shield 10. Bump feed line spool tooth blade 12. Shaft assembly 13. Handle 14. Star grip screw knob 15. Primer bulb 16. Spark plug 17. Measuring jug 18. Hex key 19. Floating disc 20. Washer 21. Locknut 22. Spark plug spanner UNPACKING Caution! This packaging contains sharp objects. Take care when unpacking. Remove the machine, together with the accessories supplied, from the packaging. Check carefully to ensure that the machine is in good condition and account for all the accessories listed in this manual. Also make sure that all the accessories are complete. If any parts are found to be missing, the machine and its accessories should be returned together in their original packaging to the retailer. Do not throw the packaging away, keep it safe throughout the guarantee period, then recycle if possible, otherwise dispose of it by the proper means. Do not let children play with empty plastic bags due to the risk of suffocation. ASSEMBLY INSTALLING THE SHAFT ASSEMBLY WARNING! Never install, remove, or adjust any attachment while power head is running. Failure to stop the engine can cause serious personal injury. Stop the engine and disconnect the spark plug wire. Loosen the star grip screw knob on the coupler of the power head shaft, Fig.2, and remove the hanger cap from the attachment. Align the button with the guide recess on the power head coupler and slide the two shafts together, Fig.3. Rotate the attachment shaft until the button locks into the positioning hole. NOTE: If the button does not release completely in the positioning hole, the shafts are not locked into place. Slightly rotate from side to side until the button is locked into place. Tighten the star grip screw knob securely. INSTALLING THE HANDLE Unscrew the four bolts on the handle using the suppled hex key, Fig.4. Remove the top half of the handle and then install the lower half onto the motor shaft, Fig.5. There are 3 notches on the motor shaft where the handle can be positioned. Replace the top half of the handle and tighten the four bolts. Do not fully tighten the bolts until you have set the perfect working position with the carrying strap. ATTACHING THE DEBRIS SHIELD WARNING! The cut-off knife on the debris shield is sharp. Avoid contact with the knife. Failure to avoid contact can result in serious personal injury. Insert the tab on the shaft assembly attachment bracket into the thin slot on the debris shield, Fig.6, and then line up the hole on the debris shield with the hole on the attachment bracket and attach together using the bolt, Fig.7. Tighten using the hex key provided. FITTING THE LINE SPOOL Place the mounting disc on the shaft, Fig.8. Screw the line spool onto the shaft by turning it counter-clockwise, Fig.9. Now tighten the trimmer head by hand. Check for freedom of motion of the line spool. REMOVING THE LINE SPOOL (FIG.10) Insert the Hex key (1) through the hole in the head assembly and into the opening on the mounting disc (3). Holding the hex key tight so the mounting disc does not move unscrew the line spool (2) clockwise until the spool is removed. FITTING THE BLADE Unscrew the locknut (7) from the shaft by turning it clockwise. Remove the floating disc (6) and washer (5). Insert the Hex key (1) through the hole in the head assembly and into the opening on the mounting disc (3). Holding the hex key tight so the mounting disc does not move position the blade (4), washer (5) and the floating disc (6) as shown in Fig
11 Screw down the locknut (7) and tighten it by turning the hex key counter clockwise. Remove hex key and check for freedom of motion of the blade. ATTACHING THE SHOULDER HARNESS (FIG.12) Connect the latch on the shoulder harness to the strap hanger. Adjust the strap to a comfortable position. OPERATING INSTRUCTIONS FUELING AND REFUELING WARNING! When refueling the brushcutter, please note the following information at all times! No smoking and no open fires! Do not refuel in closed rooms! Fuel vapors will accumulate on the ground (risk of explosion)! Fuels can contain solvent-like substances. Prevent contact of the eyes and skin with mineral oil products. Wear gloves when refueling. Change and clean your protective clothing more frequently. Do not inhale fuel vapors. Inhaling fuel vapors can cause physical damage to your health. Before refueling the machine, turn off and allow the engine to cool down. The handling of operating materials/fuels requires cautious, careful action. Refuel the machine only outdoors or in well ventilated rooms. Mineral oil products, including oils, degrease the skin. In case of repeated, longer contact, the skin will dry up. This can result in various skin diseases. Beyond that, allergic reactions are well known. Contact of the eyes with oil results in irritations. In case of eye contact, wash the affected eye immediately with clear water. If the irritation does not subside, a physician must be consulted immediately! RECOMMENDED FUEL TYPE Old fuel is the primary reason for the unit not running properly. Be sure to use fresh, clean, unleaded petrol. NOTE: This is a four cycle engine. In order to avoid damage to the unit, do not mix oil with petrol. FILLING THE FUEL TANK Clean the area around the tank cap thoroughly, so that no dirt can get into the fuel tank (not necessary upon first time operation of the line trimmer). Lay down the line trimmer, so that it is resting in a stable position. Loosen fuel cap slowly. Rest the cap on a clean surface, Fig. 13. Pour the gasoline into the measuring jug provided and then carefully transfer into the fuel tank. The fuel tank has a capacity of 280ml, do not overfill. WARNING! If you spill any fuel, clean the line trimmer immediately. If fuel gets onto your clothes, change them immediately. Screw the fuel cap on tightly, clean and inspect the fuel cap and surrounding area thoroughly. Note: It is normal for smoke to be emitted from a new engine after first use. WARNING! Always shut off the engine before fueling. Never add fuel to a machine with a running or hot engine. Move at least 30 ft. (9 m) from refueling site before starting engine. Do not smoke! RECOMMENDED OIL TYPE The engine is lubricated exclusively by the engine oil (multigrade oil of the classi cation SAE 10W-30). This is why you must check the engine oil level at a clean location before beginning to work with the line trimmer. During this inspection, it is important to make sure that no dirt gets onto the dipstick or into the crankcase in order to guarantee long service life of the engine. If, despite all precautions, dirt does get into crankcase, the engine oil must be changed before the engine is started. FILLING THE OIL TANK WARNING! When laying down the dipstick, make sure that it does not come into contact with dirt under no circumstances whatsoever! Remove dirt immediately whenever necessary! Unscrew the dipstick by rotating anticlockwise, Fig.14. Use a suitable filling bottle or the measuring jug to fill 50ml of engine oil into the oil tank. An engine oil bottle can be used for precise dosing without spilling engine oil. Screw the dipstick back in again by rotating clockwise. Following the first-time operation of the line trimmer, the engine oil must be changed after 20 hours of operation and not after 50 hours of operation. OPERATION WARNING! Always position the line trimmer on the operator's right side. The use of the line trimmer on the operator's left side will expose the operator to hot surfaces and can result in possible burn injury. To avoid burns from hot surfaces, never operate unit with the bottom of the engine above waist level. Keep a firm grip with both hands while in operation. The line trimmer should be held at a comfortable position with the handle about hip height. 11
12 Always operate the line trimmer at full throttle. Cut tall grass from the top down. This will prevent grass from wrapping around the lower shaft and line head which may cause damage from overheating. If grass becomes wrapped around the line head, STOP THE ENGINE, disconnect the spark plug wire, Fig. 15, and remove the grass. Prolonged cutting at partial throttle will result in oil dripping from the muffler. STARTING AND STOPPING Rest the unit on a flat, firm place. Keep the cutting head off the ground and clear of surrounding objects, as it will start rotating upon starting of the engine. Slowly press the primer bulb 7 times. Set the Ignition switch (1) to the I position, Fig.16. Hold the body of the machine with your hand and pull the starter handle sharply until engine attempts to run, Fig.17. Do not pull the pull starter handle more than 8 times. Press in the choke button, Fig.18. Pull the pull starter handle until the engine runs. Do not pull the starter handle more than 6 times. Allow the engine to run for 15 seconds. Press down the safety lever (2) and squeeze the throttle trigger (3) fully, Fig.16. The choke button will return to it original position when the throttle trigger is squeezed. STOPPING THE ENGINE Release the throttle trigger and run the engine for half a minute. Shift the ignition switch to the STOP 0 position. Important! Except for an emergency, avoid stopping the engine while pulling the throttle trigger. EXPANDING THE CUTTING LINE The length of the cutting line is controlled by tapping the line head on grass while running engine at full throttle. Run engine at full throttle. Tap the spool retainer on ground to make the cutting line longer. The line advances each time the spool retainer is tapped. Do not hold the spool retainer on the ground. NOTE: The line trimming cut-off blade on the grass deflector will cut the line to the correct length. NOTE: If the line is too short you may not be able to advance the cutting line by tapping it on the ground. If so, stop the engine, and manually advance the line. ADVANCING THE CUTTING LINE MANUALLY Push the spool retainer down while pulling on cutting lines to manually advance the string. If the cutting line has receeded into the spool you will have to remove the spool and feed the line through the spool holes. Make sure the engine is off and remove the 12 spark plug wire then unscrew the spool retaining knob in a anticlockwise direction. Make sure the two lines are captured in the slots opposite each other on the spool and each line is extended approximately 152 mm beyond each slot. Thread the strings into the spool holes in the line head. Carefully push the spool into the line head (gently pull the lines to the outside if necessary). When the spool is positioned in line string head, grasp the strings and pull sharply to release them from the slots in the spool. Screw on the spool retaining knob in a clockwise direction making sure it is securely fastened. CUTTING TIPS Keep the trimmer tilted toward the area being cut; this is the best cutting area. The trimmer cuts when passing the unit from right to left. This will avoid throwing debris at the operator. Use the tip of line to do the cutting; do not force the line head into uncut grass. Wire and wooden fences cause extra line wear, even breakage. Stone and brick walls, curbs, and wood may wear the string rapidly. Avoid trees and shrubs. Tree bark, wood mouldings, siding, and fence posts can easily be damaged by the string. DEBRIS SHIELD LINE TRIMMING CUT-OFF BLADE (FIG.19) The trimmer is equipped with a line trimming cut-off blade on the grass deflector. For best cutting, advance the line until it is trimmed to length by the cut-off blade. Advance the line whenever you hear the engine running faster than normal, or when trimming efficiency diminishes. This will maintain best performance and keep the line long enough to advance properly. METAL BLADE USAGE Check the nut to fasten the blade and be sure the nut has no fault, and no abrasion. Be sure that the blade and the holder have been fastened according to instruction and the blade turns smoothly without abnormal noise. WARNING! The rotating parts fastened incorrectly may cause serious accident to the operator. Make sure that the blade is not bent, warped, cracked, broken or damaged. If you find any error to the blade, discard it and change new one which is recommended by your authorised service centre. By using the shoulder strap, hang the unit on your right side. Adjust the strap length so that the cutting head may become parallel to the ground. WARNING! Make sure to use shoulder strap and debris guard. If not, it is very dangerous when you slip or lose your balance.
13 CUTTING METHOD Use the front left side cutting. Guide the blade from your right to left with it tilted slightly to your left. When mowing a wide area, start working from your left end to avoid interference of cut grass. The blade may be seized by weeds if the engine speed is too low, or the blade cuts too deep into weeds. Adjust the engine speed and cutting depth according to the condition of object. WARNING! If the grass or other object gets caught in the blade, or if the unit starts to shake or vibrate, turn off the engine and check the whole unit. Change the blade if it has been damaged. Turn off the engine, disconnect the spark plug and make sure the blade has completely stopped before checking the blade. CONTROLLING BLADE BOUNCE Kick out can cause serious personal injury. Carefully study this section. It is important that you understand what causes kick out, how you can reduce the chance of kick out and how you can remain in control of the unit if kick out does occur. Kick out can occur when the moving blade contacts an object that it cannot cut. This contact causes the blade to stop for an instant and then suddenly move or bounce away from the object that was hit. The operator can lose control of the unit and the blade can cause serious personal injury to the operator or any person nearby if the blade contacts any part of the body. REDUCING KICK OUT Recognize that kick out can happen. By understanding and knowing about bounce, you can help eliminate the element of surprise. Cut fibrous weeds and grass only. Do not let the blade contact materials it cannot cut such as hard, woody vines and brush or rocks, fences, metal, etc. Be extra prepared for bounce if you must cut where you cannot see the blade making contact such as in areas of dense growth. Keep the blade sharp. A dull blade increase the chance of bounce. Avoid feeding the blade too rapidly. The blade can bounce away from material being cut if the blade is fed faster than its cutting capability. Cut only from your right to your left. Keep your path of advance clear of material that has been cut and other debris. MAINTAINING CONTROL Keep a good, firm grip on the unit with both hands. A firm grip can help neutralize bounce. Keep your right and left hands completely around the respective handles. Keep both feet spread apart in a comfortable stance and yet braced for the possibility that the unit could bounce. Do not overreach. Keep firm footing and balance. MAINTENANCE WARNING! Use only original manufacturer's replacement parts, accessories and attachments. Failure to do so can cause poor performance, possible injury and may void your warranty. Turn off the engine and pull off the spark plug connector. Wear protective gloves. SPOOL REPLACEMENT Line diameter: ø2.5mm x 2m Stop the engine, disconnect the spark plug wire. Hold the line head and unscrew the spool retaining knob in a anticlockwise direction. Remove the empty spool from the string head. Keep the line attached to the spool, Fig 20. To install the new spool, make sure the two lines are captured in the slots opposite each other on the spool and each line is extended approximately 152 mm beyond each slot. Thread the strings into the spool holes in the line head. Carefully push the spool into the line head (gently pull the lines to the outside if necessary). When the spool is positioned in line string head, grasp the strings and pull sharply to release them from the slots in the spool. Screw on the spool retaining knob in a clockwise direction making sure it is securely fastened. REPLACING & CLEANING THE AIR FILTER For proper performance and long life, keep the air filter clean. Remove the air filter cover by squeezing down on the latch with your thumb while gently pulling on the cover, Fig. 21. Remove the filter, clean it in warm soapy water. Rinse and let dry completely. For best performance, replace annually, Fig. 22. Reinstall the filter. Replace the air filter cover by inserting the tabs on the bottom of the cover into the slots on the air filter base; push the cover up until it latches securely in place. FUEL CAP WARNING! A leaking fuel cap is a fire hazard and must be replaced immediately. The fuel cap contains a non-serviceable filter and a check valve. A clogged fuel filter will cause poor engine performance. If performance improves when the fuel cap is loosened, check valve may be faulty or filter clogged. Replace the fuel cap if required. 13
14 SPARK PLUG Do not attempt to remove the spark plug from a hot engine. Clean or replace the spark plug if it is soiled with heavy oil deposits. Replace the spark plug if the centre electrode is worn at the end. This engine uses a CMR5H spark plug with mm electrode gap. Use an exact replacement and replace annually. STORAGE (1 MONTH OR LONGER) Drain all fuel from tank into a container approved for petrol. Run engine until it stops. Clean all foreign material from the trimmer. Store it in a well-ventilated place that is inaccessible to children. Keep away from corrosive agents such as garden chemicals and de-icing salts. Abide by all ISO and local regulations for the safe storage and handling of petrol. Excess fuel should be used up in other 2-cycle engine powered equipment. TECHNICAL SPECIFICATION Engine displacement Motor 26.5cc 4-Stroke 650W Engine max. speed 7000min -1 Engine idle speed 3000+/-300min -1 Clutch speed 4500min -1 Fuel tank capacity Fuel type 280ml Unleaded Petrol Oil type SAE 10W-30 Starting system Spark plug type Cutting diameter Cutting line size Blade diameter Aluminium pole diameter Brush cutter levels: Sound pressure level Sound power level Recoil starter CMR5H 45cm Ø2.5mm x 2m Ø230mm 26mm L pa 92.2dB(A) k=3db(a L WA 101.3dB(A) k=3db(a Vibration level 7.37m/s 2 K=1.5m/s 2 Line trimmer levels: Sound pressure level L pa 94.5dB(A) k=3db(a Sound power level L WA 103.8dB(A) k=3db(a Vibration level 9.62m/s 2 K=1.5m/s 2 14
15 SYMBOLS The rating plate on your tool may show symbols. These represent important information about the product or instructions on its use. Wear hearing protection. Wear eye protection. Wear respiratory protection. Waste electrical products should not be disposed of with household waste. Please recycle where facilities exist. Check with your Local Authority or retailer for recycling advice. Conforms to relevant safety standards. Read the instruction manual Do not smoke while mixing fuel or filling the tank. Keep the machine away from fire or sparks Thrown objects can ricochet and result in personal injury or property damage. Wear foot protection Keep all bystanders at least 15m away. Never touch the nylon cutting head when the engine is running. CAUTION: This is a 4 stroke engine. Fill petrol and oil in seperate tanks Wear no-slip heavy duty work gloves to improve your grip on the handle. Gloves also reduce the transmission of machine vibration to your hands General warning Do not remove the guard or safety devices with the machine in motion Danger of burns Dress properly, do not wear loose clothing or jewellery that could become caught in moving parts of the unit Danger automatic start Hot exhaust, do not touch Do not clean, lubricate or repair the machine while in motion The engine emits CARBON MONOXIDE, do not run the engine indoors or in enclosed spaces Do not expose the machine to wet or rainy weather conditions 15
16 ENVIRONMENTAL PROTECTION Information for (private householders) for the environmentally responsible disposal of Waste Electrical and Electronic Equipment (WEEE) This symbol on products and or accompanying documents indicates that used and end of life electrical and electronic equipment should not be disposed of in household waste. For the proper disposal, treatment, recovery and recycling, please take these products to designated collection points, where they will be accepted on a free of charge basis. Alternatively, in some countries you may be able to return your products to your retailer upon the purchase of an equivalent new product. Disposing of this product correctly will help to save valuable resources and prevent any potential adverse effects on human health and the environment which could otherwise arise from inappropriate waste disposal and handling. Please contact your local authority for further details of your nearest designated collection point. Penalties may be applicable for incorrect disposal of this waste in accordance with national legislation. FOR BUSINESS USERS IN THE EUROPEAN UNION. If you wish to discard electrical and electronic equipment, please contact your dealer or supplier for further information. Information on Disposal in other Countries outside the European Union. This Symbol is only valid in the European Union. If you wish to dispose of this product, please contact your local authorities or dealer and ask for the correct method of disposal. 16
17 ESITTELY Kiitos, että ostit tämän tuotteen, joka on läpäissyt kattavan laatutarkastusprosessimme. Kaikki on tehty sen varmistamiseksi, että saat sen täydellisessä toimintakunnossa. TURVALLISUUS ENSIN Seuraavat perusvarotoimet on tehtävä ennen sähkötyökalun käyttämistä tulipalojen, sähköiskujen ja henkilövahinkojen estämiseksi. On tärkeää lukea nämä käyttöohjeet, jotta ymmärrät tämän työkalun käytön, siihen liittyvät rajoitukset ja potentiaaliset vaarat. TAKUUTODISTUS Tällä tuotteella on 2 vuoden takuu, joka alkaa ostopäivästä ja koskee vain ensimmäistä ostajaa. Tämä takuu kattaa vain virheet, jotka aiheutuvat raaka-aineja valmistusvioista, ja jotka tulevat esille takuuaikana. Takuu ei korvaa kuluvia osia. Valmistaja korjaa tai vaihtaa tuotteen harkintansa mukaan edellyttäen seuraavassa mainittuja asioita. Tuotetta on käytetty käsikirjan ohjeiden mukaisesti, ja sitä ei ole käytetty väärin tai huolimattomasti tai tarkoitukseen, johon sitä ei ole tarkoitettu käytettäväksi. Laitetta ei ole purettu osiin tai peukaloitu millään tavalla, sitä ei ole huollatettu valtuuttamattomilla henkilöillä tai käytetty vuokrauksen kohteena. Kuljetusvauriot eivät kuulu tämän takuun piiriin. Niistä on vastuussa kuljetusliike. Takuuvaateet on esitettävä ensisijaisesti suoraan jälleenmyyjälle takuukauden aikana. Tuote tulee palauttaa valmistajalle vain poikkeuksellisissa tapauksissa. Näissä tapauksissa ostajan vastuulla on tuotteen palauttaminen omalla kustannuksellaan ja varmistaen, että se on asianmukaisesti pakattu kuljetusvaurioiden estämiseksi. Mukaan tulee liittää lyhyt kuvaus viasta ja kopio kuitista tai muusta ostotodistuksesta. Valmistaja ei ole vastuussa mistään erityisistä, esimerkillisistä, suorista, välillisistä, satunnaisista tai epäsuorista menetyksistä tai vahingoista takuun aikana. Tämä takuu tulee lisänä, eikä vaikuta oikeuksiin, joita kuluttajalla saattaa olla vuoden 1973 Tavaranmyyntilain ja siihen vuonna 1975 ja 1999 tehtyjen muutosten mukaisesti. LAKISÄÄTEISET OIKEUDET Tämä takuu on lisänä, eikä vaikuta lakisääteisiin oikeuksiisi. TUOTTEEN HÄVITTÄMINEN Kun tuotteen käyttöikä loppuu tai se hävitetään jostakin muusta syystä, sitä ei saa hävittää kotitalousjätteen mukana. Luonnonvarojen säilyttämiseksi ja haitallisten ympäristövaikutusten minimoimiseksi, kierrätä tuote tai hävitä muulla ympäristöystävällisellä tavalla. Tuote tulee viedä paikalliseen kierrätyskeskukseen tai muuhun viralliseen keräily- ja hävityspisteeseen. Jos olet epävarma, kysy kierrätys- ja/tai hävittämisvaihtoehdoista paikalliselta jäteliikkeeltä. ERITYISET TURVAOHJEET Lue ohjeet huolellisesti. Tutustu asetuksiin ja koneen kunnolliseen käyttämiseen. Älä anna lasten tai ohjeisiin perehtymättömien henkilöiden käyttää työkalua. 17 Älä koskaan käytä sivullisten - erityisesti lasten - tai eläinten lähellä. Varoitus! Säilytä 15 metrin turvaetäisyys. Sammuta laite välittömästi, jos joku lähestyy. Muista, että koneen käyttäjä on vastuussa vahingoista, joita aiheutuu sivullisille ja/tai heidän omaisuudelleen. Käytä aina tukevia, luistamattomia jalkineita ja pitkälahkeisia housuja, kun käytät konetta. Älä koskaan käytä konetta paljain jaloin tai sandaalit jalassa. Tarkista maasto, jossa konetta käytetään ja poista kaikki esineet, jotka voivat tarttua kiinni ja sinkoutua koneesta. Varoitus! Bensiini on erittäin syttyvää! Säilytä bensiini säiliöissä, jotka on tarkoitettu bensiinipohjaisille nesteille. Lisää bensiiniä vain ulkona, äläkä tupakoi bensiinin lisäämisen aikana. Lisää polttoaine aina ennen moottorin käynnistämistä. Älä avaa polttoainesäiliön korkkia, äläkä lisää polttoainetta, kun moottori on käynnissä tai raivaussaha on kuuma. Jos bensiiniä on vuotanut yli, älä missään tapauksessa yritä käynnistää moottoria. Siirrä sen sijaan kone pois saastuneelta alueelta. Vältä moottorin käynnistämistä, kunnes bensiinihöyryt ovat täysin haihtuneet. Bensiinisäiliöt tai muut suljetut säiliöt täytyy vaihtaa, jos ne vaurioituvat. Vaihda vialliset pakoputket. Ennen bensiinikäyttöisen raivaussahan käyttämistä tarkasta silmämääräisesti asennuspulttien ja koko leikkuukoneiston toimintakunto (ts. ei kulumia tai vaurioita). Vaihda kuluneet terät ja vaurioituneet asennuspultit kokonaisina sarjoina epätasapainon välttämiseksi. KÄSITTELY Käytä sopivia, kestäviä työvaatteita, jotka tarjoavat suojaa, kuten pitkät housut, turvalliset jalkineet, kestävät suojakäsineet, kypärä, kasvosuojus tai suojalasit silmien suojaamiseksi, korkealaatuiset korvatulpat tai muut kuulosuojaimet kuulon suojaamiseksi. Varastoi turvallisessa paikassa. Avaa polttoainesäiliön korkki varovasti ja päästä ulos mahdollinen paine, jota voi muodostua polttoainesäiliöön. Käynnistä laite vähintään 3 metrin päässä polttoaineen täyttöpaikasta tulipalovaaran välttämiseksi. Sammuta laite ennen kuin lasket sen alas. Pidä laitetta aina tukevasti kahdella kädellä peukalo ja sormet kahvojen ympärillä. Pidä kaikki ruuvit ja kiinnittimet tiukalla. Älä käytä laitetta, jos se on säädetty väärin tai ei ole kokonaan tai turvallisesti koottu.
18 Pidä kahvat kuivina, puhtaina ja siisteinä polttoaineseoksesta. Pidä leikkuupää mahdollisimman lähellä maata. Älä anna siimakelan osua pieniin kohteisiin. Kun leikkaat rinteessä, seiso siimapään alapuolella. Älä KOSKAAN leikkaa tai tasoita mäessä tai rinteessä ym., jos on pienikin mahdollisuus liukastumiseen tai tasapainon menettämiseen. Tarkasta leikkuualue roskien varalta, jotka voivat takertua koneeseen ja sinkoutua työskentelyn aikana. Pidä kaikki kehonosat ja vaatteet etäällä leikkuupäästä, kun käynnistät moottorin tai moottori on käynnissä. Varmista ennen moottorin käynnistämistä, ettei leikkuupää osu mihinkään esteisiin. Sammuta moottori ennen kuin tarkastat leikkuusiimaa. Säilytä laite etäällä syttymislähteistä, kuten kaasukäyttöisistä vedenlämmittimistä, vaatteiden kuivaajista tai öljyllä toimivista uuneista, kannettavista lämmittimistä jne. Pidä aina turvasuojukset, leikkuupää ja moottori puhtaina roskakertymistä. Vain aikuiset ja täydellisen opastuksen saaneet henkilöt saavat käyttää laitetta. Jos et ole tutustunut leikkuutekniikkaan, harjoittele toimintoja moottorin ollessa "OFF"-asennossa. Puhdista leikattava alue roskista kuten tölkeistä, pulloista, kivistä jne. Sinkoutuvat esineet voivat aiheuttaa henkilövahingon käyttäjälle tai sivullisille sekä myös omaisuusvahinkoja. Jos johonkin esineeseen osutaan vahingossa, sammuta moottori välittömästi ja tarkista laite. Älä koskaan käytä laitetta, jossa on vaurioituneita varusteita. Leikkaa aina suurilla moottorin kierrosluvuilla. Älä käytä moottoria hitaalla nopeudella käynnistyksen aikana tai leikkuutoimintojen aikana. Älä käytä laitetta mihinkään muuhun tarkoitukseen kuin ruohon tai rikkaruohojen leikkaamiseen. Älä koskaan nosta leikkuupäätä polven korkeuden yläpuolelle. Älä käytä laitetta, jos lähistöllä on muita ihmisiä tai eläimiä. Käyttäjän ja muiden ihmisten tai eläinten välillä täytyy olla vähintään 15 metriä, kun laitteella leikataan tai niitetään. Käyttäjän ja muiden ihmisten tai eläinten välillä täytyy olla vähintään 30 metriä, kun käytössä on bensiinikäyttöinen ruohotrimmeri. Kun työskentelet rinteessä, seiso leikkuulaitteen alapuolella. Älä koskaan käytä laitetta mäessä tai rinteessä, jos on pienikin mahdollisuus liukastumiseen tai tasapainon menettämiseen. LISÄOHJEET ÄLÄ KÄYTÄ MITÄÄN MUUTA POLTTOAINETTA kuin ohjekirjassa suositeltua. Noudata aina luvun Polttoaine ja öljyt ohjeita. Älä käytä bensiiniä, jos sitä ei ole kunnolla sekoitettu 2-tahtimoottoriöljyn kanssa. Seurauksena voivat olla pysyvät moottorin vauriot ja valmistajan takuun mitätöityminen. ÄLÄ TUPAKOI polttoaineen täytön tai laitteen käytön aikana. ÄLÄ KÄYTÄ LAITETTA ILMAN POISTOPUTKEA ja oikein asennettua poistoputken suojusta. ÄLÄ KOSKETA tai anna käsien tai kehon joutua kosketuksiin pakoputken kanssa. Pidä laitetta peukalo ja sormet kahvojen ympärillä. ÄLÄ TYÖSKENTELE HANKALASSA ASENNOSSA, poissa tasapainosta, ojennetuin käsin tai yhdellä kädellä. Käytä aina molempia käsiä peukalot ja sormet kierrettyinä kahvojen ympärille. ÄLÄ NOSTA SIIMAKELAA maanpinnan yläpuolelle laitteen ollessa käynnissä. Seurauksena saattaa olla käyttäjän loukkaantuminen. ÄLÄ KÄYTÄ LAITETTA MIHINKÄÄN MUUHUN TARKOITUKSEEN kuin nurmikon tai puutarha-alueiden leikkaamiseen. ÄLÄ KÄYTÄ LAITETTA PITKIÄ AIKOJA. Pidä säännöllisiä taukoja. ÄLÄ KÄYTÄ LAITETTA OLLESSASI ALKOHOLIN TAI LÄÄKKEIDEN VAIKUTUKSEN ALAISENA. ÄLÄ KÄYTÄ LAITETTA ILMAN TURVASUOJUSTA, JONKA PITÄÄ OLLA HYVÄSSÄ KUNNOSSA. ÄLÄ LISÄÄ, POISTA TAI MUUTA TÄMÄN TUOTTEEN KOMPONENTTEJA. Tämä saattaa aiheuttaa henkilövahinkoja ja/tai vahingoittaa laitetta mitätöiden valmistajan takuun. ÄLÄ KÄYTÄ laitetta lähellä palavia nesteitä tai kaasuja sisätiloissa tai ulkona. Seurauksena voi olla räjähdys ja/tai tulipalo. ÄLÄ KÄYTÄ MITÄÄN MUITA LEIKKUUVARUSTEITA. Käytä oman turvallisuutesi takia vain tässä käyttöoppaassa mainittuja lisävarusteita. Muiden kuin tässä käyttöoppaassa suositeltujen lisävarusteiden käyttö saattaa aiheuttaa henkilövahinkojen vaaran. YLEISET TURVALLISUUSSÄÄNNÖT VAROITUS! Lue kaikki ohjeet Alla olevien ohjeiden noudattamatta jättäminen voi aiheuttaa sähköiskun, tulipalon ja/tai vakavan vamman. Käsite sähkötyökalu kaikissa alla luetelluissa varoituksissa viittaa sähkövirtakäyttöiseen (johdotettuun) sähkötyökaluun tai akkukäyttöiseen (johdotoomaan) sähkötyökaluun. PIDÄ NÄMÄ OHJEET TALLELLA 1) TYÖALUE a) Pidä työalue puhtaana ja hyvin valaistuna. Roskaiset tai pimeät alueet lisäävät onnettomuusriskiä. 18
19 b) Älä käytä työkaluja ympäristöissä, joissa on räjähdysvaara, kuten helposti syttyvien nesteiden, kaasujen tai pölyn läsnä ollessa. Työkalut synnyttävät kipinöitä, jotka voivat sytyttää pölyn tai höyryt tuleen. c) Pidä lapset ja sivulliset poissa työkalua käytettäessä. Häiriötekijät voivat haitata keskittymistä. 2) HENKILÖTURVALLISUUS a) Pysy valppaana, katso mitä teet ja käytä tervettä järkeä käyttäessäsi työkalu. Älä käytä työkalu ollessasi väsynyt tai huumeiden, alkoholin tai lääkkeiden vaikutuksen alaisena. Hetkellinen epähuomio työkalu käytettäessä voi johtaa vakaviin henkilövammoihin. b) Käytä suojavarustusta. Käytä aina suojalaseja. Turvavarustus kuten hengityssuojain, liukumattomat turvajalkineet, suojakypärä tai kuulosuojain käytettynä asianmukaisissa olosuhteissa vähentää henkilövammoja. c) Vältä vahinkokäynnistyksiä. Varmista, että kytkin on off-asennossa (sammutettuna) ennen virran kytkemistä. Työkalun kantaminen sormi kytkimellä tai virran kytkeminen päälle työkaluihin, joiden kytkin on päällä, voi aiheuttaa onnettomuuksia. d) Poista säätöavaimet tai jakoavaimet ennen työkalun käynnistämistä. Jako- tai muu avain, joka on jätetty kiinni työkalun pyörivään osaan voi aiheuttaa henkilövamman. e) Älä kurkottele. Pidä asianmukainen jalansija ja tasapaino kaiken aikaa. Tämä mahdollistaa työkalun paremman hallinnanodottamattomissa tilanteissa. f) Pukeudu asianmukaisesti. Älä pidä löysiä vaatteita tai koruja. Pidä hiuksesi, vaatteesi ja käsineesi poissa liikkuvista osista. Löysät vaatteet, korut tai pitkä tukka voivat jäädä kiinni liikkuviin osiin. g) Jos pölynpoistoon tai keräyslaitteisiin kytkettäviä laitteita on toimitettu, varmista, että ne on kytketty ja niitä käytetään asianmukaisesti. Näiden laitteiden käyttö voi vähentää pölyyn liittyviä vaaroja. 3) TYÖKALUN KÄYTTÖ JA HUOLTO a) Älä käytä voimaa työkaluun. Käytä käyttötarkoitukseesi soveltuvaa työkalua. Asianmukainen työkalu toimii paremmin ja turvallisemmin teholla, jolla se on suunniteltu. b) Älä käytä työkalua, jos kytkin ei käännä sitä päälle ja pois päältä. Työkalu, jota ei voida kontrolloida kytkimestä on vaarallinen, ja se tulee korjata. c) Säilytä seisovat työkalut poissa lasten ulottuvilta, äläkä anna henkilöiden, jotka eivät tunne työkalua tai näitä ohjeita, käyttää työkalua. Työkalut ovat vaarallisia kouluttamattomien käyttäjien käsissä. d) Pidä työkalut kunnossa. Tarkasta liikkuvien osien kohdistusvirheet tai kiinnitykset, osien murtumat ja muut seikat, jotka voivat vaikuttaa sähkötyökalujen käyttöön. Jos työkalu on vaurioitunut, korjauta se ennen käyttöä. Monet onnettomuudet aiheutuvat huonosti kunnossapidetyistä työkaluista. e) Pidä leikkaustyökalut terävinä ja puhtaina. Asianmukaisesti kunnossapidetyt leikkaustyökalut, joissa on terävät leikkausreunat, eivät juutu helposti ja niiden käsittely on helpompaa. f) Käytä työkalua, lisävarusteita ja työkalupaloja tms. näiden ohjeiden mukaisesti ja tavalla, johon kyseessä oleva sähkötyökalu on tarkoitettu, ottaen huomioon työolosuhteet ja suoritettava työ. Työkalun käyttö toimintoihin, joihin sitä ei ole tarkoitettu, voi johtaa vaaralliseen tilanteeseen. 4) HUOLTO a) Jätä työkalun huolto pätevälle korjaajalle, joka käyttää ainoastaan täsmälleen samanlaisia varaosia. Näin varmistetaan, että työkalun turvallisuus säilyy. OSAT JA SÄÄTIMET (KUVA 1) 1. Virtakytkin 2. Turvavipu 3. Ilmansuodattimen kansi 4. Käynnistimen kahva 5. Polttoainesäiliön korkki 6. Polttoainesäiliö 7. Kaasuliipaisin 8. Olkahihna 9. Roskasuojus 10. Napautuksella syötettävä siimakela hampainen terä 12. Varsikokoonpano 13. Kahva 14. Tähtinuppi 15. Pallopumppu 16. Sytytystulppa 17. Mittakannu 18. Kuusioavain 19. Kelluva levy 20. Aluslevy 21. Lukkomutteri 22. Tulppa-avain 19
20 PAKKAUKSESTA PURKU Huomio! Tämä pakkaus sisältää teräviä osia. Ole varovainen pakkausta purkaessasi. Poista kone ja sen mukana tulleet varusteet pakkauksesta. Tarkista huolellisesti, että kone on hyvässä kunnossa ja kaikki tässä käyttöoppaassa luetellut varusteet ovat mukana. Varmista myös, että kaikki varusteet ovat täydellisiä. Jos joitakin osia puuttuu, kone ja sen varusteet on palautettava jälleenmyyjälle alkuperäisessä pakkauksessa. Älä heitä pakkausta pois, säilytä se koko takuuaika, kierrätä sen jälkeen, mikäli mahdollista, tai hävitä muulla asiallisella tavalla. Älä anna lasten leikkiä tyhjillä muovipusseilla tukehtumisvaaran takia. KOKOAMINEN VARSIKOKOONPANON ASENTAMINEN VAROITUS! Älä koskaan kiinnitä tai irrota mitään lisävarustetta, kun leikkuupää on käynnissä. Moottorin sammumatta jättäminen saattaa aiheuttaa vakavan henkilövahingon. Pysäytä moottori ja irrota sytytystulpan johto. Kierrä akkupäävarren liitoksen tähtinuppi auki, kuva 2, ja poista ripustuskorkki lisäosasta. Kohdista painike akkupään liittimen ohjainsyvennykseen ja liu uta kaksi vartta yhteen, kuva 3. Kierrä lisäosavartta, kunnes painike lukittuu asetusreikään. HUOMAUTUS: Jos painike ei vapaudu kokonaan asetusreikään, varret eivät ole lukittuneet paikoilleen. Pyöritä hieman puolelta toisella, kunnes painike lukittuu paikalleen. Kiristä nyt tähtinuppi kunnolla. KAHVAN ASENTAMINEN Irrota kahvan neljä pulttia mukana tulleella kuusioavaimella, kuva 4. Poista kahvan ylempi puolisko ja asenna sitten alempi puolisko moottorin akseliin, kuva 5. Moottorin akselissa on 3 lovea, joihin kahva voidaan asentaa. Aseta kahvan ylempi puolisko takaisin paikoilleen ja kiristä neljä pulttia. Älä kiristä pultteja loppuun asti ennen kuin olet säätänyt hyvän työasennon kantohihnan kanssa. ROSKASUOJUKSEN KIINNITTÄMINEN VAROITUS! Roskasuojuksen katkaisuterä on terävä. Vältä koskettamasta terään. Tämän noudattamatta jättäminen saattaa aiheuttaa vakavan henkilövahingon. Työnnä akselikokoonpanon kiinnittimen uloke kapeaan koloon roskasuojuksessa, kuva 6, ja kohdista sitten roskasuojuksen reikä kiinnittimen reikään ja kiinnitä ne yhteen pultilla, kuva 7. Kiristä mukana tulleella kuusioavaimella. SIIMAKELAN KIINNITTÄMINEN Aseta asennuslevy akseliin, kuva 8. Kierrä siimakela akseliin kääntämällä sitä vastapäivään, kuva 9. Kiristä trimmeripää nyt käsin. Tarkasta siimakelan vapaa liikkuminen. SIIMAKELAN IRROTTAMINEN (KUVA 10) Työnnä kuusioavain (1) pääkokoonpanon reiän läpi ja asennuslevyn (3) aukkoon. Pidä kuusioavainta tiukasti, jotta asennuslevy ei pääse liikkumaan, irrota siimakela (2) kiertämällä sitä myötäpäivään. TERÄN KIINNITTÄMINEN Irrota lukkomutteri (7) akselista kääntämällä sitä myötäpäivään. Poista kelluva levy (6) ja aluslevy (5). Työnnä kuusioavain (1) pääkokoonpanon reiän läpi ja asennuslevyn (3) aukkoon. Pidä kuusioavainta tiukasti, jotta asennuslevy ei pääse liikkumaan. Aseta terä (4), aluslevy (5) ja kelluva levy (6) kuten näytetään kuvassa 11. Kiinnitä lukkomutteri (7) takaisin ja kiristä sitä kääntämällä kuusioavaimella vastapäivään. Poista kuusioavain ja tarkasta terän vapaa liikkuminen. KANTOVALJAIDEN KIINNITTÄMINENS (KUVA 12) Liitä kantovaljaiden salpa hihnan ripustimeen. Säädä hihna sopivaan asentoon. KÄYTTÖOHJEET POLTTOAINEEN LISÄÄMINEN JA TÄYDENTÄMINEN VAROITUS! Kun lisäät polttoainetta Trimmeriin, huomioi aina seuraavat ohjeet! Tupakointi ja avotuli on kielletty! Älä lisää polttoainetta suljetuissa tiloissa! Polttoainehöyryt kerääntyvät maahan (räjähdysvaara)! Polttoaineet voivat sisältää liuottimien tapaisia aineita. Vältä mineraaliöljytuotteiden pääsyä silmiin ja iholle. Käytä suojakäsineitä, kun lisäät polttoainetta. Vaihda ja pese suojavaatetus säännöllisesti. Älä hengitä polttoainehöyryjä. Polttoainehöyryjen hengittäminen voi aiheuttaa haittaa terveydellesi. Ennen polttoaineen lisäämistä sammuta kone ja anna moottorin jäähtyä. Käyttöaineiden/polttoaineiden käsittely vaatii huolellisuutta ja varovaisuutta. Lisää koneeseen polttoainetta ainoastaan ulkona tai hyvin ilmastoiduissa tiloissa. 20
PAINEILMALETKUKELA-AUTOMAATTI AUTOMATIC AIR HOSE REEL
 MAV4 MAV5 MAV6 PAINEILMALETKUKELA-AUTOMAATTI AUTOMATIC AIR HOSE REEL Käyttöohje Instruction manual HUOMIO! Lue käyttöohjeet huolellisesti ennen laitteen käyttöä ja noudata kaikkia annettuja ohjeita. Säilytä
VAROITUKSET. Älä pura laitetta osiin.
 VAROITUKSET Laitteen väärinkäyttö voi johtaa henkilövahinkoihin. Noudata kaikkia tässä ohjekirjassa annettuja ohjeita ja käytä laitetta oikein. Älä koskaan seiso laitteen alapuolella. Älä pura laitetta
1. SIT. The handler and dog stop with the dog sitting at heel. When the dog is sitting, the handler cues the dog to heel forward.
 START START SIT 1. SIT. The handler and dog stop with the dog sitting at heel. When the dog is sitting, the handler cues the dog to heel forward. This is a static exercise. SIT STAND 2. SIT STAND. The
SAGA 150. Asennusohjeet. Mittaa oven korkeus. Piirrä seinään oven kiinni -päätyyn seinäkannattimen kohdalle vaakaviiva korkeudelle ovi + 75mm + 20 mm.
 SAGA 150 Asennusohjeet 500 1 2 Mittaa oven korkeus. Piirrä seinään oven kiinni -päätyyn seinäkannattimen kohdalle vaakaviiva korkeudelle ovi + 75mm + 20 mm. 3 Piirrä vesivaa an avulla viiva myös kiskon
MOOTTORIPYÖRÄNOSTIN MOTORCYCLE LIFT
 MEG30 Lue käyttöohjeet huolellisesti ennen laitteen käyttöä ja noudata kaikkia annettuja ohjeita. Säilytä ohjeet myöhempää tarvetta varten. Read the instruction manual carefully before using the tool and
INSTALLATION INSTRUCTION ASENNUSOHJE PEM SJTK31 SJTK46 ENGLISH SUOMI
 INSTALLATION INSTRUCTION ASENNUSOHJE PEM1256 2010-2 SJTK31 SJTK46 ENGLISH SUOMI GB GENERAL INFORMATION - Check that the kit is suitable for the cable type. - Check the materials listed in the bill of materials
LYTH-CONS CONSISTENCY TRANSMITTER
 LYTH-CONS CONSISTENCY TRANSMITTER LYTH-INSTRUMENT OY has generate new consistency transmitter with blade-system to meet high technical requirements in Pulp&Paper industries. Insurmountable advantages are
On instrument costs in decentralized macroeconomic decision making (Helsingin Kauppakorkeakoulun julkaisuja ; D-31)
") On instrument costs in decentralized macroeconomic decision making (Helsingin Kauppakorkeakoulun julkaisuja ; D-31) Juha Kahkonen Click here if your download doesn"t start automatically On instrument costs
On instrument costs in decentralized macroeconomic decision making (Helsingin Kauppakorkeakoulun julkaisuja ; D-31) Juha Kahkonen Click here if your download doesn"t start automatically On instrument costs
Information on preparing Presentation
 Information on preparing Presentation Seminar on big data management Lecturer: Spring 2017 20.1.2017 1 Agenda Hints and tips on giving a good presentation Watch two videos and discussion 22.1.2017 2 Goals
Käyttöohje 5,5hv lumilinko
 OMISTAJAN OPAS / KÄYTTÖOHJEKIRJA A L K U P E R Ä I S T E N O H J E I D E N K Ä Ä N N Ö S Käyttöohje 5,5hv lumilinko Alkuperäisten ohjeiden käännös HANDAI IS REGISTERED TRADEMARK www.handai.fi 1. MERKIT
Box 1. Things you have/ Pakkaus sisältää. x 4 x 16 x 4 x 4. 300mm. 1700mm. 300mm 1. Things you should know / Sinun Tulee Tietää
 Phobos 30 Things you should know / Sinun Tulee Tietää Things you prepare / Näitä Tarvitset DURING INSTALLATION ALL PRODUCTS: use protective gloves at all times use eye protection at all times never install
Installation instruction PEM
 Installation instruction ASENNUSOHJE PEM1032 2010-02 SURGE ARRESTER SET FOR POLE MOUNT TRANSFORMER YLIJÄNNITESUOJASETTI PYLVÄSMUUNTAJALLE ENGLISH SUOMI 2/8 PEM1032 2010-02 ENGLISH GENERAL INFORMATION -
National Building Code of Finland, Part D1, Building Water Supply and Sewerage Systems, Regulations and guidelines 2007
 National Building Code of Finland, Part D1, Building Water Supply and Sewerage Systems, Regulations and guidelines 2007 Chapter 2.4 Jukka Räisä 1 WATER PIPES PLACEMENT 2.4.1 Regulation Water pipe and its
Uusi Ajatus Löytyy Luonnosta 4 (käsikirja) (Finnish Edition)
 (Finnish Edition)") Uusi Ajatus Löytyy Luonnosta 4 (käsikirja) (Finnish Edition) Esko Jalkanen Click here if your download doesn"t start automatically Uusi Ajatus Löytyy Luonnosta 4 (käsikirja) (Finnish Edition) Esko Jalkanen
Uusi Ajatus Löytyy Luonnosta 4 (käsikirja) (Finnish Edition) Esko Jalkanen Click here if your download doesn"t start automatically Uusi Ajatus Löytyy Luonnosta 4 (käsikirja) (Finnish Edition) Esko Jalkanen
Recirkulering. El-tilslutning. Kontrolpanel. Dansk. Timerfunktion
 1 2 Dansk Recirkulering Luften renses ved hjælp at aktive kulfiltre hvorefter den returneres til rummet. Kulfiltre bestilles separat. El-tilslutning Emhætten skal tilsluttes 230 V i henhold til stærkstrømsreglementet.
Solar Water Heater Kit. EcoStyle. 1 User Manual/Operating Instructions. Contents FREE LESSON PLANS AVAILABLE.
 EcoStyle 1 User Manual/Operating Instructions Contents 1 Contents 2 What s in the box? 3 Setting up the 4 Heating water 5 Measuring water temperature with the digital thermometer 6 Maximum/minimum temperature
INSTALLATION INSTRUCTION ASENNUSOHJE PEM1417 2012-11 ENGLISH SUOMI CURRENT LIMITING DEVICE VIRTAA RAJOITTAVA SUOJA SDI46.812 & SDI46.
 INSTALLATION INSTRUCTION ASENNUSOHJE PEM1417 2012-11 ENGLISH SUOMI CURRENT LIMITING DEVICE VIRTAA RAJOITTAVA SUOJA SDI46.812 & SDI46.824 2/8 SDI46.812 & SDI46.824 PEM1417 2012-11 ENGLISH GENERAL INFORMATION
Capacity Utilization
 Capacity Utilization Tim Schöneberg 28th November Agenda Introduction Fixed and variable input ressources Technical capacity utilization Price based capacity utilization measure Long run and short run
Öljytäytteinen sähköpatteri Electric Oil Radiator
 Öljytäytteinen sähköpatteri Electric Oil Radiator KÄYTTÖOHJE Alkuperäisten ohjeiden käännös INSTRUCTIONS MANUAL Original instructions MALLI/MODEL: Holly 1500: ERC2-1507 Holly 2000: ERC2-2009 DT Istr (ERC
Secto Design Oy Kauppalantie 12 02700 Kauniainen Finland tel. +358 9 5050598 fax +358 9 5475 2535 info@sectodesign.fi www.sectodesign.
 Secto Design Oy Kauppalantie 12 02700 Kauniainen Finland tel. +358 9 5050598 fax +358 9 5475 2535 info@sectodesign.fi www.sectodesign.fi Secto 4200 pendant natural birch, black or white laminate, walnut
CONVERSION KITS FOR FRAMES MR8 AND MR9 INSTALLATION INSTRUCTIONS
 CONVERSION KITS FOR FRAMES MR8 AND MR9 INSTALLATION INSTRUCTIONS MR8 AND MR9 CONVERSION KIT - INSTALLATION INSTRUCTION Document ID: DPD01787, Revision: A, Release date: 17.11.2015 1.1 MR8 kit contents
KONEISTUSKOKOONPANON TEKEMINEN NX10-YMPÄRISTÖSSÄ
 KONEISTUSKOKOONPANON TEKEMINEN NX10-YMPÄRISTÖSSÄ https://community.plm.automation.siemens.com/t5/tech-tips- Knowledge-Base-NX/How-to-simulate-any-G-code-file-in-NX- CAM/ta-p/3340 Koneistusympäristön määrittely
Network to Get Work. Tehtäviä opiskelijoille Assignments for students. www.laurea.fi
 Network to Get Work Tehtäviä opiskelijoille Assignments for students www.laurea.fi Ohje henkilöstölle Instructions for Staff Seuraavassa on esitetty joukko tehtäviä, joista voit valita opiskelijaryhmällesi
Installation instruction PEM
 Installation instruction ASENNUSOHJE PEM1031 2010-04 CURRENT LIMITING DEVICE FOR POLE MOUNT TRANSFORMER VIRTAA RAJOITTAVA SUOJA PYLVÄSMUUNTAJALLE ENGLISH SUOMI 75 2/8 PEM1031 2010-04 ENGLISH GENERAL INFORMATION
On instrument costs in decentralized macroeconomic decision making (Helsingin Kauppakorkeakoulun julkaisuja ; D-31)
") On instrument costs in decentralized macroeconomic decision making (Helsingin Kauppakorkeakoulun julkaisuja ; D-31) Juha Kahkonen Click here if your download doesn"t start automatically On instrument costs
On instrument costs in decentralized macroeconomic decision making (Helsingin Kauppakorkeakoulun julkaisuja ; D-31) Juha Kahkonen Click here if your download doesn"t start automatically On instrument costs
PARTS LIST Item Description Q'TY Item Description Q'TY
 PARTS LIST Item Description Q'TY Item Description Q'TY 1 Lower door 1 40 Jockey wheel axel 1 2 Safety switch 1 41 Power cord 1 3 Screw M4 35 4 42 Switch 1 4 Hex bolt M6 8 4 43 Lower shaft bracket 1 5 Washer
Särmäystyökalut kuvasto Press brake tools catalogue
 Finnish sheet metal machinery know-how since 1978 Särmäystyökalut kuvasto Press brake tools catalogue www.aliko.fi ALIKO bending chart Required capacity in kn (T) in relation to V-opening. V R A S = plates
KOPIOINTILAITE PUUSORVIIN WOOD LATHE COPYING ATTACHEMENT
 XW016-3 XW017-3 KOPIOINTILAITE PUUSORVIIN WOOD LATHE COPYING ATTACHEMENT Käyttöohje Instruction manual HUOMIO! Lue käyttöohjeet huolellisesti ennen laitteen käyttöä ja noudata kaikkia annettuja ohjeita.
Owner s Manual GREE Electric Appliances,Inc.of zhuhai
 Ilmalämpöpumppu Split air conditioner wall mounted model Käyttäjän opas Owner s Manual GREE Electric Appliances,Inc.of zhuhai Ultra-thin GWHD09A3NK3DF KFR-25GW/NaA12FA GWHD12B2NK3AD KFR-32GW/NaA12FA Please
On instrument costs in decentralized macroeconomic decision making (Helsingin Kauppakorkeakoulun julkaisuja ; D-31)
") On instrument costs in decentralized macroeconomic decision making (Helsingin Kauppakorkeakoulun julkaisuja ; D-31) Juha Kahkonen Click here if your download doesn"t start automatically On instrument costs
On instrument costs in decentralized macroeconomic decision making (Helsingin Kauppakorkeakoulun julkaisuja ; D-31) Juha Kahkonen Click here if your download doesn"t start automatically On instrument costs
1/4. Resetointi ja vianmääritys. 22.11.2013 ntr
 A400-64176 Sähköpöydät 1/4 Resetointi ja vianmääritys Pöydän resetointi tehdään aina ennen käyttöönottoa ja tarvittaessa häiriötilanteessa. Määritä pöydän tyyppi käyttökytkimen ja jalustan mukaan ja tee
INSTALLATION INSTRUCTION ASENNUSOHJE PEM ENGLISH SUOMI INSULATION PIERCING CONNECTOR SLIW17.2 ERISTYKSEN LÄPÄISEVÄ LIITIN SLIW17.
 INSTALLATION INSTRUCTION ASENNUSOHJE PEM904 2011-08 ENGLISH SUOMI INSULATION PIERCING CONNECTOR SLIW17.2 ERISTYKSEN LÄPÄISEVÄ LIITIN SLIW17.2 2/8 SLIW17.2 PEM904 2011-08 GENERAL INFORMATION (ENG) - Check
anna minun kertoa let me tell you
 anna minun kertoa let me tell you anna minun kertoa I OSA 1. Anna minun kertoa sinulle mitä oli. Tiedän että osaan. Kykenen siihen. Teen nyt niin. Minulla on oikeus. Sanani voivat olla puutteellisia mutta
Käyttöohje Savukehitin Micro Rocket
 Käyttöohje Savukehitin Micro Rocket Markkinointi Pietiko Oy www.pietiko.fi Tekniset tiedot Savun määr: Tehon kulutus Säiliön koko Akut Kulutus Paino 2.7 kg Mitat 227X66X81 mm Savun kehityksen kesto: 10-12
LAATTALEIKKURI TILE CUTTING SAW
 AWD600 LAATTALEIKKURI TILE CUTTING SAW Käyttöohje Instruction manual HUOMIO! Lue käyttöohjeet huolellisesti ennen laitteen käyttöä ja noudata kaikkia annettuja ohjeita. Säilytä ohjeet myöhempää tarvetta
Tork Paperipyyhe. etu. tuotteen ominaisuudet. kuvaus. Väri: Valkoinen Malli: Vetopyyhe
 etu Monikäyttöpaperi hoitaa useimmat pyyhintätehtävät Sopiva lasipintojen pyyhintään Sopii käsien kuivaamiseen Elintarvikekäyttöön hyväksytty Tork Easy Handling, pakkaus, jota on helppo kantaa mukana,
Choose Finland-Helsinki Valitse Finland-Helsinki
 Write down the Temporary Application ID. If you do not manage to complete the form you can continue where you stopped with this ID no. Muista Temporary Application ID. Jos et onnistu täyttää lomake loppuun
Curriculum. Gym card
 A new school year Curriculum Fast Track Final Grading Gym card TET A new school year Work Ethic Detention Own work Organisation and independence Wilma TMU Support Services Well-Being CURRICULUM FAST TRACK
Jokaisella person. käyttökerralla tehtävän rutiinitarkastuksen lisäksi pätevän henkilön tulisi tehdä henkilösuojaimelle
 Inspection Henkilösuojaimen tarkastus Tarkastusohjeet Inspection Inspection Inspection In addition to routine checks for each use, should regularly undergo a detailed inspection by a competent Jokaisella
Dataluettelo. Pyöränruuvien/-mutterien asennusohjeita
 Dataluettelo ruuvien/-mutterien asennusohjeita Copyright Opel Automobile GmbH, Rüsselsheim am Main, Germany Tässä painotuotteessa mainitut tiedot pätevät alkaen alla mainitusta päivämäärästä. Opel Automobile
Ajettavat luokat: SM: S1 (25 aika-ajon nopeinta)
") SUPERMOTO SM 2013 OULU Lisämääräys ja ohje Oulun Moottorikerho ry ja Oulun Formula K-125ry toivottaa SuperMoto kuljettajat osallistumaan SuperMoto SM 2013 Oulu osakilpailuun. Kilpailu ajetaan karting radalla
SUPERMOTO SM 2013 OULU Lisämääräys ja ohje Oulun Moottorikerho ry ja Oulun Formula K-125ry toivottaa SuperMoto kuljettajat osallistumaan SuperMoto SM 2013 Oulu osakilpailuun. Kilpailu ajetaan karting radalla
FI GB. Asennus-, käyttöohjeet. Installation, operation instructions
 FI GB Asennus-, käyttöohjeet Installation, operation instructions Asennus FI Keinuripustuksen asennus Tekstin sulkeissa olevat numerot viittaavat kuvien 1, 2, 3 ja 4 numerointiin. Kiinnitä keinuripustuksen
WINE COOLER TFW METOS TFW 160S, TFW 365-2S, TFW 375S MG ,
 WINE COOLER TFW METOS TFW 160S, TFW 365-2S, TFW 375S MG4116794, 4116798, 4116797 Instruction manual TWF 365-2S TWF 375S TWF 160S 01.09.2015 Table if Contents 1. Important safety instructions...3 2. Unpacking
MÖNKIJÄN TUKKIKÄRRY ATV TRAILER
 A T V 1 MÖNKIJÄN TUKKIKÄRRY ATV TRAILER KÄYTTÖOHJE MANUAL HUOMIO! Lue käyttöohjeet huolellisesti ennen laitteen käyttöä ja noudata kaikkia annettuja ohjeita. Säilytä ohjeet myöhempää tarvetta varten. NOTE!
Rekisteröiminen - FAQ
 Rekisteröiminen - FAQ Miten Akun/laturin rekisteröiminen tehdään Akun/laturin rekisteröiminen tapahtuu samalla tavalla kuin nykyinen takuurekisteröityminen koneille. Nykyistä tietokantaa on muokattu niin,
Salasanan vaihto uuteen / How to change password
 Salasanan vaihto uuteen / How to change password Sisällys Salasanakäytäntö / Password policy... 2 Salasanan vaihto verkkosivulla / Change password on website... 3 Salasanan vaihto matkapuhelimella / Change
Golfpallon etsijä asennusmanuaali
 Golfpallon etsijä asennusmanuaali Prazza takuu Kaikki Prazza tuotteet on suunniteltu ja valmistettu tiukkojen laatuvaatimusten mukaan, tuotteet ovat helppokäyttöisiä ja helppoja asentaa. Jos sinulla ilmenee
TIKIT a) Suorassa tikissä ristiommel jää nahan alle piiloon. b) Ristitikissä ommel jää näkyviin.
 Suorassa tikissä ristiommel jää nahan alle piiloon. b) Ristitikissä ommel jää näkyviin.") CML WHEEL COVER -RUORINAHKAN OMPELUOHJE Liota nahkoja lämpimässä vedessä n. 15 minuuttia ennen ompelua. Pidä nahka kosteana koko ompelun ajan esim. sumutepullolla. Pidä ommellessa kevyt kireys nahkaan,
CML WHEEL COVER -RUORINAHKAN OMPELUOHJE Liota nahkoja lämpimässä vedessä n. 15 minuuttia ennen ompelua. Pidä nahka kosteana koko ompelun ajan esim. sumutepullolla. Pidä ommellessa kevyt kireys nahkaan,
Fitting instructions. Fitting set for joining all types of DEVI self limiting heating cables to heating cables Art. no. 19805779 SSTL nro 04 312 85
 GB/FI Fitting instructions Fitting set for joining all types of DEVI self limiting heating cables to heating cables Art. no. 19805779 SSTL nro 04 312 85 intelligent varme Contents: GB Connection kits 3
TÄYTTÖAUTOMAATIT TÄYTTÖAUTOMAATIT COMPUTER INFLATORS
 31 S AHCON computer inflators are designed with a view to high quality, precision and long service life. The inflation computers are designed in Denmark and manufactured and tested in our own workshop.
B40 P ELITE B40 B ELITE
 S1154653-38,B40 B,P ELITE_1.fm Page 1 Wednesday, March 14, 2012 7:51 AM GB Operator s manual 2-27 SE Bruksanvisning 28-52 DK Brugsanvisning 53-78 FI Käyttöohje 79-104 NO Bruksanvisning 105-129 FR Manuel
The CCR Model and Production Correspondence
 The CCR Model and Production Correspondence Tim Schöneberg The 19th of September Agenda Introduction Definitions Production Possiblity Set CCR Model and the Dual Problem Input excesses and output shortfalls
Efficiency change over time
 Efficiency change over time Heikki Tikanmäki Optimointiopin seminaari 14.11.2007 Contents Introduction (11.1) Window analysis (11.2) Example, application, analysis Malmquist index (11.3) Dealing with panel
4x4cup Rastikuvien tulkinta
 4x4cup Rastikuvien tulkinta 4x4cup Control point picture guidelines Päivitetty kauden 2010 sääntöihin Updated for 2010 rules Säännöt rastikuvista Kilpailijoiden tulee kiinnittää erityistä huomiota siihen,
03 PYÖRIEN SIIRTÄMINEN
 78 03 PYÖRIEN SIIRTÄMINEN Wheels and tyres are heavy. Their handling may involve heavy lifting at the workshop. We have developed a logical ergonomic method for transporting wheels. The focus here is our
FBM 135 A1. Petrol Lawnmower Translation of original operation manual. Bensiinikäyttöinen ruohonleikkuri Alkuperäisen käyttöohjeen käännös
 FBM 135 A1 Petrol Lawnmower Translation of original operation manual Bensiinikäyttöinen ruohonleikkuri Alkuperäisen käyttöohjeen käännös Bensindriven gräsklippare Översättning av bruksanvisning i original
PRODUCT SPECIFICATIONS SAVE THIS MANUAL GENERAL SAFETY RULES
 PRODUCT SPECIFICATIONS Item Overall Dimensions Roof Panel Dimensions Roof Overhand Roof Gables Frame Dimensions Side Wall Height Side Post Spacing Tubing Anchor Stake Size Weight Description 20 Long x
Vannekiristin metallivanteelle. Sealless steel strapping tool
 XK6071 Vannekiristin metallivanteelle Sealless steel strapping tool Käyttöohje Manual HUOMIO! Lue käyttöohjeet huolellisesti ennen laitteen käyttöä ja noudata kaikkia annettuja ohjeita. Säilytä ohjeet
TIEKE Verkottaja Service Tools for electronic data interchange utilizers. Heikki Laaksamo
 TIEKE Verkottaja Service Tools for electronic data interchange utilizers Heikki Laaksamo TIEKE Finnish Information Society Development Centre (TIEKE Tietoyhteiskunnan kehittämiskeskus ry) TIEKE is a neutral,
LUONNOS RT 80260 EN AGREEMENT ON BUILDING WORKS 1 THE PARTIES. May 1998 1 (10)
") RT 80260 EN May 1998 1 (10) AGREEMENT ON BUILDING WORKS This agreement template is based on the General Terms and Conditions of Building Contracts YSE 1998 RT 16-10660, LVI 03-10277, Ratu 417-7, KH X4-00241.
RT 80260 EN May 1998 1 (10) AGREEMENT ON BUILDING WORKS This agreement template is based on the General Terms and Conditions of Building Contracts YSE 1998 RT 16-10660, LVI 03-10277, Ratu 417-7, KH X4-00241.
Results on the new polydrug use questions in the Finnish TDI data
 Results on the new polydrug use questions in the Finnish TDI data Multi-drug use, polydrug use and problematic polydrug use Martta Forsell, Finnish Focal Point 28/09/2015 Martta Forsell 1 28/09/2015 Esityksen
ATV TUKKIKÄRRY ATV LOG TRAILER
 Lue käyttöohjeet huolellisesti ennen laitteen käyttöä ja noudata kaikkia annettuja ohjeita. Säilytä ohjeet myöhempää tarvetta varten. Read the instruction manual carefully before using the appliance and
Secto 4200 pendant natural birch, black or white laminate, walnut veneer
 Secto Design Oy Kauppalantie 12 02700 Kauniainen Finland tel. +358 9 5050598 fax +358 9 5475 2535 info@sectodesign.fi www.sectodesign.fi Secto 4200 pendant natural birch, black or white laminate, walnut
Secto Design Oy Kauppalantie Kauniainen Finland tel fax
 Secto Design Oy Kauppalantie 12 02700 Kauniainen Finland tel. +358 9 5050598 fax +358 9 5475 2535 info@sectodesign.fi www.sectodesign.fi Secto 4202 Magnum pendant Available in natural birch, black or white
Reliable diagnostic support Ultra-light design
 EN Powerful illumination Intelligent charging management Reliable diagnostic support Ultra-light design VISIOMED Optima UV original scale 1:1 VISIOMED Optima Quality Made Easy and an illumination close
CLEANING JOB ORIENTATION
 CLEANING JOB ORIENTATION CLEANING EQUIPMENT 1. cleaning trolley 2. cleaning bucket 3. garbage sack 4. squegee - You can dry windows, mirrors and floors. 5. floor mop and cloth 6. window washing applicator
Travel Getting Around
 - Location Olen eksyksissä. Not knowing where you are Voisitko näyttää kartalta missä sen on? Asking for a specific location on a map Mistä täällä on? Asking for a specific...wc?...pankki / rahanvaihtopiste?...hotelli?...huoltoasema?...sairaala?...apteekki?...tavaratalo?...ruokakauppa?...bussipysäkki?
Data protection template
 Data protection template Aihe: rekisteriseloste ja informointipohja Topic: information about the register and information to users (related to General Data Protection Regulation (GDPR) (EU) 2016/679) Mallina
KEY TO SYMBOLS. Symbols. 2 English. Choke: Set the choke control in the choke position. Set the choke control in the RUN position.
 GB Operator s manual 2-27 SE Bruksanvisning 28-54 DK Brugsanvisning 55-79 FI Käyttöohje 80-105 NO Bruksanvisning 106-131 FR Manuel d utilisation 132-157 NL Gebruiksaanwijzing 158-184 IT Istruzioni per
LINC 17. sanka.fi 130624A
 LINC 17 130624A SANKA takaa tuotteen toimivuuden kun asennus tapahtuu ohjeiden mukaisesti. SANKA garanterar produktens funktion då monteringsanvisningen följs. sanka.fi Tarvittaessa. Vid behov. 6mm 3mm
KMTK lentoestetyöpaja - Osa 2
 KMTK lentoestetyöpaja - Osa 2 Veijo Pätynen 18.10.2016 Pasila YHTEISTYÖSSÄ: Ilmailun paikkatiedon hallintamalli Ilmailun paikkatiedon hallintamalli (v0.9 4.3.2016) 4.4 Maanmittauslaitoksen rooli ja vastuut...
Olet vastuussa osaamisestasi
 Olet vastuussa osaamisestasi Ohjelmistoammattilaisuuden uudet haasteet Timo Vehmaro 02-12-2015 1 Nokia 2015 Mitä osaamista tulevaisuudessa tarvitaan? Vahva perusosaaminen on kaiken perusta Implementaatio
Asennusopas. DEVIreg 531. Elektroninen termostaatti.
 Asennusopas DEVIreg 531 Elektroninen termostaatti www.devi.com Sisällysluettelo 1 Johdanto................. 3 1.1 Tekniset tiedot.......... 4 1.2 Turvaohjeet............ 5 2 Asennusohjeet.............
FIS IMATRAN KYLPYLÄHIIHDOT Team captains meeting
 FIS IMATRAN KYLPYLÄHIIHDOT 8.-9.12.2018 Team captains meeting 8.12.2018 Agenda 1 Opening of the meeting 2 Presence 3 Organizer s personell 4 Jury 5 Weather forecast 6 Composition of competitors startlists
IEC IP V AC. VIZULO Stork Little Brother LED street luminaire / katuvalaisin. Mounting instruction Asennusohjeet. min 40 C.
 VIZULO Stork Little Brother LED street luminaire / katuvalaisin Mounting instruction Asennusohjeet 05 IEC EN 60598 IP66 min 40 C max + 45 C 198-264 V AC PH2 4 6 29/01/2016 SIA VIZULO Ganibu dambis 7a,
Microsoft Lync 2010 Attendee
 VYVI MEETING Lync Attendee 2010 Instruction 1 (15) Microsoft Lync 2010 Attendee Online meeting VYVI MEETING Lync Attendee 2010 Instruction 2 (15) Index 1 Microsoft LYNC 2010 Attendee... 3 2 Acquiring Lync
B 95 RS Bp Pack. 1 Integroitu lakaisuyksikkö. B 95 RS Bp Pack, 1.006-149.0, 2016-01-26
 B 95 RS Bp Pack Seisaaltaan ohjattava ketterä yhdistelmäkone on helppokäyttöinen, jossa yhdistyvät perässäkäveltävän koneen ketteryys ja päältäajettavan nopeus. 1 1 Integroitu lakaisuyksikkö Tekniset tiedot
Sisävesidirektiivin soveltamisala poikkeussäännökset. Versio: puheenjohtajan ehdotus , neuvoston asiakirja 8780/16.
 Sisävesidirektiivin soveltamisala poikkeussäännökset Versio: puheenjohtajan ehdotus 13.5.2016, neuvoston asiakirja 8780/16. Artikla 2 1. This Directive applies to deck crew members, radio operators, liquefied
KLAPISIRKKELI LOG SAW
 Lue käyttöohjeet huolellisesti ennen laitteen käyttöä ja noudata kaikkia annettuja ohjeita. Säilytä ohjeet myöhempää tarvetta varten. Read the instruction manual carefully before using the appliance and
LX 70. Ominaisuuksien mittaustulokset 1-kerroksinen 2-kerroksinen. Fyysiset ominaisuudet, nimellisarvot. Kalvon ominaisuudet
 LX 70 % Läpäisy 36 32 % Absorptio 30 40 % Heijastus 34 28 % Läpäisy 72 65 % Heijastus ulkopuoli 9 16 % Heijastus sisäpuoli 9 13 Emissiivisyys.77.77 Auringonsuojakerroin.54.58 Auringonsäteilyn lämmönsiirtokerroin.47.50
O-renkaan vaihto-ohje Instructions for replacement of o-ring
 Vexve-teräsventtiilin DN10-50 Venttiileille jotka valmistettu vuonna 2006 tai sen jälkeen ja kahva (2) irroita pidätinrengas (3) irroita rajoitin (4) karan tiivisteholkki (5) vaihda vioittunut o-rengas
Tilausvahvistus. Anttolan Urheilijat HENNA-RIIKKA HAIKONEN KUMMANNIEMENTIE 5 B RAHULA. Anttolan Urheilijat
 7.80.4 Asiakasnumero: 3000359 KALLE MANNINEN KOVASTENLUODONTIE 46 51600 HAUKIVUORI Toimitusosoite: KUMMANNIEMENTIE 5 B 51720 RAHULA Viitteenne: Henna-Riikka Haikonen Viitteemme: Pyry Niemi +358400874498
Tarua vai totta: sähkön vähittäismarkkina ei toimi? 11.2.2015 Satu Viljainen Professori, sähkömarkkinat
 Tarua vai totta: sähkön vähittäismarkkina ei toimi? 11.2.2015 Satu Viljainen Professori, sähkömarkkinat Esityksen sisältö: 1. EU:n energiapolitiikka on se, joka ei toimi 2. Mihin perustuu väite, etteivät
107401959 G INSTRUCTIONS FOR USE BRUGSANVISNING BETRIEBSANLEITUNG VC300 SERIES USER MANUAL MODE D EMPLOI INSTRUCCIONES DE USO
 0740959 G INSTRUCTIONS FOR USE BRUGSANVISNING BETRIEBSANLEITUNG MODE D EMPLOI INSTRUCCIONES DE USO VC300 SERIES USER MANUAL - Basic operations. - Suction regulation 3 - Cordlock (HEPA) 3. 4 - Wind up the
Presenter SNP6000. Register your product and get support at Käyttöopas
 Register your product and get support at www.philips.com/welcome Presenter SNP6000 FI Käyttöopas 1 a b c d e 2 3 4 Federal Communication Commission Interference Statement This equipment has been tested
Sisällysluettelo Table of contents
 Sisällysluettelo Table of contents OTC:n Moodlen käyttöohje suomeksi... 1 Kirjautuminen Moodleen... 2 Ensimmäinen kirjautuminen Moodleen... 2 Salasanan vaihto... 2 Oma käyttäjäprofiili... 3 Työskentely
I-VALO VEGA FIXING MODULE B300
 Nämä ohjeet eivät välttämättä sisällä kaikkien valaisinten tai tarvikkeiden yksityiskohtaisia ohjeita, eivätkä ohjeista kaikissa asennukseen ja käyttöön tai huoltoon liittyvissä tilanteissa. / These instructions
Tökötti eli koivuntuohiterva Birch bark tar
 Tökötti eli koivuntuohiterva Birch bark tar Tököttiä, eli koivuntuohitervaa tai purupihkaa, käytettiin kivikaudella esimerkiksi kivityökalujen kiinnittämiseen puisiin varsiin ja veneiden paikkaamiseen.
C470E9AC686C
 INVENTOR 17 VALUOSAN SUUNNITTELU http://help.autodesk.com/view/invntor/2017/enu/?guid=guid-b3cd4078-8480-41c3-9c88- C470E9AC686C About Mold Design in Inventor Mold Design provides integrated mold functionality
Kuivajääpuhallus IB 7/40 Advanced
 Kuivajääpuhallus IB 7/40 Advanced Vakiovarusteet: Suutinrasva Viuhkasuutin Työkalu suuttimenvaihtoon 2 kpl Puhallusletku, sähköliitäntä ja pikaliitin Jääpuhalluspistooli (ergonominen ja turvallinen) Kuivajään
AYYE 9/ HOUSING POLICY
 AYYE 9/12 2.10.2012 HOUSING POLICY Mission for AYY Housing? What do we want to achieve by renting apartments? 1) How many apartments do we need? 2) What kind of apartments do we need? 3) To whom do we
TYÖKALUVAUNU JA YLÄKAAPPI
 MEG95 TYÖKALUVAUNU JA YLÄKAAPPI Käyttöohje (Alkuperäisten käyttöohjeiden käännös) FI Onnittelut tämän laadukkaan Meganex-tuotteen valinnasta. Lue käyttöohjeet huolellisesti ennen laitteen käyttöä ja noudata
Vakiomallisten kuumakanavajärjestelmien kytkeminen Wiring of standard hotrunner systems
 Teknillinen dokumentaatio Technical documentation E. Vakiomallisten kuumakanavajärjestelmien kytkeminen Wiring of standard hotrunner systems Version.0 ! Tärkeä turvaohje / Important safety instruction
MEETING PEOPLE COMMUNICATIVE QUESTIONS
 Tiistilän koulu English Grades 7-9 Heikki Raevaara MEETING PEOPLE COMMUNICATIVE QUESTIONS Meeting People Hello! Hi! Good morning! Good afternoon! How do you do? Nice to meet you. / Pleased to meet you.
SIRKKELINTERÄN TEROITUSKONE SLIPMASKIN FÖR SÅGKLINGOR SAW BLADE SHARPENING MACHINE
 XWS024 SIRKKELINTERÄN TEROITUSKONE SLIPMASKIN FÖR SÅGKLINGOR SAW BLADE SHARPENING MACHINE Käyttöohje Bruksanvisning Instruction manual Alkuperäisten käyttöohjeiden käännös Översättning av originalbruksanvisning
C B. min 4mm (0,16 ) 2 English 1153988-26 Rev.4 2014-04-15
 2 English 1153988-26 Rev.4 2014-04-15") GB Operator s manual 6-26 SE Bruksanvisning 27-47 DK Brugsanvisning 48-69 FI Käyttöohje 70-91 NO Bruksanvisning 92-112 FR Manuel d utilisation 113-135 NL Gebruiksaanwijzing 136-158 IT Istruzioni per l
GB Operator s manual 6-26 SE Bruksanvisning 27-47 DK Brugsanvisning 48-69 FI Käyttöohje 70-91 NO Bruksanvisning 92-112 FR Manuel d utilisation 113-135 NL Gebruiksaanwijzing 136-158 IT Istruzioni per l
Information on Finnish Language Courses Spring Semester 2018 Päivi Paukku & Jenni Laine Centre for Language and Communication Studies
 Information on Finnish Language Courses Spring Semester 2018 Päivi Paukku & Jenni Laine 4.1.2018 Centre for Language and Communication Studies Puhutko suomea? -Hei! -Hei hei! -Moi! -Moi moi! -Terve! -Terve
Lab SBS3.FARM_Hyper-V - Navigating a SharePoint site
 Lab SBS3.FARM_Hyper-V - Navigating a SharePoint site Note! Before starting download and install a fresh version of OfficeProfessionalPlus_x64_en-us. The instructions are in the beginning of the exercise.
Innovative and responsible public procurement Urban Agenda kumppanuusryhmä. public-procurement
 Innovative and responsible public procurement Urban Agenda kumppanuusryhmä https://ec.europa.eu/futurium/en/ public-procurement Julkiset hankinnat liittyvät moneen Konsortio Lähtökohdat ja tavoitteet Every
2017/S Contract notice. Supplies
 Supplies 153936 2017 25/04/2017 S80 - - Supplies - Contract notice - Open procedure I. II. III. IV. VI. -: Medical equipments, pharmaceuticals and personal care products 2017/S 080-153936 Contract notice