Manual for Orangery 3,16x3,63x2,89m
|
|
|
- Katriina Krista Mäkinen
- 6 vuotta sitten
- Katselukertoja:
Transkriptio
1 Manual for Orangery 3,16x3,63x2,89m

2 IMPORTANT Please read these instructions carefully before you start to assemble this product. Please carry out the steps in the order set out in these instructions. Keep these instructions in a safe place for future reference. Safety Advice For safety purposes we strongly recommend the product to be assembled by at least two people. Some parts may have sharp edges. Please be careful when handling components. Always wear gloves, eye protection, and long sleeves when assembling or performing any maintenance on your product. Do not attempt to assemble the product in windy or wet conditions. Do not attempt to assemble the product if you are tired, have taken drugs, medications or alcohol, or if you are prone to dizzy spells. Dispose of all plastic bags safely - keep them away from children's reach. Keep children away from the assembly area. When using a stepladder or power tools, make sure that you are following the manufacturer's safety advice. Keep roof and gutters clear of snow, dirt & leaves. Heavy snow load on the roof can make it unsafe to stand below or nearby. Do not lean against or push the product during construction. Hot items such as recently used grills, blowtorches etc. must not be stored inside the product. Heavy or sharp articles should not be leaned against the wall panels. Make Sure there are no hidden pipes or cables in the ground before inserting the pegs (not supplied) Do not touch overhead power cables with the aluminum profiles. If color was scratched during assembly it can be fixed. Note: Th is product must be anchored on to a leveled surface and solid foundation to ensure its stability. Make sure that screws and anchors are compatible with foundation type. Make sure that there are no obstructions between the assembly area and the final position. Cleaning Instructions In order to clean the product, use a mild detergent solution and rinse with cold clean water. Do not use acetone, abrasive cleaners, or other special detergents to clean the panels. Clean the product once assembly is complete. Before Assembly Choose your site carefully before beginning assembly. The ground surface must be perfectly flat and leveled. Choose a sunny area, away from overhanging trees. Do not position your product in an area exposed to excessive winds. The product must be positioned and fixed onto a flat leveled surface. We strongly recommend to secure this product directly onto a solid foundation. Use the pre-drilled holes in the steel base. Complete site preparation before unpacking parts and beginning assembly. Sort the parts and check against the content parts list. Parts should be laid out close at hand. Keep all small parts (screws etc.) in a bowl so they do not get lost. Please consult your local authorities if any permits are required prior to constructing the product. Tools & Equipment T001 (Supplied)

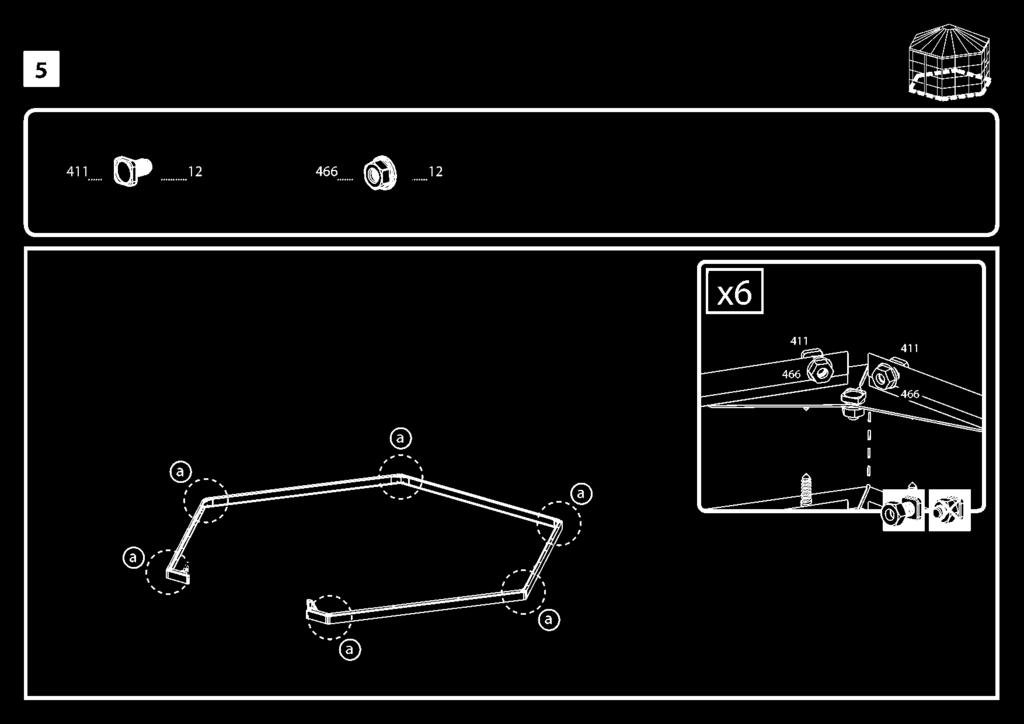
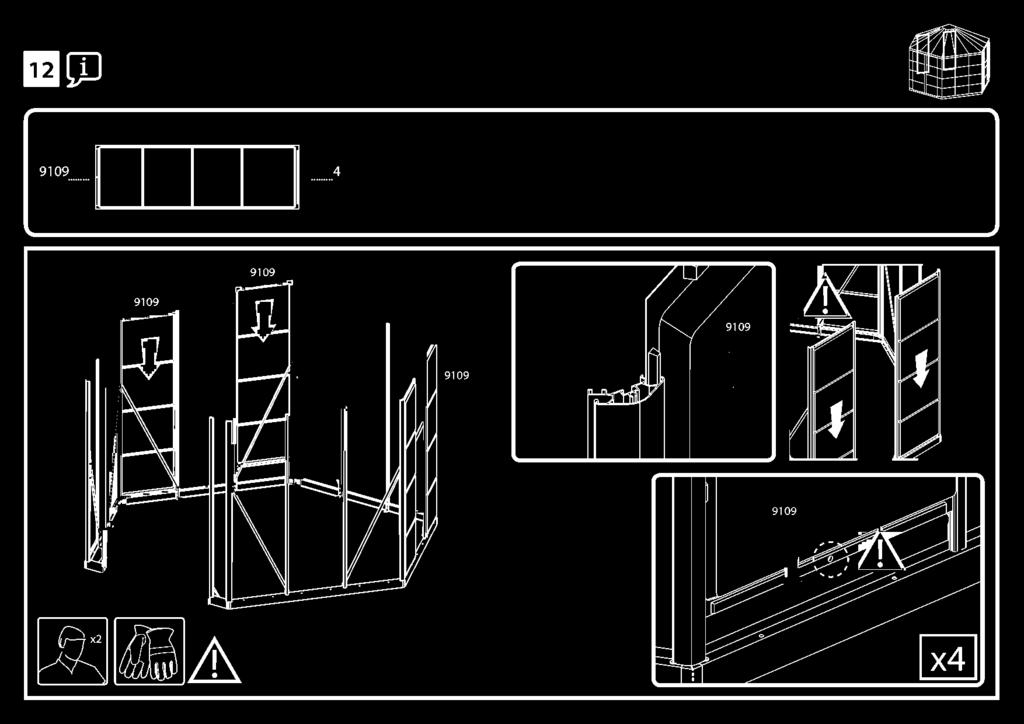
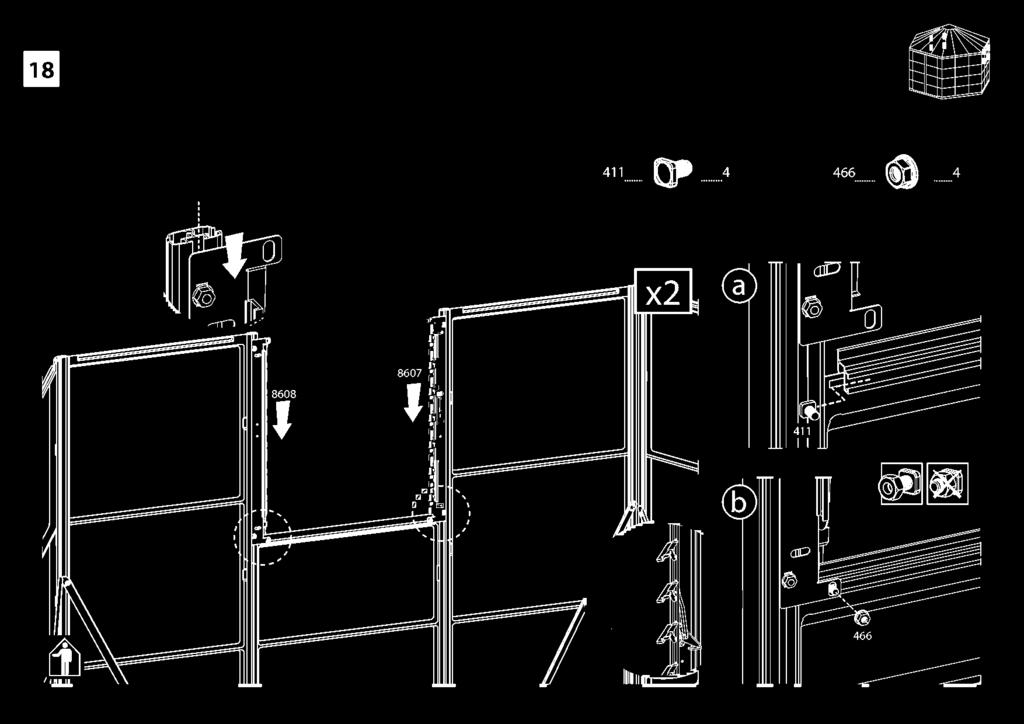
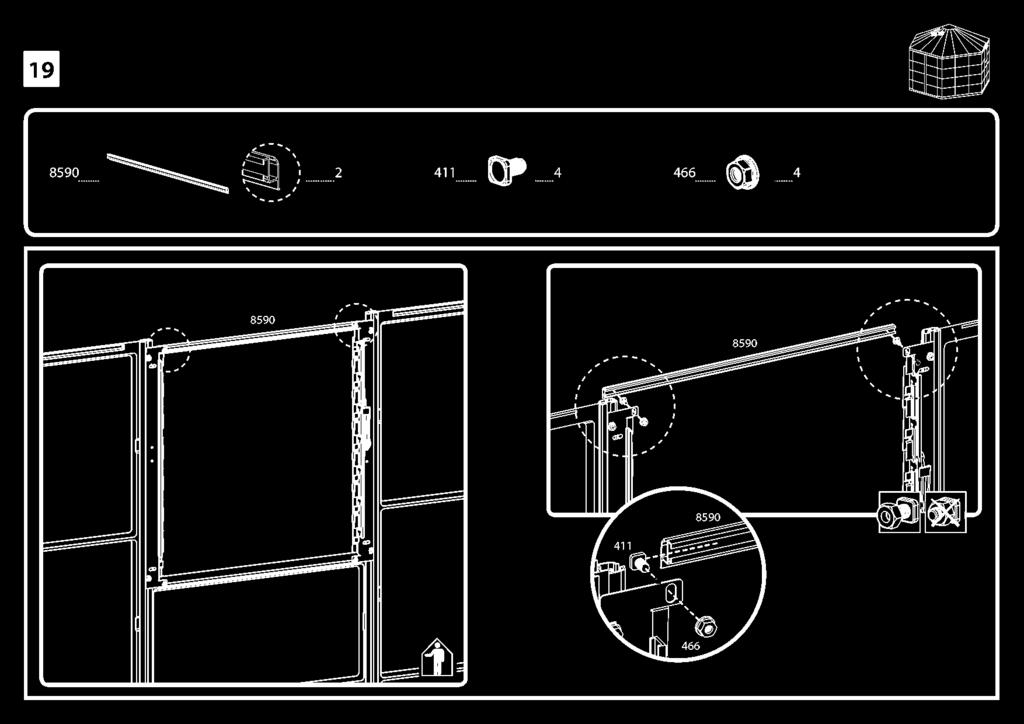
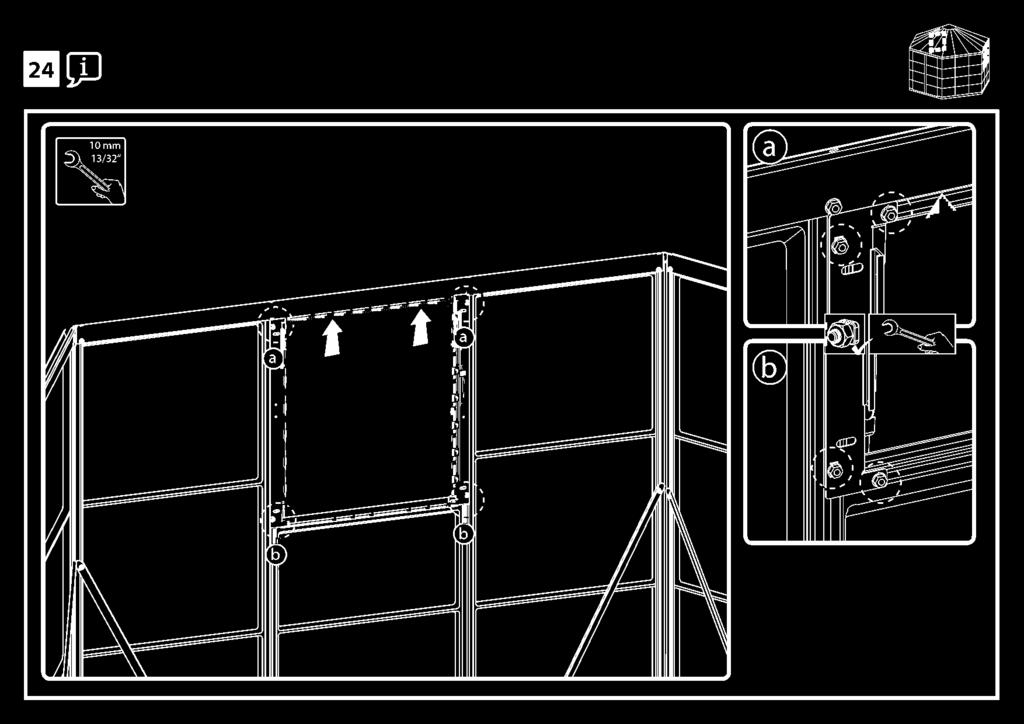
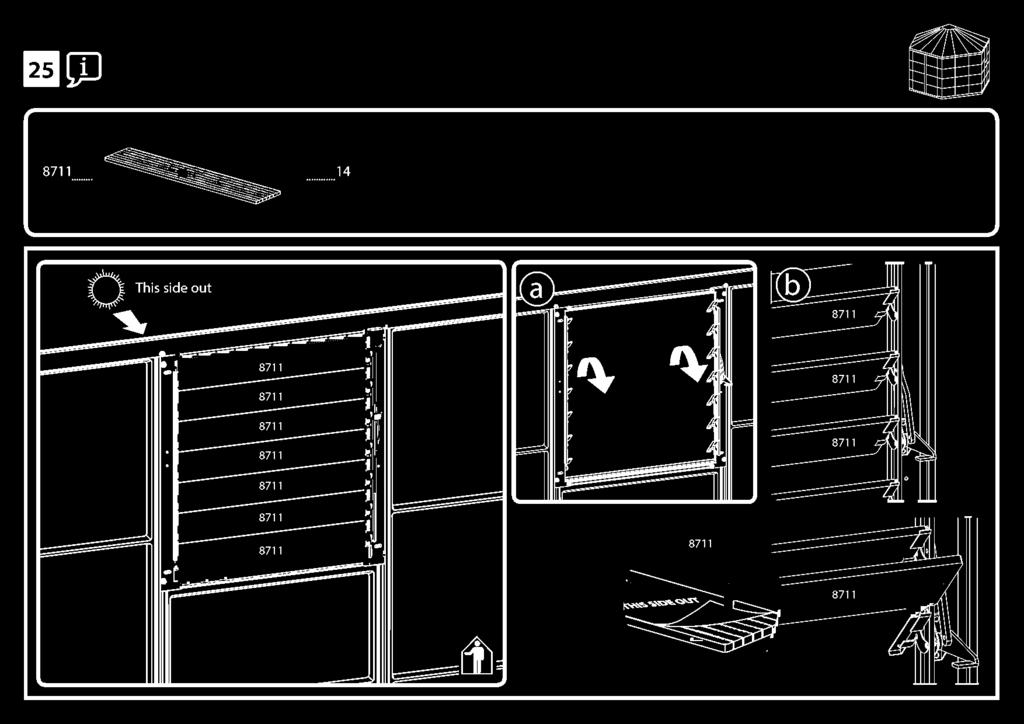
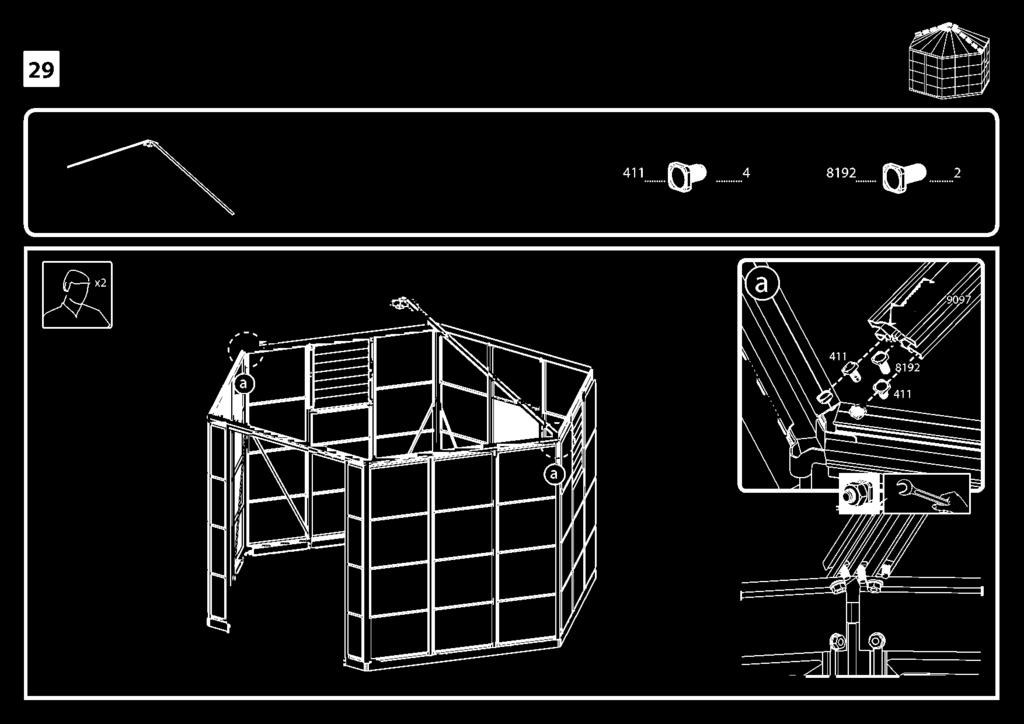
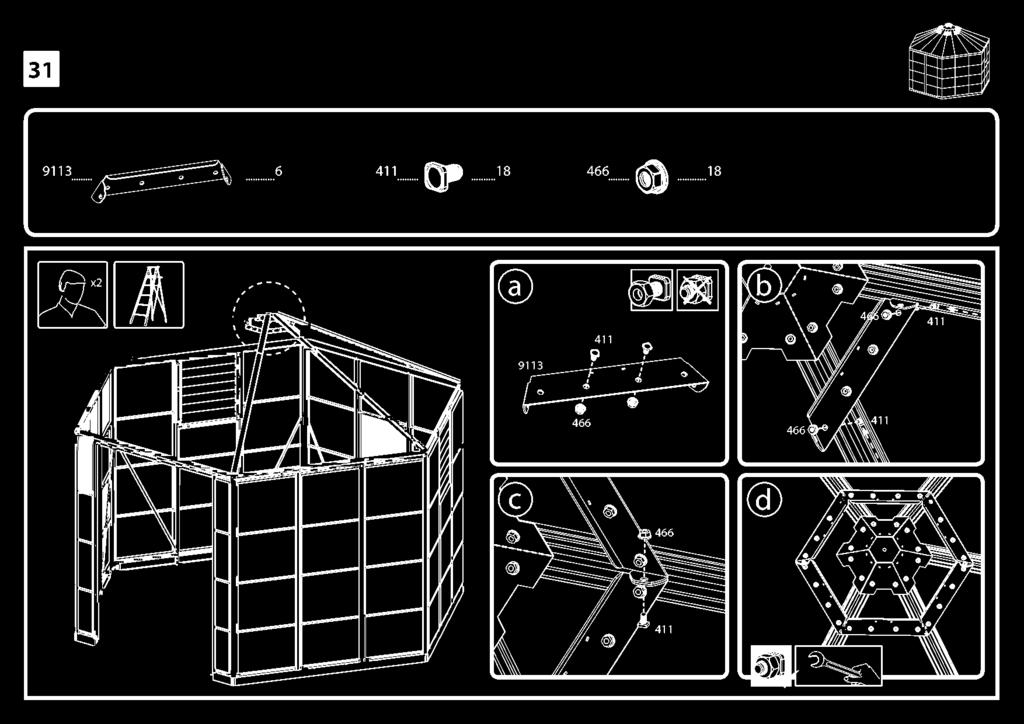
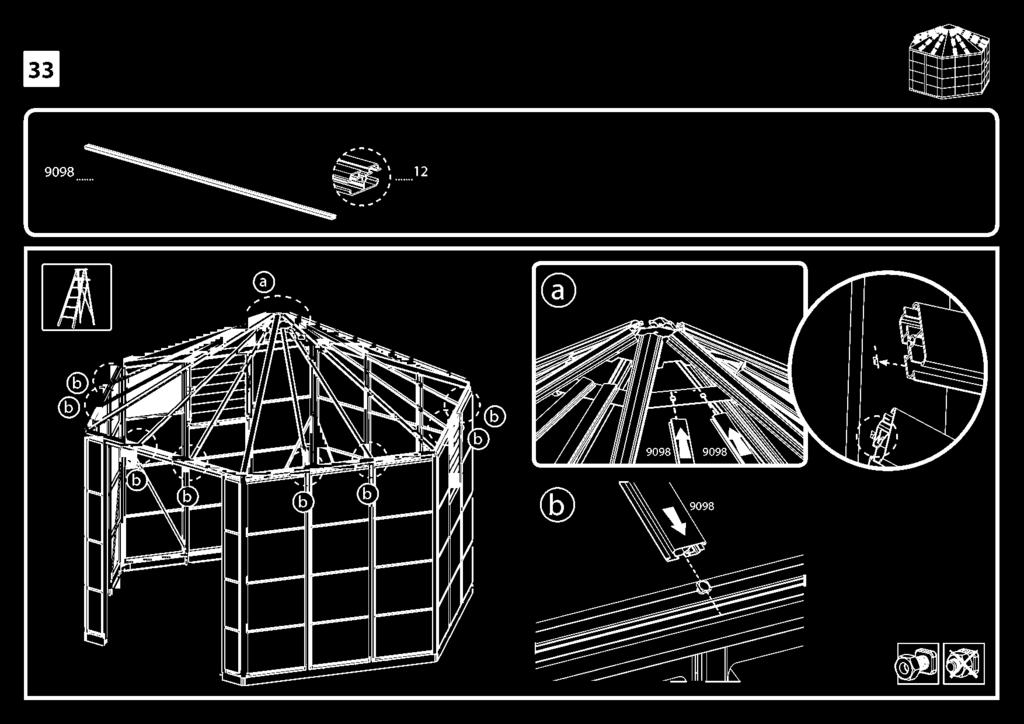
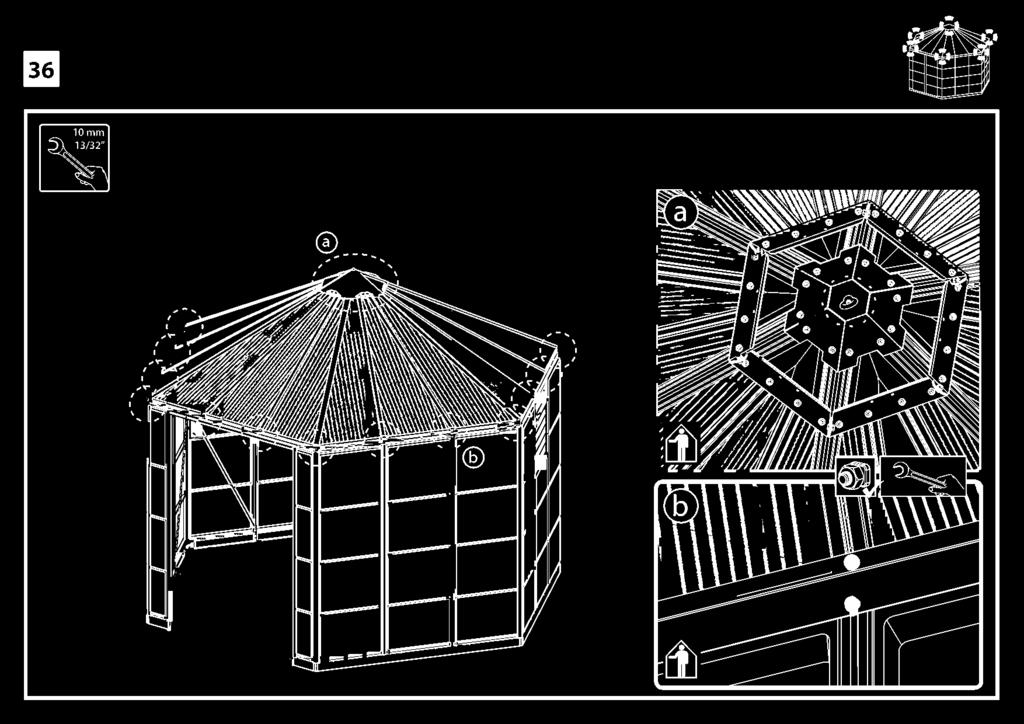
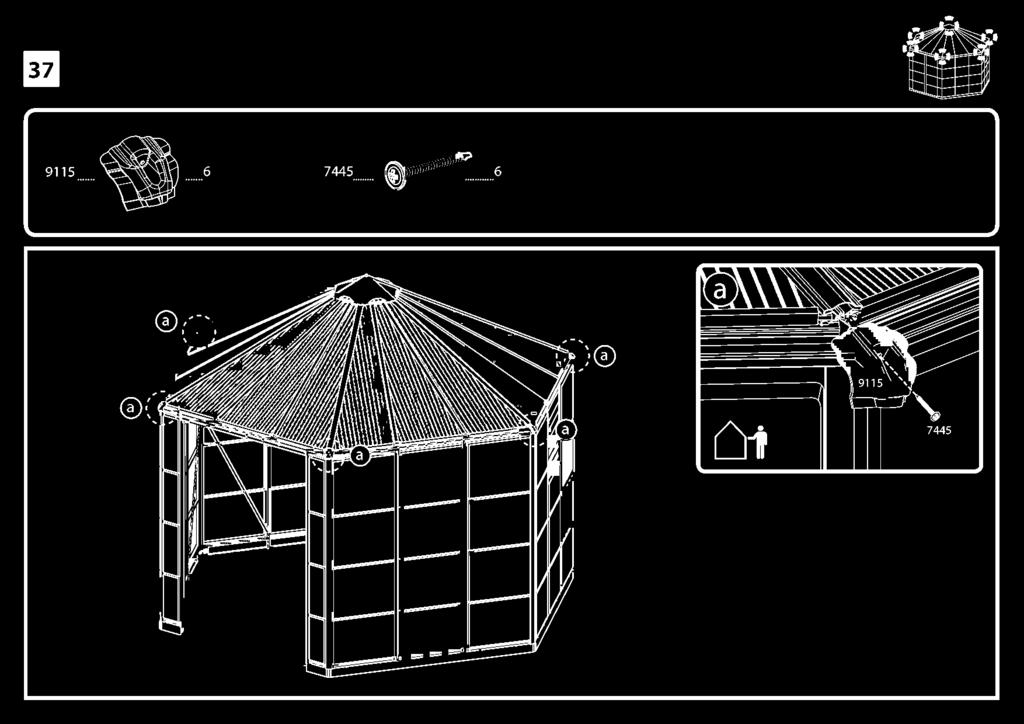
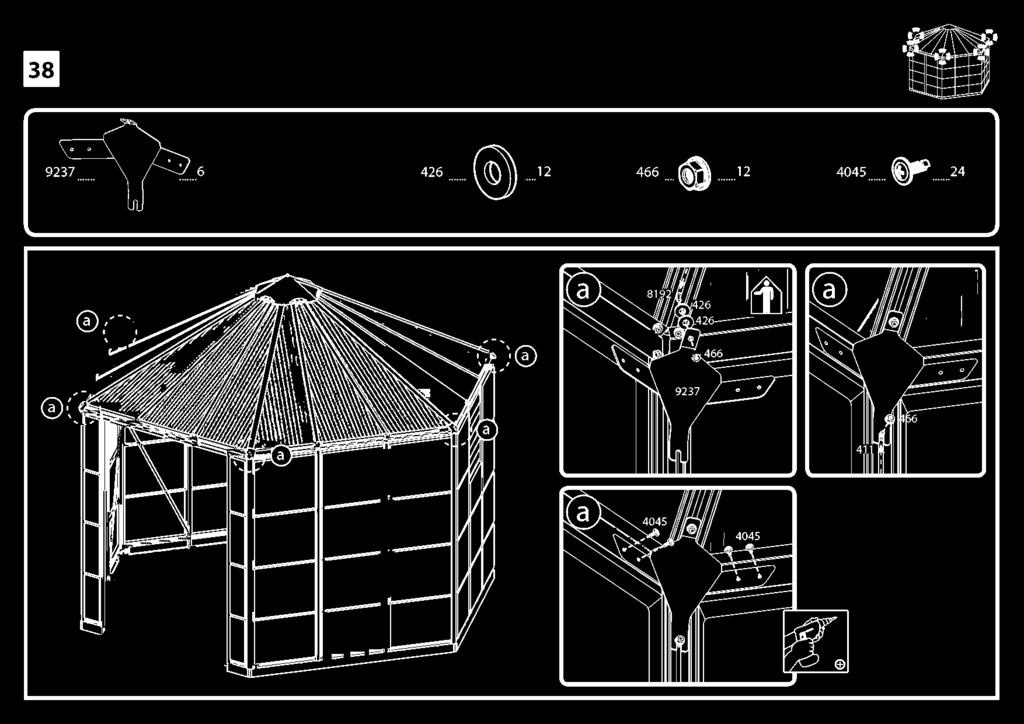
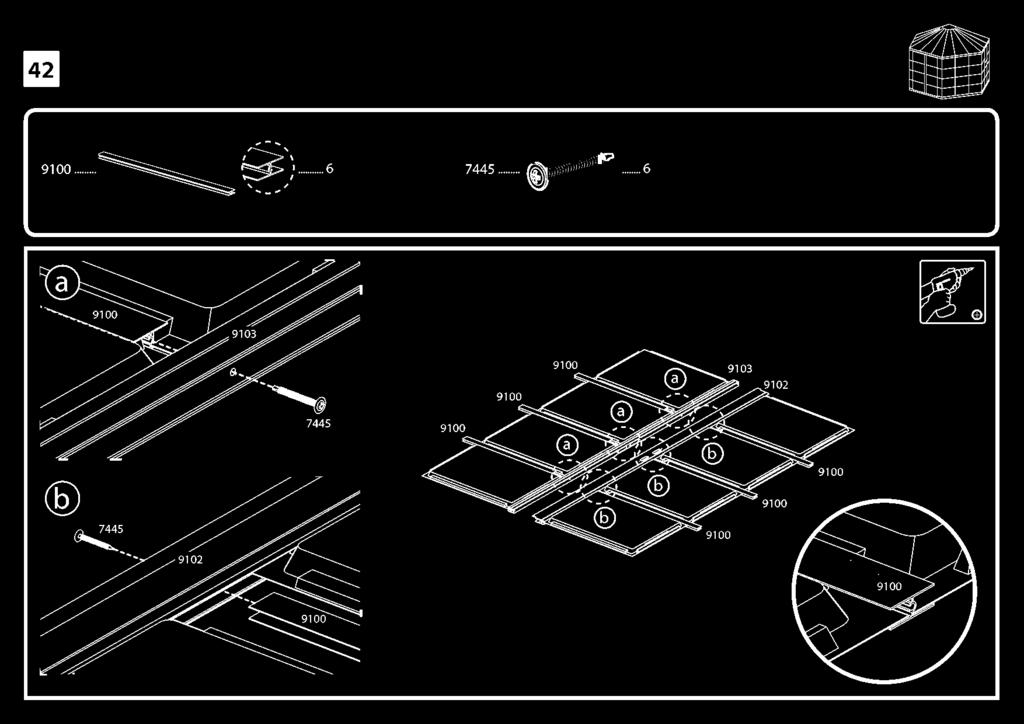
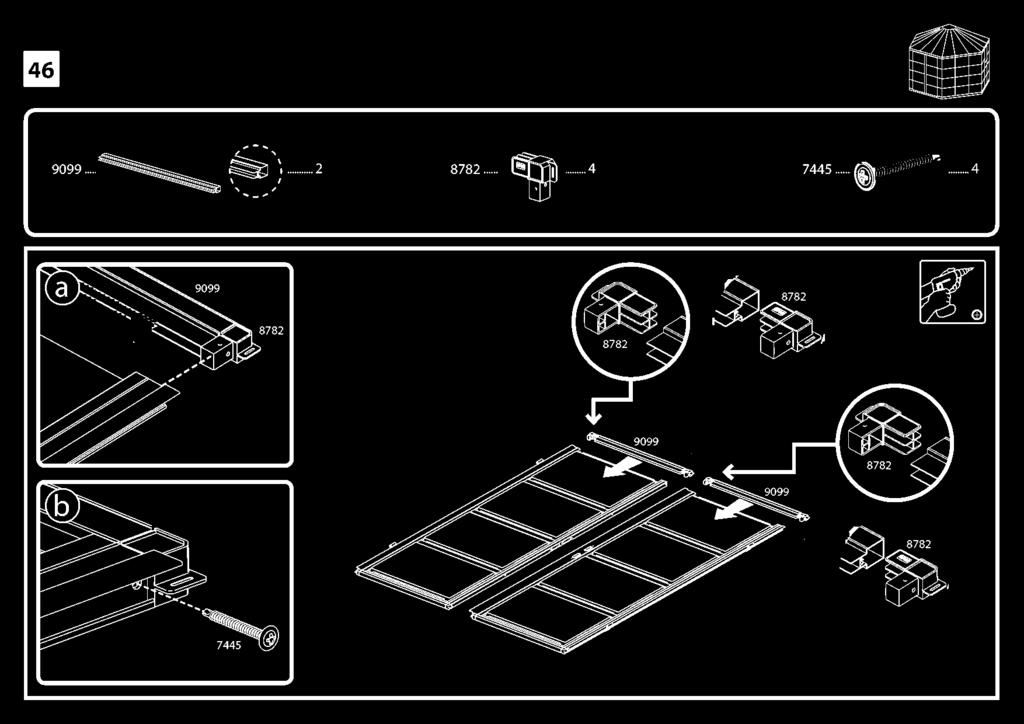
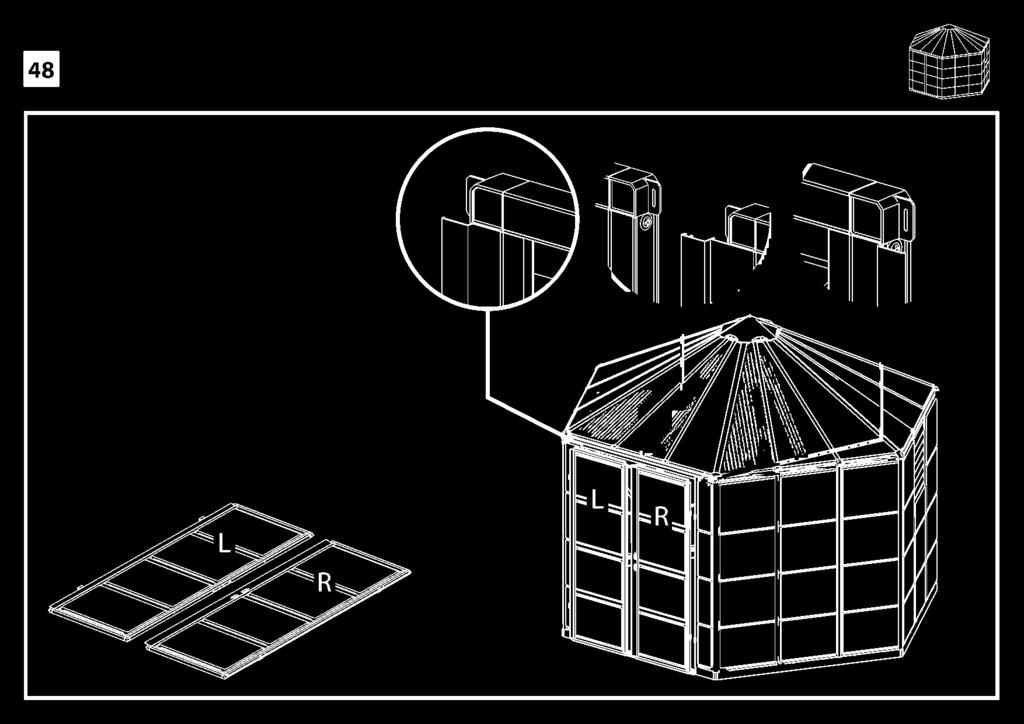
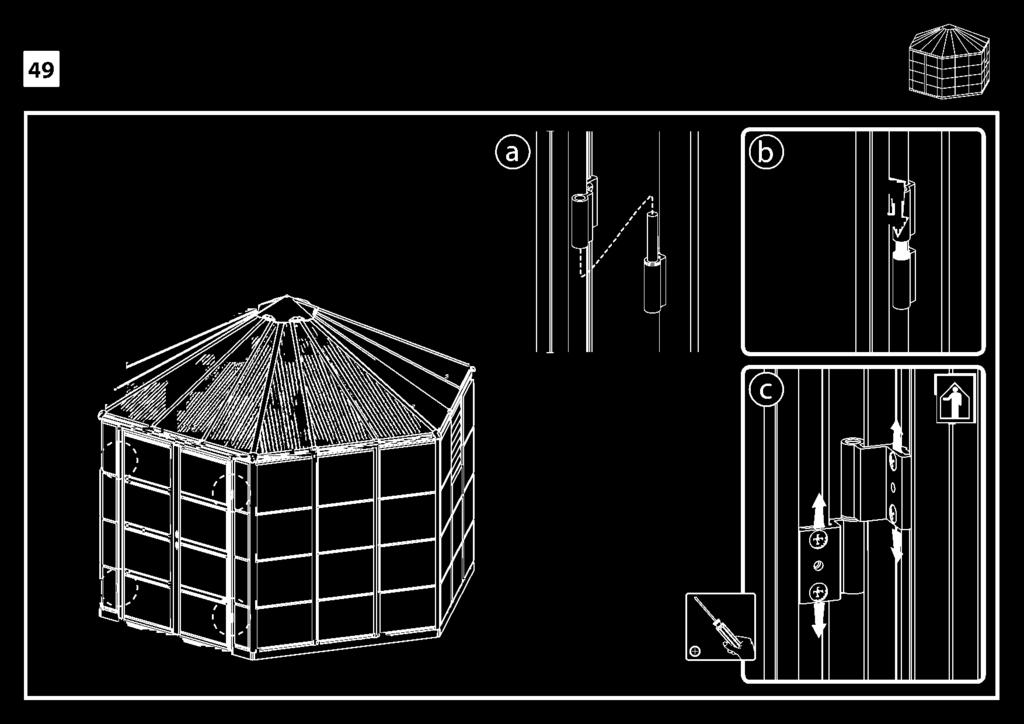
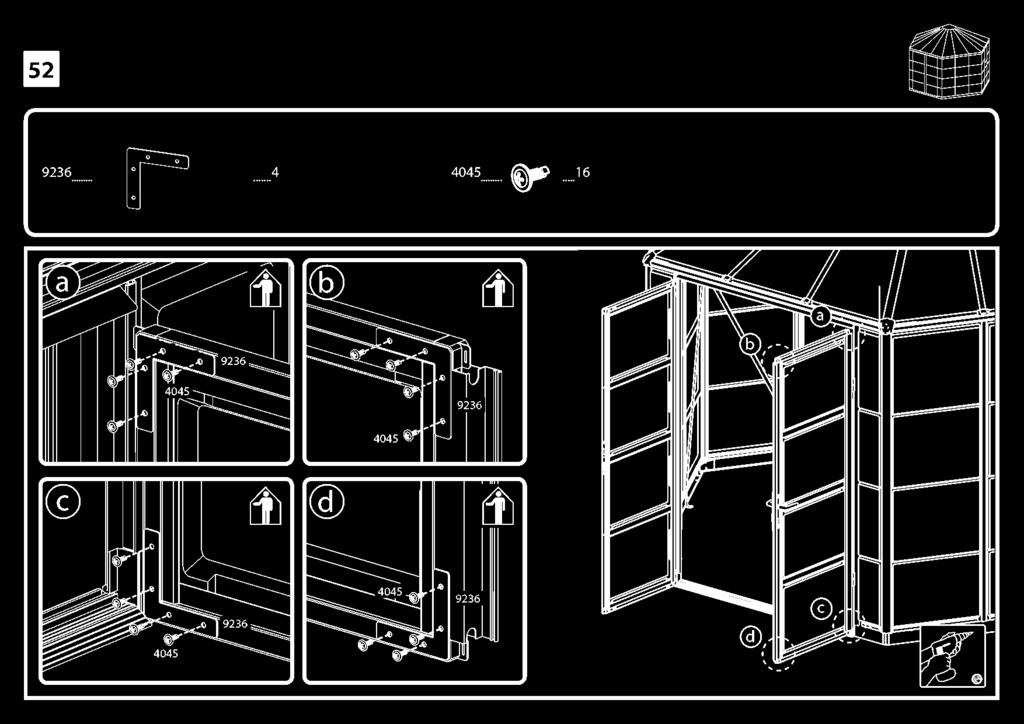
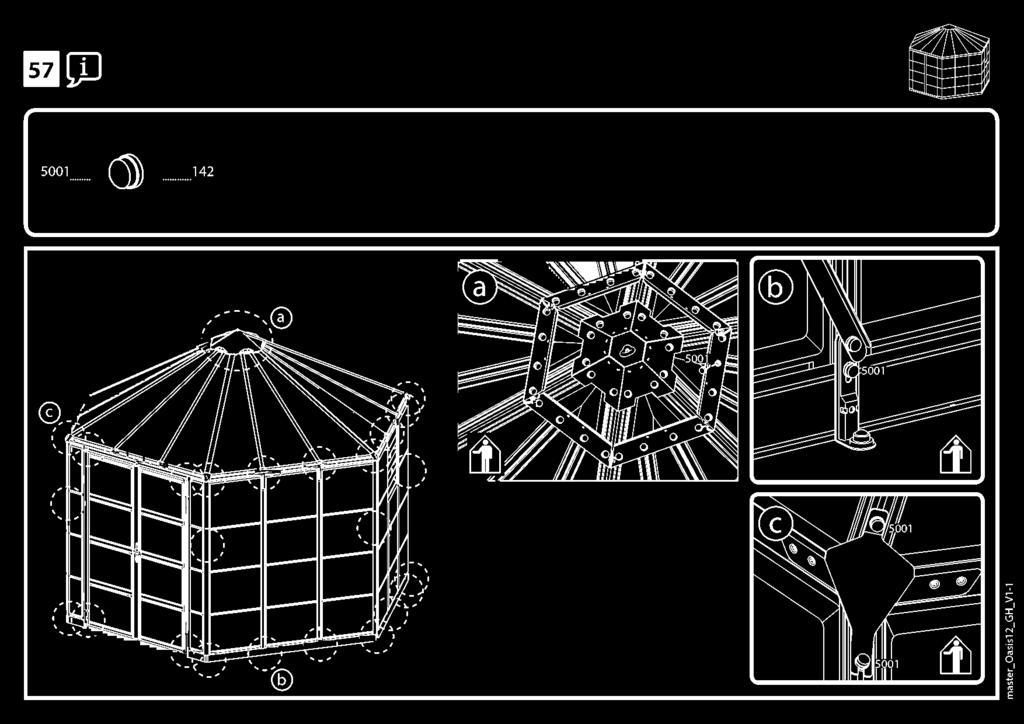
3 During Assembly Make sure the base is square by measuring the diagonals and level by using a spirit level. You may use silicone lubricant spray in order to help you slide the panels into the profiles. Do not spray the polycarbonate panels. Use a rubber mallet if necessary. All panels with the stamped words "THIS SIDE OUT" must be facing out to create full UV protection. Remove plastic sticker as panels are locked in place. Screws 411 and nuts 412 are used thruoghout the assembly process. Screws 411 are to be assembled from the outside and nuts 412 from the inside of the greenhouse. Do not fasten screws and nuts (411 & 412) more than 23- turns only. Do not tighten them until completion of the panels'assembly, if not specified otherwise. However, in some steps, temporary tightening of a few screws may be needed to prevent a profile from falling. When encountering the information icon, please refer to the relevant assembly step for additional comments and assistance. This icon indicates that the installer should be inside the product. U. Attention Di This icon indicates that the installer should be outside the product. Note: Firmly connect t e product to a leve surface immediately after completion of the assembly. Anchoring this product to the ground is essential to its stability and rigidity. It is required to complete this stage in order for your warranty to be valid. During assembly use a soft surface below the parts to avoid scratches and damages. Steps Step 12: Note the panels' direction. Use gloves and beware of the panels'sharp edges. Step 13: Decide on the louvre window's location before assembly. It can only be set in the middle of the wall (5 options). Step 17: Note, insert the screws into the rectangular holes. Step 24: Make sure the louvre window's upper profile is firmly attached to the gutter's profile, only then you can tighten the screws. Step : Please note you install the panels with the UV protected side out (marked with "THIS SIDE OUT") remove plastic sticker as panels are locked in place. Step 41: It is recommended to assemble the doors on a table, from this step until attaching them to the product. Be careful not to scratch the parts. Step 56: The screws and plugs supplied with this product are suitable for concrete foundation. Please use suitable screws and plugs for any other foundation type. Step 57: Make sure all screws are firmly tightened prior to covering them with part # * Please tighten all screws when completing assembly.
4 TARKEAA Lue nama ohjeet huolellisesti ennen kuin aloitat tuotteen kokoamisen. Suorita vaiheet siina jarjestyksessa, kuin ne on naissa ohjeissa esitetty. Sailyta nama ohjeet turvallisessa paikassa myohempaa tarvetta varten. Turvaohjeita Turvallisuussyista suosittelemme, etta vahintaan kaksi henkiloa suorittaa tuotteen kokoamisen. Joissakin osissa voi olla teravia reunoja. Ole varovainen kasitellessasi osia. Kayta aina kasineita, kenkia, suojalaseja ja pitkahihaisia vaatteita, kun kasittelet tuotetta tai teet sille mitaan huoltotoita. Ala yrita koota tuotetta tuulisissa tai marissa olosuhteissa. Ala yrita koota tuotetta jos olet vasynyt, huumeiden, laakkeiden tai alkoholin vaikutuksen alaisena, tai jos sinulla on taipumusta huimaukseen. Havita kaikki muovipussit turvallisesti - pida ne poissa pienten lasten ulottuvilta. Pida lapset poissa kokoamisalueelta. Kun kaytat tikkaita tai sahkotyokaluja, niin varmista, etta noudatat valmistajan turvaohjeita. Pida katto ja kouru puhtaana lumesta, liasta ja lehdista. Painava lumikuorma katolla voi aiheuttaa vaaran sen alla tai sita lahella seisoville. Ala nojaa tuotteeseen tai tyonna sita rakennustyon aikana. Kuumia esineita, kuten askettain kaytettya grillia, ei saa sailyttaa tuotteen sisapuolella. Raskaita tai teravia esineita ei saa asettaa nojaamaan seinapaneeleita vasten. Varmista, etta maassa ei ole piilossa olevia putkia tai kaapeleita ennen kuin asetat tapit (eivat sisally toimitukseen) paikoilleen Ala kosketa ylapuolella olevia sahkojohtoja alumiiniprofiileilla. Jos vari naarmuuntuu kokoamisen aikana, se voidaan korjata. Huomaa:Tama tuote on ankkuroitava tasatulle pinnalle ja kiinteaan perustukseen, jotta varmistetaan sen vakaus. Varmista, etta ruuvit ja ankkurit ovat perustustyypille sopivia. Varmista, etta kokoamisalueen ja lopullisen sijoituspaikan valilla ei ole esteita. Puhdistusohjeet yllapito Kayta tuotteen puhdistamiseen mietoa pesuaineliuosta ja huuhtele se kylmalla, puhtaalla vedella. Ala kayta asetonia, hankaavia puhdistusaineita tai muita erikoispesuaineita paneelien puhdistamiseen. Puhdista tuote, kun kokoaminen on valmis. Tyokalut ja valineet Ennen kokoamista Valitse paikka huolellisesti ennen kokoamisen aloittamista. Alustan on oltava taysin tasainen ja suora. Valitse aurinkoinen alue, jossa ei ole puita ylapuolella. Ala sijoita tuotetta alueelle, jossa se altistuu voimakkaille tuulille. Tuote on sijoitettava ja kiinnitettava tasaiselle, tasatulle pinnalle. Suosittelemme vahvasti kiinnittamaan tuotteen suoraan kiinteaan perustukseen. Kayta siihen terasperustan esiporattuja reikia. Tee paikan valmistelu loppuun ennen kuin purat osat pakkauksesta ja aloitat kokoamisen. Lajittele osat ja tarkista ne osaluettelon avulla. Osat on asetettava kaden ulottuville. Pida pienet osat (ruuvit yms.) astiassa, jotta ne eivat katoa. Ota yhteytta paikallisiin viranomaisiin saadaksesi tietoja, tarvitaanko tuotteen rakentamiseen lupia. T001 (sisaltyy toimitukseen)

5 Kokoamisen aikana Varmista, etta pohja on nelikulmio mittaamalla ristimitat kulmasta kulmaan, ja tasaa se vesivaa'an avulla. Voit kayttaa silikonivoitelusuihketta helpottamaan paneelien liu'uttamista profiileihin. Ala suihkuta ainetta polykarbonaattipaneeleihin. Kayta tarvittaessa kumivasaraa. Kaikki paneelit, joissa on merkinta "THIS SIDE OUT" (tama puoli ulospain) on asetettava ulospain, jotta muodostuu taysi UV-suojaus. Poista muovitarrat, kun paneelit lukitaan paikoilleen.. Ruuveja 411 ja muttereita 412 kaytetaan lapi koko kokoamisprosessin. Ruuvit 411 asennetaan kasvihuoneen ulkopuolelta, ja mutterit 412 kasvihuoneen sisapuolelta. Ala kiinnita ruuveja ja muttereita (411 ja 412) enempaa kuin 23- kierrosta. Ala kirista niita ennen kuin paneelien asennus on valmis, ellei erikseen muuta ohjeisteta. Joissakin vaiheissa saatetaan kuitenkin tarvita muutaman ruuvin valiaikaista kiristamista, jotta estetaan profiilin putoaminen. Kun naet tietokuvakkeen, katso vastaavaa asennusohjeen vaihetta saadaksesi lisaohjeita ja apua. Tama kuvake ilmaisee, etta asentajan on oltava tuotteen sisapuolella. Tama kuvake ilmaisee, 11 etta asentajan on oltava tuotteen ulkopuolella. Huomaa: Kiinnita tuote tiukasti tasaiselle pinnalle heti, kun kokoaminen on valmis. Taman tuotteen ankkurointi maahan on olennaista sen vakaudelle ja kestavyydelle. Tama vaihe on suoritettava, jotta takuu on voimassa. rjk Attention Kayta kokoamisen aikana pehmeaa pintaa osien alla, jotta valtetaan niiden naarmuuntuminen ja vahingoittuminen. Vaiheet Vaihe 12: Huomioi paneelien suunta. Kayta kasineita ja varo paneelien teravia reunoja. Vaihe 13: Valitse saleikkunan paikka ennen kokoamista. Se voidaan asentaa vain seinan keskelle (5 vaihtoehtoa). Vaihe 17: Huomaa, aseta ruuvit suorakulmaisiin reikiin. Vaihe 24: Varmista, etta saleikkunan ylaprofiili on tiukasti kiinni kourun profiilissa, ja kirista ruuvit vasta sitten. Vaiheet : Varmista, etta asennat paneelit UV-suojattu puoli ulospain (merkitty "THIS SIDE OUT" (tama puoli ulospain)), ja poista muovitarrat, kun paneelit lukitaan paikoilleen. Vaihe 41: Suositellaan, etta kokoat ovet poydalla tasta vaiheesta alkaen sinne saakka, kun Iiitat ne tuotteeseen.varo, ettet naarmuta osia. Vaihe 56:Taman tuotteen mukana toimitetut ruuvit ja tulpat sopivat betoniperustukselle. Muilla perustustyypeilla kayta sopivia ruuvia ja tulppia. Vaihe 57: Varmista, etta kaikki ruuvit on kiristetty tiukalle ennen kuin peitat ne osalla #5001. * Kirista kaikki ruuvit, kun viimeistelet kokoamisen.

6 IMPORTANT Veuillez lire attentivement ces instructions avant de &tauter le montage du produit. Veuillez suivre les etapes dans l'ordre indique dans ces instructions. Conservez ces instructions en lieu sur pour reference ulterieure. Consignes de securite Pour des raisons de securite, nous recommandons vivement que le produit soft assemble par au moins deux personnes. Certaines pieces presentent des bords metalliques.veuillez manipuler les composants avec precaution. Portez des gants, des chaussures et des lunettes de securite tout au long de l'assemblage. N'essayez pas d'assembler le produit en cas de vent ou de conditions humides. Jetez precautionneusement tous les sacs plastiques - tenez-les hors de portee des enfants. Tenez les enfants a distance de la zone de montage. N'essayez pas d'assembler le produitsi vous etes fatigue, avez pris des medicaments ou consommé de l'alcool, ou si vous etes enclin aux vertiges. Si vous utilisez un escabeau ou des outils electriques, assurez-vous de respecter les consignee de securite du fabricant. Eliminez la neige, la terre et les feuilles du toit et des gouttieres. Une lourde charge de neige sur le toit peut rendre dangereux le fait de se tenir debout en dessous ou a proximite. Ne vous appuyez pas contre le produit ou ne le poussez pas pendant sa construction. Les objets lourds ou coupants ne doivent pas etre appuyes contre les panneaux muraux. Assurez-vous n'y a aucun tuyau ou cable cache dans le sol avant thinserer les piquets (non fournis). Ne touchez pas les cables electriques aeriens avec des profiles en aluminium. Si la couleur a ete rayee lors du montage, elle peut etre corrigee. Remarque : ce produit dolt etre ancre sur une surface nivelee et une base solide pour assurer sa stabilite. Assurez-vous que les vis et les ancrages sont compatibles avec les fondations. Instructions de nettoyage Pour nettoyer le produit, utilisez une solution detergente douce et rincez a l'eau claire froide. N'utilisez pas d'acetone, de nettoyants abrasifs, ou autres detergents speciaux pour nettoyer les panneaux. Nettoyez le produit une fois le montage termine. Outils & Equipement Avant l'assemblee Choisissez votre site avec soin avant de commencer l'assemblage. La surface du sol dolt etre parfaitement plate et nivele. Choisissez un endroit ensoleille, loin des arbres en surplomb. Ne placez pas votre produit dans une zone exposee a des vents excessifs. Le produit dolt etre positionne et fixe sur une surface plate et nivelee. Nous vous recommandons fortement de fixer ce produit directement sur une base solide. Utilisez les trous pre-perces dans la base en acier. Terminez la preparation du site avant de deballer les pieces et de commencer l'assemblage. Le produit dolt etre positionne et fixe sur une surface plate et nivelee. Nous vous recommandons fortement de fixer ce produit directement sur une base solide. Utilisez les trous pre-perces dans Ia base en acier. Ordonnez les pieces et verifiez-les avec Ia liste des pieces contenues. Les pieces doivent etre disposees a portee de main. Rangez toutes les petites pieces (vis, etc.) dans un bol pour ne pas les egarer. Veuillez consulter les autorites locales au cas oil des permis sont necessaires pour Ia construction du produit. T001 - outil special


7 Pendant l'assemblage Assurez-vous que la base soit bien carree en mesurant les diagonales et le nivelage a l'aide d'un niveau a bulle. Vous pouvez utiliser un spray de silicone lubrifiant afin de vous aider a glisser les panneaux dans les profils. Ne pulverisez pas les panneaux en polycarbonate. Utilisez un maillet en caoutchouc si necessaire. Tous les panneaux estampilles THIS SIDE OUT doivent etre orientes vers l'exterieur pour assurer une protection UV integrale. Retirez les stickers en plastique alors que les panneaux sont verrouilles en place. Lorsque vous rencontrez l'icone Informations, veuillez vous referer a l'etape d'assemblage pertinente afin d'obtenir davantage de commentaires et d'aide. Les vis 411 et emus 412 servent tout au long de la procedure. Les vis 411 se placent l'exterieur et les emus 412 a l'interieur de la serre. Ne serrez les vis et emus (411 & 412) que de 2 a 3 tours, pas plus. Ne les serrez pas tant que l'assemblage n'est pas completement termine, sauf indication contraire. Cependant, la realisation de certaines etapes peut necessiter le serrage provisoire de quelques vis pour empecher un profile de tomber en attendant gull soit entierement integre a ('ensemble de la structure dans les etapes suivantes. Um] Cette icone indique que l'installateur doit etre a hinterieur du produit Atencion n11. Cette icone indique que l'installateur doit etre en dehors du produit. Remarque: Cette etape ancrage du produit au sol est essentielle a sa stabilite et a sa rigidite, elle est de plus necessaire pour assurer la validite de votre garantie. Connectez fermement le produit a une surface nivelee immediatement apres la fin de l'assemblage. Pendant le montage, placez une surface souple sous les pieces pour eviter de les erafier ou de les endommager. Etapes Etape 12: Notez la direction des panneaux. Utilisez des gants et faites attention aux aretes vives du panneau. Etape 13: Determinez ('emplacement des fenetres a grille avant l'assemblage. II ne peut etre place qu'au milieu du mur (5 options). Etape 17: Remarque, inserez les vis dans les trous rectangulaires. Etape 24: Assurez-vous que le profile superieur de la fenetre a lamelles est fermement fixe au profile de la gouttiere. C'est alors seulement que vous pourrez serrer les vis. Etape : Veuillez noter que vous installez les panneaux avec le cote protégé des UV (indique par"this SIDE OUT"), enlevez l'autocollant en plastique car les panneaux sont verrouilles en place. Etape 41: II est recommande d'assembler les portes sur une table, a partir de cette etape, jusqu'a leur fixation au produit. Veillez a ne pas rayer les pieces. Etape 56: Les vis et les bouchons fournis avec ce produit conviennent aux fondations en beton. Veuillez utiliser des vis et des chevilles appropriees pour tout autre type de fondation. Etape 57: Assurez-vous que toutes les vis sont bien serrees avant de les recouvrir de la piece # * Serrez toutes les vis une fois l'assemblage termine.

8 co WICHTIG Bitte lesen Sie die vorliegenden Anweisungen sorgfaltig durch, bevor Sie mit dem Zusammenbau dieses Schuppens beginnen. Bitte fuhren Sie die Schritte in derin der vorliegenden Anleitung aufgefuhrten Reihenfolge aus. Bewahren Sie die Anleitung fur eine spatere Bezugnahme an einem sicheren Ort auf. Pflege- und Sicherheitshinweise Aus Sicherheitsgrunden empfehlen wir, das Produkt nicht alleine zusammenzubauen. Einige Teile besitzen Kanten aus Metall. Seien Sie vorsichtig, wenn Sie diese Teile zusammenbauen. Tragen Sie wahrend des Aufbaus immer Handschuhe, Schuhe und Schutzbrillen. Versuchen Sie nicht, den Produkt bei windigen oder feuchten Wetterverhaltnissen zusammenzubauen. Entsorgen Sie die Plastikbeutel vorschriftsgemass - und achten Sie darauf, dass sie nicht in Reichweite von Kindern kommen. Halten Sie Kinder wahrend des Aufbaus vom Produkt fern. Versuchen Sie nicht, den Produkt aufzubauen, wenn Sie mude sind, Drogen, Medikamente oder Alkohol zu sich genommen haben oder zu Schwindelanfallen neigen. Wenn Sie eine Stufenleiter oder Elektrowerkzeuge benutzen, achten Sie darauf, die Sicherheitshinweise des Herstellers zu befolgen. Halten Sie das Dach und die Dachrinnen frei von Schnee, Dreck und Blattern. Grosse Mengen von Schnee auf dem Dach konnen den Produkt beschadigen und dazu fuhren, dass es nicht mehr sicher ist, unter oder neben ihm zu stehen. Wahrend der des Zusammenbaus, sich nicht an das Produkt anlehnen oder dies schieben. Keine heibe Gegenstande wie z.b. kurzlich benutzte Grills, Lotlampen etc. in den produkt stellen. Schwere oder scharfe Gegenstande sollten nicht an die Wandpaneele gelehnt werden. Stellen Sie sicher, dass sich keine versteckten Rohre oder Kabel im Boden befinden, bevor Sie die Bolzen einsetzen (nicht im Lieferumfang enthalten). Beruhren Sie keine freiliegende Leitungen mit den Aluminiumprofilen. Wenn die Farbe bei der Montage zerkratzt wurde, so kann dies in Ordnung gebracht werden. Hinweis: Dieses Produkt muss auf einer ebenen Flache und auf einem festen Untergrund verankert werden, damit es nicht beschadigt wird und dessen Stabilitat zu gewahrleistet wird.vergewissern Sie sich, dass die Schrauben und Dubel mit dem Fundament kompatibel sind. Achten Sie darauf, dass sich keine Hindernisse zwischen dem Montagebereich und dem endgultigen Platz des Produktes befinden. Reinigungsanweisungen Saubern Sie das Produkt nach dem Aufbau. Um die produkt zu reinigen, verwenden Sie ein mildes Reinigungsmittel und spolen Sie es mit kaltem, sauberem Wasser ab. Verwenden Sie fur die Reinigung der Paneele kein Azeton, keine Scheuermittel oder andere spezielle Reinigungsmittel. Werkzeug & Ausriistung Bevor Sie beginnen Wahlen Sie lhren Standort sorgfaltig, bevor Sie mit dem Aufbau beginnen. Die Bodenflache muss absolut Flach und eben sein. Wahlen Sie eine sonnige Stelle, abseits von Oberhangenden Baumen. Stellen Sie Ihr Produkt nicht in einem Bereich auf, der ObermaBigen Winden ausgesetzt ist. Das Produkt muss positioniert und auf einer flachen und ebenen Flache fixiert werden. Wir empfehlen lhnen, dieses Produkt direkt auf einem stabilen Fundament zu befestigen. Verwenden Sie die vorgebohrten Locher im StahlfuB. Vor dem Auspacken der Teile und dem Beginn der Montage muss jene Stelle, wo Sie das Produkt aufbauen vorbereitet werden. Der Untergrund muss vollkommen flach und eben sein und einen festen Untergrund haben, wie Beton, Asphalt, Fliesen etc. Sortieren Sie die Teile und profen, ob alle Teile, die auf der Inhaltsliste stehen enhalten sind. Die Teile sollten in lhrer unmittelbarer Nahe liegen. Bewahren Sie alle Kleinteile (Schrauben etc.) in einer Schussel auf damit sie nicht verloren gehen. T001 (Geliefert)

9 co Wahrend der Montage Vergewissern Sie sich, dass die Basis sowohl quadratisch als auch waagrecht ist, indem Sie die Diagonalen messen und die Basis mit einer Wasserwaage profen. Urn das EinfOhren der einzelnen Platten in die Profile zu vereinfachen, konnen Sie Silikon-Gleitspray verwenden. BesprOhen Sie nicht die Polycarbonat-Platten. Nehmen Sie - falls notig - einen Gummihammer zur Hilfe. Alle mit den Worten THIS SIDE OUT versehenen Platten mussen nach auben zeigen, damit der voile UV-Schutz garantiert werden kann. Schrauben 411 and Muttern 412 werden wahrend des gesamten Aufbauvorgangs benutzt. Schrauben 411 werden von der Aussenseite des Gewachshauses eingesetzt und Muttern 412 von der Innenseite. Ziehen Sie die Schrauben und Muttern (411 und 412) nicht mit mehr als 2-3 Umdrehungen fest. Ziehen Sie sie erst nach Beendigung der Verglasung weiter fest, falls dies nicht ausdrucklich anders festgelegt ist. Bei einigen Schritten mussen allerdings eventuell ein paar Schrauben vorobergehend angezogen werden, urn zu vermeiden dass ein Profil fallt. Beim Aufbau wird Ihnen das Informationssymbol begegnen. Fur zusatzliche Kommentare und Unterstutzung beziehen Sie sich bitte auf die entsprechende Aufbaustufe. Dieses Symbol zeigt an, dass sich die installierende Person sich im Inneren des Produktes befinden sollte Achtung: Dieses Symbol zeigt an, dass die installierende Person sich auberhalb des Produktes befinden sollte. Note: Die Verankerung dieses Produkts im Untergrund ist wesentlich fur seine Stabilitat und Festig keit. Sie ist unablasslich, urn diesen Arbeitsschritt zu beenden, damit lhre Garantie gultig bleibt. Das Produkt unmittelbar nach Fertigstellung fest an einer flachen und ebenen Flache anbringen. Legen sie wahrend des Aufbaus eine weiche Unterlage unter die einzelnen Teile, urn Kratzer und Schaden zu vermeiden. Schritte Schritt 12: Beachten Sie die Richtung der Paneele.Verwenden Sie Handschuhe und achten Sie auf die scharfen Kanten der Paneele. Schritt 13: Legen Sie vor der Montage die Position des Lamellenfensters fest. Dies kann nur in der Mitte der Wand positioniert werden (5 Optionen). Schritt 17: Achten Sie darauf, dass Sie die Schrauben in die rechteckigen Locher einsetzen. Schritt 24: Stellen Sie sicher, dass das obere Profil des Lamellenfensters fest mit dem Profil der Dachrinne verbunden ist. Erst dann konnen Sie die Schrauben festziehen. Schritt : Bitte beachten Sie, dass Sie die Paneele mit der UV-geschutzten Seite nach auben (gekennzeichnet mit «THIS SIDE OUT)) montieren, und entfernen Sie die Schutzfolie nachdem Sie die Paneele montiert haben. Schritt 41: Es wird empfohlen, die Turen ab diesem Schritt bis hin zum Anbringen auf einem Tisch zusammenzubauen. Achten Sie darauf, die Teile nicht zerkratzt werden. Schritt 56: Die mit diesem Produkt gelieferten Schrauben und DObel sind fur ein Betonfundament geeignet. Fur alle anderen Fundamenttypen verwenden Sie bitte immer geeignete Schrauben und DObel. Schritt 57: Stellen Sie sicher, dass alle Schrauben fest angezogen sind, bevor Sie sie mit Teil NT abdecken. * Ziehen Sie alle Schrauben fest, sobald die Montage beendet ist.


10 IMPORTANTE Le rogamos lea con atencion las siguientes instrucciones antes de empezar a montar este producto. Siga los distintos pasos en el mismo orden de las instrucciones. Guarde las instrucciones en un lugar seguro para poder consultarlas en el futuro. Consejos de cuidado y seguridad Por motivos de seguridad, recomendamos encarecidamente que el producto sea montado al menos por dos personas. Algunas piezas pueden tener bordes afilados. Por favor, tenga cuidado al manipular los componentes. Lleve siempre guantes, proteccion ocular y mangas largas al montar o realizar cualquier mantenimiento de su producto. No intente montar el producto en condiciones de viento o humedad. Tire todas las bolsas de plastico con seguridad; mantengalas fuera del alcance de los ninos pequenos. Mantenga a los ninos lejos del area de montaje. No intente montar el producto si esta cansado, ha tornado drogas, medicamentos o alcohol o si es propenso a ataques de mareo. Cuando utilice una escalera de mano o herramientas electricas, asegurese de seguir los consejos de seguridad del fabricante. Mantenga el tejado y el canal& sin nieve, suciedad ni hojas. No es seguro pararse debajo o cerca cuando hay gran cantidad de nieve sobre el techo. No se apoye ni empuje el producto durante la construcci6n. Articulos calientes, como parrillas recientemente usadas, sopletes, etc. no deben ser almacenados dentro del producto. Los articulos pesados o afilados no deben apoyarse contra los paneles de la pared. AsegUrese de que no haya tuberfas o cables ocultos en el suelo antes de insertar las estacas (no suministradas). No toque cables electricos en altura con los perfiles de aluminio. Si se ray6 el acabado de color durante el montaje, el mismo puede ser arreglado. Nota: Este producto debe estar anclado a una superficie nivelada y a una base solida. Asegurese de que los tornillos y los anclajes sean compatibles con el tipo de base. Asegurese de que no haya obstrucciones entre el area de ensamblaje y la posicion final. Instrucciones de limpieza Limpie el producto una vez terminado el montaje. Cuando necesite limpiar su producto, use una solucion de detergente suave y aclarelo con agua limpia fria. No utilice acetona, limpiadores abrasivos ni otros detergentes especiales para limpiar los paneles. Herramientas y equipo Antes de empezar: Elija su sitio cuidadosamente antes del ensamblaje inicial. La superficie del terreno debe ser perfectamente plana y estar nivelada. Elija un area soleada, lejos de arboles que puedan cubrir la estructura. No coloque su producto en un area expuesta a vientos excesivos. El producto debe colocarse y fijarse sobre una superficie plana y nivelada. Recomendamos encarecidamente asegurar este producto directamente sobre una base Utilice los orificios pre-perforados en la base de acero. Complete la preparaci6n del sitio antes de desempacar las piezas y comenzar el ensamblaje. Las partes deben disponerse al alcance de la mano. Mantenga todas las piezas pequenas (tornillos, etc.) en un recipiente para que no se pierdan. Consulte las limitaciones, requisitos, permisos y a las autoridades locales para la construction de este cobertizo de jardin. T001 (Suministrados)

11 111 instalador Durante la instalacion Asegurese de que la base es cuadrada, midiendo las diagonales y el nivel mediante el use de un nivel de burbuja. Es posible utilizar un aerosol lubricante de silicona con el fin de ayudar a deslizar los paneles en los perfiles. No pulverice los paneles de policarbonato. Utilice un martillo de goma si es necesario. Todos los paneles con las palabras estampadas THIS SIDE OUT deben estar mirando hacia afuera para crear una proteccion UV completa. Quite la etiqueta de plastico a medida que bloquee los paneles en su lugar. Cuando encuentre el icono de informacion, por favor lea con cuidado dicho paso con comentarios y asistencia adicionales. Este icon indica que el instalador debe estar dentro del producto. Este icon indica que el debe estar fuera del producto. Los tornillos 411 y las tuercas 412 son usados durante todo el proceso de montaje. Los tornillos 411 deben ser montados desde el exterior y las tuercas 412 desde el interior del invernadero. No apriete los tornillos y tuercas (411 y 412) mas de 23- vueltas. No los apriete hasta terminar el montaje de los paneles, a menos que orientado de otra manera. Sin embargo, en algun paso puede ser necesario apretar de forma temporal algunos tornillos para evitar que se caiga un perfil. Note: Inmediata ente -spues de c. pletar el ensamblaje, vincule firmemente el producto a una superficie nivelada. Ancle firmemente el producto a una superficie nivelada inmediatamente despues de finalizar el ensamblaje. Atencion Durante el montaje, ponga algo suave por debajo de las piezas, para evitar que se rayen o estropeen. Pasos Paso 12: Tenga en cuenta la orientacion de los paneles. Use guantes y tenga cuidado con los bordes afilados de dichos paneles. Paso 13: Decida la ubicacion de la ventana lumbrera, antes de su montaje. Solo se puede fijar en el centro de la pared (5 opciones). Paso 17: Atenci6n, inserte los tornillos en los agujeros rectangulares. Paso 24: Asegurese de que el perfil superior de la ventana lumbrera este firmemente sujeto al perfil del canal, solo asi podra apretar los tornillos. Paso : Tenga en cuenta que el lado protegido contra los rayos UV (marcado con "THIS SIDE OUT"), de cada panel, debe instalarse hacia afuera. Retire la etiqueta de plastico cuando los paneles esten fijos en su lugar. Paso 41: Desde este paso, se recomienda ensamblar las puertas sobre una mesa, hasta que las mismas puedan ser fijadas al producto. Tenga cuidado de no rayar las piezas. Paso 56: Los tornillos y tacos suministrados con este producto son adecuados para cimientos de concreto. Para cualquier otro tipo de base, utilice tornillos y tacos que sean adecuados. Paso 57: Asegurese de que todos los tornillos esten firmemente apretados antes de cubrirlos con la pieza # * Apriete todos los tornillos una vez este completado el montaje.


12 ccn cm / 125.5" P A


13 Contents Item 9117 Qty. 2 i Item 9100 I Qty. Item 8657 Qty %, i


14 Contents Item Qty Item v Qty Item Qty. 0 V Item Qty
 5001 5000 Qty.")

15 Contents Item Qty. Item (+1) Qty. Item (+14) (+5) Qty. Item Qty. 12 (+1) 12 (+1) (+17) 12 (+1) 12 (+1) (+3) 18 (+1) 52 (+5 26 (+2)


16
17 A ea 7442


18 A


19 x6 %-

20 x

21 I 6 10 mm


22 7 r I b x , L


23 8 L LZZ6 OL Z6L8 OZ 9917 OZ Z61.8


24 / 10 mm 13/32" 9093 %
25 O

26 \000k

27 A

28


29 x2 41

30 15 I I T ] 2 ] 9111


31 k --^, 466


32 17 P cr, e a x2 8607

33 18

34 A


35 IN x2

36 A

37 22 r
))))))?")
38 )))))))?, 6

39 24

40 This side out


41 / 9104


42 :4 466 Obi


43 OF 466

44

45

46 /


47
48
1 10V 7121 1 9116")

49 IV w 11 )11 1 )1 10V


50 pk V o 9114 N Oil»»» 12 This side out

51 36 10 mm 13/32"

52

53 /
 8.")

54 P is) 8../ 4111!- 1110, % o o e

55

56 41 F

57 ]

58 43 L /


59 V 8


60 45 I.m.,, ft,,..* I

61


62 47 30 cm 11.8"A" - - / 30 cm, 11.8"

63 48

64 I I, 0 } '


65 ""''' AA" 8039 "Na 7958 I


66 A J A 7993 _ 7948

67 C A


68 C A s "949 "4" 4045 S


69 a

70 / ,- a ( ow' u...'it 1/4.1_, a 4043, ' 'a _ A


71 /

72 L.../ I 4.
73 Contact information Head office: Dancover A/S Nordre Strandvej 119 G 3150 Hellebæk Denmark For more information please visit: National contact Denmark: denmark@dancover.com UK: uk@dancover.com Germany: germany@dancover.com France: france@dancover.com Sweden: sverige@dancover.com Finland: suomi@dancover.com Poland: polska@dancover.com Luxembourg: luxembourg@dancover.com Spain: espana@dancover.com Italy: italia@dancover.com Switzerland: schweiz@dancover.com Austria: austria@dancover.com Norway: norge@dancover.com Nederland: nederland@dancover.com Ireland: ireland@dancover.com Belgium: belgique@dancover.com Portugal: portugal@dancover.com
8-kulmainen viherhuone 4,5m2 Asennusohje
 8-kulmainen viherhuone 4,5m2 Asennusohje LUE KAIKKI OHJEET HUOLELLA ENNEN ASENNUSTA SÄILYTÄ OHJEET MYÖHEMPÄÄ KÄYTTÖÄ VARTEN Maahantuoja: Horisont Enterprises Ltd Oy Atomitie 5 B, 00370 Helsinki 09-6866720
Hex 12 Greenhouse. Find After Sales Service Info inside package 1of 2
 OasisTM Hex 12 Greenhouse Light Transmission Roof -82% Wall - 80% x2 EN Find After Sales Service Info inside package 1of 2 19.03_87554_MV-1.1 10 mm 13/32 FR DE ES Les informations sur le Service Après-Ventes
Copyright Lappset Goup Ltd LAPPSET FINNO REF: TEXT DATE: LAPPSET PROMENADE PAVILLION REF: DATE: TEXT PAGE 1. Tarkista rakennel
 Copyright Lappset Goup Ltd LAPPSET FINNO REF: TEXT DATE: 27.4.2007 2 LAPPSET PROMENADE PAVILLION REF: DATE: 26.8.2013 2 TEXT PAGE 1. Tarkista rakennelistan ja osiin merkittyjen tuotenumeroiden avulla,
Box 1. Things you have/ Pakkaus sisältää. x 4 x 16 x 4 x 4. 300mm. 1700mm. 300mm 1. Things you should know / Sinun Tulee Tietää
 Phobos 30 Things you should know / Sinun Tulee Tietää Things you prepare / Näitä Tarvitset DURING INSTALLATION ALL PRODUCTS: use protective gloves at all times use eye protection at all times never install
SAGA 150. Asennusohjeet. Mittaa oven korkeus. Piirrä seinään oven kiinni -päätyyn seinäkannattimen kohdalle vaakaviiva korkeudelle ovi + 75mm + 20 mm.
 SAGA 150 Asennusohjeet 500 1 2 Mittaa oven korkeus. Piirrä seinään oven kiinni -päätyyn seinäkannattimen kohdalle vaakaviiva korkeudelle ovi + 75mm + 20 mm. 3 Piirrä vesivaa an avulla viiva myös kiskon
I-VALO LED 6721 RETROFIT instructions
 I-VALO LED 6721 RETROFIT instructions FI Asennusohjeet EN Installation instructions DE Montageanleitung I-VALO LED6721 RETROFIT asennusohjeet 12/2013 I-VALO LED 6721 RETROFIT FI 6721 RetroFit-paketin sisältö
INSTALLATION INSTRUCTION ASENNUSOHJE PEM SJTK31 SJTK46 ENGLISH SUOMI
 INSTALLATION INSTRUCTION ASENNUSOHJE PEM1256 2010-2 SJTK31 SJTK46 ENGLISH SUOMI GB GENERAL INFORMATION - Check that the kit is suitable for the cable type. - Check the materials listed in the bill of materials
INSTRUCTIONS DE MONTAGE MONTIERANLEITUNG MONTERINGSANVISNING ASSEMBLY INSTRUCTIONS MONTAGEAANWIJZING KOKOAMISOHJE
 INSTRUCTIONS DE MONTAGE MONTIERANLEITUNG MONTERINGSANVISNING ASSEMBLY INSTRUCTIONS MONTAGEAANWIJZING KOKOAMISOHJE Tools that are needed IMPORTANT Contrōlez d'abord le contenu. Triez vis et ferrures selon
Roller Support Stand. Safety. Setting up. Putting away. Art.no 40-6814
 Roller Support Stand Art.no 40-6814 English Please read the entire instruction manual before using the product and save it for future reference. We reserve the right for any errors in text or images and
National Building Code of Finland, Part D1, Building Water Supply and Sewerage Systems, Regulations and guidelines 2007
 National Building Code of Finland, Part D1, Building Water Supply and Sewerage Systems, Regulations and guidelines 2007 Chapter 2.4 Jukka Räisä 1 WATER PIPES PLACEMENT 2.4.1 Regulation Water pipe and its
 ASENNUSOHJE KELTAISILLE ADAPTEREILLE Gibbonswing 220513 keskipallon adaptereiden vaihtaminen tapahtuu suraavasti: Aseta keltaiset holkit putkeen 904102 kuvan osoittamalla tavalla. Aseta pallon puolisko
ADAPTER UPGRADE OLD NEW
 ADAPTER UPGRADE 17.7.2015 OLD NEW 11.5.2017 1 2 Tuotekyltti tulee tuotteen mukana yhdellä seuraavista tavoista: 1) Metallinen tuotekyltti ja kiinnitysruuvit - Kiinnitä tuotekyltti ruuveilla
mini Safe by Design and optimized for tilting windows
 mini Safe by Design and optimized for tilting windows MINI CASSETTE Suitable for 17mm or 20mm chain or constant tension spring mechanism. The spring mechanism is suited also for operating from the bottom
 Jousen ja kiinnityslevyn kiinnittäminen Fixing the spring and gable plate Aseta jousen kiinnityslevy jousen kierteiden väliin. Place the spring berch between the bottom coils Kierrä kiinnityslevyä kohti
Jousen ja kiinnityslevyn kiinnittäminen Fixing the spring and gable plate
 Jousen ja kiinnityslevyn kiinnittäminen Fixing the spring and gable plate Aseta jousen kiinnityslevy jousen kierteiden väliin. Place the spring berch between the bottom coils Kierrä kiinnityslevyä kohti
Secto Design Oy Kauppalantie 12 02700 Kauniainen Finland tel. +358 9 5050598 fax +358 9 5475 2535 info@sectodesign.fi www.sectodesign.
 Secto Design Oy Kauppalantie 12 02700 Kauniainen Finland tel. +358 9 5050598 fax +358 9 5475 2535 info@sectodesign.fi www.sectodesign.fi Secto 4200 pendant natural birch, black or white laminate, walnut
MARQUE: PHILIPS REFERENCE: HR2505/00 CODIC:
 MARQUE: PHILIPS REFERENCE: HR0/00 CODIC: 9 NOTICE HR0 (MAX) 00 g 00-0 g 0 g 00 g 00 g 0- sec. 00 g 0 sec. 00-00 g 0-0 sec. 0-00 g 0-0 sec. 0.0.. 9 0 8 8 9 FRANÇAIS Introduction Félicitations pour votre
MARQUE: PHILIPS REFERENCE: AT770/20 CODIC:
 MARQUE: PHILIPS REFERENCE: AT770/0 CODIC: 38517 Register your product and get support at www.philips.com/welcome AquaTouch Range AT941, AT940, AT918, AT899, AT897, AT896, AT894, AT891, AT890, AT889, AT887,
LINC 17. sanka.fi 130624A
 LINC 17 130624A SANKA takaa tuotteen toimivuuden kun asennus tapahtuu ohjeiden mukaisesti. SANKA garanterar produktens funktion då monteringsanvisningen följs. sanka.fi Tarvittaessa. Vid behov. 6mm 3mm
CFL. Asennusohjeet. CASAFLEX - Kaukolämpöputket. Asennusohje. Liitin CASAFLEX - DUO. CFL - DUO - Liitin
 - DUO - Liitin 1 et Liitin CASAFLEX - DUO 3 2 6 1 9 4 5 8 10 7 1 Stützring 2 Graphitdichtring 3 Anschlussstück 4 Druckring 5 Pressplatte A 6 Konusplatte B 7 Innen-Sechskantschraube 8 Schutzkappe (2 - teilig)
CONVERSION KITS FOR FRAMES MR8 AND MR9 INSTALLATION INSTRUCTIONS
 CONVERSION KITS FOR FRAMES MR8 AND MR9 INSTALLATION INSTRUCTIONS MR8 AND MR9 CONVERSION KIT - INSTALLATION INSTRUCTION Document ID: DPD01787, Revision: A, Release date: 17.11.2015 1.1 MR8 kit contents
SIRIUS valaisin on asemoitava siten, ettei pitkäaikaista katsomista valaisimeen voi olettaa tapahtuvan 2,3m lähempää.
 SIRIUS M * SIRIUS valaisin on asemoitava siten, ettei pitkäaikaista katsomista valaisimeen voi olettaa tapahtuvan 2,3m lähempää. SIRIUS luminaire should be positioned so that prolonged staring into the
1. SIT. The handler and dog stop with the dog sitting at heel. When the dog is sitting, the handler cues the dog to heel forward.
 START START SIT 1. SIT. The handler and dog stop with the dog sitting at heel. When the dog is sitting, the handler cues the dog to heel forward. This is a static exercise. SIT STAND 2. SIT STAND. The
ÜB. 1. a) Lektion 7. Ein Gute-Nacht-Bier ÜB. 2 (1) ÜB. 1. b)
 Lektion 7. Ein Gute-Nacht-Bier ÜB. 2 (1) ÜB. 1. b)") ÜB. 1. a) Lektion 7 Ein Gute-Nacht-Bier 1. Mozart-Straße 23 2. Kahden hengen huone maksaa 103-170 euroa. 3. Ensin lähijunalla Marienplatzille ja sitten metrolla Universitätille (yliopiston pysäkille).
ÜB. 1. a) Lektion 7 Ein Gute-Nacht-Bier 1. Mozart-Straße 23 2. Kahden hengen huone maksaa 103-170 euroa. 3. Ensin lähijunalla Marienplatzille ja sitten metrolla Universitätille (yliopiston pysäkille).
Lab SBS3.FARM_Hyper-V - Navigating a SharePoint site
 Lab SBS3.FARM_Hyper-V - Navigating a SharePoint site Note! Before starting download and install a fresh version of OfficeProfessionalPlus_x64_en-us. The instructions are in the beginning of the exercise.
Installation instruction PEM
 Installation instruction ASENNUSOHJE PEM1032 2010-02 SURGE ARRESTER SET FOR POLE MOUNT TRANSFORMER YLIJÄNNITESUOJASETTI PYLVÄSMUUNTAJALLE ENGLISH SUOMI 2/8 PEM1032 2010-02 ENGLISH GENERAL INFORMATION -
KÄYTTÖOHJE. AUTOTALLI 18m²
 KÄYTTÖOHJE AUTOTALLI 18m² ENNEN KUIN ALOITAT Ennen kuin aloitat asennuksen, selvitä paikallisilta viranomaisilta tarvitseeko autotalli rakennusluvan. Lue käyttöohje huolellisesti ja noudata annettuja ohjeita.
Fonte 16045SAVA 16045VAVA 16045SAVA 16045VAVA ASENNUSOHJE MONTERINGSANVISNING ASSEMBLY INSTRUCTIONS K16045VAK2 K16045SAK1 K16045K3 K16045K3
 Fonte 16045SAVA 16045VAVA ASENNUSOHJE MONTERINGSANVISNING ASSEMBLY INSTRUCTIONS 16045SAVA K16045SAK1 K16045VAK2 K16045K3 16045VAVA K16045VAK1 K16045VAK2 K16045K3 1 2 900167 LE22SWL003 LE22VWL003 LE18VWL001
Choose Finland-Helsinki Valitse Finland-Helsinki
 Write down the Temporary Application ID. If you do not manage to complete the form you can continue where you stopped with this ID no. Muista Temporary Application ID. Jos et onnistu täyttää lomake loppuun
ÜB. 1. der Fuβ der Kopf das Knie der Bauch die Schulter das Auge der Mund. jalka pää polvi vatsa hartia, olkapää silmä suu
 Lektion 7 Hatschi! ÜB. 1 der Fuβ der Kopf das Knie der Bauch die Schulter das Auge der Mund jalka pää polvi vatsa hartia, olkapää silmä suu ÜB. 1 Fortsetzung die Hand das Ohr der Finger die Nase das Bein
08/2009. Mod:DM-4. Production code: KÄYTTÖOHJE KAHVINKEITIN DM-4
 08/2009 Mod:DM-4 Production code: 1003110 KÄYTTÖOHJE KAHVINKEITIN DM-4 1. SISÄLLYSLUETTELO 1. Sisällysluettelo 2 2. Toiminnot 3 3. Asennus ja käyttöönotto 4-6 4. Kahvin valmistaminen 7-8 5. Ylläpito 9-10
 ABC OPTION PLATES 27.2.2014 27.2.2014 Removed orange options / MS, TV PRODUCT SIZE YEL RED DARK GRA LIGHT GRA ORANGE J31934M 5x1149x1258 702942 703082 703083 No No Ø350x15 702962 703084 703085 No No J51511M
You can check above like this: Start->Control Panel->Programs->find if Microsoft Lync or Microsoft Lync Attendeed is listed
 Online Meeting Guest Online Meeting for Guest Participant Lync Attendee Installation Online kokous vierailevalle osallistujalle Lync Attendee Asennus www.ruukki.com Overview Before you can join to Ruukki
Fitting instructions. Fitting set for joining all types of DEVI self limiting heating cables to heating cables Art. no. 19805779 SSTL nro 04 312 85
 GB/FI Fitting instructions Fitting set for joining all types of DEVI self limiting heating cables to heating cables Art. no. 19805779 SSTL nro 04 312 85 intelligent varme Contents: GB Connection kits 3
Asennusopas. DEVIreg 531. Elektroninen termostaatti.
 Asennusopas DEVIreg 531 Elektroninen termostaatti www.devi.com Sisällysluettelo 1 Johdanto................. 3 1.1 Tekniset tiedot.......... 4 1.2 Turvaohjeet............ 5 2 Asennusohjeet.............
On instrument costs in decentralized macroeconomic decision making (Helsingin Kauppakorkeakoulun julkaisuja ; D-31)
") On instrument costs in decentralized macroeconomic decision making (Helsingin Kauppakorkeakoulun julkaisuja ; D-31) Juha Kahkonen Click here if your download doesn"t start automatically On instrument costs
On instrument costs in decentralized macroeconomic decision making (Helsingin Kauppakorkeakoulun julkaisuja ; D-31) Juha Kahkonen Click here if your download doesn"t start automatically On instrument costs
Recirkulering. El-tilslutning. Kontrolpanel. Dansk. Timerfunktion
 1 2 Dansk Recirkulering Luften renses ved hjælp at aktive kulfiltre hvorefter den returneres til rummet. Kulfiltre bestilles separat. El-tilslutning Emhætten skal tilsluttes 230 V i henhold til stærkstrømsreglementet.
FinFamily PostgreSQL installation ( ) FinFamily PostgreSQL
 FinFamily PostgreSQL") FinFamily PostgreSQL 1 Sisällys / Contents FinFamily PostgreSQL... 1 1. Asenna PostgreSQL tietokanta / Install PostgreSQL database... 3 1.1. PostgreSQL tietokannasta / About the PostgreSQL database...
FinFamily PostgreSQL 1 Sisällys / Contents FinFamily PostgreSQL... 1 1. Asenna PostgreSQL tietokanta / Install PostgreSQL database... 3 1.1. PostgreSQL tietokannasta / About the PostgreSQL database...
SAKSA, LYHYT OPPIMÄÄRÄ, kirjallinen osa
 SAKSA, LYHYT OPPIMÄÄRÄ, kirjallinen osa 3.10.2016 Tutkintoaineen sensorikokous on tarkentanut hyvän vastauksen sisältöjä seuraavasti. Sensorikokous on päättänyt muuttaa tehtävien 15 16 pisteitystä. Pisteitys
4x4cup Rastikuvien tulkinta
 4x4cup Rastikuvien tulkinta 4x4cup Control point picture guidelines Päivitetty kauden 2010 sääntöihin Updated for 2010 rules Säännöt rastikuvista Kilpailijoiden tulee kiinnittää erityistä huomiota siihen,
PUUTARHAVAJA METALLIA KÄYTTÖ- JA ASENNUSOHJEET. Asentamiseen tarvitaan kaksi ihmistä ja asennus vie aikaa 2-3 tuntia.
 PUUTARHAVAJA METALLIA KÄYTTÖ- JA ASENNUSOHJEET Asentamiseen tarvitaan kaksi ihmistä ja asennus vie aikaa 2-3 tuntia. ENNEN KUIN ALOITAT: Ennen vajan kokoamista tarkasta paikalliset rakennusmääräykset vajan
anna minun kertoa let me tell you
 anna minun kertoa let me tell you anna minun kertoa I OSA 1. Anna minun kertoa sinulle mitä oli. Tiedän että osaan. Kykenen siihen. Teen nyt niin. Minulla on oikeus. Sanani voivat olla puutteellisia mutta
ADAPTER UPGRADE OLD NEW
 ADAPTER UPGRADE 17.7.2015 OLD NEW 8/2007 1 2 3 Tuotekyltti tulee tuotteen mukana yhdellä seuraavista tavoista: 1) Metallinen tuotekyltti ja kiinnitysruuvit - Kiinnitä tuotekyltti ruuveilla
KASVIHUONE PRE-220 YLEISET TAKUUEHDOT
 KASVIHUONE PRE-220 YLEISET TAKUUEHDOT Tuotteella on kahdentoista (60) kuukauden materiaali ja valmistusvirhetakuu. Takuu edellyttää, että tuote on koottu ja asennettu paikalleen asianmukaisella tavalla
KASVIHUONE PRE-440 YLEISET TAKUUEHDOT
 KASVIHUONE PRE-440 YLEISET TAKUUEHDOT Tuotteella on kahdentoista (60) kuukauden materiaali ja valmistusvirhetakuu. Takuu edellyttää, että tuote on koottu ja asennettu paikalleen asianmukaisella tavalla
mini Safe by Design and optimized for tilting windows
 mini Safe by Design and optimized for tilting windows DOMICET MINI Suitable for mm or 20mm chain or constant tension spring mechanism. Optimized for tilting windows and the spring mechanism is suited also
PAINEILMALETKUKELA-AUTOMAATTI AUTOMATIC AIR HOSE REEL
 MAV4 MAV5 MAV6 PAINEILMALETKUKELA-AUTOMAATTI AUTOMATIC AIR HOSE REEL Käyttöohje Instruction manual HUOMIO! Lue käyttöohjeet huolellisesti ennen laitteen käyttöä ja noudata kaikkia annettuja ohjeita. Säilytä
TW-LTE 4G/3G. USB-modeemi (USB 2.0)
") TW-LTE 4G/3G USB-modeemi (USB 2.0) Tiedonsiirtonopeus: 100 Mbps/50 Mbps LTE: 1800/2100/2600 MHz GSM/GPRS/EDGE: 850/900/1800/1900 MHz UMTS: 900/2100 MHz Pikaohje (Finnish) CE Käyttöönotto- ohje SIM- kortin
TW-LTE 4G/3G USB-modeemi (USB 2.0) Tiedonsiirtonopeus: 100 Mbps/50 Mbps LTE: 1800/2100/2600 MHz GSM/GPRS/EDGE: 850/900/1800/1900 MHz UMTS: 900/2100 MHz Pikaohje (Finnish) CE Käyttöönotto- ohje SIM- kortin
Finanzmärkte III: Finanzmarktanalyse
 Finanzmärkte III: Finanzmarktanalyse Siegfried Trautmann /4 Finanzmärkte III : Finanzmarktanalyse Teil C : Makromarkt-Perspektive 8 Finanzmärkte 9 Preise und Renditen im Finanzmarktgleichgewicht 0 Empirische
GB F FIN USA. Wollmeisenbad. Detergent for wool and fine laundry Instruction for Use Lessive pour laine et linge délicat Mode d emploi
 Wollmeisenbad GB F N S FIN USA CDN AUS Detergent for wool and fine laundry Instruction for Use Lessive pour laine et linge délicat Mode d emploi FIN Hienopesuun Tämän hienopesuaineen tutkittu koostumus
DESIGN NEWS MATTI MÄKINEN EIN DESIGNER IN ANGEBOT WIE LOCKEN WIR DEN GEIST IN DIE FLASCHE?
 WIE KÖNNEN SIE MATTI MÄKINEN TREFFEN? EIN DESIGNER IN ANGEBOT EIN GELUNGENES PRODUKT WORAN ERKENNT MAN DAS GELUNGENE PRODUKT? WIE LOCKEN WIR DEN GEIST IN DIE FLASCHE? UND WAS BEDEUTET DIESES KURZ ZUSAMMENGEFASST?
INSTALLATION INSTRUCTION ASENNUSOHJE PEM1417 2012-11 ENGLISH SUOMI CURRENT LIMITING DEVICE VIRTAA RAJOITTAVA SUOJA SDI46.812 & SDI46.
 INSTALLATION INSTRUCTION ASENNUSOHJE PEM1417 2012-11 ENGLISH SUOMI CURRENT LIMITING DEVICE VIRTAA RAJOITTAVA SUOJA SDI46.812 & SDI46.824 2/8 SDI46.812 & SDI46.824 PEM1417 2012-11 ENGLISH GENERAL INFORMATION
SQUARE. Greenled Tarjusojantie Kempele FINLAND
 SQUARE 30x30 SQUARE 60x60 SQUARE 30x120 SQUARE 60x120 GLSQ00030x30_xx GLSQ00060x60_xx GLSQ0030x120_xx GLSQ0060x120_xx 18 W 28 W / 45 W 28 W / 45 W 55 W 1600 lm 2950 lm / 4700 lm 2900 lm / 4500 lm 5500
Information on preparing Presentation
 Information on preparing Presentation Seminar on big data management Lecturer: Spring 2017 20.1.2017 1 Agenda Hints and tips on giving a good presentation Watch two videos and discussion 22.1.2017 2 Goals
PRODUCT SPECIFICATIONS SAVE THIS MANUAL GENERAL SAFETY RULES
 PRODUCT SPECIFICATIONS Item Overall Dimensions Roof Panel Dimensions Roof Overhand Roof Gables Frame Dimensions Side Wall Height Side Post Spacing Tubing Anchor Stake Size Weight Description 20 Long x
TIKIT a) Suorassa tikissä ristiommel jää nahan alle piiloon. b) Ristitikissä ommel jää näkyviin.
 Suorassa tikissä ristiommel jää nahan alle piiloon. b) Ristitikissä ommel jää näkyviin.") CML WHEEL COVER -RUORINAHKAN OMPELUOHJE Liota nahkoja lämpimässä vedessä n. 15 minuuttia ennen ompelua. Pidä nahka kosteana koko ompelun ajan esim. sumutepullolla. Pidä ommellessa kevyt kireys nahkaan,
CML WHEEL COVER -RUORINAHKAN OMPELUOHJE Liota nahkoja lämpimässä vedessä n. 15 minuuttia ennen ompelua. Pidä nahka kosteana koko ompelun ajan esim. sumutepullolla. Pidä ommellessa kevyt kireys nahkaan,
ASENNUSOHJE KAMMIOEROTIN JEKA MOOTTORIOHJAIMELLE N 0037.03
 ASENNUSOHJE KAMMIOEROTIN JEKA MOOTTORIOHJAIMELLE N 0037.03 OUTDOOR DISCONNECTOR ISO 9001:2009 ISO 14001:2005 OHSAS 18001:2008 TYPE CUB a) PACKING 9713680 Erotin täydellisenä, sisältää erotinpaketin ja
Secto 4200 pendant natural birch, black or white laminate, walnut veneer
 Secto Design Oy Kauppalantie 12 02700 Kauniainen Finland tel. +358 9 5050598 fax +358 9 5475 2535 info@sectodesign.fi www.sectodesign.fi Secto 4200 pendant natural birch, black or white laminate, walnut
MARKSCHEME BARÈME DE NOTATION ESQUEMA DE CALIFICACIÓN
 M08/2/ABFIN/SP1/FIN/TZ0/XX/M MARKSCHEME BARÈME DE NOTATION ESQUEMA DE CALIFICACIÓN May / mai / mayo 2008 FINNISH / FINNOIS / FINÉS B Standard Level Niveau Moyen Nivel Medio Paper / Épreuve / Prueba 1 6
C470E9AC686C
 INVENTOR 17 VALUOSAN SUUNNITTELU http://help.autodesk.com/view/invntor/2017/enu/?guid=guid-b3cd4078-8480-41c3-9c88- C470E9AC686C About Mold Design in Inventor Mold Design provides integrated mold functionality
KONEISTUSKOKOONPANON TEKEMINEN NX10-YMPÄRISTÖSSÄ
 KONEISTUSKOKOONPANON TEKEMINEN NX10-YMPÄRISTÖSSÄ https://community.plm.automation.siemens.com/t5/tech-tips- Knowledge-Base-NX/How-to-simulate-any-G-code-file-in-NX- CAM/ta-p/3340 Koneistusympäristön määrittely
Esittäytyminen Vorstellungen
 Esittäytyminen Vorstellungen Tehtävän kohderyhmä saksa; yläkoulun A- ja B-kieli Tehtävän konteksti Suomalainen ja saksalainen oppilas tapaavat toisensa ensimmäistä kertaa oltuaan sähköpostiyhteydessä.
Alfa Q TW 56W Alfa Q 58W GLAQTW00056 GLAQ W 58 W 5300 lm 5400 lm
 Alfa Q TW 56W Alfa Q 58W GLAQTW00056 GLAQ00058 56 W 58 W 5300 lm 5400 lm Greenled Tarjusojantie 12-14 90440 Kempele FINLAND Turvallisuusvaroitukset: Ennen asennusta tai huoltotyötä kytke valaisin irti
Adapter PDF :33 Uhr Seite 1. big foot Adapter. big foot. c d e
 Adapter PDF 07.01.2004 15:33 Uhr Seite 1 690 492 big foot Adapter c d e Adapter PDF 07.01.2004 15:33 Uhr Seite 2 Bilder big foot 1 2 3 4 5 6 B ild 1 B ild 2 B ild 3 B ild 4 2 1 B ild 6 B ild 5 B ild 7
CP8-JL AUTOKATOS ALUMIINIRUNGOLLA. KOKO: 576 x 300 x192 (219)cm. Väri: Valkoinen RAL9016 Katto: Polykarbonaatti 8mm
cm. Väri: Valkoinen RAL9016 Katto: Polykarbonaatti 8mm") AUTOKATOS ALUMIINIRUNGOLLA KOKO: 576 x 300 x92 (29)cm Väri: Valkoinen RAL906 Katto: Polykarbonaatti 8mm CP8-JL Tuotteella on kahdenkymmenenneljän (24) kuukauden materiaali ja valmistusvirhetakuu. Takuu
AUTOKATOS ALUMIINIRUNGOLLA KOKO: 576 x 300 x92 (29)cm Väri: Valkoinen RAL906 Katto: Polykarbonaatti 8mm CP8-JL Tuotteella on kahdenkymmenenneljän (24) kuukauden materiaali ja valmistusvirhetakuu. Takuu
Stand for Log Splitter , ,
 Stand for Log Splitter 18-3570, 40-9122, 40-9511 rt.no. 40-9363 1. lose the bleed screw. 2. Turn the log splitter upside down, detach the wheels and remove the plugs from the ends of the legs. 3. First
Fiat Ducato Citroën Jumper Peugoet Boxer
 Montageanleitung LED Tagfahrlicht Mounting instructions LED Daytime Running Lights Instructions de montage LED Feux diurnes Monteringsanvisning LED Varselljus Montagehandleiding LED Dagrijlichten Instrucciones
Henkilökuljetuspalvelut Virtain kylissä Personentransportdienste in den Dörfern von Virrat
 Henkilökuljetuspalvelut Virtain kylissä Personentransportdienste in den Dörfern von Virrat Henkilökuljetukset Personentransporte Sivistystoimi Koulukuljetukset Asiointiliikenne Perusturva Schulverwaltungsamt
 LAPPSET FINNO ARCSPORT REF: DATE: 23.11.2017 2 1. Tarkista tuoteosaluettelon avulla, että olet saanut tarvitsemasi osat (s. 3). 2. Valitse ArcSport areenalle paikka ottaen huomioon valmistajan mitat (s.
Z-N626 LAITTEEN PIKAOPAS
 Z-N626 LAITTEEN PIKAOPAS FI SISÄLTÖ YLEISKUVAUS TIETOJA KÄYTTÖOHJEESTA... S. 02 TURVAOHJEET... S. 02 ENNEN ENSIMMÄISTÄ KÄYTTÖKERTAA... S. 02 LAITTEEN YLEISKUVAUS ZENEC-JÄRJESTELMÄ... S. 03 MONITOIMIOHJAUSPYÖRÄ...
MOOTTORIPYÖRÄNOSTIN MOTORCYCLE LIFT
 MEG30 Lue käyttöohjeet huolellisesti ennen laitteen käyttöä ja noudata kaikkia annettuja ohjeita. Säilytä ohjeet myöhempää tarvetta varten. Read the instruction manual carefully before using the tool and
KÄYTTÖOHJE KAAPELIN JA JOHDON LÄPIVIENNIT ESKE/1(S)(-L)-*(-RDE)** (LT)
(-L)-*(-RDE)** (LT)") KÄYTTÖOHJE KAAPELIN JA JOHDON LÄPIVIENNIT ESKE/1(S)(-L)-*(-RDE)** WISKA Hoppmann & Mulsow GmbH Kisdorfer Weg 28 24568 Kaltenkirchen Germany Puh. +49 (0) 4191 508-100 Faksi +49 (0) 4191 508-249 Internet
KÄYTTÖOHJE KAAPELIN JA JOHDON LÄPIVIENNIT ESKE/1(S)(-L)-*(-RDE)** WISKA Hoppmann & Mulsow GmbH Kisdorfer Weg 28 24568 Kaltenkirchen Germany Puh. +49 (0) 4191 508-100 Faksi +49 (0) 4191 508-249 Internet
Liike-elämä Sähköposti
 - Aloitus Suomi Saksa Arvoisa Herra Presidentti Sehr geehrter Herr Präsident, Erittäin virallinen, vastaanottajalla arvonimi jota käytetään nimen sijasta Hyvä Herra, Virallinen, vastaanottaja mies, nimi
Liike-elämä Sähköposti
 - Aloitus Suomi Saksa Arvoisa Herra Presidentti Sehr geehrter Herr Präsident, Erittäin virallinen, vastaanottajalla arvonimi jota käytetään nimen sijasta Hyvä Herra, Virallinen, vastaanottaja mies, nimi
Secto Design Oy Kauppalantie Kauniainen Finland tel fax
 Secto Design Oy Kauppalantie 12 02700 Kauniainen Finland tel. +358 9 5050598 fax +358 9 5475 2535 info@sectodesign.fi www.sectodesign.fi Secto 4202 Magnum pendant Available in natural birch, black or white
Auswandern Dokumente. Dokumente - Allgemeines. Dokumente - Persönliche Informationen. Fragen wo man ein Formular findet
 - Allgemeines Mistä löydän lomakkeen varten? Fragen wo man ein Formular findet Milloin [dokumenttisi] on myönnetty? Fragen wann ein Dokument ausgestellt wurde Missä [dokumenttisi] on myönnetty? Fragen
6-7 HPS III-SXE Ø 12 mm. Kaikki tämän luettelon mitat viittaavat EWIKON-kuumakanavan komponentteihin niiden ollessa käyttölämpötilassaan
 230V Sisältö/Content 2-5 Yleiskatsaus Overview 6-7 8-9 Locating ring 10 Asennusohje Assembly note Kaikki tämän luettelon mitat viittaavat EWIKON-kuumakanavan komponentteihin niiden ollessa käyttölämpötilassaan
Network to Get Work. Tehtäviä opiskelijoille Assignments for students. www.laurea.fi
 Network to Get Work Tehtäviä opiskelijoille Assignments for students www.laurea.fi Ohje henkilöstölle Instructions for Staff Seuraavassa on esitetty joukko tehtäviä, joista voit valita opiskelijaryhmällesi
ECO E II. Greenled Tarjusojantie Kempele FINLAND
 Greenled Tarjusojantie 12-14 90440 Kempele FINLAND IP44 Turvallisuusvaroitukset: Ennen asennusta tai huoltotyötä kytke valaisin irti sähköverkosta välttääksesi sähköiskun vaaran! Asennus / huoltotyön saa
VAROITUKSET. Älä pura laitetta osiin.
 VAROITUKSET Laitteen väärinkäyttö voi johtaa henkilövahinkoihin. Noudata kaikkia tässä ohjekirjassa annettuja ohjeita ja käytä laitetta oikein. Älä koskaan seiso laitteen alapuolella. Älä pura laitetta
Mr. Adam Smith Smith Plastics 8 Crossfield Road Selly Oak Birmingham West Midlands B29 1WQ
 - Osoite Mr. J. Rhodes Rhodes & Rhodes Corp. 212 Silverback Drive California Springs CA 92926 Mr. J. Rhodes Rhodes & Rhodes Corp. 212 Silverback Drive California Springs CA 92926 Osoitteen ulkoasu amerikkalaisittain:
TeleWell TW-LTE/4G/3G USB -modeemi Cat 4 150/50 Mbps
 TeleWell TW-LTE/4G/3G USB -modeemi Cat 4 150/50 Mbps Pikaohje Laite toimii Windows XP SP3, Windows 7,8,10 ja Mac OSx 10.5 tai käyttöjärjestelmissä, Linux tuki netistä ladattavilla ajureilla USB portin
On instrument costs in decentralized macroeconomic decision making (Helsingin Kauppakorkeakoulun julkaisuja ; D-31)
") On instrument costs in decentralized macroeconomic decision making (Helsingin Kauppakorkeakoulun julkaisuja ; D-31) Juha Kahkonen Click here if your download doesn"t start automatically On instrument costs
On instrument costs in decentralized macroeconomic decision making (Helsingin Kauppakorkeakoulun julkaisuja ; D-31) Juha Kahkonen Click here if your download doesn"t start automatically On instrument costs
6-7 HPS III-SXE Ø 9 mm. Kaikki tämän luettelon mitat viittaavat EWIKON-kuumakanavan komponentteihin niiden ollessa käyttölämpötilassaan
 230V Sisältö/Content 2-5 Yleiskatsaus Overview 6-7 8-9 Locating ring 10 Asennusohje Assembly note Kaikki tämän luettelon mitat viittaavat EWIKON-kuumakanavan komponentteihin niiden ollessa käyttölämpötilassaan
MARKSCHEME BARÈME DE NOTATION ESQUEMA DE CALIFICACIÓN
 M13/2/ABFIN/SP1/FIN/TZ0/XX/M MARKSCHEME BARÈME DE NOTATION ESQUEMA DE CALIFICACIÓN May / mai / mayo 2013 FINNISH / FINNOIS / FINÉS B Standard Level Niveau Moyen Nivel Medio Paper / Épreuve / Prueba 1 6
Retrojasson asennus- ja huolto-ohjeet
 Retrojasson asennus- ja huolto-ohjeet Retrojasson asennusohje 1. Asennuspohjan valinta Laite painaa noin 30 kg. Seinäkiinnitystä varten Retrojasson takaseinässä on kaksi reikää. Kiinnitykseen käytetään
HUOMAA! ON TÄRKEÄÄ, ETTÄ VÄLIT TIIVISTETÄÄN SILIKONILLA. MUUTEN VESI VOI TUNKEUTUA RAKENTEISIIN. Asennusohjeet Vinter-liukuovet
 Lue asennusohjeet läpi ennen töiden aloittamista. Jotta kehykset eivät vaurioituisi kuljetuksen aikana, ne toimitetaan osina. Olemme kuitenkin testanneet koko järjestelmän paneeleineen ennen toimitusta
FI GB. Asennus-, käyttöohjeet. Installation, operation instructions
 FI GB Asennus-, käyttöohjeet Installation, operation instructions Asennus FI Keinuripustuksen asennus Tekstin sulkeissa olevat numerot viittaavat kuvien 1, 2, 3 ja 4 numerointiin. Kiinnitä keinuripustuksen
BESCHREIBUNG: MATERIAL FÜR HUMANISTEN/GESELLSCHAFTSWISSENSCHAFTLER
 BESCHREIBUNG: MATERIAL FÜR HUMANISTEN/GESELLSCHAFTSWISSENSCHAFTLER Allgemeines Bei der Systembeschreibung, die bei diesen Fachrichtungen üblich ist, wird wie folgt vorangegangen: 1. Schritt: Das System
Capacity Utilization
 Capacity Utilization Tim Schöneberg 28th November Agenda Introduction Fixed and variable input ressources Technical capacity utilization Price based capacity utilization measure Long run and short run
RULLARADAT RULLADAT ROLLER TABLES
 ROLLER TABLES Roller tables are an important element in an assembly line, where ergonomics and good workflow must be ensured. The roller tables guarantee that the wheels can be fed forward effortlessly
JÄÄTELÖALLAS MICROGEL
 JÄÄTELÖALLAS MICROGEL Asennus- ja käyttöohjeet Käännös valmistajan alkuperäisestä materiaalista 4000466, 4000491, 4000492 SISÄLLYSLUETTELO 1. Asennus...3 2. Puhdistus...5 3. HUOM...6 4. Hallinta...7 4.1.
 LAPPSET FINNO ARCSPORT REF: DATE: 20.8.2008 2 1. Tarkista tuoteosaluettelon avulla, että olet saanut tarvitsemasi osat (s. 3). 2. Valitse ArcSport areenalle paikka ottaen huomioon valmistajan mitat (s.
6-7 HPS III-SXE Ø 6 mm. Kaikki tämän luettelon mitat viittaavat EWIKON-kuumakanavan komponentteihin niiden ollessa käyttölämpötilassaan
 230V Sisältö/Content 2-5 Yleiskatsaus Overview 6-7 8-9 Keskitysrengas Locating ring 10 Asennusohje Assembly note Kaikki tämän luettelon mitat viittaavat EWIKON-kuumakanavan komponentteihin niiden ollessa
La chaise CHIP, dessinée par Antti Kotilainen, est fabriquée et distribuée par PIIROINEN.
 CHIP CHIP on muotoilija Antti Kotilaisen suunnittelema ja PIIROISEN valmistama sekä markkinoima julkitilatuoli. CHIPin muotoilullisena lähtökohtana oli suunnitella esteettisesti ja laadullisesti kestävä
Efficiency change over time
 Efficiency change over time Heikki Tikanmäki Optimointiopin seminaari 14.11.2007 Contents Introduction (11.1) Window analysis (11.2) Example, application, analysis Malmquist index (11.3) Dealing with panel
AUTOTALLI KÄYTTÖOHJE
 AUTOTALLI KÄYTTÖOHJE ENNEN KUIN ALOITAT Ennen kuin aloitat asennuksen, ota selvää paikallisilta viranomaisilta, tarvitseeko autotalli rakennusluvan. Lue käyttöohje huolellisesti ja noudata annettuja ohjeita.
Auswandern Wohnen. Wohnen - Mieten. Äußern dass man etwas mieten möchte. Art der Unterbringung. Art der Unterbringung
 - Mieten Deutsch Ich möchte mieten. Äußern dass man etwas mieten möchte ein Zimmer eine Wohnung/ ein Apartment ein Studioapartment ein Einfamilienhaus ein Doppelhaus ein Reihenhaus Wie viel beträgt die
WindPRO version joulu 2012 Printed/Page :42 / 1. SHADOW - Main Result
 SHADOW - Main Result Assumptions for shadow calculations Maximum distance for influence Calculate only when more than 20 % of sun is covered by the blade Please look in WTG table 13.6.2013 19:42 / 1 Minimum
Asennus- ja käyttöohjeet
 UPOTETTAVA TARJOILUPATA Asennus- ja käyttöohjeet 4138930, 4138933, 4138934 ASENNUS (vain koulutetun huoltohenkilön toimesta) Tee kalusteeseen aukotus haudeosaa (1) ja käyttöpaneelia (23) varten. Katso