Maxi-Cosi Mobi. The safe world of Maxi-Cosi
|
|
|
- Väinö Aho
- 8 vuotta sitten
- Katselukertoja:
Transkriptio
1 Maxi-Cosi Mobi GB N Instructions for use/warranty IMPORTANT: Keep for future reference Bruksanvisning/Garanti ADVARSEL: Ta vare på bruksanvisningen til senere bruk S FIN Bruksanvisning/Garanti VIKTIGT: Spara på denna för framtida bruk Käyttöohjeet/Takuu TÄRKEÄÄ: Säilytä myöhempää käyttöä varten The safe world of Maxi-Cosi

2 Maxi-Cosi Mobi GB Instructions for use / Warranty 7-18 N Bruksanvisning / Garanti S Bruksanvisning / Garanti FIN Käyttöohje / Takuu Contents 2

3 Illustrations 3

4 Illustrations 4

5 Illustrations 5

6 Illustrations 6
7 Dear parents Congratulations on your purchase of the Maxi-Cosi Mobi. Safety, user-friendliness, comfort and design were given top priority during all stages of the development of the Maxi-Cosi Mobi. This product meets the most stringent safety regulations. The Maxi-Cosi Mobi offers maximum safety only when used in accordance with these instructions. Continuous research by our development team, supported by intensive contact and consultation with test persons and customers, ensures that we are kept fully up-to-date in the field of child safety. Therefore, if you have any questions concerning the use of the Maxi-Cosi Mobi, please do not hesitate to contact us. GB Dorel LEGEND 1. Removable cover 2. Shell 3. Base 4. Belt yoke 5. User manual 6. Tetherset 7. Control button support leg 8. Foot support leg 9. Support leg 10. Belt portion loop 11. Dashboard supports 12. Harness slots 13. Belt pads 14. Belt buckle 15. Adjustment button 16. Adjuster belt 17. Positioning handle 18. Frame 19. Shoulder belt 20. Belt hook 21. Car kit 22. Metal attachment hooks English 7

8 CONTENTS GB 1. IMPORTANT: READ FIRST! INSTALLING AND REMOVING THE MAXI-COSI MOBI Installing the Maxi-Cosi Mobi Removing the Maxi-Cosi Mobi PLACING AND SECURING YOUR CHILD Use of the harness system: closing and tightening the harness Seat positions (adjusting the seat into sitting and reclining positions) Removing your child MAINTENANCE AND CLEANING General Seat cover Belt buckle functioning and cleaning GENERAL INSTRUCTIONS ACCESSORIES WASTE SEPARATION NEXT STAGE CHILD RESTRAINTS (RECOMMENDED) CAR FITTING LIST WARRANTY QUESTIONS IMPORTANT: READ FIRST! The Maxi-Cosi Mobi is for rearward-facing use only. Do not use it forward facing! Read this user manual carefully and save it for future reference in the space provided at the bottom of the Maxi-Cosi Mobi. Failure to follow the instructions contained in this manual could result in serious injury to your child. Use original accessories and manufacturer-approved parts only. Do not make any changes to this product. If you have any problems or complaints, contact your retailer or importer. The Maxi-Cosi Mobi has been approved according to the latest regulations in the ECE R 44/04, the European standard for child restraints, and can be used for children aged approximately 9 months to around 5 years (Group 1+2: 9 to 25 kg). The Maxi-Cosi Mobi is designated as "semi-universal" and therefore suitable for installation on the seats of specific types of cars, as included in the Car List (see Chapter 9: Car List). Approval according to ECE R 44/04 Group Body Weight Age Maxi-Cosi Mobi kg 9 months around 5 years 8 English

9 2. INSTALLING AND REMOVING THE MAXI-COSI MOBI The Maxi-Cosi Mobi can be installed with an automatic 3-point or 2-point safety belt in combination with the tethers and support leg. To check whether your car is suitable for installing the Maxi-Cosi Mobi with tethers and support leg, see Chapter 9: Car list. Installed with 3-point safety belt Installed with static 2-point safety belt On passenger seat On left/right side of the back seat In the middle position of the back seat Yes Yes Yes Yes Yes GB Rearward-facing Forward-facing Belt routing marking Yes No Blue Frontal airbag Side airbag No Yes Never use the Maxi-Cosi Mobi on seats equipped with frontal airbags! This does not apply to side airbags. Frontal airbags must be switched off when the car seat is in the front passenger seat. The manufacturer advises that frontal airbags will be switched off or disabled by an official car-brand-dealer. The Maxi-Cosi Mobi is only suitable for use in the listed vehicles fitted with dynamic 3-point or static 2-point safety belts, approved in accordance with ECE Regulation No. 16 or equivalent standard. The proper threading of the seat belt is essential to your child s safety. The seat belt must be threaded along the blue markings on the Maxi-Cosi Mobi. Never thread the belt in any other way! 2.1 Installing the Maxi-Cosi Mobi Step 1: Adapting the harnesses to your child Before installing the Maxi-Cosi Mobi, you will need to determine the proper height of the shoulder belts for your child. The Maxi-Cosi Mobi has 3 slots for the shoulder belts. Smaller children should use the lowest slots, while older children should use the top slots. Use the middle slot for children of medium height, making sure the slot used is not below the child s shoulders. Loosen the shoulder belts by pressing the adjustment button and pulling the shoulder belts towards you (1). IMPORTANT! Do not pull on the belt pads. Release the belt buckle by pressing the red button on the buckle (2). Drape the belts over the belt hooks on the shell and flip away the belt buckle (3). Position your child in the Maxi-Cosi Mobi with his back straight up against the backrest. Adjust the height of the shoulder belts to a suitable height for your child (4). IMPORTANT! The correct height of the shoulder belts is attained when the belt disappears into the shell slightly above the shoulders of the child. Instructions for use 9

10 GB Remove your child from the Maxi-Cosi Mobi. Place the Maxi-Cosi Mobi in the sleeping position (see section 3.2: Seat positions) IMPORTANT! Make sure the support leg is in the folded-out position to enable you to access the back of the Maxi-Cosi Mobi (see Step 5; Positioning the support leg). Pull the shoulder belts until the belt yoke on the back appears and remove the shoulder belts from the belt yoke (5). IMPORTANT! Make sure the belt buckle is locked in order to prevent the belts from twisting. Pull the shoulder belts out of the belt pads through the shell and cover. Do this on both sides (6). TIP! Loosen the top part of the cover to make it easier to remove the belts and belt pads. Remember to reattach the cover to the shell afterwards (7). Remove the belt pads (8). From the front, thread one belt pad through the correct slot in the cover and shell and then rethread this belt pad through the back through the adjacent slot (9). IMPORTANT! Make sure the strap between the belt pads lies tight against the plastic shell and does not become entangled with the belt portion of the support leg. Thread the shoulder belts through the adjusted belt pads, cover and shell (10). Attach the shoulder belts to the belt yoke and check to make sure the 3 red stitching on the belt ends and the belt yoke are facing the shell (11) (if not, this means the belts are twisted). IMPORTANT! Make sure the belts are threaded along the plastic shell, remain behind the rods and do not become entangled with and stay behind the belt portion of the support leg (12). Step 2: Checking for anchor points or installing the car kit Remove the elastic band from around the tethers and let the tethers drop to the floor. There are three ways to hook the tethers onto the anchor points in the car. Specific anchor points may already be present in the car that can be used. If not, the car kit components or metal attachment hooks provided can serve as anchor points. Whenever possible, use the most forward positioned anchor points to attach the tethers Anchor points already present in the car Check the passenger seat rails for anchor points. In some cars, the child seat anchor points are part of the rail itself (13). In others, there are metal child seat anchor loops bolted to the rail, often painted blue (14). Check whether the hooks of the tether can be easily connected to and disconnected from the present anchor points (15). If so, use these points to anchor the Maxi-Cosi Mobi. IMPORTANT! Make sure the straps of the tethers are not twisted. Wait with tightening the tethers until after Step 4; Positioning the support leg. Extra anchor points provided with the Maxi-Cosi Mobi The Maxi-Cosi Mobi has extra anchor points that you can use to tether the Maxi-Cosi Mobi if no anchor points are available in your car. There are several options for doing this. Study the bottom of the car seat and the seat rails and choose the right configuration for installation; car kit or metal attachment hooks (both included). a) Car kit The (below) chart shows all possible configurations for installing the car kit components. To obtain the right length, a suitable opening in the tether must be chosen (16). IMPORTANT! Determine the length based on the position of the Maxi-Cosi Mobi in the car (rear, middle or front seat). Simply hook the tether hook onto the anchor point (17). IMPORTANT! Make sure the tether straps and car kit components are not twisted. Wait with tightening the tethers until after Step 4; Positioning the support leg. 10 English
. TIP!")
11 Maxi-Cosi Mobi on FRONT SEAT Maxi-Cosi Mobi on MIDDLE SEAT Maxi-Cosi Mobi on REAR LEFT/ RIGHT SEAT Car kit components braided together as single component 1 GB 2 3 Car kit components attached separately 1 2x b) Metal attachment hooks If you can see a bolt holding down the seat rail you can use the metal attachment hooks as separate anchor loops. Ask your car dealer to connect the metal attachment hooks to the bolt (18). IMPORTANT! Ask your certified car dealer to connect the metal attachment hooks. Changes to the car done by yourself can affect the warranty conditions of your car. Simply hook the tether hook onto the metal attachment hooks (19). IMPORTANT! Make sure the tether straps are not twisted. Wait with tightening the tethers until after Step 4; Positioning the support leg. Step 3: Installation of the Maxi-Cosi Mobi IMPORTANT! On some seats, the belts are fitted so far forward that proper installation is not possible. If this is the case, try another seat. IMPORTANT! In some cases, the buckle of the car belt may be too long and therefore sit too high against the base of the Maxi-Cosi Mobi. If this is the case, the Maxi-Cosi Mobi cannot be installed securely and you ll have to choose another position in the car. If you have any questions, please contact the manufacturer. Place the Maxi-Cosi Mobi on the seat and, using the dashboard supports, lean it against the: a) Dashboard, if installed on the front seat (20). b) Front seat(s) if installed on the left/right (21) and middle (22) of the back seat. IMPORTANT! Place the Maxi-Cosi Mobi as far as possible with the front to the back of the seat (23) and make sure the marking on the plastic base is aligned with the end of the seat of the car (24). If necessary, slide the passenger seat forward or backward until the marking is aligned with the end of the seat (25). Place the Maxi-Cosi Mobi in the sitting position (see section 4.2: Seat positions). Attach the tethers; Do not tighten until after Step 4; Positioning the support leg (17/19). Instructions for use 11
. IMPORTANT!")
12 GB Step 4: Positioning the support leg IMPORTANT! When installing on the back seat, always use the support leg to ensure the safe use of the Maxi-Cosi Mobi. The support leg does not need to be used when installing on the passenger seat (leaning against the dashboard). IMPORTANT! If the Maxi-Cosi Mobi is installed on the back seat, slide the passenger seat forward in order to create enough space for the support leg of the Maxi-Cosi Mobi (26). Fold out the support leg by removing the magnet using the loop on the belt portion of the support leg (27). The support leg will now fold itself out. IMPORTANT! Make sure the support leg is folded out as far as possible. The belt portion of the support leg should now be tight (28). Hold onto the support leg under the control button and press the control button with your thumb (29). Keep the button pressed and move the support leg downwards until it reaches the floor of the car. Release the control button and "click" the support leg into the locked position (30). Check to make sure the support leg is securely locked and stays in position by trying to move it up or down without pressing the control button. Slide the passenger seat backwards again to create enough room for the legs of the passenger on the front seat (31). Step 5: Tightening the tethers IMPORTANT! Slide the passenger seat to the front to make it possible to tighten the tethers (26). Pull the tethers as tightly as possible first on the side most far from the door by pulling the tether with the loop downwards as hard as you can (32). Then tighten the other s ide (32,2) and give extra tightness by strapping it down with your foot (32,3). Check to make sure the Maxi-Cosi Mobi is securely and firmly installed in the car by pulling on the seat. Step 6: Safety belt installation The Maxi-Cosi Mobi can be installed with a dynamic 3-point or a static 2-point safety belt: a) If you re installing the Maxi-Cosi Mobi with a dynamic 3-point safety belt, hold the lap and shoulder belt (33), thread them between the steel frame and the plastic base (34) and click the seat belt into the car seat buckle (35). Also see the blue markings for proper belt routing. b) If you re installing the Maxi-Cosi Mobi with a static 2-point safety belt, hold the lap belt (33), thread it between the steel frame and the plastic base (34) and click the seat belt into the car seat buckle (36). Also see the blue markings for proper belt routing. IMPORTANT! Make sure the seat belts are not twisted. Using the shoulder belt, pull everything to the front of the Maxi-Cosi Mobi as tightly as possible (37). Make sure the arrow continues to be aligned with the end of the car seat. Checklist To ensure the optimum safety of your child, check after installation to make sure that The seat belts are as tight as possible and not twisted. If the car kit is used, it is attached properly and not twisted. The tethers are not twisted, are properly secured, and as tight as possible. If the Maxi-Cosi Mobi is installed on the back seat, the support leg is folded out as far as possible, locked and supported against the floor of the car. The entire Maxi-Cosi Mobi is installed securely and firmly in the car (check by pulling on the seat). 2.2 Removing the Maxi-Cosi Mobi Restore the support leg to its start position by pressing the control button and moving the support leg upwards (38). Using the loop on the belt portion of the support leg, pull the support leg into its folded-up position against the plastic base (39). Secure the support leg by placing it in the appropriate place (40). 12 English
.")
13 41 42 Loosen the tethers by pushing the silver button (41,1), pushing the part with the silver button upward (41,2) and pulling on the belt with the hook attached (41,3) (keep silver button pushed in). TIP: First push the car seat down to lighten the tension of the tethers. Release the tether-hooks from the anchor points. (Possibly roll them up and bind them together with an elastic band.) Loosen the car seat belt and remove it from between the plastic base and steel frame (42). IMPORTANT! If the Maxi-Cosi Mobi is installed on the back seat, hold onto it while uninstalling to make sure it does not tip over. Remove the Maxi-Cosi Mobi from the car. GB PLACING AND SECURING YOUR CHILD 3.1 Use of the harness system: closing and tightening the harness Once the shoulder belts are adjusted to the proper height as described in section 2.1, Step 1 and your child has been placed in the seat, you can now secure your child in the seat. Slide the buckle sections together and "click" them into the belt buckle (43). IMPORTANT! Position the lap belt part of the harness system as low as possible in order to safely support your child s hips (44). Pull the shoulder belts tight (45,1) and remove any remaining slack from the harness system by pulling the belts tightly using the adjuster belt (45,2). IMPORTANT! Make sure you can fit only one finger between the harnesses and your child (46). The tighter the belts are around your child, the better the protection. IMPORTANT! Make sure the belt pads are positioned properly against your child s shoulders. IMPORTANT! Make sure the belts are not twisted. If you are unable to click the buckle sections into the buckle, release the buckle by pressing the red button and try again. If you are unable to fasten the harness belts properly or pull them tight, contact your supplier immediately and do not use the Maxi-Cosi Mobi under any circumstances. Always use the belt pads, as they are essential to your child s safety. Instruct your child to never play with the belt buckle. 3.2 Seat positions (adjusting the seat into sitting and reclining positions) The Maxi-Cosi Mobi can be adjusted to 4 different positions (47). Pull the positioning handle under the front of the seat upwards, and then pull or push the seat forwards or backwards (48). Release the positioning handle in the desired position and push until you hear a "click". IMPORTANT! Check to make sure the Maxi-Cosi Mobi is securely locked in the desired position by pulling on it. Checklist To ensure the optimal safety of your child, check before every trip to make sure that The entire Maxi-Cosi Mobi is installed securely and firmly in the car using the belts, tether set and car kit (if used). If installed on the front seat, that the Maxi-Cosi Mobi is leaning properly against the dashboard. If installed on the back seat, that the Maxi-Cosi Mobi is leaning properly on the folded-out support leg. The height of the shoulder belts is suitable for your child. The belts are not twisted. The belt pads are positioned properly against your child s shoulders. Your child is securely fastened with the harnesses, and the belt buckle is locked properly. The belts of the Maxi-Cosi Mobi are not damaged. If so, do not use the Maxi-Cosi Mobi under any circumstances and contact your retailer or importer immediately. Instructions for use 13

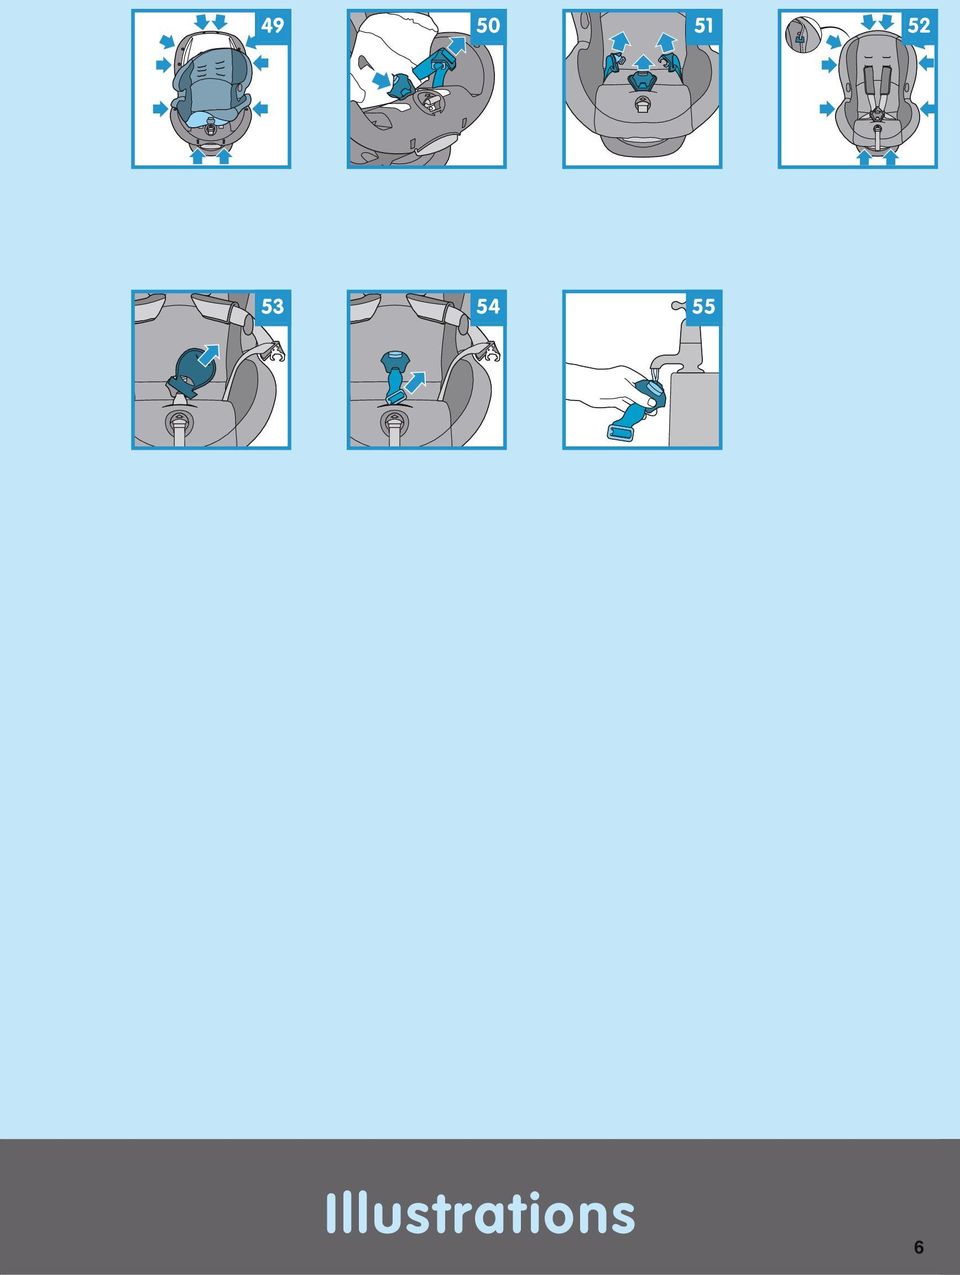
14 Removing your child Place the Maxi-Cosi Mobi in the sitting position (also see section 3.2: Seat positions). Release the belt buckle by pressing the red button on the buckle (2). Drape the belts over the belt hooks on the shell and flip away the belt buckle (3). Remove your child from the Maxi-Cosi Mobi. GB 4. MAINTENANCE AND CLEANING 4.1 General IMPORTANT! Remove the Maxi-Cosi Mobi from the car before cleaning. Use lukewarm water, soap and a rag to clean the plastic parts of the seat. Do not use abrasive cleaners. Clean the steel parts using a damp cloth. IMPORTANT! Never use lubricants, not even for the moving parts on the Maxi-Cosi Mobi Seat cover A. Removing the seat cover IMPORTANT! Make sure the belt buckle is locked in order to prevent the belts from twisting. Place the Maxi-Cosi Mobi in the sleeping position (see section 3.2: Seat positions). Pull the shoulder belts until the belt yoke on the back appears and remove the shoulder belts from the belt yoke (5). Pull the shoulder belts out of the belt pads through the shell and cover. Do this on both sides (6). TIP! Loosen the top part of the cover to make it easier to remove the belts and belt pads. Remove the belt pads (8). Loosen the cover (49). Pull the belts, belt pads, buckle sections and belt buckle through the openings in the cover (50). Remove the cover. B. Cleaning the seat cover The cover and belt pads should be washed by hand (maximum of 30 C). Do not place them in the dryer. Also see the care instructions on the cover itself. Tip: It is advisable to buy an extra cover when purchasing the Maxi-Cosi Mobi so that you can continue to use the Maxi-Cosi Mobi at all times, even when washing or drying the cover C. Reattaching the seat cover Place the cover back on the Maxi-Cosi Mobi. Thread the belt buckle and shoulder belts through the cover (51). Reattach the cover all around by fastening it to the hooks (52). Reattach the belt pads (9). IMPORTANT! Make sure the strap between the belt pads lies tight against the plastic shell and does not become entangled with the belt portion of the support leg. Thread the shoulder belts through the belt pads, cover and shell (10). Attach the shoulder belts to the belt yoke and check to make sure the 3 red stitching on the belt ends and the belt yoke are facing the shell (11) (if not, this means the belts are twisted). IMPORTANT! Make sure the belts are threaded along the plastic shell, remain behind the rods and do not become entangled with and stay behind the belt portion of the support leg (12). Check the functioning of the harness system. 14 English

15 4.3 Belt buckle functioning and cleaning The proper functioning of the belt buckle contributes substantially to the safety of your child. The most common reason that the buckle does not function properly is because it is dirty (from dust, grime, food particles, etc.). The following is a list of possible of function failures and possible solutions. A. Problems When opening the belt buckle, the buckle sections are released slowly. The belt buckle can only be opened with considerable force. It is difficult to click the buckle sections into the buckle (too much resistance). The buckle sections do not lock into the belt buckle (they are released again immediately). There is no "click" sound when locking the buckle sections into the belt buckle. GB B. Cleaning the belt buckle to solve the problem Removing the belt buckle Release the buckle by pressing the red button. Remove the belt buckle pad (53). Place the Maxi-Cosi Mobi in the reclining position (see section 4.2: Seat positions). Hold the metal clasp under the shell, tilt it and remove the belt buckle (54). Cleaning the belt buckle Rinse the belt buckle thoroughly under the tap and let it dry completely (55). IMPORTANT! Do not use lubricants! Reattaching the belt buckle Push the metal clasp through the opening of the shell and tilt it so that the belt buckle is in the proper position. IMPORTANT! Check to make sure the belt buckle stays in place by pulling on it forcefully. Reattach the belt buckle pad. If you are unable to close the belt buckle or if you are unsure whether you have solved the problem correctly, contact your retailer or importer immediately (see back of the instruction manual). Do not use the Maxi-Cosi Mobi under any circumstances! 5. GENERAL INSTRUCTIONS Always pay close attention to the following Prior to purchase, check to make sure the seat fits properly in your car. Always use the seat, even on short trips, as this is when most accidents occur. Only use the Maxi-Cosi Mobi in a car and not at home, in an airplane, boat or other recreational vehicle. The child restraint is approved for car travel only. The seat must always be secured with the seat belt, tethers and, if installed on the back seat, with the support leg, even when not in use. A loose seat could injure other passengers in a sudden stop or crash. Never use the Maxi-Cosi Mobi without its cover. Do not replace the cover with a cover other than the one supplied by the manufacturer, as the cover contributes to the safety of the seat. Always cover up the Maxi-Cosi Mobi when the car is parked in the sun, as plastic and metal parts may become extremely hot and discolour the fabric. To avoid damage to the fabric, do not remove the logos on the cover. Make sure that the Maxi-Cosi Mobi does not become wedged by or overloaded with heavy luggage, adjustable seats or slamming the car door. Make sure that all luggage and objects likely to cause injury in the event of an accident (on the rear window shelf for instance) are secured properly. If the back seat of the vehicle can be folded forward, make sure the seat back locks are fully locked before placing a child in the Maxi-Cosi Mobi on the back seat of the vehicle. Take short breaks on longer trips to give your child some freedom of movement. Instructions for use 15
.")
16 GB Never leave your child unattended in the car. Save the instruction manual for future reference in the space provided under the Maxi-Cosi Mobi. Never use a second-hand product, as you can never be certain what has happened to it. The safety of the car seat can only be guaranteed by the manufacturer when used by the original owner. Replace the Maxi-Cosi Mobi after an accident, as the seat may become unsafe due to damage that is not readily apparent. The manufacturer has taken into consideration the fact that car seats may cause indentations in car upholstery. This is unavoidable, however, due to the prescribed safety standards, and because the car seat must be installed tightly in order to protect your child. Dorel is not liable for any damage that may occur to the car upholstery as a result of this. And it goes without saying Set a good example and always wear your seat belt! 6. ACCESSORIES Sun canopy Cup holder Playtray Summer cover 7. WASTE SEPARATION If cared for properly, Maxi-Cosi Mobi can be used for 2 children or approximately 8 years. However, plastics do deteriorate with age and exposure to extreme temperatures. Please check the date of manufacture (stamped in the shell) before using a Maxi-Cosi Mobi that has been stored for a longer period. Once your child has outgrown the seat, we recommend that you discontinue using it and discard it as waste. For reasons of environmental protection, we ask that you separate the waste generated by the Maxi-Cosi Mobi from the purchase (packaging) to the moment of discarding (product parts), and dispose of it properly. Keep all plastic packaging away from children to avoid the risk of suffocation. Packaging Cardboard box Paper waste Plastic bag Household waste Product parts Fabric cover Household waste Plastic parts appropriate recycling container Metal parts Container for metal Tether/harnesses Container for polyester Belt buckle Household waste 16 English

17 8. NEXT STAGE CHILD RESTRAINTS (RECOMMENDED) Type of child restraint Approved according to ECE R 44/04 Group Body Weight Age GB to 36 kg 3,5 to 12 years old Maxi-Cosi Rodi XR to 36 kg 3,5 to 12 years old Maxi-Cosi Rodi SPS 9. CAR FITTING LIST The Maxi-Cosi Mobi is designated as semi-universal and therefore suitable for installation in certain types of cars. These types have been compiled in a list. This list is subject to change and additions. For an up-to-date version of the car fitting list, please look at the popsheet added to this product and/or retail outlet for the Maxi-Cosi Mobi, where you can inquire about the suitability of the Maxi-Cosi Mobi for your specific car. An up-to-date car fitting list is included with purchase of the Maxi-Cosi Mobi. 10. WARRANTY We guarantee that this product was manufactured in accordance with the current European safety requirements and quality standards which are applicable to this product, and that this product is free from defects in workmanship and material at the time of purchase. During the production process the product was subjected to various quality checks. If this product, despite our efforts, shows a material/manufacturing fault within the warranty period of 24 months, (with normal use as described in the user instructions) we will comply with the warranty terms and conditions. In this case please contact your dealer. For extensive information on applying the warranty terms and conditions, you can contact the dealer or look on our website: The warranty is not valid in the following cases: In case of a use or purpose other than described in the manual. If the product is submitted for repair through a dealer that is not authorized by us. If the product is not supplied to the manufacturer with the original purchase receipt (via the retailer and/or importer). If repairs were carried out by third parties or a dealer that is not authorized by us. If the defect is the result of improper or careless use or maintenance, negligence or impact damage to the fabric cover and/or frame. If the parts show normal wear and tear that may be expected from daily use of a product (wheels, rotating and moving parts etc.) Warranty 17

18 Date of effect: The warranty becomes effective on the date the product is purchased. Warranty term: The warranty period applies for a period of 24 consecutive months. The warranty only applies for the first owner and is not transferable. GB What to do in case of defects: After purchasing the product, keep the purchase receipt. The date of purchase must be clearly visible on the receipt. Should problems or defects arise please contact your retailer. Exchanging or taking back the product cannot be requested. Repairs do not give entitlement to extension of the warranty. Products that are returned directly to the manufacturer are not eligible for warranty. This Warranty Clause conforms to European Directive 99/44/EG of 25 May QUESTIONS If you have any questions, please contact your retailer or importer (see back of instruction manual). Make sure you have the following information on hand when calling: Serial number at the bottom of the orange sticker (at the back of the Maxi-Cosi Mobi) Make and type of car and seat on which the Maxi-Cosi Mobi is installed Your child s age and weight 18 Warranty

19 Kjære foreldre Gratulerer med anskaffelsen av Maxi-Cosi Mobi. Sikkerhet, brukervennlighet, komfort og design har hatt førsteprioritet i alle stadia av utviklingen av Maxi-Cosi Mobi. Dette produktet oppfyller de aller strengeste sikkerhetskrav. Optimal sikkerhet oppnås kun hvis Maxi-Cosi Mobi blir brukt i henhold til denne bruksanvisningen. Kontinuerlig forskning, som utføres av vår avdeling for produktutvikling og suppleres med omfattende kontakt med testpersoner og kunder, gjør at vi hele tiden blir informert om de nyeste utviklingene når det gjelder sikring av barn. Nøl derfor ikke med å kontakte oss hvis dere har spørsmål om bruken av Maxi-Cosi Mobi. N Dorel FORKLARING 1. Løst trekk 2. Sete 3. Understell 4. Feste til sikkerhetsseler 5. Bruksanvisning 6. Selesettfeste 7. Kontrollknapp støtteben 8. Fotstøtte ben 9. Støtteben 10. Beltereguleringsløkke 11. Dashbordstøtter 12. Åpninger til sikkerhetsseler 13. Belteputer 14. Beltelås 15. Justeringsknapp 16. Justeringsbelte 17. Innstillingshåndtak 18. Ramme 19. Skulderbelte 20. Beltekrok 21. Bilsett 22. Festekroker i metall Norsk 19

20 INNHOLD N 1. VIKTIG: LES DETTE FØRST! MONTERE OG FJERNE MAXI-COSI MOBI Montere Maxi-Cosi Mobi Fjerne Maxi-Cosi Mobi PLASSERE OG SIKRE BARNET Bruk av sikkerhetsselesystemet: Lukke og stramme sikkerhetsselene Setestillinger (justere setet til sitte- og liggestillinger) Fjerne barnet VEDLIKEHOLD OG RENGJØRING Generelt Setetrekk Beltelås funksjon og rengjøring GENERELLE INSTRUKSER TILBEHØR KILDESORTERING AV AVFALL NESTE STADIUM SIKKERHETSSETER TIL BARN (ANBEFALT) BILOVERSIKT GARANTI SPØRSMÅL VIKTIG: LES DETTE FØRST! Maxi-Cosi Mobi må kun brukes bakovervendt. Må ikke brukes med ansiktet i kjøreretningen! Les denne bruksanvisningen nøye og gjem den til senere bruk i rommet som finnes i bunnen av Maxi-Cosi Mobi. Manglende overholdelse av instruksene som finnes i denne bruksanvisningen, kan føre til at barnet får alvorlige skader. Bruk kun originalt tilbehør og originale deler som er godkjent av fabrikanten. Foreta ingen endringer av produktet. Ved eventuelle problemer eller klager, vennligst ta kontakt med forhandleren eller importøren. Maxi-Cosi Mobi er godkjent i henhold til de siste forskrifter i ECE R 44/04, den europeiske standarden for sikkerhetsseter til barn, og kan brukes til barn fra ca. 9 måneder til ca. 5 år (Gruppe 1+2: 9 til 25 kg). Maxi- Cosi Mobi har betegnelsen "semi-universell" og kan derfor monteres på seter i de spesifikke biltyper som forekommer i biloversikten (se Kapittel 9: Biloversikt). Godkjenning i henhold til ECE R 44/04 Gruppe Kroppsvekt Alder Maxi-Cosi Mobi kg 9 måneder ca. 5 år 20 Norsk

21 2. MONTERE OG FJERNE MAXI-COSI MOBI Maxi-Cosi Mobi kan monteres med et automatisk 3-punkts eller 2-punkts bilbelte i kombinasjon med festeselene og støttebenet. Kontroller om din bil er egnet til montering av Maxi-Cosi Mobi med festeseler og støtteben. Se Kapittel 9: Biloversikt. Montert med 3-punkts bilbelte Montert med statisk 2-punkts bilbelte Ja Ja N På passasjersetet På venstre/høyre side av baksetet I midtstilling på baksetet Ja Ja Ja Ryggen mot kjøreretningen Ansiktet i kjøreretningen Belteføringsmarkering Ja Nei Blå Front-kollisjonspute Side-kollisjonspute Nei Ja Bruk aldri Maxi-Cosi Mobi på seter med front-kollisjonsputer! Dette gjelder ikke side-kollisjonsputer. Airbag i forsetet må slåes av, når bilstolen plasseres i passasjersetet foran. Produsenten anbefaler at airbagen blir slått av eller de-montert av en offisiel bilmerke-forhandler Maxi-Cosi Mobi er kun egnet til bruk i de kjøretøyene i oversikten som er utstyrt med et dynamisk 3-punkts eller et statisk 2-punkts bilbelte, som er godkjent i henhold til ECE forskrift nr.16 eller tilsvarende standard. For barnets sikkerhet er det helt nødvendig at bilbeltet tres riktig. Bilbeltet må føres langs de blå markeringene på Mobi. Tre aldri beltet på noen annen måte! 2.1 Montere Maxi-Cosi Mobi Trinn 1: Justere sikkerhetsselen til barnet Før Maxi-Cosi Mobi monteres må man fastslå hva som er riktig høyde på skulderbeltene for barnet. Maxi-Cosi Mobi har 3 åpninger for skulderbeltene. Små barn bør bruke de nederste åpningene, mens eldre barn bør bruke de øvre åpningene. Bruk den midterste åpningen til mellomstore barn. Kontroller at åpningen som benyttes ikke befinner seg lavere enn barnets skulderhøyde. Løsne skulderbeltene ved å trykke inn justeringsknappen og trekke skulderbeltene mot deg (1). VIKTIG! Ikke trekk i belteputene. Åpne beltelåsen ved å trykke inn den røde knappen på låsen (2). Legg beltene over beltekrokene på setet og vipp bort beltelåsen (3). Sett barnet i Maxi-Cosi Mobien med rett rygg mot seteryggen. Juster høyden på skulderbeltene slik at den passer til barnet (4). VIKTIG! Skulderbeltene har riktig høyde når beltet forsvinner inn i setet rett ovenfor skuldrene på barnet. Ta barnet ut av Maxi-Cosi Mobien. Bruksanvisning 21
22 N Sett Maxi-Cosi Mobien i sovestilling (se del 3.2: Setestillinger). VIKTIG! Kontroller at støttebenet er i utslått stilling, slik at du kan komme til på baksiden av Maxi-Cosi Mobien (se Trinn 5: Innstilling av støttebenet). Dra i skulderbeltene til belteplaten på baksiden kommer til syne og fjern skulderbeltene fra belteplaten (5). VIKTIG! Kontroller at beltelåsen er låst for å unngå at beltene vrir seg. Dra skulderbeltene ut av belteputene gjennom setet og trekket. Gjør dette på begge sider (6). TIPS! Løsne den øverste delen av trekket for å gjøre det enklere å fjerne beltene og belteputene. Husk å feste trekket til setet igjen etterpå (7). Fjern belteputene (8). Tre en av belteputene forfra gjennom den riktige åpningen i trekket og setet og tre så denne belteputen tilbake gjennom ryggen igjen gjennom åpningen ved siden av (9). VIKTIG! Kontroller at remmen mellom belteputene ligger tett inntil plastdelen av setet og ikke floker seg sammen med beltedelen på støttebenet. Tre skulderbeltene gjennom de justerte belteputene, trekket og setet (10). Fest skulderbeltene til belteplaten og kontroller slik at du er sikker på at de 3 røde sømmene på belteendene og belteplaten er vendt mot setet (11) (hvis ikke er beltene vridd). VIKTIG! Kontroller at beltene er ført langs plastdelen av setet, at de befinner seg bak stengene og ikke floker seg sammen med eller befinner seg bak beltedelen på støttebenet (12). Trinn 2: Kontroll av festepunkter eller montering av bilsett Fjern strikken som holder tjoringene sammen og la tjoringene falle ned på bilgulvet. Det er tre måter å hekte tjoringene fast til festepunktene i bilen. Det fins muligens allerede festepunkter i bilen som kan brukes. Hvis ikke, kan delene i bilsettet eller festekrokene i metall brukes til dette formålet. Om mulig, bruk festepunktene som sitter lengst fremme for å feste festeselene Det fins allerede festepunkter i bilen Sjekk skinnene til passasjersetet for festepunkter. I noen biler utgjør festepunktene for barnesete en del av skinnen selv (13). I andre biler er det skrudd fast festeøyne (ofte blåmalte) til skinnen (14). Kontroller om krokene på tjoringene lett kan festes til og løsnes fra de eksisterende festepunktene (15). Hvis dette ikke byr på problemer, kan disse festepunktene brukes ved montering av Maxi-Cosi Mobi. VIKTIG! Se til at tjoringsstroppene ikke er vridd. Vent med å stramme tjoringene til trinn 4 er gjennomført; Plassering av støttebenet. Ekstra festepunkter levert med Maxi-Cosi Mobi Maxi-Cosi Mobi er også utstyrt med ekstra festepunkter som kan brukes til fasttjoring av Maxi-Cosi Mobi hvis det ikke fins festepunkter i bilen din. Det er flere muligheter for å få til dette. Studer bunnen av bilsetet og seteskinnene og velg rett måte å montere setet på, ved hjelp av bilsettet eller festekrokene i metall (begge deler følger med). a) Bilsett Oversikten (nedenfor) viser alle mulige måter å montere delene i bilsettet på. For å oppnå riktig lengde, må en passende åpning i tjoringen velges (16). VIKTIG! Bestem lengden i henhold til plasseringen av Maxi-Cosi Mobi i bilen (baksetet, i midten eller forsetet). Hekt rett og slett tjoringskroken fast på festepunktet (17). VIKTIG! Se til at tjoringsstroppene og delene i bilsettet ikke er vridd. Vent med å stramme tjoringene til trinn 4 er gjennomført; Plassering av støttebenet. b) Festekroker i metall Hvis du kan se en skrue som fester seteskinnen, kan du bruke festekrokene i metall som separate festeøyne. Be din forhandler om å montere festekrokene i metall til skruefestet (18). VIKTIG! Be din sertifiserte bilforhandler om å montere festekrokene i metall. Hvis du utfører endringer på bilen selv, kan det ha følger for garantibestemmelsene for bilen din. Hekt rett og slett tjoringskroken fast på festekrokene i metall (19). 22 Norsk
23 Maxi-Cosi Mobi på FORSETET Maxi-Cosi Mobi på MIDTRE BAKSETE Maxi-Cosi Mobi på VENSTRE/ HØYRE BAKSETE Bilsettdeler flettet sammen til én del 1 N 2 3 Bilsettdeler festet hver for seg 1 2x VIKTIG! Se til at tjoringsstroppene ikke er vridd. Vent med å stramme tjoringene til trinn 4 er gjennomført; Plassering av støttebenet. Trinn 3: Montering av Maxi-Cosi Mobi VIKTIG! På noen seter er beltene montert så langt fremme at riktig montering ikke er mulig. Hvis situasjonen er slik, må man prøve et annet sete. VIKTIG! I noen tilfeller er låsen på bilbeltet så lang at den kommer for langt opp mot understellet på Mobi. Hvis dette er tilfellet, kan Maxi-Cosi Mobi ikke monteres på sikker måte og må man velge et annet plasseringssted i bilen. Ved eventuelle spørsmål ber vi deg kontakte fabrikanten. Sett Maxi-Cosi Mobi på setet og len det, med bruk av dashbordstøttene, mot: a) Dashbordet, hvis Maxi-Cosi Mobi er montert på forsetet (20). b) Forsetet/-setene hvis Maxi-Cosi Mobi er montert på høyre/venstre side av (21) eller midt på (22) baksetet. VIKTIG! Plasser Maxi-Cosi Mobi som vist (23) og kontroller at markeringene på understellet er på linje med kanten av bilsetet (24). Eventuelt må passasjersetet skyves lenger frem eller tilbake til markeringen er på høyde med setekanten (25). Sett Maxi-Cosi Mobi i sittestilling (se del 4.2: Setestillinger). Fest festeselene; Stram ikke til trinn 4 er gjennomført; Plassering av støttebenet (17/19). Trinn 4: Plassering av støttebenet VIKTIG! Ved montering på baksetet må støttebenet alltid benyttes for at Maxi-Cosi Mobi skal være sikker i bruk. Støttebenet trenger ikke å brukes ved montering på passasjersetet (lent mot dashbordet). VIKTIG! Hvis Maxi-Cosi Mobi monteres på baksetet, må passasjersetet foran skyves fremover slik at det blir plass nok til støttebenet på Maxi-Cosi Mobi (26). Bruksanvisning 23
24 N Slå ut støttebenet ved å fjerne magneten ved hjelp av løkken på beltedelen på støttebenet (27). Støttebenet slår seg nå ut selv. VIKTIG! Pass på at støttebenet er slått helt ut. Beltedelen på støttebenet skal da være stram (28). Hold støttebenet fast under kontrollknappen og trykk inn kontrollknappen med tommelen (29). Hold knappen inne og før støttebenet ned til det når ned til bilgulvet. Slipp kontrollknappen og "klikk" støttebenet i låst stilling (30). Kontroller at støttebenet er forsvarlig låst og blir stående i stillingen ved å prøve om det kan beveges opp eller ned uten å trykke inn kontrollknappen. Skyv passasjersetet bakover igjen for å få plass til passasjeren på dette setet (31). Trinn 5: Stramme festeselene VIKTIG! Skyv passasjersetet forover for å muliggjøre stramming av festeselene (26). Stram festeselene ved å trekke dem nedover (32) først nærmest midten av bilen (32,1), deretter nærmest bildøren så stramt som mulig (32,2). Festeselene kan avsluttningsvis strammes ved å benytte foten (32,3). Dra i setet for å forvisse deg om at Maxi-Cosi Mobi er sikkert og solid festet i bilen Trinn 6: Montering av sikkerhetsbelte Maxi-Cosi Mobi kan monteres med et dynamisk 3-punkts eller et statisk 2-punkts bilbelte: a) Hvis Maxi-Cosi Mobi monteres med et dynamisk 3-punkts bilbelte: Hold hofte- og skulderbeltet (33), tre dem mellom stålrammen og plastunderstellet (34) og klikk bilbeltet fast i beltelåsen (35). Pass på at beltet føres riktig, langs den blå markeringen. b) Hvis Maxi-Cosi Mobi monteres med et statisk 2-punkts bilbelte: Hold hoftebeltet (33), tre det mellom stålrammen og plastunderstellet (34) og klikk bilbeltet fast i bilsetelåsen (36). Pass på at beltet føres riktig, langs den blå markeringen. VIKTIG! Kontroller at bilbeltene ikke er vridd. Dra, ved hjelp av skulderbeltet, alt til forsiden av Maxi-Cosi Mobi og så stramt som mulig (37). Pass på at pilen fortsatt befinner seg på linje med kanten på bilsetet. Kontrolliste For å sørge for at barnet er optimalt sikret, må man etter monteringen kontrollere at Bilbeltene er så stramme som mulig og ikke vridd. Hvis bilsettet brukes, dette er riktig festet og ikke vridd. Festeselene ikke er vridd, at de er godt sikret så stramme som mulig. Hvis Maxi-Cosi Mobi er montert på baksetet, at støttebenet er maksimalt utslått, låst og at det går helt ned til bilgulvet. Hele Maxi-Cosi Mobi er sikkert og solid festet til bilen (kontrolleres ved å dra i setet). 2.2 Fjerne Maxi-Cosi Mobi Sett støttebenet i dets opprinnelige stilling igjen ved hjelp av kontrollknappen og ved å føre støttebenet opp (38). Ved hjelp av løkken på beltedelen på støttebenet trekkes støttebenet tilbake i innslått stilling mot plastunderstellet (39). Sikre støttebenet ved å sette det på riktig sted (40). Løsne festeselene ved å trykke på den grå knappen (41,1). Hold denne knappen inne mens du skyver den oppover (41,2) og samtidig drar i den andre delen (41,3). TIPS: Trykk Maxi-Cosi Mobi ned i bilens sete for å slakke festeselene. Løsne festeselekrokene fra ankerpunktene. (Rull dem eventuelt opp og hold dem sammen med en strikk.) Løsne bilbeltet og ta det ut av mellomrommet mellom plastunderstellet og stålrammen (42). VIKTIG! Hvis Maxi-Cosi Mobi er montert på baksetet, må det holdes mens det demonteres for å unngå at det tipper over. Ta Maxi-Cosi Mobi ut av bilen. 3. PLASSERE OG SIKRE BARNET 3.1 Bruk av sikkerhetsselesystemet: Lukke og stramme sikkerhetsselene Når skulderbeltene er justert i riktig høyde, som beskrevet i del 2.1, Trinn 1, og barnet er plassert i setet, kan det nå sikres i setet. 24 Norsk
25 Skyv låsdelene sammen og "klikk" dem fast i beltelåsen (43). VIKTIG! Plasser hoftebeltedelen av sikkerhetsselesystemet så lavt som mulig for å gi sikker støtte til barnets hofter (44). Stram skulderbeltene godt (45,1) og fjern all gjenværende slark i sikkerhetsselesystemet ved å stramme beltene godt med justeringsbeltet (45,2). VIKTIG! Kontroller at det bare er plass til én finger mellom sikkerhetsselen og barnet (46). Jo strammere beltene sitter rundt barnet, desto bedre beskyttelse gir de. VIKTIG! Kontroller at belteputene er plassert riktig mot barnets skuldre. VIKTIG! Kontroller at beltene ikke er vridd. Hvis du ikke klarer å klikke låsdelene fast i låsen, må du åpne låsen ved å trykke inn den røde knappen og deretter prøve på nytt. Hvis du ikke klarer å feste sikkerhetsselene skikkelig eller stramme dem godt, må du øyeblikkelig ta kontakt med forhandleren og ikke under noen omstendighet bruke Maxi-Cosi Mobi. Bruk alltid belteputene ettersom disse er helt vesentlige for barnets sikkerhet. Lær barnet at det aldri må leke med beltelåsen. 3.2 Setestillinger (justere setet til sitte- og liggestillinger) Maxi-Cosi Mobi kan justeres i 4 ulike stillinger (47). Dra innstillingshåndtaket under setets forside opp og dra eller skyv deretter setet fremover eller bakover (48). Slipp innstillingshåndtaket ved ønsket stilling og skyv til du hører et "klikk". VIKTIG! Kontroller at Maxi-Cosi Mobi er forsvarlig låst i ønsket stilling ved å dra i det. Kontrolliste For å forvisse deg om at barnet er optimalt sikret, må du før hver tur kontrollere at Hele Maxi-Cosi Mobien er solid og sikkert montert i bilen ved hjelp av beltene, festeselesettet og bilsettet (hvis dette brukes). Maxi-Cosi Mobi er forsvarlig lent mot dashbordet hvis det er montert på passasjersetet. Maxi-Cosi Mobi er forsvarlig støttet at det utslåtte støttebenet hvis det er montert på baksetet. Høyden på skulderbeltene passer til barnet. Beltene ikke er vridd. Belteputene er plassert riktig mot barnets skuldre. Barnet sitter godt fast med sikkerhetsselene og at beltelåsen er forsvarlig låst. Beltene på Maxi-Cosi Mobi ikke er skadd. Hvis dette er tilfellet, må Maxi-Cosi Mobi ikke under noen omstendighet brukes og må man øyeblikkelig ta kontakt med forhandleren eller importøren. N Fjerne barnet Sett Maxi-Cosi Mobi i sittestilling (se også del 3.2: Setestillinger). Åpne beltelåsen ved å trykke inn den røde knappen på låsen (2). Legg beltene over beltekrokene på setet og vipp bort beltelåsen (3). Ta barnet ut av Maxi-Cosi Mobi. 4. VEDLIKEHOLD OG RENGJØRING 4.1 Generelt VIKTIG! Ta Maxi-Cosi Mobi ut av bilen før rengjøring. Bruk lunkent vann, såpe og en klut til rengjøring av setets plastdeler. Bruk ikke aggressive rengjøringsmidler. Rengjør ståldelene med en fuktig klut. VIKTIG! Bruk aldri smøremidler, heller ikke til bevegelige deler på Maxi-Cosi Mobi. Bruksanvisning 25
26 N Setetrekk A. Fjerne setetrekket VIKTIG! Kontroller at beltelåsen er låst for å unngå at beltene vris. Sett Maxi-Cosi Mobi i sovestilling (se del 3.2: Setestillinger). Dra i skulderbeltene til belteplaten på baksiden kommer til syne og fjern skulderbeltene fra belteplaten (5). Dra skulderbeltene ut av belteputene og gjennom setet og trekket. Gjør dette på begge sider (6). TIPS! Løsne den øverste dele av trekket for å gjøre det enklere å fjerne beltene og belteputene. Fjern belteputene (8). Løsne trekket (49). Dra beltene, belteputene, låsdelene og beltelåsen gjennom åpningene i trekket (50). Fjern trekket. B. Vaske setetrekket Trekket og belteputene må vaskes for hånd (maksimum 30 C). Legg dem ikke i tørketrommel. Se også vaskeanvisningen på selve trekket. Tips: Man rådes til å kjøpe et ekstra trekk ved anskaffelsen av Maxi-Cosi Mobi. Det er da mulig å bruke Maxi- Cosi Mobi kontinuerlig, også når trekket vaskes og tørkes. C. Sette setetrekket tilbake på plass Sett trekket tilbake på Maxi-Cosi Mobi. Tre beltelåsen og skulderbeltene gjennom trekket (51). Fest trekket hele veien rundt igjen ved å sette det fast med krokene (52). Fest belteputene igjen (9). VIKTIG! Kontroller at remmen mellom belteputene ligger helt inntil plastdelen av setet og at den ikke floker seg sammen med beltedelen på støttebenet. Tre skulderbeltene gjennom belteputene, trekket og setet (10). Fest skulderbeltene til belteplaten og kontroller at de 3 røde sømmene på belteendene og belteplaten vender mot setet (11) (hvis ikke, betyr det at beltene er vridd). VIKTIG! Kontroller at beltene er ført langs plastdelen av setet, at de holder seg bak stengene og ikke blir floket sammen med eller blir værende bak beltedelen på støttebenet (12). Kontroller at sikkerhetsselesystemet virker som det skal. 4.3 Beltelås funksjon og rengjøring For ditt barns sikkerhet er det av stor betydning at beltelåsen virker som den skal. Den vanligste årsaken til at låsen ikke virker tilfredsstillende er at den er skitten (som følge av støv, smuss, matrester o.l). Her følger en liste med mulige årsaker til funksjonsproblemer, samt eventuelle løsninger. A. Problemer Når beltelåsen åpnes, tar det lang tid før låsdelene løsner. Beltelåsen kan bare åpnes ved at man bruker temmelig stor kraft. Det er vanskelig å klikke låsdelene fast i låsen (for stor motstand). Låsdelene låses ikke fast i beltelåsen (de løsner igjen med en gang). Det er ingen "klikkelyd" når låsdelene låses fast i beltelåsen. B. Rengjøre beltelåsen for å løse problemet Fjerne beltelåsen Åpne låsen ved å trykke inn den røde knappen. Fjern beltelåsputen (53). Sett Maxi-Cosi Mobi i liggestilling (se del 4.2: Setestillinger). Hold metallspennen under setet, vri den og fjern beltelåsen (54). Rengjøre beltelåsen Skyll beltelåsen grundig under springen og la den tørke helt (55). VIKTIG! Ikke bruk smøremidler! 26 Norsk
CarSeat.se. English. EXI0154_GBA_MOBI_I_BW:-- 16-03-2007 11:08 Pagina 7. Dear parents. Congratulations on your purchase of the Maxi-Cosi Mobi.
 EXI0154_GBA_MOBI_I_BW:-- 16-03-2007 11:08 Pagina 7 Dear parents Congratulations on your purchase of the Maxi-Cosi Mobi. Safety, user-friendliness, comfort and design were given top priority during all
Maxi-Cosi Mobi (XP) Maxi-Cosi Mobi (XP) www.maxi-cosi.com. www.maxi-cosi.com. The safe world of Maxi-Cosi
 Maxi-Cosi Mobi (XP) www.maxi-cosi.com. www.maxi-cosi.com. The safe world of Maxi-Cosi") 0 Maxi-Cosi (XP) www.maxi-cosi.com Maxi-Cosi (XP) 0 0 0 0 0 0 0 0 0 0 04 03 03 03 EN Instructions for use / Warranty 7-8 0 0 NO Bruksanvisning / Garanti 0 9-30 0 SV Bruksanvisning / Garanti 3 05 05 06
0 Maxi-Cosi (XP) www.maxi-cosi.com Maxi-Cosi (XP) 0 0 0 0 0 0 0 0 0 0 04 03 03 03 EN Instructions for use / Warranty 7-8 0 0 NO Bruksanvisning / Garanti 0 9-30 0 SV Bruksanvisning / Garanti 3 05 05 06
Mobi (XP) EN Instructions for use / Warranty. SV Bruksanvisning / Garanti. Käyttöohje / Takuu. 9 M 4 Y / 9-25 kg INDEX
 EN Instructions for use / Warranty. SV Bruksanvisning / Garanti. Käyttöohje / Takuu. 9 M 4 Y / 9-25 kg INDEX") Mobi (XP) 0 0 04 05 9 M 4 Y / 9-5 kg INDEX 0 0 EN Instructions for use / Warranty 0 4 5 7-8 04 05 06 07 NO Bruksanvisning / Garanti 9-0 6 07 NORGE Dorel Netherlands P.O. Box 607 5700 ET Helmond Nederland
Mobi (XP) 0 0 04 05 9 M 4 Y / 9-5 kg INDEX 0 0 EN Instructions for use / Warranty 0 4 5 7-8 04 05 06 07 NO Bruksanvisning / Garanti 9-0 6 07 NORGE Dorel Netherlands P.O. Box 607 5700 ET Helmond Nederland
1. SIT. The handler and dog stop with the dog sitting at heel. When the dog is sitting, the handler cues the dog to heel forward.
 START START SIT 1. SIT. The handler and dog stop with the dog sitting at heel. When the dog is sitting, the handler cues the dog to heel forward. This is a static exercise. SIT STAND 2. SIT STAND. The
PAINEILMALETKUKELA-AUTOMAATTI AUTOMATIC AIR HOSE REEL
 MAV4 MAV5 MAV6 PAINEILMALETKUKELA-AUTOMAATTI AUTOMATIC AIR HOSE REEL Käyttöohje Instruction manual HUOMIO! Lue käyttöohjeet huolellisesti ennen laitteen käyttöä ja noudata kaikkia annettuja ohjeita. Säilytä
Box 1. Things you have/ Pakkaus sisältää. x 4 x 16 x 4 x 4. 300mm. 1700mm. 300mm 1. Things you should know / Sinun Tulee Tietää
 Phobos 30 Things you should know / Sinun Tulee Tietää Things you prepare / Näitä Tarvitset DURING INSTALLATION ALL PRODUCTS: use protective gloves at all times use eye protection at all times never install
LYTH-CONS CONSISTENCY TRANSMITTER
 LYTH-CONS CONSISTENCY TRANSMITTER LYTH-INSTRUMENT OY has generate new consistency transmitter with blade-system to meet high technical requirements in Pulp&Paper industries. Insurmountable advantages are
On instrument costs in decentralized macroeconomic decision making (Helsingin Kauppakorkeakoulun julkaisuja ; D-31)
") On instrument costs in decentralized macroeconomic decision making (Helsingin Kauppakorkeakoulun julkaisuja ; D-31) Juha Kahkonen Click here if your download doesn"t start automatically On instrument costs
On instrument costs in decentralized macroeconomic decision making (Helsingin Kauppakorkeakoulun julkaisuja ; D-31) Juha Kahkonen Click here if your download doesn"t start automatically On instrument costs
Choose Finland-Helsinki Valitse Finland-Helsinki
 Write down the Temporary Application ID. If you do not manage to complete the form you can continue where you stopped with this ID no. Muista Temporary Application ID. Jos et onnistu täyttää lomake loppuun
34-9208-2. Trolley Case. Resväska Trillekoffert Matkalaukku. Push-button locking tele scopic handle. Four 360 multidirectional wheels
 34-9208-2 Trolley Case Resväska Trillekoffert Matkalaukku Push-button locking tele scopic handle Four 360 multidirectional wheels Trolley Case Made of polycarbonate. Push-button locking telescopic handle
National Building Code of Finland, Part D1, Building Water Supply and Sewerage Systems, Regulations and guidelines 2007
 National Building Code of Finland, Part D1, Building Water Supply and Sewerage Systems, Regulations and guidelines 2007 Chapter 2.4 Jukka Räisä 1 WATER PIPES PLACEMENT 2.4.1 Regulation Water pipe and its
Information on preparing Presentation
 Information on preparing Presentation Seminar on big data management Lecturer: Spring 2017 20.1.2017 1 Agenda Hints and tips on giving a good presentation Watch two videos and discussion 22.1.2017 2 Goals
On instrument costs in decentralized macroeconomic decision making (Helsingin Kauppakorkeakoulun julkaisuja ; D-31)
") On instrument costs in decentralized macroeconomic decision making (Helsingin Kauppakorkeakoulun julkaisuja ; D-31) Juha Kahkonen Click here if your download doesn"t start automatically On instrument costs
On instrument costs in decentralized macroeconomic decision making (Helsingin Kauppakorkeakoulun julkaisuja ; D-31) Juha Kahkonen Click here if your download doesn"t start automatically On instrument costs
Efficiency change over time
 Efficiency change over time Heikki Tikanmäki Optimointiopin seminaari 14.11.2007 Contents Introduction (11.1) Window analysis (11.2) Example, application, analysis Malmquist index (11.3) Dealing with panel
Uusi Ajatus Löytyy Luonnosta 4 (käsikirja) (Finnish Edition)
 (Finnish Edition)") Uusi Ajatus Löytyy Luonnosta 4 (käsikirja) (Finnish Edition) Esko Jalkanen Click here if your download doesn"t start automatically Uusi Ajatus Löytyy Luonnosta 4 (käsikirja) (Finnish Edition) Esko Jalkanen
Uusi Ajatus Löytyy Luonnosta 4 (käsikirja) (Finnish Edition) Esko Jalkanen Click here if your download doesn"t start automatically Uusi Ajatus Löytyy Luonnosta 4 (käsikirja) (Finnish Edition) Esko Jalkanen
1/4. Resetointi ja vianmääritys. 22.11.2013 ntr
 A400-64176 Sähköpöydät 1/4 Resetointi ja vianmääritys Pöydän resetointi tehdään aina ennen käyttöönottoa ja tarvittaessa häiriötilanteessa. Määritä pöydän tyyppi käyttökytkimen ja jalustan mukaan ja tee
anna minun kertoa let me tell you
 anna minun kertoa let me tell you anna minun kertoa I OSA 1. Anna minun kertoa sinulle mitä oli. Tiedän että osaan. Kykenen siihen. Teen nyt niin. Minulla on oikeus. Sanani voivat olla puutteellisia mutta
4x4cup Rastikuvien tulkinta
 4x4cup Rastikuvien tulkinta 4x4cup Control point picture guidelines Päivitetty kauden 2010 sääntöihin Updated for 2010 rules Säännöt rastikuvista Kilpailijoiden tulee kiinnittää erityistä huomiota siihen,
VAROITUKSET. Älä pura laitetta osiin.
 VAROITUKSET Laitteen väärinkäyttö voi johtaa henkilövahinkoihin. Noudata kaikkia tässä ohjekirjassa annettuja ohjeita ja käytä laitetta oikein. Älä koskaan seiso laitteen alapuolella. Älä pura laitetta
Capacity Utilization
 Capacity Utilization Tim Schöneberg 28th November Agenda Introduction Fixed and variable input ressources Technical capacity utilization Price based capacity utilization measure Long run and short run
FinFamily PostgreSQL installation ( ) FinFamily PostgreSQL
 FinFamily PostgreSQL") FinFamily PostgreSQL 1 Sisällys / Contents FinFamily PostgreSQL... 1 1. Asenna PostgreSQL tietokanta / Install PostgreSQL database... 3 1.1. PostgreSQL tietokannasta / About the PostgreSQL database...
FinFamily PostgreSQL 1 Sisällys / Contents FinFamily PostgreSQL... 1 1. Asenna PostgreSQL tietokanta / Install PostgreSQL database... 3 1.1. PostgreSQL tietokannasta / About the PostgreSQL database...
Recirkulering. El-tilslutning. Kontrolpanel. Dansk. Timerfunktion
 1 2 Dansk Recirkulering Luften renses ved hjælp at aktive kulfiltre hvorefter den returneres til rummet. Kulfiltre bestilles separat. El-tilslutning Emhætten skal tilsluttes 230 V i henhold til stærkstrømsreglementet.
TIKIT a) Suorassa tikissä ristiommel jää nahan alle piiloon. b) Ristitikissä ommel jää näkyviin.
 Suorassa tikissä ristiommel jää nahan alle piiloon. b) Ristitikissä ommel jää näkyviin.") CML WHEEL COVER -RUORINAHKAN OMPELUOHJE Liota nahkoja lämpimässä vedessä n. 15 minuuttia ennen ompelua. Pidä nahka kosteana koko ompelun ajan esim. sumutepullolla. Pidä ommellessa kevyt kireys nahkaan,
CML WHEEL COVER -RUORINAHKAN OMPELUOHJE Liota nahkoja lämpimässä vedessä n. 15 minuuttia ennen ompelua. Pidä nahka kosteana koko ompelun ajan esim. sumutepullolla. Pidä ommellessa kevyt kireys nahkaan,
MOOTTORIPYÖRÄNOSTIN MOTORCYCLE LIFT
 MEG30 Lue käyttöohjeet huolellisesti ennen laitteen käyttöä ja noudata kaikkia annettuja ohjeita. Säilytä ohjeet myöhempää tarvetta varten. Read the instruction manual carefully before using the tool and
OFFICE 365 OPISKELIJOILLE
 OFFICE 365 OPISKELIJOILLE Table of Contents Articles... 3 Ohjeet Office 365 käyttöönottoon... 4 One Driveen tallennetun videon palauttaminen oppimisympäristön palautuskansioon... 5 Changing default language
ARM-519 ARM-520. Fixed wall mount. User guide. Användarhandledning. Käyttöohje. Brugervejledning. Brukermanual
 ARM-19 ARM-20 Fixed wall mount EN SE FI DK NO User guide Användarhandledning Käyttöohje Brugervejledning Brukermanual EN User guide SE Användarhandledning For mounting on concrete and wooden walls, please
Network to Get Work. Tehtäviä opiskelijoille Assignments for students. www.laurea.fi
 Network to Get Work Tehtäviä opiskelijoille Assignments for students www.laurea.fi Ohje henkilöstölle Instructions for Staff Seuraavassa on esitetty joukko tehtäviä, joista voit valita opiskelijaryhmällesi
AYYE 9/ HOUSING POLICY
 AYYE 9/12 2.10.2012 HOUSING POLICY Mission for AYY Housing? What do we want to achieve by renting apartments? 1) How many apartments do we need? 2) What kind of apartments do we need? 3) To whom do we
MEETING PEOPLE COMMUNICATIVE QUESTIONS
 Tiistilän koulu English Grades 7-9 Heikki Raevaara MEETING PEOPLE COMMUNICATIVE QUESTIONS Meeting People Hello! Hi! Good morning! Good afternoon! How do you do? Nice to meet you. / Pleased to meet you.
Virtually Oy. Laadukas tyynysarja vaativaan käyttöön IMMOBILISAATIO. Arpegia. y-tunnus: puh.
 Arpegia 07/1340 Taille 1 long. 200 cm haut. 18 cm 07/1345 Taille 2 long. 245 cm haut. 18 cm 07/1350 Taille 3 long. 280 cm haut. 18 cm 07/1440 Taille 1 long. 200 cm haut. 10 cm 07/1445 Taille 2 long. 245
The CCR Model and Production Correspondence
 The CCR Model and Production Correspondence Tim Schöneberg The 19th of September Agenda Introduction Definitions Production Possiblity Set CCR Model and the Dual Problem Input excesses and output shortfalls
Fitting instructions. Fitting set for joining all types of DEVI self limiting heating cables to heating cables Art. no. 19805779 SSTL nro 04 312 85
 GB/FI Fitting instructions Fitting set for joining all types of DEVI self limiting heating cables to heating cables Art. no. 19805779 SSTL nro 04 312 85 intelligent varme Contents: GB Connection kits 3
KONEISTUSKOKOONPANON TEKEMINEN NX10-YMPÄRISTÖSSÄ
 KONEISTUSKOKOONPANON TEKEMINEN NX10-YMPÄRISTÖSSÄ https://community.plm.automation.siemens.com/t5/tech-tips- Knowledge-Base-NX/How-to-simulate-any-G-code-file-in-NX- CAM/ta-p/3340 Koneistusympäristön määrittely
Bruksanvisning E 5 NO/DK FIN GB DE 0+/1. www.besafe.eu ECE R44/04 C ECE R44/04 ECE R44/04 SEMI-UNIVERSAL O-18 KG UNIVERSAL 9-18 KG
 Bruksanvisning NO/DK FIN GB DE 0+/1 6m www.besafe.eu Testet og godkjent i henhold til: ECE R44/04 ECE R44/04 C ECE R44/04 SEMI-UNIVERSAL O-18 KG UNIVERSAL 9-18 KG E 5 E R 44 04201 (SEMI-UNIVERSAL) R 44
1. Liikkuvat määreet
 1. Liikkuvat määreet Väitelauseen perussanajärjestys: SPOTPA (subj. + pred. + obj. + tapa + paikka + aika) Suora sanajärjestys = subjekti on ennen predikaattia tekijä tekeminen Alasääntö 1: Liikkuvat määreet
Secto Design Oy Kauppalantie 12 02700 Kauniainen Finland tel. +358 9 5050598 fax +358 9 5475 2535 info@sectodesign.fi www.sectodesign.
 Secto Design Oy Kauppalantie 12 02700 Kauniainen Finland tel. +358 9 5050598 fax +358 9 5475 2535 info@sectodesign.fi www.sectodesign.fi Secto 4200 pendant natural birch, black or white laminate, walnut
Solar Water Heater Kit. EcoStyle. 1 User Manual/Operating Instructions. Contents FREE LESSON PLANS AVAILABLE.
 EcoStyle 1 User Manual/Operating Instructions Contents 1 Contents 2 What s in the box? 3 Setting up the 4 Heating water 5 Measuring water temperature with the digital thermometer 6 Maximum/minimum temperature
TYÖKALUVAUNU JA YLÄKAAPPI
 MEG95 TYÖKALUVAUNU JA YLÄKAAPPI Käyttöohje (Alkuperäisten käyttöohjeiden käännös) FI Onnittelut tämän laadukkaan Meganex-tuotteen valinnasta. Lue käyttöohjeet huolellisesti ennen laitteen käyttöä ja noudata
You can check above like this: Start->Control Panel->Programs->find if Microsoft Lync or Microsoft Lync Attendeed is listed
 Online Meeting Guest Online Meeting for Guest Participant Lync Attendee Installation Online kokous vierailevalle osallistujalle Lync Attendee Asennus www.ruukki.com Overview Before you can join to Ruukki
Microsoft Lync 2010 Attendee
 VYVI MEETING Lync Attendee 2010 Instruction 1 (15) Microsoft Lync 2010 Attendee Online meeting VYVI MEETING Lync Attendee 2010 Instruction 2 (15) Index 1 Microsoft LYNC 2010 Attendee... 3 2 Acquiring Lync
Rekisteröiminen - FAQ
 Rekisteröiminen - FAQ Miten Akun/laturin rekisteröiminen tehdään Akun/laturin rekisteröiminen tapahtuu samalla tavalla kuin nykyinen takuurekisteröityminen koneille. Nykyistä tietokantaa on muokattu niin,
INSTALLATION INSTRUCTION ASENNUSOHJE PEM SJTK31 SJTK46 ENGLISH SUOMI
 INSTALLATION INSTRUCTION ASENNUSOHJE PEM1256 2010-2 SJTK31 SJTK46 ENGLISH SUOMI GB GENERAL INFORMATION - Check that the kit is suitable for the cable type. - Check the materials listed in the bill of materials
Tork Paperipyyhe. etu. tuotteen ominaisuudet. kuvaus. Väri: Valkoinen Malli: Vetopyyhe
 etu Monikäyttöpaperi hoitaa useimmat pyyhintätehtävät Sopiva lasipintojen pyyhintään Sopii käsien kuivaamiseen Elintarvikekäyttöön hyväksytty Tork Easy Handling, pakkaus, jota on helppo kantaa mukana,
IRROITETTAVAN ISTUIMEN ASENNUSOHJE LÖSTAGBAR SÄTE MONTERINGS MANUAL REMOVABLE SEAT S INSTALLATION MANUAL
 IRROITETTAVAN ISTUIMEN ASENNUSOHJE LÖSTAGBAR SÄTE MONTERINGS MANUAL REMOVABLE SEAT S INSTALLATION MANUAL V. 1.2 20.03.2016 OSAT Etulaatikko sisältää seuraavat osat: 1. Esikasattu laatikko 2. Kiinnitysruuvi
Data protection template
 Data protection template Aihe: rekisteriseloste ja informointipohja Topic: information about the register and information to users (related to General Data Protection Regulation (GDPR) (EU) 2016/679) Mallina
FinFamily Installation and importing data (11.1.2016) FinFamily Asennus / Installation
 FinFamily Asennus / Installation") FinFamily Asennus / Installation 1 Sisällys / Contents FinFamily Asennus / Installation... 1 1. Asennus ja tietojen tuonti / Installation and importing data... 4 1.1. Asenna Java / Install Java... 4 1.2.
FinFamily Asennus / Installation 1 Sisällys / Contents FinFamily Asennus / Installation... 1 1. Asennus ja tietojen tuonti / Installation and importing data... 4 1.1. Asenna Java / Install Java... 4 1.2.
Jokaisella person. käyttökerralla tehtävän rutiinitarkastuksen lisäksi pätevän henkilön tulisi tehdä henkilösuojaimelle
 Inspection Henkilösuojaimen tarkastus Tarkastusohjeet Inspection Inspection Inspection In addition to routine checks for each use, should regularly undergo a detailed inspection by a competent Jokaisella
Stege till uppblåsbar pool Bassengtrapp Portaat uima-altaaseen
 KÄYTTÖOHJE BRUKSANVISNING Stege till uppblåsbar pool Bassengtrapp Portaat uima-altaaseen Ver. 00-000 Modell/Malli: AC-90 Nr/Nro: -9 SVENSKA Stege till uppblåsbar pool Artikelnummer: -9, modell AC-90 Läs
Tilausvahvistus. Anttolan Urheilijat HENNA-RIIKKA HAIKONEN KUMMANNIEMENTIE 5 B RAHULA. Anttolan Urheilijat
 7.80.4 Asiakasnumero: 3000359 KALLE MANNINEN KOVASTENLUODONTIE 46 51600 HAUKIVUORI Toimitusosoite: KUMMANNIEMENTIE 5 B 51720 RAHULA Viitteenne: Henna-Riikka Haikonen Viitteemme: Pyry Niemi +358400874498
LX 70. Ominaisuuksien mittaustulokset 1-kerroksinen 2-kerroksinen. Fyysiset ominaisuudet, nimellisarvot. Kalvon ominaisuudet
 LX 70 % Läpäisy 36 32 % Absorptio 30 40 % Heijastus 34 28 % Läpäisy 72 65 % Heijastus ulkopuoli 9 16 % Heijastus sisäpuoli 9 13 Emissiivisyys.77.77 Auringonsuojakerroin.54.58 Auringonsäteilyn lämmönsiirtokerroin.47.50
Gap-filling methods for CH 4 data
 Gap-filling methods for CH 4 data Sigrid Dengel University of Helsinki Outline - Ecosystems known for CH 4 emissions; - Why is gap-filling of CH 4 data not as easy and straight forward as CO 2 ; - Gap-filling
SAGA 150. Asennusohjeet. Mittaa oven korkeus. Piirrä seinään oven kiinni -päätyyn seinäkannattimen kohdalle vaakaviiva korkeudelle ovi + 75mm + 20 mm.
 SAGA 150 Asennusohjeet 500 1 2 Mittaa oven korkeus. Piirrä seinään oven kiinni -päätyyn seinäkannattimen kohdalle vaakaviiva korkeudelle ovi + 75mm + 20 mm. 3 Piirrä vesivaa an avulla viiva myös kiskon
CONVERSION KITS FOR FRAMES MR8 AND MR9 INSTALLATION INSTRUCTIONS
 CONVERSION KITS FOR FRAMES MR8 AND MR9 INSTALLATION INSTRUCTIONS MR8 AND MR9 CONVERSION KIT - INSTALLATION INSTRUCTION Document ID: DPD01787, Revision: A, Release date: 17.11.2015 1.1 MR8 kit contents
Fonte 16045SAVA 16045VAVA 16045SAVA 16045VAVA ASENNUSOHJE MONTERINGSANVISNING ASSEMBLY INSTRUCTIONS K16045VAK2 K16045SAK1 K16045K3 K16045K3
 Fonte 16045SAVA 16045VAVA ASENNUSOHJE MONTERINGSANVISNING ASSEMBLY INSTRUCTIONS 16045SAVA K16045SAK1 K16045VAK2 K16045K3 16045VAVA K16045VAK1 K16045VAK2 K16045K3 1 2 900167 LE22SWL003 LE22VWL003 LE18VWL001
Other approaches to restrict multipliers
 Other approaches to restrict multipliers Heikki Tikanmäki Optimointiopin seminaari 10.10.2007 Contents Short revision (6.2) Another Assurance Region Model (6.3) Cone-Ratio Method (6.4) An Application of
INSTALLATION INSTRUCTION ASENNUSOHJE PEM1417 2012-11 ENGLISH SUOMI CURRENT LIMITING DEVICE VIRTAA RAJOITTAVA SUOJA SDI46.812 & SDI46.
 INSTALLATION INSTRUCTION ASENNUSOHJE PEM1417 2012-11 ENGLISH SUOMI CURRENT LIMITING DEVICE VIRTAA RAJOITTAVA SUOJA SDI46.812 & SDI46.824 2/8 SDI46.812 & SDI46.824 PEM1417 2012-11 ENGLISH GENERAL INFORMATION
Särmäystyökalut kuvasto Press brake tools catalogue
 Finnish sheet metal machinery know-how since 1978 Särmäystyökalut kuvasto Press brake tools catalogue www.aliko.fi ALIKO bending chart Required capacity in kn (T) in relation to V-opening. V R A S = plates
WINE COOLER TFW METOS TFW 160S, TFW 365-2S, TFW 375S MG ,
 WINE COOLER TFW METOS TFW 160S, TFW 365-2S, TFW 375S MG4116794, 4116798, 4116797 Instruction manual TWF 365-2S TWF 375S TWF 160S 01.09.2015 Table if Contents 1. Important safety instructions...3 2. Unpacking
LUONNOS RT 80260 EN AGREEMENT ON BUILDING WORKS 1 THE PARTIES. May 1998 1 (10)
") RT 80260 EN May 1998 1 (10) AGREEMENT ON BUILDING WORKS This agreement template is based on the General Terms and Conditions of Building Contracts YSE 1998 RT 16-10660, LVI 03-10277, Ratu 417-7, KH X4-00241.
RT 80260 EN May 1998 1 (10) AGREEMENT ON BUILDING WORKS This agreement template is based on the General Terms and Conditions of Building Contracts YSE 1998 RT 16-10660, LVI 03-10277, Ratu 417-7, KH X4-00241.
The Viking Battle - Part Version: Finnish
 The Viking Battle - Part 1 015 Version: Finnish Tehtävä 1 Olkoon kokonaisluku, ja olkoon A n joukko A n = { n k k Z, 0 k < n}. Selvitä suurin kokonaisluku M n, jota ei voi kirjoittaa yhden tai useamman
Curriculum. Gym card
 A new school year Curriculum Fast Track Final Grading Gym card TET A new school year Work Ethic Detention Own work Organisation and independence Wilma TMU Support Services Well-Being CURRICULUM FAST TRACK
acette Luxaflex Facette Monteringsvejledning
 acette Monteringsvejledning Indhold Forberedelse Montering Betjening Afmontering ADVARSEL Små børn kan blive kvalt i løkken af kæder, bånd og snore, der bruges til betjening af gardinprodukter. De kan
Lab SBS3.FARM_Hyper-V - Navigating a SharePoint site
 Lab SBS3.FARM_Hyper-V - Navigating a SharePoint site Note! Before starting download and install a fresh version of OfficeProfessionalPlus_x64_en-us. The instructions are in the beginning of the exercise.
Results on the new polydrug use questions in the Finnish TDI data
 Results on the new polydrug use questions in the Finnish TDI data Multi-drug use, polydrug use and problematic polydrug use Martta Forsell, Finnish Focal Point 28/09/2015 Martta Forsell 1 28/09/2015 Esityksen
Ajettavat luokat: SM: S1 (25 aika-ajon nopeinta)
") SUPERMOTO SM 2013 OULU Lisämääräys ja ohje Oulun Moottorikerho ry ja Oulun Formula K-125ry toivottaa SuperMoto kuljettajat osallistumaan SuperMoto SM 2013 Oulu osakilpailuun. Kilpailu ajetaan karting radalla
SUPERMOTO SM 2013 OULU Lisämääräys ja ohje Oulun Moottorikerho ry ja Oulun Formula K-125ry toivottaa SuperMoto kuljettajat osallistumaan SuperMoto SM 2013 Oulu osakilpailuun. Kilpailu ajetaan karting radalla
Miksi Suomi on Suomi (Finnish Edition)
") Miksi Suomi on Suomi (Finnish Edition) Tommi Uschanov Click here if your download doesn"t start automatically Miksi Suomi on Suomi (Finnish Edition) Tommi Uschanov Miksi Suomi on Suomi (Finnish Edition)
Miksi Suomi on Suomi (Finnish Edition) Tommi Uschanov Click here if your download doesn"t start automatically Miksi Suomi on Suomi (Finnish Edition) Tommi Uschanov Miksi Suomi on Suomi (Finnish Edition)
Mobile Telephone Holder
 36-2948, 36-2947 Mobile Telephone Holder Mobiltelefonhållare Mobiltelefonholder Matkapuhelinteline Nr/Nro: 36-2947, 36-2948 English 2 Svenska 4 Norsk 6 Suomi 8 Ver. 001-200705 ENGLISH Mobile Telephone
Salasanan vaihto uuteen / How to change password
 Salasanan vaihto uuteen / How to change password Sisällys Salasanakäytäntö / Password policy... 2 Salasanan vaihto verkkosivulla / Change password on website... 3 Salasanan vaihto matkapuhelimella / Change
AquaTrio FC7070. EN User manual 5. DA Brugervejledning 29. FI Käyttöopas 53. NO Brukerhåndbok 76. SV Användarhandbok 100
 Register your product and get support at AquaTrio FC7070 EN User manual 5 DA Brugervejledning 29 FI Käyttöopas 53 NO Brukerhåndbok 76 SV Användarhandbok 100 2.3 2.4 2.2 Table of contents 1 Important 5
Travel Getting Around
 - Location Olen eksyksissä. Not knowing where you are Voisitko näyttää kartalta missä sen on? Asking for a specific location on a map Mistä täällä on? Asking for a specific...wc?...pankki / rahanvaihtopiste?...hotelli?...huoltoasema?...sairaala?...apteekki?...tavaratalo?...ruokakauppa?...bussipysäkki?
LINC 17. sanka.fi 130624A
 LINC 17 130624A SANKA takaa tuotteen toimivuuden kun asennus tapahtuu ohjeiden mukaisesti. SANKA garanterar produktens funktion då monteringsanvisningen följs. sanka.fi Tarvittaessa. Vid behov. 6mm 3mm
FIS IMATRAN KYLPYLÄHIIHDOT Team captains meeting
 FIS IMATRAN KYLPYLÄHIIHDOT 8.-9.12.2018 Team captains meeting 8.12.2018 Agenda 1 Opening of the meeting 2 Presence 3 Organizer s personell 4 Jury 5 Weather forecast 6 Composition of competitors startlists
SIRKKELINTERÄN TEROITUSKONE SLIPMASKIN FÖR SÅGKLINGOR SAW BLADE SHARPENING MACHINE
 XWS024 SIRKKELINTERÄN TEROITUSKONE SLIPMASKIN FÖR SÅGKLINGOR SAW BLADE SHARPENING MACHINE Käyttöohje Bruksanvisning Instruction manual Alkuperäisten käyttöohjeiden käännös Översättning av originalbruksanvisning
C++11 seminaari, kevät Johannes Koskinen
 C++11 seminaari, kevät 2012 Johannes Koskinen Sisältö Mikä onkaan ongelma? Standardidraftin luku 29: Atomiset tyypit Muistimalli Rinnakkaisuus On multicore systems, when a thread writes a value to memory,
YLEISTÄ VAROITUKSIA Lue nämä tarkkaan ASENNUSOHJE
 KLIPPAN BELT-FIX YLEISTÄ - Belt-Fix on tarkoitettu ainoastaan antamaan parempaa mukavuutta. - Belt-Fix:iä voidaan käyttää useimpien 3-pisteturvavöiden kanssa, joilla on sopiva E-hyväksyntä tai vastaava.
Installation instruction PEM
 Installation instruction ASENNUSOHJE PEM1032 2010-02 SURGE ARRESTER SET FOR POLE MOUNT TRANSFORMER YLIJÄNNITESUOJASETTI PYLVÄSMUUNTAJALLE ENGLISH SUOMI 2/8 PEM1032 2010-02 ENGLISH GENERAL INFORMATION -
IEC IP V AC. VIZULO Stork Little Brother LED street luminaire / katuvalaisin. Mounting instruction Asennusohjeet. min 40 C.
 VIZULO Stork Little Brother LED street luminaire / katuvalaisin Mounting instruction Asennusohjeet 05 IEC EN 60598 IP66 min 40 C max + 45 C 198-264 V AC PH2 4 6 29/01/2016 SIA VIZULO Ganibu dambis 7a,
ALOITUSKESKUSTELU / FIRST CONVERSATION
 ALOITUSKESKUSTELU / FIRST CONVERSATION Lapsen nimi / Name of the child Lapsen ikä / Age of the child yrs months HYVINKÄÄN KAUPUNKI Varhaiskasvatuspalvelut Lapsen päivähoito daycare center / esiopetusyksikkö
Secto Design Oy Kauppalantie Kauniainen Finland tel fax
 Secto Design Oy Kauppalantie 12 02700 Kauniainen Finland tel. +358 9 5050598 fax +358 9 5475 2535 info@sectodesign.fi www.sectodesign.fi Secto 4202 Magnum pendant Available in natural birch, black or white
Tork Xpress Soft Multifold käsipyyhe. etu
 etu Erinomainen imukyky: kuivaa kädet nopeasti Pehmeä: hellävarainen käsille Tork Carry Pack -pakkaus helpottaa käsittelyä ja hävittämistä Lehti kohokuviointi: suunniteltu tekemään kauniin vaikutelman
MINTA DESIGN + ENGINEERING GROHE GERMANY
 MINTA DESIGN + ENGINEERING GROHE GERMANY 95.581.231/ÄM 232945/06.15 www.grohe.com 30 274 32 168 D...1 NL...6...3 PL...11...6 P...16...8 BG...21...11 CN...26...13 GB...2...1 S...7...4 UAE...12...6 TR...17...9
Exercise 1. (session: )
") EEN-E3001, FUNDAMENTALS IN INDUSTRIAL ENERGY ENGINEERING Exercise 1 (session: 24.1.2017) Problem 3 will be graded. The deadline for the return is on 31.1. at 12:00 am (before the exercise session). You
EEN-E3001, FUNDAMENTALS IN INDUSTRIAL ENERGY ENGINEERING Exercise 1 (session: 24.1.2017) Problem 3 will be graded. The deadline for the return is on 31.1. at 12:00 am (before the exercise session). You
TW-WLAN 802.11g/n MIMO PCI-sovitin Asennusohje
 TW-WLAN 802.11g/n MIMO PCI-sovitin Asennusohje CE Copyright Telewell Oy Esittely TW-WLAN PCI-sovitin on ulkoinen Wlan-sovitin PCIväylään. Ominaisuudet Yhteensopiva sekä IEEE 802.11b, 802.11g, että 802.11n
Matkustaminen Majoittuminen
 - Majoituspaikan löytäminen Where can I find? Ohjeiden kysyminen majoituspaikan löytämiseksi Where can I find?... a room to rent?... a room to rent?... a hostel?... a hostel?... a hotel?... a hotel?...
WPS/Reset Hold i 5 sekunder for å automatisk konfigurere med WPS. Hold i 10 Seoncds å tilbakestille WiFi å faktor standardinnstillingene.
 WiFi Push the front button you get the status of the WiFi device Trykk foran knappen får du status for WiFi-enhet Työnnä eteen painiketta saat tilan WiFi laitteen When the button blinks blue the WiFi is
TÄYTTÖAUTOMAATIT TÄYTTÖAUTOMAATIT COMPUTER INFLATORS
 31 S AHCON computer inflators are designed with a view to high quality, precision and long service life. The inflation computers are designed in Denmark and manufactured and tested in our own workshop.
Reliable diagnostic support Ultra-light design
 EN Powerful illumination Intelligent charging management Reliable diagnostic support Ultra-light design VISIOMED Optima UV original scale 1:1 VISIOMED Optima Quality Made Easy and an illumination close
4x4cup Rastikuvien tulkinta. 4x4cup Control point picture guidelines
 4x4cup Rastikuvien tulkinta 4x4cup Control point picture guidelines Säännöt rastikuvista Kilpailijoiden tulee kiinnittää erityistä huomiota siihen, että rastikuvissa näkyy selvästi että kilpailija koskee
Matkustaminen Majoittuminen
 - Majoituspaikan löytäminen Where can I find? Ohjeiden kysyminen majoituspaikan löytämiseksi... a room to rent?... a hostel?... a hotel?... a bed and breakfast?... a camping site? What are the prices like
Tietorakenteet ja algoritmit
 Tietorakenteet ja algoritmit Taulukon edut Taulukon haitat Taulukon haittojen välttäminen Dynaamisesti linkattu lista Linkatun listan solmun määrittelytavat Lineaarisen listan toteutus dynaamisesti linkattuna
MUSEOT KULTTUURIPALVELUINA
 Elina Arola MUSEOT KULTTUURIPALVELUINA Tutkimuskohteena Mikkelin museot Opinnäytetyö Kulttuuripalvelujen koulutusohjelma Marraskuu 2005 KUVAILULEHTI Opinnäytetyön päivämäärä 25.11.2005 Tekijä(t) Elina
TW-LTE 4G/3G. USB-modeemi (USB 2.0)
") TW-LTE 4G/3G USB-modeemi (USB 2.0) Tiedonsiirtonopeus: 100 Mbps/50 Mbps LTE: 1800/2100/2600 MHz GSM/GPRS/EDGE: 850/900/1800/1900 MHz UMTS: 900/2100 MHz Pikaohje (Finnish) CE Käyttöönotto- ohje SIM- kortin
TW-LTE 4G/3G USB-modeemi (USB 2.0) Tiedonsiirtonopeus: 100 Mbps/50 Mbps LTE: 1800/2100/2600 MHz GSM/GPRS/EDGE: 850/900/1800/1900 MHz UMTS: 900/2100 MHz Pikaohje (Finnish) CE Käyttöönotto- ohje SIM- kortin
Information on Finnish Language Courses Spring Semester 2018 Päivi Paukku & Jenni Laine Centre for Language and Communication Studies
 Information on Finnish Language Courses Spring Semester 2018 Päivi Paukku & Jenni Laine 4.1.2018 Centre for Language and Communication Studies Puhutko suomea? -Hei! -Hei hei! -Moi! -Moi moi! -Terve! -Terve
Secto 4200 pendant natural birch, black or white laminate, walnut veneer
 Secto Design Oy Kauppalantie 12 02700 Kauniainen Finland tel. +358 9 5050598 fax +358 9 5475 2535 info@sectodesign.fi www.sectodesign.fi Secto 4200 pendant natural birch, black or white laminate, walnut
Stand for Log Splitter , ,
 Stand for Log Splitter 18-3570, 40-9122, 40-9511 rt.no. 40-9363 1. lose the bleed screw. 2. Turn the log splitter upside down, detach the wheels and remove the plugs from the ends of the legs. 3. First
Sisällysluettelo Table of contents
 Sisällysluettelo Table of contents OTC:n Moodlen käyttöohje suomeksi... 1 Kirjautuminen Moodleen... 2 Ensimmäinen kirjautuminen Moodleen... 2 Salasanan vaihto... 2 Oma käyttäjäprofiili... 3 Työskentely
mini Safe by Design and optimized for tilting windows
 mini Safe by Design and optimized for tilting windows MINI CASSETTE Suitable for 17mm or 20mm chain or constant tension spring mechanism. The spring mechanism is suited also for operating from the bottom
ATV TUKKIKÄRRY ATV LOG TRAILER
 Lue käyttöohjeet huolellisesti ennen laitteen käyttöä ja noudata kaikkia annettuja ohjeita. Säilytä ohjeet myöhempää tarvetta varten. Read the instruction manual carefully before using the appliance and
Voice Over LTE (VoLTE) By Miikka Poikselkä;Harri Holma;Jukka Hongisto
 By Miikka Poikselkä;Harri Holma;Jukka Hongisto") Voice Over LTE (VoLTE) By Miikka Poikselkä;Harri Holma;Jukka Hongisto If you are searched for a book by Miikka Poikselkä;Harri Holma;Jukka Hongisto Voice over LTE (VoLTE) in pdf form, then you have come
Voice Over LTE (VoLTE) By Miikka Poikselkä;Harri Holma;Jukka Hongisto If you are searched for a book by Miikka Poikselkä;Harri Holma;Jukka Hongisto Voice over LTE (VoLTE) in pdf form, then you have come